 The first sparkling wine I ever made was a black cherry. It was supposed to be a semi-sweet still wine, so when I opened the first bottle at a social event, I was both surprised and disappointed by the profuse eruption of bubbles. My guests, however, were not disappointed, but suggested it would have been better served chilled. I suspect many sparkling wines have been made unintentionally, but here we will focus on making such wines intentionally, limiting our discussion to sparkling country wines like my black cherry.
We do not know who made the first sparkling wine, but like mine it was almost certainly an accident. We do know that the ancient Greeks and Romans mentioned them, but had no idea how they happened to be. In 1662 the English scientist Christopher Merret published a method for the deliberate production of effervescent wines by adding sugar before bottling, six years before the Benedictine monk Dom Pérignon arrived at the abbey at Hautvilliers where he became famous as cellarmaster. Since then, the method was known.
Methods for Making Sparkling Wines
The challenge of deliberately creating sparkling wines was overcome with Merret’s work. Refining the techniques involved took longer to work out, and here Dom Pérignon must receive his due. While Merret described it, the monk perfected the méthode champenoise — a complete, complex method for the production of sparkling wines.
The Italians developed the second method of creating sparkling wines, which appropriately is called Metodo Italiano or the Charmat process. Here the second fermentation is conducted in bulk tanks and the wine bottled under pressure. This is not a practical method for most home winemakers.
A third method involves making the sparkling wine in bottles using an abbreviated méthode champenoise and then transferring it to tanks for blending or additional aging. It is then bottled under pressure. This is appropriately called the transfer method, but like the Charmat process is impractical for most home winemakers.
The fourth method simply injects carbon dioxide (CO2) into a still wine in much the same way soft drinks are carbonated. While home winemakers could easily purchase or rent the equipment necessary to utilize this method themselves, there are two disadvantages to the sparkling wines produced. The first is that the wine’s bubbles, like the bubbles released from soft drinks, are large. The second disadvantage is that the bubbles are released fairly rapidly, leaving a still wine in the glass or bottle. Conversely, the other three methods result in fine, small bubbles that are released slowly.
The Méthode Champenoise
One can clearly see from the above that the méthode champenoise is the only practical method for making quality sparkling wines at home. The method essentially requires fermenting a must to about 11.5% alcohol by volume (ABV), bottling it, reinitiating fermentation in the bottle, sealing the bottle until the yeast die off and the wine ages, collecting and removing the dead yeast, and resealing the bottle. Let us look at the separate elements involved.
The Must
With few exceptions, fruit and berries suitable for country wines will not have natural sugar sufficient to produce a base wine high enough in alcohol to suit our needs. Furthermore, it will probably need dilution to adjust the acidity. Thus, the must will need sugar and nutrients in order to reach the desired base wine potential for making a sparkling wine.
The base wine should not have an alcohol content lower than 10% or higher than 11.5% by volume. Sugar additions should be calculated so the must will ferment to dryness within this window.
Fruit and berries should be harvested based upon the flavor and aroma of the juice, as well as analysis of sugar, titratable acid (TA) and pH. Allowing them to reach absolute maturity is not desirable without a predictive harvest history reaching back several years. It would be better to harvest just under ripeness than over. In warmer climates, mature fruit flavors and aromas usually can be detected when the sugar concentrations are below their expected peak and TA is still high. The pH of the juice should be low — the closer to 3.0 (or slightly lower) the better.
The type of fruit or berry selected will determine the juice extraction method. Most will yield best to simple crushing and pressing, but some may require chopping and/or destoning before pressing. Steam extraction and heat should be avoided except in rare cases. Pressing should be gradual but progressive, exerting just enough pressure to start a flow of juice. Increase the pressure slowly to start the juice flowing again until it slows, then exert more pressure. This exertion of pressure, waiting and re-exertion minimizes pulp extraction and is continued until approximately 75% of the expected yield is extracted. For most fruit and berries, this juice is relatively clear and thin. This is the juice you want to use for the base wine, or cuvée. Any juice extracted after this should be reserved for a still wine.
Steady, gentle pressing reduces the chance of releasing phenols responsible for bitterness and astringency. Phenols are colorless but turn brown upon oxidation. For this reason, if no other, the juice should be sulfited to at least 30 ppm of SO2 — more if you do not intend a malolactic fermentation. Sulfiting will also deter contamination by spoilage bacteria and postpone that eventual browning. The juice should then be cold-settled for a day and pectic enzymes dissolved in a sample and broadcast over the surface of the juice without stirring. Cold-settlement should be continued for another day and the juice removed from any nonsoluble settlement.
Primary Fermentation
There are opposing considerations in deciding whether to ferment cold or warm. Cooler fermentations (55–60 °F/13–16 °C) and a lower content of nonsoluble solids contribute to fruity, floral and aromatic aromas in wines. On the other hand, if the cuvée is fermented warm (65–70 °F/18–21 °C)), the floral intensity is reduced but malolactic fermentation is encouraged. This decision is yours, but I discourage MLF in my sparkling wines.
The cuvée should be supplemented with nitrogen; 0.4 grams per gallon of diammonium phosphate is ample. The addition of 0.4–1 gram per gallon of bentonite before inoculation will promote
protein stability.
The yeast selected for the primary fermentation need only ferment to 11.5% ABV (1.085 specific gravity) in the selected temperature range and then expire. However, if one intends to use the same yeast for both primary and secondary fermentation, it must also possess an ability to tolerate pressure, ferment to 13–14% ABV and tolerate both cold and SO2 environments. It should ferment to dryness, die thereafter, create small, granular, non-clinging lees, and not produce off-flavors or odors. For those not aware, “yeasty” odors are not “off” odors.
For primary-only yeasts, Red Star’s Montrachet and Pasteur Champagne are among the best. For secondary fermentation, Lalvin EC-1118 and DV10 are highly respected.
A yeast culture is gradually husbanded to high-density in a starter solution and slowly brought to the same temperature as the must. Inoculation begins in an aerobic primary and after 2–3 days is transferred to secondary and capped with an airlock. Fermentation is as normal for a still wine, with 2–3 rackings spaced 3–4 weeks apart to achieve clarity. Fining with Isinglass or gelatin to remove additional phenolics is at the discretion of the vintner. The cuvée should be allowed to age and develop anywhere from 6 months to a year without stabilizing. Oaking is an option but not usually considered appropriate for sparkling wines. SO2 should be maintained at a level of at least 30 ppm throughout most of the aging, but in the final two months it can be allowed to drop to 15–20 ppm.
Preparing the Wine for Secondary Fermentation
The cuvée has now undergone its primary, or first, fermentation. It must be prepared for the bottle, or secondary, fermentation. If you have fermented the primary fermentation to dryness, the wine needs to be chaptalized (sweetened) for the secondary fermentation — sucrose or dextrose are each suitable. For a finished sparkling wine with 4 atmospheres of CO2 (about 58 pounds of pressure per square inch), 16.8 grams of sugar per liter are added (63.6 grams per U.S. gallon or 318 grams per 5-gallon/19-L batch).
The sugar is best added as a sugar syrup of 50% solution — equal parts of sugar and wine stirred until dissolved and added to the batch. If sucrose is used, citric acid in the amount of 0.96 grams per US gallon (0.25 g/L) should be added to invert the sugar.
A similar amount (0.9 g/gallon or 0.24 g/L) of diammonium phosphate (DAP) should be added for yeast nutrition and wine development, which will promote ester production, reduce the production of fusel oils and minimize the production of sulfites by yeast. Over a period of 1–2 days, bring the cuvée to the temperature you will ferment it — 60–65 ºF (15–18 ºC) would be appropriate.
Making A Yeast Starter
I am assuming you will be making a 3-gallon (11-L), 5-gallon (19-L) or 6-gallon (23-L) batch of sparkling wine and thus will have enough cuvée to do what is described. While making the yeast starter by the instructions below, sanitize the necessary number of Champagne bottles and closures, covering them until needed. Do not, under any circumstances, use regular wine bottles to make sparkling wine.
A minimum of 1 million cells per milliliter should be added to each bottle to insure secondary fermentation. To ensure you attain this number, a yeast starter solution is absolutely necessary. Remove 500 milliliters of the sweetened cuvée. Take a hydrometer reading and write down the number. Add 13 grams of sugar to the sample and stir to dissolve. Take another hydrometer reading and write down this number too. Bring this sample to 80 °F (27 °C); a few seconds in a microwave may help.
Add a sachet of the active dried yeast you have selected by sprinkling it onto the surface of the sample. Do not stir. Cover the sample and leave it alone. Check it in an hour to ensure the yeast is viable. It is in a medium that already has 11.5% alcohol, so don’t expect it to be bubbling . . . yet. But you should be able to tell if the yeast is viable. The granules of yeast will have swollen; if on the surface they probably will have flattened and expanded. If so, stir the sample and re-cover it. Wait an additional 5 hours and take a hydrometer reading. You should not expect a real change, but you need to do this at least every two hours thereafter to monitor its progress and know when the sample returns to its original hydrometer reading (the first number you wrote down). When it does, stir in another 13 grams of sugar, add 20 milliliters of bottled water and re-cover the sample.
There are three things needing explanation here. The amount of sugar added to the cuvée creates a low sugar condition in an 11.5% alcohol environment. You want the yeast to acclimate to this environment while undergoing a vigorous reproductive phase in the starter solution. When the sugar you added to the starter is consumed, it needs to be replenished so the yeast do not feed on the sugar already in the cuvée, bring the starter to dryness and start dying off. At the same time, while consuming the sugar you added to the starter, the yeast created some alcohol and that increases the total alcohol in the starter. The reason for adding the water is to dilute the alcohol the yeast made in the starter solution. If you don’t dilute it, the alcohol in the starter will rise too high and kill the yeast, defeating your purpose.
When the SG again drops to the original hydrometer reading, add another 13 grams of sugar and 25 milliliters of bottled water and repeat the procedure. During the next few hours bring the temperature of the starter solution to the temperature of the cuvée, but don’t rush it. Take periodic hydrometer readings as before. When the SG drops to the original reading, add 30 milliliters of bottled water, remove 75 milliliters of wine from the larger batch (this is the amount of water you added to the starter, so you need to remove it from the cuvée or the starter will not all go into the carboy), add the starter to the cuvée, and stir it slowly but sufficiently to integrate it thoroughly into the wine. From the time the yeast is hydrated to the time it is added to the cuvée could take 24–48 hours, but don’t be concerned about this. Just let the yeast multiply and get acclimated to the environment.
The Secondary Fermentation
The cuvée must be bottled immediately after being inoculated. Fill each bottle to within 3⁄4 inch of the top. The preferred method of closure is to insert a bidule, a small plastic reservoir which later aids in collecting and removing bottle sediment and a Champagne crown cap. Crown caps for sparkling wine are different than those for beer as they must have the proper skirt length to grip the lip of the bottle and must have a cork liner. However, it has been years since I have been able to find bidules and Champagne crown caps. Some people use regular beer bottle caps and chance it, but we will use an alternative, but adequate Champagne stopper instead.
These are hollow, plastic closures for Champagne bottles, inserted with the aid of a wooden mallet and held in place with a wire cage. These are readily available from most homebrew/winemaking shops.
What occurs next is true secondary fermentation, as opposed to the primary (first) fermentation that occurs when a wine is in the primary and secondary (carboy). The other kind of secondary fermentation is malolactic fermentation.
The bottles are now stored upright for 12–18 months. The wine should be held at a constant temperature of 60–65 ºF (15–18 ºC) for the first 4–6 months, after which it can be cellared at 55–60 ºF (13–16 °C). These ranges are important and the 65 ºF (18 °C) high and 55 ºF (13 °C) low are absolutes for good sparkling wine. During this period the lees undergo a slow, autolysis-induced transformation during which the amino acid content of the wine increases by as much as 12% and contributes to the unique character and complexity of méthode champenoise wines.
Another reason to age the wine at least 12–18 months is to allow the yeast cells sufficient time to die. It would be unsightly at best and explosive at worse to disgorge early, sweeten the wine and insert the final closure, only to have it continue fermenting.
To age the wines at 55 ºF (13 °C) without a temperature-controlled cellar, an old refrigerator can be fitted with a thermostat that allows this temperature to be maintained fairly inexpensively.
Riddling
When sufficiently aged, the bottles are shaken to dislodge the lees and inserted in a riddling rack — an adjustable rack that holds the bottles horizontally but with the necks tilted slightly downward — where the lees resettle on the bottom-most side of the bottle. After a day in this position, each bottle is given a sharp quarter-turn clockwise and an equally sharp one-eighth turn counterclockwise. These twists jar the yeast from their resting position and resettle them along a slightly different portion of the bottle. Because of the angle, gravity moves them slightly downward toward the neck of the bottle. This procedure is repeated each of the next two days and then the angle of the rack is decreased to drop the neck slightly lower. Do not decrease the angle too much at any adjustment.
Again, the bottles are given a sharp, quarter-turn clockwise and eighth-turn counterclockwise each day for three days. The rack is then again adjusted to drop the neck slightly lower and the procedure is again repeated. This routine is continued even after the angle of the bottles is severe — straight up and down, actually — until all the lees in the bottles have migrated into the hollow Champagne stopper. This should take a month to complete, but if the lees are difficult it may take up to 3 months. Do not rush it.
Anyone with a drill and a piece of heavy plywood can make a riddling rack. If you cannot find, afford or build a riddling rack, you can store the bottles upright during aging and then turn them upside down in a wine case and give each bottle a sharp, quarter-turn right and eighth-turn left every day for 6 weeks. Do not try to shorten this period, as contrary to appearances, it is not nearly as efficient and thorough as using an adjustable riddling rack. If anything, extend the riddling period if using this alternative.
When riddling, or handling the bottles any time after the second fermentation, you need to protect yourself against the possibility of a bottle bursting by wearing eye protection.
Disgorging
When all the lees are in the hollow Champagne stopper, it’s time to disgorge the sediment. Prior to disgorging, the wine is chilled to about 36–40 ºF (2–4 °C) to help prevent significant loss of wine or carbon dioxide. While the wine is chilling, take 500 milliliters of a still wine made from the same fruit or berry as the cuvée — a wine made from the remaining 25% of the pressing — and to it add 500 grams of sugar. Stir this until thoroughly dissolved. You will use this to “top up” the sparkling wine bottles after disgorgement and bring the wine off bone dryness — this wine/syrup is technically called the “dosage.” If you don’t want to sweeten it at all, then simply use the unsweetened still wine for “topping up,” but only the most perfectly balanced sparkling wines can “stand on their own” without some added sweetness.
There are several ways to disgorge the wine, but I will explain the way I have always done it. While you can disgorge by yourself, it goes a lot faster and easier if someone helps you.
In a tub or bucket large enough for all your bottles, prepare a brine 1 inch (2.5 cm) deep by mixing one part of coarse salt with four parts of crushed ice until the desired depth is reached. The bottles are placed upside-down in the brine, just deep enough so the Champagne stopper and 2.25 inches (6 cm) of the neck above that are in the brine. One and a half inches (4 cm) is usually more than sufficient. It is essential that not more than this is in the brine. If the brine level rises too high as the bottles are inserted, remove some of the brine.
I am always amazed how quickly the wine in the brine freezes, although I have never actually timed it. Just pay attention to the wine and you will see it freeze. However, the wine immediately next to the glass will freeze before the whole volume in the brine freezes solid. If you begin the next step too soon, the ice will not freeze solid, a “plug” will not form, and you’ll end up with a mess. Give it a few more minutes.
You have to do several things in rapid succession, so have everything ready. The bottles will have to be re-closed, so have new sanitized stoppers ready with the wooden mallet to drive them in and the wire cages to secure them. It is also best to put some of the dosage syrup you will “top up” with in a creamer or other vessel with a pouring spout. You will also need some large pliers or channel-locks to pull the stoppers with — don’t think for a minute you can push them out with your thumbs. Finally, you will need a large bucket or pail to receive the stopper, the ice plug, and any wine that escapes. I set the bucket on a chair next to the tub of brine so I don’t have to work bent over. I set it on the chair at an angle, so I can hold a Champagne bottle horizontally over the lower rim of the bucket and the opposite wall of the bucket is higher than the bottle. If wine spewed from the bottle at this angle, it would all go into the bucket — well, most of it would. You might have to use some towels to brace the bucket solidly and some twine to secure it to the chair. You’ll have to work this out for yourself, but it isn’t difficult.
From here on, speed is essential. Hold a bottle firmly upright and use the pliers to loosen and start pulling the stopper. Look at a Champagne stopper before you do this so you know exactly how much of it is lodged in the neck of the bottle. The stoppers have a series of successive beveled ridges that grip the inner walls of the neck of the bottle. The idea is to pull it out to the point where only one beveled ridge remains in the bottle. Now hold the bottle horizontally and point the stopper into the bucket. Use the thumb of one hand to pry the stopper from the bottle while using the other thumb to resist the stopper from simply shooting out. When the stopper is free from the bottle, slowly allow the pressure in the bottle to push it and the ice plug completely free. As soon as the plug is free, let it drop into the bucket while simultaneously raising the neck of the bottle and covering its mouth with one of your thumbs (I use the thumb I was pushing with). You have to stop the wine from spewing out or you could lose more than a little of it. If the wine was not chilled to 40 ºF (4.4 °C) or below prior to this, you would surely lose 1⁄4 to 2⁄3 of it.
After about 15–20 seconds, you can safely (but slowly) remove your thumb. You must now do two more things rapidly. Carefully pour in just enough of the dosage syrup to bring the level to within 1 to 1.25 inches (2.5 to 3.2 cm) from the mouth and immediately insert a sanitized stopper with your free hand and drive it in with the mallet in the other. Here you may want your helper to tie down the cap with a wire cage while you remove the cage from the next bottle.
Fruit and Berries Suitable for Sparkling Country Wines
Not all fruit and berries are suitable for sparkling wine production. There are many reasons for these exceptions that I will not go into here, but chemistry (especially acidity), aging ability, flavor profiles, and propensity to develop “off” odors or flavors on lees are all considerations.
You will generally use more fruit than when making a similar still wine, but the exact amount is dictated by the TA and pH of the juice. You want to dilute the juice just enough to bring the TA down to about 6–7 g/L for whites or blushes and 5.5–6.5 g/L for reds. You must have acid and pH testing equipment available when making sparkling country wines. If the juice is low in acid, you can dilute however little or much you want.
After extracting and cold settling the juice, add just enough tap or spring water (not distilled) to lower the acidity to the acceptable window indicated. This is not a problem with low acid fruit as you will need to add acid no matter how much or little you dilute the juice. For sparkling wines, I try to dilute no more than 25% unless the acidity is very high. See Table 1 below for relative acidity, although there are exception varieties and cultivars to every one listed (and many not listed). Other fruit and berries not listed below are generally within the acceptable acid level.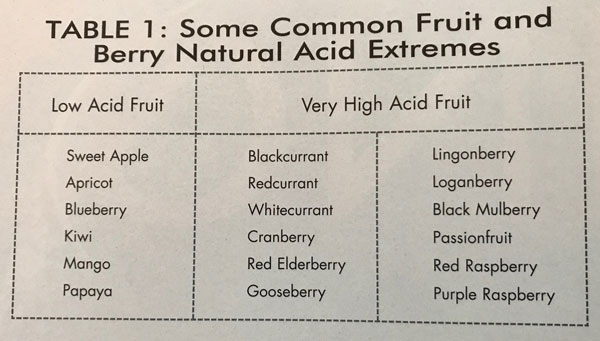
It is generally believed that lemons and limes are very high acid fruit, but they actually compare with pomegranates. And while most cherries are low to moderate in acidity, Morellos are very high. The variation among fruit is wide.
Fruits that are suitable for sparkling wine are varied. All stone fruits are suitable, but very flavorful peaches, nectarines, cherries and pluots are best. Citric fruit, sour apples, pineapples, pomegranates, blackberries, black raspberries, strawberries, and all those listed in the table on page 26 except mango and papaya are equally suitable.
There are no hard recipes for sparkling country wines. Simply follow good winemaking techniques and the content of this article, use your hydrometer, acid testing equipment, pectic enzyme, yeast nutrients and acid blend if required and you will be able to make good sparkling country wines.
One last bit of advice. Do not cellar them too long after the final bottling. With rare exceptions, consume them within three years for best quality. Cheers!

Dominic Rivard is a consultant fruit winemaker producing commercial wines in Asia, North America and Europe and author of “The Ultimate Fruit Winemaker’s Guide” at www.fruitwineguide.com. A qualified sommelier, Dominic studied winemaking and oenology at UC-Davis and passed the Wine and Spirit Education Trust (WSET) Diploma with distinctions. I would say that choosing a yeast strain for a specific style of fruit wine is very important. Yeast is a major key in…
Country wine is the informal term that has been used for years to define fermented beverages made from ingredients other than grapes. This can include fruits, vegetables, flowers and herbs. Wine made with honey is called mead and wine from apples is cider (5 to 7% alcohol). Every home winemaker should make room in his or her cellar for country wines. They taste fresh and fruity; they reflect the aroma and flavor…

