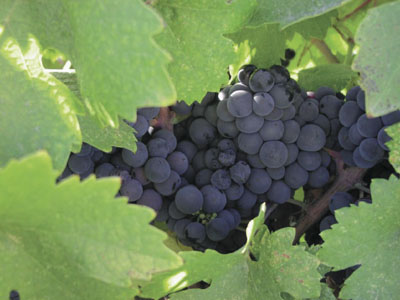
Ripe grapes make the best wine. Of course, there are wines made deliberately from under-ripe grapes, like Champagne. And there are those made from over-ripe grapes such as late harvest or ice wine. But for the vast majority of fine table wine, the winemaker wants to start with fruit that is exactly ripe. Before getting into how to determine grape ripeness, let’s consider what it means. At its simplest, as the Concise Oxford Dictionary says, ripe is “ready to be reaped, gathered, eaten.” For home winemakers who grow their own grapes, or have influence over the harvest date of purchased grapes, determining that readiness is one of the most important decisions of the entire vintage.
There have been numerous university studies of grape ripeness trying to correlate specific numerical measurements with the quality of the resulting wine. Unfortunately, no simple index has been found to be universally predictive of great wine. The first and foremost numerical feature for a picking decision is the sugar level, which winemakers measure in °Brix (the percent sugar by weight in the juice). However, fine wine also requires grapes displaying what experts call “physiological maturity.”
To understand ripeness better, you need to understand how the wine grape develops. Early in the growing season, berries are small, hard and acidic (and contain little sugar), all of which discourages animal predation. As the vintage progresses, acid levels in the grape drop steadily, mostly due to the depletion of malic acid. At veraison, a variety of changes occur. Berry size increases more quickly than before and the pH rises rapidly. Sugar levels (overwhelmingly glucose and fructose), which begin to take off a bit before veraison, continue to rise rapidly. In red grapes, anthocyanin production begins and the grapes take on color. (In addition, both red and white fruit lose chlorophyll.)
As ripeness approaches, the berries soften to a consistency that is palatable to animals that would eat the fruit and disperse the seeds. Although all grapes share a similar path to ripening, as ripeness approaches, each will start to display the characteristic flavors and aromas of its variety. Small-scale vineyardists should get to know the characteristics expected of ripe grapes — which include an expected level of sugar and acids as well as characteristic colors, aromas and flavors — of the variety they are growing in their climate.
For the grape, ripeness is not a discrete quality, it is a window in the continuum of development. For the home vineyardist, figuring out when this window occurs will let you bring in the grapes at optimal ripeness and make the best possible wine.
Although all grapes share a similar path to ripening, as ripeness approaches, each will start to display the characteristic flavors and aromas of its variety.
Think for a moment about the grape as the reproductive bait that it is. The fruit must develop aromas, flavors, and colors that will attract predators to consume the fruit — and the enclosed seeds — with the possibility of depositing those seeds later in fertile soil. As anyone who has a vineyard knows, though, the birds will eat the fruit long before it is ripe enough for fine wine. Physiological maturity means the seeds are mature enough to grow a new plant.
For winemaking, we look for characteristic hardening and browning of the seeds to illustrate that maturity. We also look for rich golden, purple, or blue-black colors in the grape skin as clues to maturity. So, although sugar level is king, it is not enough if the grapes are not mature. Wine made from immature grapes, even with enough sugar to produce a suitable alcohol level, will have under-ripe aromas and flavors. In maturing grapes, and in the wine that results, flavors move from vegetal and citrusy into red fruit notes like berries and cherries, and finally into black fruits like currants and blackberries. Left to ripen further, flavors of jam, dried fruit, or stewed prunes may emerge. (In white varieties, the reference fruits are different, moving from lemon and green apple through ripe pears and peaches, then possibly to litchi and mango.)
Acidity
Beyond the subjective evaluation of skin color, seed color and hardness, and fruit flavor, we can do some additional measurements beyond Brix. The most commonly used index figures for ripeness are Titratable Acidity (TA) and pH. Those have bearing on the harvest decision because as grapes ripen, the malic acid level drops while the tartaric acid level remains the same. As a result, TA drops and pH rises. In your harvest decision, you will want to look for the “perfect” combination of Brix, TA, and pH. (People sometimes ask me why they cannot just pick early — before the birds eat the grapes — and add sugar. Technically, you can. But those immature flavors will present the same kind of problems as trying to add sugar to a green bell pepper to make it taste like a red bell pepper—it won’t work.)
Putting It All Together: An Example
But what combination of sugar, acid, and pH will you look for? First, choose the sugar level you are targeting. For my backyard Pinot Noir, I want vineyard Brix measurements to come in at 25 °Brix and my Chardonnay at 23 °Brix. (Despite my best efforts, post-crush Brix is often a bit lower than the vineyard samples — possibly due to under-ripe clusters getting into the picking bins!) Because I grow in a cool climate (western Sonoma County, California), I expect slightly high TAs of around 0.7 g/100 mL for the Pinot and 0.8 or even 0.9 on the Chardonnay. Corresponding pHs are a bit below conventional wisdom, at about 3.2 and 3.0. Usual guidelines for red wine are Brix levels of 23 to 25, TA of about 0.65, and pH of 3.4 to 3.6. White grapes are often harvested at slightly lower sugars, higher acids, and lower pHs.
With sugar levels rising and acid levels dropping near harvest, how can we combine the numbers effectively? Linda Bisson of UC Davis has reported two different formulas sometimes applied to this question. The first is:
Brix x pH2 = 220 to 260
The second is:
Brix/TA (in g/100 mL) = 30 to 32
As an example, my 2008 homegrown Pinot Noir came in as one of the best harvests I have ever had in my hobby vineyard and the wine went on to win several awards. The crushed, soaked-up juice sample measured 24.8 °Brix, 0.71 TA, and 3.2 pH. Those figures yield 254 by formula one, which is high, but in range. The second result is 35.0, which is out of range high, indicating a low acid:sugar ratio. The wine, nonetheless, was one of the best I have made. That serves as a reminder that you must choose figures for your grapes that reflect your objectives and conditions. You are using these figures not just to determine the potential alcohol and actual acidity, but also as indicators of that elusive quality — “physiological maturity.”
What to do. First of all, write down everything. If you use grapes from the same vineyard year after year, you can develop your own rules of thumb for your grape harvest. Secondly, choose a harvest target for Brix and stick to it. It is very tempting to note that the birds (or foxes, or raccoons) are eating the grapes and rush the harvest. Don’t do it. Better to make less wine that is very good, than more wine that you can’t drink.
I like to divide my harvest monitoring into two phases: ripeness tracking and harvest decision. Three or four weeks before my anticipated harvest date, I begin taking vineyard Brix readings once a week to help me choose when to pick. Finally, a few days before the expected date, I do more extensive testing to verify the choice. I notify the friends and family who have offered to help pick my 1⁄3 acre of each set of readings. For the final harvest test, I allow about 3 days until the anticipated date, in case I need to call off the harvest party and postpone for a week or so.
For ripeness tracking, get yourself a hand-held refractometer. Go out in the vineyard with it, along with a wash bottle of distilled water, a roll of paper towels, and your notebook. Choose some reasonable number of figures to take — with 125 vines each of Pinot Noir and Chardonnay, I sample six grapes of each out of two rows for this monitoring. Without looking at them (because you will be unconsciously biased toward ripe grapes if you look), reach under the bird netting and pluck a grape. Look at (and note) its color development. Squeeze the juice onto the refractometer prism. Pop the grape in your mouth and chew thoughtfully on the pulp and skin as you take your Brix reading. Note the Brix reading, and spit the grape seeds into your hand. Note the color — I record G for green, G/B for some green and some brown, and B for brown. Make notes on the flavor of the fruit and the skin, which will be the primary tannin source in your finished wine. While development of ripe flavors is critical, experts find that the disappearance of under-ripe flavors is more important to producing good wine.
Move to another vine, pull another grape, and repeat. Do this a predetermined number of times through the vineyard. Back in the house, take an average of your Brix readings. Don’t worry if they are not tightly clustered readings, but if one is way out, remove it from the averaging process. If you repeat this sequence weekly, you will be able to determine how fast your grapes are ripening. Mine usually come up about 1.5 degrees per week, so I can predict a week or so ahead of time (barring a sudden change in the weather) when I will reach my Brix targets. Then comes the harvest decision.
Collect at least 50 grapes from throughout the vineyard into a small zip lock plastic bag. With your fingers, crush the grapes. Let the sample macerate in the bag at room temperature for two or three hours. Strain the juice through a stainless steel sieve or colander, collecting a sample for testing. Measure Brix, pH, and TA and apply the formulas above or just look for numbers that work for your vineyard. If your perception of color, seed ripeness, and flavors all concur with good numbers, Harvest is on! Notify your picking crew and get ready to make some fine wine from ripe grapes.


