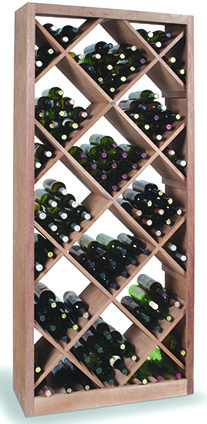
 Diamond bins, so called because of their orientation, are a simple storage option. I recommend building a diamond bin frame and making some horizontal shelves for holding wine in case boxes. (By the way, until your wine cellar is filled with wine, these shelves could also hold your home canning jars, since the same conditions – that is, cool and dark – that are right for storing and aging wine are perfect for storing home canning jars filled with your garden’s produce.)
A diamond bin, with a 14-inch interior dimension on each side, holds one case of wine of Burgundy or Bordeaux bottles. Sparkling wine bottles are larger, as of course are the larger size show bottles like magnums, and fewer will fit in a diamond. A frame 9 feet high by 18 feet wide will hold 600 bottles of wine (equal to 50 cases) in diamond bins. The edge slots of the diamond bin are just parts of diamonds; these are good for holding sparkling wine or 100-case cellar. That’s why I’d reserve the diamond bins for ready-to-drink wine and store the rest as cases. Shelving for the other 75 cases in their case boxes is straightforward. A frame of diamond bins 9 feet tall and 10 feet wide would hold 25 cases – a full quarter of your wine, and probably all the wine that’s ready to drink in your cellar and then some. So, one 9-foot by 10-foot frame of diamond bins with 14-inch interior dimensions will fit in most wine cellars. You’ll have to adjust dimensions up or down as appropriate for the space you have. Now, how do we build such a frame?
MATERIALS
-1×12 stock or 3/4 interior plywood, for top, bottom, sides
-8d nails, for bin frame
-Bricks, to keep shelving off concrete floor
-Masonry bolts (optional)
-13-gauge wire or nylon cord (optional)
-1 5/8” countersunk screws (optional)
-1×12 stock, for bin boards, diagonals
-1 1/2” finishing nails, for bin boards and diagonals
-1 1/4” finishing strips of redwood, oak, or walnut
-Wood stain (optional)
-1/2” plywood, as backing for wine racks (optional)
-3/4” trim, for edges of wine racks if plywood is used
TOOLS
-Framing/combination square
-Circular saw or handsaw and miter box
-Hammer
Cut the Top, Bottom, and Sides
Begin by cutting the top, bottom, and two sides of the frame from 1×12 stock or 3/4-inch interior-grade plywood. The top and bottom boards of the frame are 10 feet long and each of the two sides is 9 feet long. End-nail the bottom to the two sides. It’s important that the sides sit on the bottom board and be flush with its edges.
 Set Up the Frame
 Set Up the Frame
Set the frame against the wall in its permanent location. You may have to prop it with boxes or some other method to keep the sides from falling outward or inward. It’s probably a good idea to slip bricks under the bottom board to keep the wood off the floor. Set the top board across the top to give the frame stability, but don’t nail it down just yet.
Cut and Secure Diagonals and Bin Boards
 Cut and Secure Diagonals and Bin Boards
When assembling the diamond bins, you’ll need two kinds of boards that I designate bin boards and diagonals. Bin boards run up at 45-degree angles from left to right, and diagonals run down at 45-degree angels from left to right. Bin boards are all the same length (14 inches), but the length of diagonals will vary depending on their position in the frame. Your best bet is to cut and assemble each course as you work.
Circular saws can be set to cut at 45-degree angles, but I prefer a miter box, which gives you a more precise cut, although you have to do the cutting by hand. Before cutting pieces for the diamond bins, practice on a piece of scrap wood to be sure you have the exact angle you’ll need to snug the bin board into the frame.
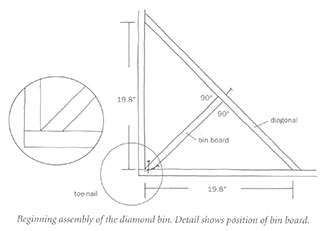
Start by toe-nailing the first bin board into the lower left corner of the frame. The edge of the bin board will be cut at a 45-degree angle to fit in the corner (see detail), making one side just slightly longer than the other. Don’t worry about it. Just make sure the slightly longer side measures 14 inches.
 Remember that 1-inch stock is actually 3/4 inch wide. With the first bin board toe-nailed into the corner, cut your first diagonal with 45-degree edges. The slightly shorter side will be 28 3/4 inches long. The edge of the shorter side should touch the side of the frame exactly 19.8 inches above the top of the bottom board. The other end of the diagonal should touch the bottom board exactly 19.8 inches from the side board. (See illustrations.) This measurement can be calculated by using the Pythagorean theorem.
Set the diagonal in place and back-nail it to the bin board also that the nail is exactly in the spot where it will penetrate into the middle of the edge of the first bin board.
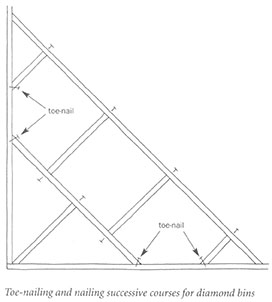
Now we’re ready for the next bin boards, which will be cut square across the edges instead of at 45-degree angles. The only time the bin boards will be cut at 45 degrees on the edges is when they butt into the bottom, sides, or top board. All the diagonals will be cut at 45 degrees on the edges, as they will all butt against the sides or top. Make sure each square-edged bin board is 14 inches long. Use the framing square to make sure all right angles are true.
From the nail you placed into the first diagonal (which defines the center of the first bin board), measure out exactly 7 inches on each side so that you have 14 inches of space. That’s where your next bin boards will go. Toe-nail them into the first diagonal, making sure there’s 14 inches of interior space between them. Measure and cut the next diagonal. Lay it in place. If you need short little bin boards on the edges, cut and toe-nail them. Even if they won’t accommodate a bottle of wine, these short bin boards will add sturdiness to the frame. Back-nail the second diagonal to the second level of bin boards.
Repeat this process until you reach the top of the frame, constantly checking your work to ensure that the interior spaces are 14 inches on a side and that right angles are true. When you reach the top course, mock the construction (tack or prop the bin boards in place without nailing securely), then lay the top board across them and trim any too-long bin boards and the last diagonal, if necessary, until the top board fits neatly and snugly. Nail the top board to the bin boards and diagonals at the top row of bins. You now have space for the equivalent of twenty-five cases of wine placed in bins so that you can easily see the tops of their capsules. They, and you, are ready to drink!
Finishing Touches
You can dress up the bins with finishing strips of redwood, oak, walnut, or other fine woods. Use finishing nails to tack them to both the diamond bins and shelving. The 1x stock you used for the bins and shelves is actually 3/4 inch thick. You’ll find a variety of finishing strips, but 1 1/4 inches is probably the best for facing these bins and shelves. You’ll be nailing them to the center of the 3/4-inch widths of the 1x stock, which will leave about 1/4 inch of overlap on each side. If your finishing stock is lighter in color than you’d like, cut it to the desired lengths, give it a quick wood stain in whatever shade you like, let it dry, and nail it up. You can use whatever pattern suits you, but I think doing the vertical strips or the diagonals of the diamond bins first, then doing the horizontals or bin boards, looks neat and trim.
SIDE BARS
Creating Perfect Angles
The Pythagorean theorem states that the sum of the squares of the sides of a right angle are equal to the square of the hypotenuse. In the diamond frame, right angles occur where the bin board meets the first diagonal. Because the sides of the triangle along the bin board and diagonal are 14 inches (interior dimension), the hypotenuse is 19.7989 inches (let’s just call it 19.8 inches). Thus, our first bin along the bottom and side boards is 19.8 inches.
Construction Tip:
If the floor is uneven or pitched forward a bit, the whole shebang may fall over face first when it’s full of wine. To prevent this, prop the bottom board so that the frame leans back against the wall at a slight angle, or better, attach two masonry bolts to the foundation or wall behind where the frame will go and then attach the bolts to the frame in some way to keep it from toppling forward. Strong wire or nylon cord attached to the masonry bolts and then to large, sturdy screws near the top of the wine rack should do the job. Just be careful here.
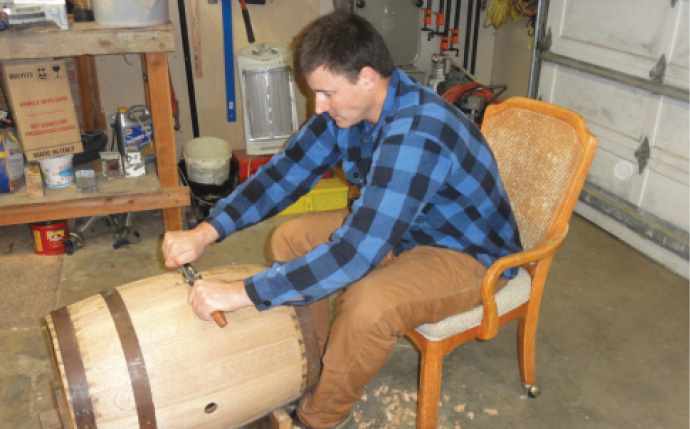
An amateur barrel maker shares his advice to build your own wine barrel at home.
Get the most from your wine cellar by maximizing the space you have. Two keys to this are leveraging vertical space and mobility.

