
Harvest is swiftly approaching and we need to get ready. Learning some of the lingo and common practices of commercial vineyards will help you choose the perfect day for bringing the fruit out of the “rows” and into your home winery. As any winemaker will tell you, the quality of the grapes dictates the quality of the wine. Perfect grapes will make your job as a winemaker easy, and making the transition from farmer to winemaker is what this article is all about. Here are ten steps you can take in late Summer and early Fall to grow great wine.
1. Keep the critters out.
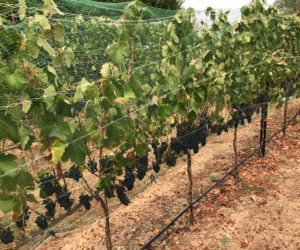
One of the most disappointing moments of winegrape growing is realizing that you spent an entire season growing grapes for the birds, deer or other wildlife. As anyonewho has grown grapes knows, critters love ripe fruit. Most birds will begin pecking at grapes when the fruit softens and hits about 16° to 18° Brix. On my ranch we net the entire vineyard, row by row, with fourteen-foot wide netting that comes on 5000 foot rolls. Smaller sections of net are available through local nurseries, or you can order them on the internet. If you net your vineyard, make sure to tuck the bottom flaps of the nets together and tie them up with tomato twine or similar material. Birds are smart enough to fly up under the nets, get some fruit and escape with ease. Make your nets a “closed system” and the birds will quickly learn that the fruit is inaccessible and will visit another vineyard in your area to do their damage. Bbig dogs are a good deer repellent, as is a nine-foot fence. Gophers are a whole different issue, one better dealt with in spring, but using traps is safer than poison.
2. Limit crop load.
Here’s a trick to try in your vineyard to reduce crop yield and increase the intensity and concentration in your wine. Limit the amount of fruit on any given shoot according to its size, leaf number and vigor. By this I mean drop any fruit on shoots less than 6″ long. If a cane is one foot or longer, retain only one cluster. If the shoot is nice and vigorous and has more than 30 leaves, leave two clusters to ripen. Note: This is better done before or during fruit softening (drop the clusters that are less ripe or colored). I can’t imagine a more important suggestion than limiting your crop load to around one cluster per 15 leaves.
3. Ripeness and water: evolution vs. dehydration.
There’s a rural legend out there in vineland that stressing a vine (cutting water off) late in the season makes for better fruit, and makes wine of greater intensity and concentration. This is partially true, and I’d like to take a moment or two to explain the difference between fruit ripened through evolution (a healthy, growing, watered vine ) and fruit ripened by dehydration (a vine shutting down and losing water from the berries). It is true that you can turn the water off in the last few weeks of a vine’s season and see the sugar levels rise. To be more accurate, the sugars might not be accumulating, the water is just drying out of the berry and leaving more sugar by volume. A vine that is “shutting down” no longer increases the sugar content of the cluster in the same way that a healthy, watered vine does.
The key to understanding how vine water-status affects ripeness is this: Sugar is not what makes a wine delicious. Sugar is potential alcohol, nothing more. What is more important to me is phenolic ripeness — making sure the clusters are physiologically ripe, not just full of sugar. You can dip a pink strawberry in powdered sugar, but it doesn’t taste as ripe and bursting with flavor as a deep red strawberry that is dark and luscious throughout its flesh. Without expensive equipment to measure phenolic ripeness, you’ll have to taste the fruit constantly and decide when it’s so delicious you just have to make wine from it. Keep the vine in balance and give it just as much water as it needs, no more, no less. A little bit of water stress will help the vine achieve (phenolic) ripeness, but too much stress and the vine may shut down early.
4. Measuring ripeness
My mouth is getting pretty good at measuring Brix. I can usually pop a few berries in my mouth and know within a few digits what the sugar content is at any given moment. It’s a fun game to play. Put a refractometer in your back pocket (a device with a window that you smear some juice on, point at a light source, and gives you a numeric value, roughly the percent of sugar solids within solution) and walk through the rows sucking berries. Taste the fruit, guess the Brix and check your accuracy with the refractometer. In this way your brain will learn to taste ripeness and you will get used to deciding a harvest date with a combination of empirical data (Brix) and the flavor of the fruit (your own palate). It’s always good to do a few lab-style juice samples close to harvest. Crush some berries and drop a weighted hydrometer in the juice to get an accurate reading of the sugar content. Allow these numbers to guide you in choosing a picking date, but make sure the fruit is delicious and appealing to your palate before it comes off the vine. Brix levels at harvest will differ from region to region, but I like to bring whites in over 23° Brix and reds above 23.5°. Remember that Brix seems to rise a bit after crushing and soaking the fruit.
5. Balancing sugar and acidity.
Most tasty beverages exhibit a special combination of fruitiness and tartness. Whether it be lemonade, orange juice, a margarita or a can of soda, fruit and acid need to be in balance for a beverage to be delicious. Acidity, and the relationship between pH and acid in the juice is important in making good wine. You don’t want to wait until the fruit is so ripe that it makes flabby, structureless wine. Try to keep the pH value of the juice below 3.4 for whites and 3.6 for reds. (If your pH is soaring and the fruit is still not sweet, remember that adding tartaric acid will lower the pH of your must/wine, allowing you to hang the fruit a little longer if necessary.) The pH values will change (and you will lose acid) during both primary and malolactic fermentations. Finding the perfect balance between ripeness and acidity is a personal decision and one that is grounded in your own preferences.
6. Sulfur residue, mildew and rot.
Do everything you can to make timely applications of fungicide to keep the grapes clean and healthy during ripening. Knowing when to stop fungicide applications is tricky. If you apply sulfur after berry softening, there is a good chance the sulfur will end up in the wine, and if you stop using it the grapes will often show mildew. There are a few things you can do to help the vine help itself. As I’ve mentioned in previous articles, opening up the canopy (where the fruit lives) to sun and wind will reduce mildew and rot pressure significantly. It will also direct your spray applications on the exposed fruit instead of it dripping off the first few leaf layers. Pulling leaves adjacent to the clusters and trying to direct the vine’s growth vertically and out of the fruit’s sun exposure is a good start. At any given time, at least 15 percent of your clusters should be flecked with sunlight. The trick is finding how much sun the clusters can take without burning or “raisining.” Massive, unruly shoots can be hedged to keep them from bending back towards the vineyard floor and shading the canopy. Remember that grapes are no longer susceptible to mildew after they reach 13° to 16° Brix, so use that to your advantage.
If you live in an area that requires you to use sulfur or other fungicide late into the season, you can (although this is not a standard or recommended process) wash the fruit with a hose or clean water in a spray unit until the sulfur or other chemical has been washed off. Try to do this in the morning or afternoon so the fruit can properly dry before harvest the following morning. Start the fruit sorting process in the field — never harvest clusters that are rotten or mildewed — drop them on the ground instead of a bucket and your wine quality will improve. Remember—never make wine from a grape cluster you wouldn’t eat straight from the vine. If you wouldn’t put it in your mouth unwashed, chances are it is going to make stinky or funky wine.
7. Harvest on the perfect day.
Try to anticipate the date that your grapes need to be harvested and make the arrangements to be free on that day. Harvest only comes once a year, and you may well lose wine quality by making your vineyard wait on your schedule. Tell the boss months in advance that you may need a day off, or better yet come down with ‘enologitis’—a rare degenerative condition that needs at least a full day of quality fruit picking and garage-lurking to cure. I truly believe there is a “right” day to get the fruit out of a vineyard. Do your best to take a day off to pick the grapes and make the wine. Maybe, just maybe, you’ll be blessed and the fruit will be ready when you have a day off. Pro viticulturists agree that picking a few days too late is better than a few days too early.
8. Harvest early in the AM and crush cool.
I can’t stress how important this is. I like to bring the fruit in before the sun touches a cluster. We have morning fog as a rule during harvest, so I can run a crew until 11:00 am usually. In a home-vineyard situation, I recommend waking pre-dawn and getting all the fruit out of the field early in the morning while it is still cool. Hot fruit, or fruit that has been handled roughly, will produce more volatile acidity and spontaneous fermentations. For those who like to “cold soak” their red grapes a few days before inoculating with yeast, bringing the fruit in cool is an absolute necessity. Being gentle with the grapes and bringing them into the winery clean and cool guarantees your year’s labor in the vineyard won’t be wasted.
9. Invite friends to help.
When harvest comes everyone wants to be a winemaker. Exploit your friends’ and family’s belief that picking grapes and making wine is romantic. Don’t mention the dirt, bees, sticky hands and finger injuries. Call them ahead of time and see if they won’t be able to come pick grapes on a moment’s notice. Offer them lunch and wine, maybe a chance to stomp some grapes if you’re feeling really old school, and watch them flock to your aid. Remember the old Chinese proverb, ‘Many Hands Make Light Work!’
10. Sterilize all equipment and make a checklist.
Consider the condition of your grape-picking and winemaking equipment. I find that most stress during harvest and winemaking is caused by poor planning. Bringing in the crop only to realize that you haven’t touched your vessels, implements and press in a year is a bad, bad feeling. Take the nervous weeks before harvest and use them to make your home winery sparkling clean, free from spoilage bacteria and random residue. If your equipment (buckets, picking shears, carboys, fermentation vessels, fermentation locks, funnels, etc) is sanitized and ready to go you will find winemaking a pleasure.
Following these ten suggestions will help you focus on grape and wine quality throughout the Summer and Fall seasons. A perfect harvest takes a full year of work. Your effort, or lack thereof, will be obvious in the glass.
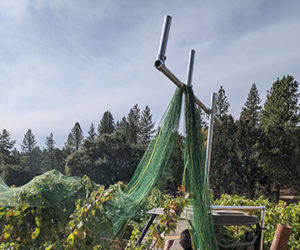
Vineyard netting is often critical to protect your grapes from birds and other predators; however, applying and removing it can be a real pain. Here is a solution for home winemakers with a utility vehicle that allows netting to mostly be installed by just one person without the net ever touching the ground.
Have you ever visited a vineyard and wondered, “How did they do that?!” You know the place, where all the vines seem to be in sync and healthy. Wes found such a hobby vineyard and decided to interview the green thumb.

