 For the home vineyardist, harvest day is the most important — or at least the busiest — day of the year. Planning and preparation is critical in order for everything to run smoothly. Let our harvest day tips guide you to great grape picking . . . and wonderful wine.
Harvest comes once per year and being prepared is vital. You can’t make up for poor farming in the last week before harvest, but you can prepare your home vineyard for harvest just like the pros. An entire year’s work in the vine rows can either pay off in delicious wine or it can produce wine that underperforms and makes you wonder why you went to all the trouble of growing grapes.
My job is to shove you gently toward the delicious and away from the disappointing. I’ve written articles on most aspects of backyard grape farming. (I’ve also met many of you and answered your questions at the wonderful WineMaker Conference.) However, I’ve never broken down my professional harvest experiences into a top ten list for what to do in the days leading up to harvest.
The take home message is this: farm smart all year and then make that hard work count by being fully prepared when the alarm clock goes off on harvest day. Happy snipping!
The Week Before Harvest:
10. Get the weather report, check the numbers and taste the fruit.
Surprises are no good during that last critical week before harvest. To prevent them, check out your “point forecast” on this website: http://www.nws.noaa.gov/.
Under the Forecast header on the right side of the page, find the “Local” button. Click Local and choose the nearest location to you. After clicking the new map as close to your location as possible, you’ll get a week’s forecast. You’re not done! There’s a new map on the page called “Detailed Point Forecast” (DPF). You can click on your exact location and the page will reload with the week’s forecast at your exact locale. After this last step, bookmark that exact page with your detailed point forecast. I check my DPF at least twice a day, and the accuracy is excellent for everything except frost potential. The high temperatures and precipitation forecasts seem to be very accurate in my experience. It will also alert you to any special or dangerous weather conditions blowing in.
If you see that your “perfect day” for harvest is being threatened by torrential hail, you may have to tweak your plans. However, remember that a little rain — say, under an inch — will likely not be a big deal right before harvest. A big rainfall, on the other hand, may dilute the wine and cause the sugar content to drop a degree or two Brix.
Getting the fruit out of the field before a serious weather event may be a good idea, but don’t let a little sprinkle freak you out.
Of course, we need to know how much sugar is in the fruit and how it tastes before deciding on a harvest day. Devices such as refractometers (which require only a drop of juice to give a reading) are accurate enough for most home winegrowing operations, as floating a hydrometer takes almost a glass of wine away from you later! Make sure to sample berries from various locations on a cluster and in the vineyard, and remember that a red wine ferment will usually gain a degree Brix (or even two!) during cold soak. After 11 harvests, I have a really good palate for guessing Brix and pH — mainly because of a game I play. I taste my samples, write down my guesses, and then run the tests to see how accurate I was. Play this game for 5–10 years and you may be able to pick strictly on flavor.
Ripe winegrapes should be almost candy-sweet. Unless the acid is dropping like Kobe Bryant’s freethrows, don’t pick until the fruit screams, “Make wine from me now.” Train your mouth to be a lab instrument and your wine will improve. You’re growing and making wine first and foremost for your taste, not to be approved by a refractometer, a pH meter or your mother-in-law’s palate.
9. Get the vineyard tidy.
It’s no fun picking in a vineyard choked with weeds, hoses, hoes, shovels, or equipment. The cleaner the vineyard floor the more efficient the picking will be. Make time to walk down each row, or at the least peer down each row carefully to check for impediments. It will likely be dark when the picking begins, and you don’t want your precious volunteers tripping and hurting themselves over a grandkid’s skateboard or walking through a massive spiderweb with a silver-dollar sized arachnid in the middle. (I once lost a picker, who freaked out big time, this way). You may want to mow between the rows, hoe out any invasive weeds, and fill holes that could trip a picker.
8. Call some friends and schedule pickers early.
Unfortunately, fruit is rarely perfectly ripe on a weekend or a holiday. I know plenty of home winemakers who plan their harvest weeks, even a month in advance for the benefit of their friends, which may be a good idea socially, but is very poor viticultural practice. To make great wine, you need to harvest according to the fruit’s needs, not yours. If harvest usually falls in September, put out an email or a postcard in August to all your friends letting them know that you are looking for help to harvest your backyard vineyard and make some wine. Make it sound romantic and offer a “vineyard lunch” as recompense. Detail the fact that a day of harvest and winemaking will forever change the way they think about (and taste) wine. Let them know the final decision will likely come within 48 hours of harvest, and you understand if some cannot make it, but you will be highly appreciative of those that can. A good professional picker can do a ton in a day. So your friends will likely be able to do a quarter ton before they fall over or make a comment like, “Darn, I’m sure glad I got an MBA and didn’t have to do THIS for a living.” For every 100 lb. (45 kg) of fruit you plan to harvest, try to have one picker. (Four full buckets per picker is easy stuff, even for kids or those of limited physical capacity.) That way the picking will be done in an hour — two at most and no one will have time to complain. If you start early enough, you will be able to harvest, sort, crush or press and still be on time for an early lunch or late brunch. When you finally decide on a day for harvest, contact your pickers personally and urge them to come for a morning of vineyard fun and wine education. If worse comes to worse, offer some neighborhood kids $20 for an hour or two’s work. “Many hands make light work,” is a wonderful Chinese proverb.
7. Revisit last year’s wine and winemaking/harvest notes.
This is important stuff! Try to keep a winery and vineyard notebook with dated journal entries with what you’ve done each day in the vineyard and in the winery. Reading the narrative of last year’s harvest and winemaking process may bring up issues that are easily resolved with a little tweaking. Example: last year you forgot to have SO2 handy at the crusher, or wanted to try using enzymes but forgot to order them. Maybe you picked at a level of ripeness that was a little too ripe, and you can check what the exact Brix and pH were and you can change this year’s pick to compensate. While you are actively writing your journal, I suggest a short, one-sentence addition to each day’s entry: “How to Improve This Process Next Year.” Decide how to make your growing or winemaking easier through experience, take some notes, read them actively before the next crush and adapt! If you are “reinventing the wheel” with each vintage, your mistakes and hardships will make the wines worse instead of better.
The Day Before:
6. Confirm Brix and pH, taste the fruit one last time.
Twenty-four hours and counting! Things are getting exciting. Whether you are trying to beat a storm or the fruit is in perfect condition for winemaking, it’s always a good idea to do one last test to make sure you have an accurate reckoning of ripeness. Brix and pH are only numerical tools for understanding a range of ripeness appropriate for winemaking. The final decision as you become more and more expert in tasting the fruit will depend more and more on the flavors you taste in the fresh grapes.
I take tasting notes on fresh grape samples and have found, over the past decade, I notice references that lead me to a picking decision. For example, when I taste kiwi notes in my Chardonnay, I know that it is not yet time for picking. When the kiwi yields to pear and melon, I know we are getting very close. In Pinot Noir, I want to taste a certain candy sweetness in the grapes that usually occurs around 24 °Brix or slightly lower. The way I describe it in my harvest notebook is: If you ask yourself if the fruit is ripe, it probably isn’t. Wait for the moment that you exclaim, “Damn that’s sweet!” Of course, I have the rare privilege of growing fruit in an area that allows amazing levels of acidity even at elevated ripeness. (A producer surprised me in 2007 with these numbers after a 24 hour soak in a Pinot Noir fermenter: 27.2 °Brix at 3.18 pH!)
You may have to pick the grapes a bit earlier if the acid begins to plummet, or get yourself a nice bag of tartaric acid for adjustments — every winery should have a 50 lb. (23 kg) bag stashed away just in case.)
I start worrying if white grapes climb over 3.3 pH and if my red grapes are harvested at a pH above 3.5. But, I should admit I like to make structured wines with solid acidity. Make sure your pH meter is calibrated each week, and if you get weird readings, ask a winemaker friend if you can run numbers in their little lab to double check your results.
For home winemaking, a refractometer reading of juice samples should be accurate enough to make a Brix-based harvest decision.
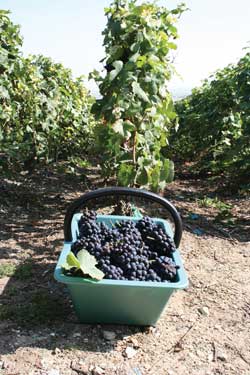
5. Wash buckets, sharpen and oil clippers and clean/sanitize all winemaking equipment.
You may get dirty looks from your picking volunteers if you spend the whole morning in the basement cleaning your equipment. It’s your fruit and you should enjoy the picking! Use the day before to wash, sanitize and rinse all equipment so it’s ready to go when the fruit starts rolling in. Picking lugs or buckets should be clean and dry the morning of the pick, and your picking snips (don’t use those clunky bypass pruners for harvest) should be sharpened with a stone or grinder. A touch of olive oil can be dripped on the base of the blades, worked into the snips and then softly wiped. (Do not use WD40 or anything that could leave residue on the fruit.) If the buckets are going to be stored outside, turn them upside down so they don’t collect dew or MOG (material other than grapes) overnight. Keep the sharp, lubricated clippers in a bucket and bring them out in the morning. Have a few extra pair of snips in case a spring pops out or a pair becomes unusable. Cotton picking gloves can be purchased at a local Ag Supply store for a few bucks per dozen, and they do a good job protecting hands against small cuts and from bee and yellowjacket stings. Have a small first-aid kit handy with various sizes of bandages. If the weather is hot and the nights are warm you may want to find some food-grade dry ice to cool the must or the juice when it is pressed or crushed.
The Night Before:
4. Remove bird netting, stage buckets/picking bins, confirm with your pickers and get the vineyard ready to start harvesting immediately.
Nothing helps you sleep on an exciting night better than a bit of hard physical labor. If you follow my advice and bird-net your vineyard, it is a general best-practice to untie, roll up and store the nets the night before harvest instead of doing it the morning of. Whatever critters may lurk in your neighborhood, they have become accustomed to your netting and will likely stay away one night without knowing the fruit is unprotected. Never wear any clothing with buttons when you do net work, and always wear long sleeves and gloves. With your buckets clean, you may want to turn a picking bucket over on each endpost, on both ends of the row. Keeping a steady supply of empty buckets available to the pickers is vital to an efficient pick. If you use a picking bin, turn it upside-down in a safe, clean area that will make it easy to flip upright and dump into as picking commences in the last dark hours of morning. The last thing to do before you are ready is to confirm who is coming to help in the morning. Just like in business, you’ll get more traction with some time on the phone making personal contact.
Harvest Day:
3. Get a very early start or consider night harvest.
Bringing in cool, fresh grapes is a must! If your yard is well-lit, consider having a night-harvest party with music and food. Most night picks start after midnight, but if it gets cool early in the night, you can do it a bit earlier to the same effect. Remember that the fruit will need some time to cool after a warm day, so the longer you wait, the cooler the must or juice will be in the winery. Keeping the fruit fresh and cool until crushing/pressing is important in that it reduces potential volatile acidity (VA) and the chance a native fermentation will begin unexpectedly. Cold fruit is safe fruit. You spent the entire year farming those precious clusters, so you might as well bring them into the winery cold! My rule: if you can see the clusters, it’s not too early to pick. Night picking with those neat flashlights on headbands works well, too!
2. Consider safety and picker protocol.
Here’s my Golden Rules of Harvest that I announce every morning in a loud voice to my crew before we start picking:
- Never cut what you can’t see — because usually it’s your finger.
- Punish the vine, pamper the clusters. This means the pickers should pull and push on the canes to get a better position to clip out the bunches.
- Never yank on the clusters to get a better position on the stem. If berries are falling off the cluster, you are being too rough.
- Don’t pick any green fruit. You will have to show the pickers an example of a cluster that is appropriate for picking and one that isn’t. (Show rot, mildew, unripe fruit and the difference between a primary and a second-crop cluster.) In general, never use second crop (those small clusters high in the canopy). In general, we only make wine from primary clusters. If you have tons of second crop, wait a few weeks until it’s above 23 °Brix on average and make a carboy of rosé.
- Once a bucket is full, show the pickers where you want it placed or dumped.
- Never push down on the clusters in your bucket to make more room. Clusters should arrive at the crusher/press in pristine condition.
- Only pick clusters that look good enough to eat right off the vine. If a tiny bit (I usually say a quarter or less) of an otherwise clean cluster is messed up, cut off the bad part and toss the good part in the bucket.
- NEVER place your snips in your bucket, and never place any material other than grapes into the bucket. Everything in the bucket goes into an expensive piece of machinery. Some of the more interesting objects I’ve kept from sliding into the crusher: burritos, cell phones, pocket knives, small coolers, a gopher snake and a soiled Bandaid.
- Clip bad clusters onto the vineyard floor and leave them there so they don’t overwinter and add to mildew/rot pressure next year. A clean cluster dropped on the ground can be picked up, blown off, and put into the bucket.
- Watch for bees and stinging insects on the backs of clusters. They sometimes spend the night there.
- Be careful walking with full buckets. It’s very easy to hit a bump or hole and sprain an ankle.
- If you need a bucket, a new pair of snips or a Bandaid let me know. If it bleeds after a few minutes of direct pressure, you may need a stitch.
1. Spend the first moments of the pick watching the pickers and fine tuning.
Take your snips and bucket and pick a few clusters with each of your pickers to make sure they are doing what you have asked. Remember that your neighborhood vineyard helpers may know nothing about winemaking or vineyard practices. It’s a lot easier to fine-tune the management than to sort every cluster. With the right education, every cluster that goes into a bucket will make it into the wine.
I call my wife — who is also my co-winemaker here at Clos Pepe — my “Bin Angel,” because (besides being angelic) she rides the picking bin behind the tractor and sorts out less-than-perfect clusters. She keeps snips handy too, so she can cut out bad parts of otherwise good clusters to keep yields decent.
0. Bonus tip: Have fun — and maybe a drink!
Harvest is (generally) the only time I drink in the morning. One of our producers started a ritual where we take a big shot of grappa or high-end tequila before hitting the rows, and I have to admit that seeing the first streaks of sunlight over the Santa Rita Hills with a slight tequila buzz is a transcendent experience. Some winemakers shoot back a little wine from the previous harvest, some start the day with a flute of bubbly. Remember the old term “eye-opener?” It may not be politically correct today, but that makes it all the more enjoyable. I should mention that I don’t drive the tractor or go beyond that first shot of Cesar Monterrey Reposado Reserva. Well, some mornings I do . . . but that’s a story for another article.

