 Growing grapes and grapevines is a rewarding hobby. Whether you want to grow them for winemaking, fresh eating, or decoration, they can be propagated simply by taking a few cuttings and rooting them. In this article I’ll explain the method that has given me success many times. Even if you don’t have a green thumb, with a little care you can have your very own micro-vineyard in your own backyard.
Choosing Your Cuttings
Vine cuttings can come from anywhere … for example, your existing vineyard, a friend’s vines, or you can bribe a local vineyard manager with wine to collect pruning debris to propagate. No matter where you obtain your cuttings, starting with a quality specimen is paramount to propagation success. A word of caution before we start, though: Independent and university grape breeders patent their grape varieties — meaning you pay royalties when you purchase their grapevines. In other words, it is illegal to propagate patented grapevines. The royalty money goes back into research so that folks like you and I can grow grapes in unforgiving climates. These folks dedicate their life’s work to viticulture and they are my heroes for the work they do. Before propagating a particular vine, please make sure it isn’t patented; and if it is, you may even be able to sign an agreement and pay royalties by contacting the breeder.
Follow these guidelines to assist you in choosing the best cuttings for your propagation project:
• While the vines are dormant, take cuttings within the first 36 inches (91 cm) of the cane.
• Cuttings should be pencil thick to 3⁄4-inch (~2 cm) in diameter.
• Cuttings should have at least three buds, but four or even five is better.
• Avoid bull canes, which are oversized and have an irregular oval shape to them. Bull canes are shoot growths that are too vigorous, with very long internodes.
• Make an angled cut at the top of your cutting to be able to differentiate between top and bottom; this is very important.
• Choose clean, disease-free wood without black spots that may be harboring spores of such fungal diseases as black rot, phomopsis, or anthracnose.
If you need to store your cuttings until you’re ready to start rooting them, they can be bundled, and wrapped in wet newspaper, stored in a plastic bag and put in the fridge. They can be stored like this for months. A good time to take the cuttings from storage and get your project started is two to six weeks before your last frost date in the spring, when it’s safe to plant a tender young vine. Even if you’ve misjudged this date the cuttings will be patient while waiting in their pots to be planted. In order to get the cuttings to root, you need to keep your cuttings in a cold room to suppress bud swell while heating the bottom of the cuttings to encourage root growth. If the bud(s) swell and leaves form before there are roots to support the plant, the leaves will quickly decimate stored energy reserves in the cutting; essentially killing the cutting in the process. My wine cellar is about 50–57 °F (10–13 °C) around the beginning of April. The cellar is where I do my propagation, and I’ve had
good success.
The Dirty Part
Propagation of grapevines is essentially just taking a cutting and putting it into a planting medium. I use the least expensive, most generic potting soil I can find without all of the fancy additives. My theory is that the extra cost for the slow release nutrient-rich soil is unnecessary because the cuttings don’t yet have roots and will not spend enough time in the soil to take advantage of any benefits it may have.
The Container
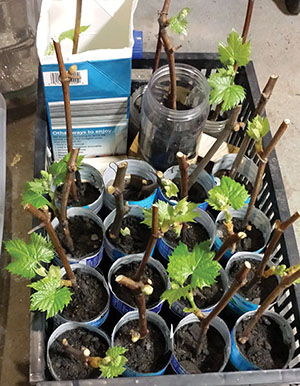
If you’re trying to do this process on the cheap I recommend saving cardboard milk cartons to build your own Plant Bands (more on this product in a moment). Though not as convenient, they are the perfect height for a grapevine cutting. Simply cut the top and bottom of a rinsed-out milk carton and form it like in the top picture on the facing page. The opening should be 2 inches x 2 inches (5 cm x 5 cm). Now you have your very own disposable plant container! Once the cuttings are rooted and you are ready to plant, you will remove the vine cutting from the milk carton and plant the vine in the ground. You may even be able to save these cartons for next year’s propagation if you’re extra thrifty.
Alternatively, you can build a shallow wooden box to the dimensions of a heating mat (more on that to come). Then drill several holes into the bottom of the box to allow heat from the mat to warm the cuttings, and also for drainage (see example on the right of the bottom photo on the facing page). This box can also be used to hold your milk carton containers too. If you’re only doing a handful of cuttings, any simple planting pot will do.
In his book The Grape Grower (Chelsea Green Publishing, 2002), author Lon Rombough recommends using Plant Bands. Plant Bands, made by Monarch Manufacturing, are containers similar to the makeup of a milk carton. This gives them the ability to hold moist dirt and stand up to greenhouse conditions for months on end. Plant Bands give each cutting their own space, and 40+ bands are all held together within the provided tray. Once the cuttings are ready to be planted outside, the vine and the Plant Band can be planted and the band will break down over time. Choose the setup that fits your budget and creativity best.
Seedling Mat
To heat the future rooting zone of your grapevine cuttings, a seedling mat will be employed. These mats plug into any 120V outlet and warm up to 10–20 °F (5–10 °C) above ambient temperature. They are water resistant and fit right under your propagation tray. For precise control you can use a thermostat and thermometer to monitor and control the temperature. In this case you would set it at around 85 °F (~30 °C). Although a regular seedling mat without temperature control will do just fine. Seedling mats come in various sizes. Determine how many cuttings you will be working with and coordinate your propagation tray dimensions to your heating mat size.
Put it All Together and Plant
I like to start my cuttings here where I live in western Pennsylvania in the beginning of April with the intent of planting them in May. This gives me enough time to get them rooted, hardened off, and planted. When starting your propagation project, look at the last frost date for where you live and start your cuttings between two and six weeks in advance. This time frame may seem broad, but for where I live I can plant all the way into late May and even early June. It’s better to be prepared, and if you started earlier, the budding vines can be potted up after checking for roots and kept inside until it’s safe to plant out.
Remove your cuttings from cold storage and freshen up the cutting on the bottom by making a cut just below the last bud. Then make a slanted cut on top 1⁄2 to 1 inch (12 to 25 mm) above the top bud. Place them bottom down in a bucket with a few inches of water in it to hydrate the cuttings. Allow them to sit like this for a few hours, even overnight. Once they’re finished rehydrating you can set up your seedling mat and plug it in. Fill your Plant Bands, milk cartons, or wooden planting box with potting soil and lightly pack it down to make it firm. Take a pencil and poke a hole into each of them for inserting the cuttings.
Before we insert the cuttings into the medium let’s talk about rooting hormones. Rooting hormones help to stimulate root growth in plant cuttings. Using them is not a 100% guarantee, and some cuttings can root without it, but it increases your success rate significantly. One hormone I like to use is called Dip ‘N’ Grow. According to their website all you need to do is mix it, dip it, and plant it. That sounds easy, wouldn’t you say? I highly recommend using this for better success in your propagation project.
Now that your planting containers are full, mix your rooting hormone according to the instructions for hardwood propagation. Dip each cutting in for the instructed amount of time the manufacturer recommends (usually a few seconds per cutting) and then insert your cutting into each Plant Band (or milk carton) all the way to the bottom then pull it back up just a 1⁄2 inch (12 mm). Gently firm the dirt around each cutting. When using a planter box and the cuttings don’t have their own Plant Band, you can plant them 2 inches (50 mm) apart. Lightly water the soil so that water will reach the bottom. This is most likely one of the last times you’ll water like this. From now on you will use a spray bottle to water the cuttings. Too much water will cool the root zone and defeat the purpose of the heating mat.
Watering
Once the cuttings are in their containers, your job is to monitor them and gently water them. That is all you really need to do for the next 2 to 6 weeks. This, in my opinion is the most nerve-racking part, though — watering. How do you know how much water a rootless cutting needs? All of the sources I’ve studied recommend keeping the soil slightly moist, definitely not overly wet. But don’t let them dry out either. This is why a spray bottle works great and you feel satisfied giving them a mist every other day or so; but in the end; try to water as little as possible. If you’re unsure of the moisture content, you can carefully (careful, careful now) pull out a band to check the bottom or stick a finger in the top. The bands or milk carton containers are tall (around 8 inches/20 cm), checking the bottom may be your best bet. As time goes on resist the urge to check the cuttings for roots before two weeks. It takes a while to get these cuttings to root, but indeed they will because life wants to live!
Two to Four Weeks Later
If you’ve resisted the urge to check for roots in the first week, I’m proud of you. If not, it’s all right I’m guilty of that one myself. It is now time to check for roots or callusing. According to The Grape Grower by Lon Rombough, on page 146, “Callusing is the formation of lumpy or grainy-looking white tissue, white undifferentiated tissues in grape cuttings. The cutting has to form such tissue before rooting can occur, as the roots arise from the callus.” This is a very important step towards rooting your cuttings, if not the most important. In my own experience, I’ve seen cuttings root without noticeable callus tissue. Either way, as long as you have one or the other (roots or callus tissue) you’re on your way. There are two ways to check for roots or callus tissue. One way is to gently pull out a cutting and give it a look (see the photo at the top of the facing page). I recommend removing a few cuttings because there is a chance some won’t root. Another method is to lift up the whole box or tray and take a look underneath. The roots are very fragile at this time. If you break one off it’s not the end of the world but try to avoid it and take care when checking for them. If the cuttings look the same as when you initially put them in, simply stick them back into the soil. It is inevitable that some cuttings just won’t root. Because of this, be sure to gather extra cuttings to make up for duds. Extra cuttings are also nice in case some don’t make it through the summer or following winter.
Once you’ve discovered roots or callus tissue, there are different ways to move on to the next step. If you have roots and/or callus tissue but the cutting hasn’t spouted leaves yet, you may plant your cuttings directly into their permanent place in the vineyard, or in a nursery row to be planted out next year. We’ll discuss this more in the next section.
If there happens to be leaves on the cutting, I like to repurpose water bottles with the top cut off, and a hole drilled in the bottom for drainage. I then plant each cutting into a bottle. Now you can put them all in a shallow tub and can move them around in one container. These leaves have never seen the light of day and they should be hardened off to the sun’s rays and the outside environment. This can be done similar to hardening off a tomato seedling. About 10 to 14 days before you plant, take your new vines outdoors to an area where they’ll be protected from high winds and intense sunlight. Leave them out for a few hours and bring them back inside. Be sure the temperature is above 50 °F (10 °C). Gradually increase the vines’ exposure to sun and wind, and then eventually start leaving them out overnight. After about 10 to 14 days your vines should be ready for planting. It is important for the vines to get acclimated to the outside since they were brought up indoors. I’ve seen sun scorch on tender grape leaves when planted in the vineyard too soon and this tends to set them back a little. While the vines are being hardened off, be sure to keep them watered; maybe even sing to them a
little too.
The Other Dirty Part
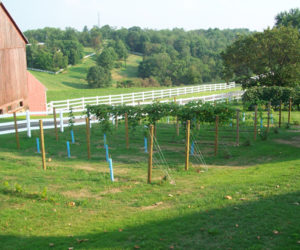
Finally, when the cuttings have rooted, callused, leafed out, and everything is a go, you can choose a nice evening to plant cuttings that you’ve worked so hard for. If possible, try to pick a time to plant when the temperatures are mild for the next day or two. You can choose the best plants and put them in their permanent location, or maybe your vineyard isn’t quite ready and they can be planted in a nursery row about 1 foot (30 cm) apart to get established and planted out next spring. Extras can also be planted pretty much anywhere: A square dirt patch near your vineyard for example. These newly planted vines will need about 1 inch (2.5 cm) of water weekly. Now you can decide how you will keep rabbits and deer from eating the little guys. You could either use grow tubes or some chicken wire. Both are effective methods to deter animals.
You Did It! Wait, You Did Research, Right?
This article is based on my experience propagating vines to expand my vineyard and to keep costs down. I learned this method from books and various online sources and combined the information for this article to provide you with a method that continues to work for me. A big influence — as you’ve no doubt gathered — is The Grape Grower – A Guide to Organic Viticulture. This book contains a far more in-depth look at grapevine propagation, which is beyond the scope of this article. I feel with anything you want to accomplish, especially grape growing, research is the first step to success. Therefore, before a cutting is snipped I highly recommend doing more of your own homework so you’re not ripping up vines two years later because they won’t work in your climate and region.
WineMaker magazine’s own Wes Hagen also provides lots of great grape growing information in his “Backyard Vines” column, as well as in his Best of WineMaker special issue: Guide to Growing Grapes (www.winemakermag.com/store/special-issues/guide-to-growing-grapes).
Good luck with your propagation project, and send your pictures to WineMaker magazine!
Grow your own grapes? Thinking of starting a backyard vineyard? Now is the time to plan your spring. Here is a list of suppliers where you can purchase grapevines and/or supplies for your home vineyard...
Not all wine grape growers need to irrigate, but for those that do there are options available. Get a primer on what those strategies look like and some pointers to get going in the right direction.

