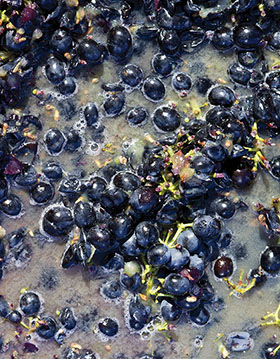
 If you have ever researched how to make Pinot Noir, you have no doubt come across the term “pre-fermentation cold maceration” or simply “cold soak.” Although a cold soak is used on other grape varietals, lowering the temperatures prior to fermentation is primarily done to coax more color out of Pinot Noir, which tends to be a bit color shy.
Cold soaking has its followers and detractors, however. One camp of winemakers believe that wines made utilizing a cold soak are more complex and fruit-forward, and exhibit improved color retention. By soaking their grapes at lowered temperatures for a period of time, they can extract anthocyanins (color), aromatics, supple tannins, improved mouthfeel, and flavor compounds more effectively than is thought to be possible with conventional methods. The opposing camp of winemakers feel that this whole process is not necessary and does nothing but increase the possibility of spoilage, and produce short-lived effects that don’t last long enough to make it into the bottle. These winemakers prefer to use maceration enzymes, pump-overs, heat, and alcohol to get their desired result. While there is little scientific data and few studies to look to supporting the efficacy of the cold soak, it seems to be an artistic winemaking decision rather than a process soaked in facts. Whether or not you believe it helps, cold soaking is perfect for small batch experimentation in a home winemaking setting. The primary focus of the technique for this article will be red grapes, although wines made from more aromatic white grapes can certainly benefit from a short cold soak prior to fermentation. This can increase aromatics from the grape skins along with some desirable flavor compounds. These compounds help contribute to the body and aging potential of the wine.
Temperature & Duration
The most important factor in performing a cold soak is maintaining a temperature from 40–50 °F (5–15 °C). This is primarily a function of microbial spoilage prevention for the duration of the cold soak. Without the protection of lowered temperatures, lengthy pre-fermentation maceration at ambient temperatures would promote oxidation and microbial spoilage or carbon dioxide produced during fermentation.
The average cold soak is conducted for about four days, although some winemakers are known to push it to the limits and macerate for seven to fourteen days. It is difficult to provide a one-size-fits-all time when first attempting a cold soak, so keep your time intervals short until you gain experience in maintaining low must temperatures. This will prevent any spontaneous fermentations or spoilage. In home winemaking things are rarely perfect, glycol jacketed tanks may be available but aren’t the norm, and we use what we can to reduce the temperatures of the must. In his book Techniques in Home Winemaking, Daniel Pambianchi recommends freezing water in freezer bags or plastic milk jugs (ice bombs) that can be added to the must to bring the temperature down. Be sure to sanitize the ice bombs prior to adding as not to contribute microbial spoilage organisms. Pay close attention to keeping the temperatures at the desired level. This involves rotating ice in and out as needed, stirring the must twice daily, (stirring evenly distributes the temperature throughout the primary fermenter, and prevents microbes from setting up shop on the surface). Check the temperature every time the must is stirred, which will avoid opening the primary fermenter more than is needed, especially when using inert gas.
Other Benefits of a Cold Soak
Besides retaining color, there are other possible benefits to cold soaking. First, the must has time to soak and get thoroughly mixed. This helps to reveal more trustworthy readings of base chemistry such as Brix, titratable acidity, and pH. This is especially true for Zinfandel grapes that often come in very ripe with raisined grapes. Through soaking, these raisined grapes can release sugars over time, giving a better picture of the potential alcohol of the must.
The average cold soak is conducted for about four days . . .
By locking the color in early in the process, you have the option to press early, which avoids extracting harsh alcohol soluble-tannin from the seeds and stems later in the fermentation. This allows the decision to press to be guided by taste rather than the numbers.
How to Cold Soak
I have devised a comprehensive list of steps to do a cold soak at home. Carefully review the steps prior to receiving your grapes so you are prepared.
The use of ice bombs to maintain proper temperatures during a cold soak is intended for winemakers using 20- to 40-gallon (75- to 150-L) food-grade plastic trash cans as primary fermenters. Due to their size, half-ton macro bins will need dry ice to keep them cool. Dry ice gets down to -109 °F (-79 °C), and you will need to follow strict safety standards when handling — including using gloves, and using it in an open space. Be sure to use food-grade dry ice. Use dry ice at a rate of 100 lbs./ton of grapes or 0.8 oz./lb. (50 g/KG.)
1. Depending on the batch size, you may need to use up to five 1-gallon (3.8-L) jugs of ice at a time, with back-up jugs to be rotated as the others thaw out. Start saving plastic jugs and freezing them well in advance of harvest and crush. Otherwise, buy a box of heavy-duty freezer bags.
2. Prior to crush, Daniel Pambianchi recommends an additional step of cooling the grapes prior to processing. This can be done by placing dry ice on the harvested grapes, purchasing them already refrigerated, or harvesting at night or early in the morning while the grapes are still cool. This will facilitate the cooling process and minimize oxidation during crush. If none of these recommendations are possible due to transportation logistics or your harvest schedule, just do your best and have sulfite and ice bombs ready to immediately start the cooling process.
3. Crush and process your grapes in the usual fashion into your primary fermenter.
4. The must is kept cool enough to slow most oxidative or microbial processes down, but without the use of sulfite, the risk of spoilage is increased significantly. If you choose to use sulfite, add it to the wine at a rate of 25–50 ppm.
5. Add your ice bombs or dry ice. For comparison, I am able to keep 20 gallons (75 L) of must at 45 °F (7°C) with three ice bombs.
6. Although it is safer to allow the must to warm up after cold soaking prior to yeast inoculation in a home winery setting, Thomas Henick-King, Professor of Enology at Washington State University, suggests making a yeast starter and adding it prior to cold soaking. The yeast slurry should be carefully adjusted to the must at ambient temperature and added to the must prior to cooling. Acclimating the yeast to the must temperature is a very important step so as not to shock the yeast cells. The addition of a yeast starter culture will suppress the growth of unwanted yeast and bacteria during the cold soaking.
7. Keep your fermenter tightly sealed. I have found in the case of food-grade plastic trash cans a beach towel over the top in combination with snapping the lid down does a great job of keeping out fruit flies and containing the inert gas.
8. If you are uneasy about leaving your must to the open air within the fermenter, in his book Home Winemaking Step by Step, Jon Iverson suggests you lay plastic wrap across the must to minimize oxygen exposure (for food-grade plastic trash can fermenters). Another option is to flood the headspace of the fermenter with argon or carbon dioxide and effectively blanket the must. This would of course need to be repeated every time you stir the must to ensure an adequate protection is achieved.
9. Replace ice bombs as needed and closely monitor the must temperature twice daily as you punch the cap and stir up the must. Be sure to taste the juice often to detect any possible off flavors forming. If you see or smell signs of fermentation, it is time to remove the ice bombs, allow the temperature in the fermenter to rise, add your yeast and nutrients, and get fermentation into high gear; this will prevent wild yeast from getting too much of a foot hold. If you inoculated prior to cooling the must, allow the temperature to rise and allow fermentation to proceed.
10. Once you are satisfied with the cold soaking period, simply remove the ice bombs or any remaining dry ice blocks and allow the must to reach ambient temperatures for fermentation to finally commence. Then add your yeast starter if you did not do so prior to the cold soak. In the case of white wines, the must will then be pressed and inoculated with yeast.
Final Thoughts
Not all grapes are good candidates for cold soaking. Low quality or damaged fruit will harbor even more bacteria and unfriendly yeasts than unbroken grapes normally would, making the process riskier. Because of this, it is best to only perform cold soaking with sound, fully ripened fruit. Also, if you are not able to dedicate the time to pay special attention to temperature control, forgo cold soaking all together.
While cold soaking is debated in winemaking, and despite few studies being done on the subject, this shouldn’t keep you from giving the technique a try. Creativity and artistic experimentation, after all, is part of the fun of making wine, and is what leads to interesting wines.
When the editors at WineMaker suggested quality control (QC) for a story, I was delighted to take it on. I have a long personal and professional history with QC and it infuses most of my activities — including my fermentation hobbies. Before joining the world of winemaking, I put my chemistry degree to work in environmental testing laboratories. The 1980s were filled with efforts to improve quality and consistency of analytical results,…
Get tips on performing bench trials at home from three pros who utilize bench trials at their day jobs.

