 For winemakers, grape harvest is a period of intense activity. Important decisions and preparations need to happen well in advance of crush day in order for things to go smoothly. These decisions include ordering or picking the grapes, obtaining a crusher, selecting the right yeast, etc. Beyond these decisions, your crush area, winery and equipment needs to be checked, cleaned and prepared. Whether you are making wine from grapes for the first time, or a seasoned winemaker who just needs to organize his or her thoughts, the following is a checklist to guide you through your pre-harvest decisions. If you prepare adequately for harvest, you will still be busy, but the only thing under real pressure will be your grapes.
1. Start a Crush Log
Home winemaking is where it is today because those before us kept good notes. Pick up a notebook, and keep daily records of everything from crush to bottling.
2. Select and Order Grapes
Unless you are harvesting your own grapes, the quality of your fruit is in the hands of those bringing it to you. Knowing how and where you will acquire your grapes is as important as your winemaking and fermentation decisions. It doesn’t hurt for this research to be made well in advance — even at the beginning of the season. Grapes can be purchased from a local supplier or you can pick them up yourself from a grower.
Buying Grapes from a Local Supplier: Some suppliers require ordering wine grapes weeks or months in advance. The grapes may be trucked in from hundreds, or even thousands, of miles away. Suppliers will call when the truck arrives; you load your grapes, pay for them and go home. If you didn’t order them in advance, and you don’t mind just wandering down there to see what’s available, that’s fine also. However, it would still be a good idea to get to the depot as soon as the truck arrives, otherwise you will be purchasing over-ripe, and possibly rotting, leftovers that have been picked through and sitting for a while.
Buying Grapes from a Grower: If you are getting your grapes directly from a vineyard, ask the grower to let you know when your grapes will be picked, so that you can be there for them when they come off the vine. Growers cannot always make that decision until the grapes are ripe and weather cooperates. I used to live a four-hour drive away from my grower. The day before picking, they called me to give me the time to be there when they came in out of the vineyard.
If you’ve ordered a large quantity of grapes, it pays to think about how you will transport them from the supplier or vineyard to your home winery. They may not all fit in the back seat of your Toyota. Renting or borrowing a pickup truck is a good option. If you plan to drive for any distance — or you know the journey will be dusty — make sure you have a tarp to put over the fruit.
3. Organize Your Working Area
You will need space to crush your grapes and ferment the wine. Most professional wineries organize their winemaking into two designated areas, outside for crush, inside for fermentation. Here are some principles to remember.
Crush Pad: Crushing grapes can be a messy business. Aside from sticky juice, and numerous bees and fruit flies, there will be skins and stems lying around. Crushing and pressing is best done where you can hose the environment down before and after crush. Anticipate the possibility of rain or hot sun. A shaded back patio, empty garage or carport works well. Wear clothing you can get dirty and rubber boots.
Before crush day, make sure the area is clean, away from compost piles, stored rubbish bins or places that can contaminate your grapes and must. Inspect and sanitize your fermentation bins. Depending on how much fruit you have, be prepared to light the work place into the evening if necessary. The crush is not a process you can stop in the middle of and resume again tomorrow. Grapes begin to deteriorate in quality if left for a length of time — especially if they’ve already been in a truck for a few days. Anything you can do to keep the grapes cool once you harvest or take possession of them will improve the quality of your wine. Planning for a cooled or shaded area, or even just having some ice on hand, can help you with this.
Winery: After crush, fermentation often takes place indoors. If you are doing this for the first time, make sure you have cleared and sanitized a space to store your fermenting wine at the right temperature — with enough room to work with the wine; racking, pressing off the skins, stabilizing, filtering, etc. Organize a no-hazard way to get your bins or pails of crushed grapes from the crush pad, into the winery. Organize a place to hang your racking equipment, and shelve the necessary chemicals for your wine lab. You will also need hot and cold running water and a sink basin.
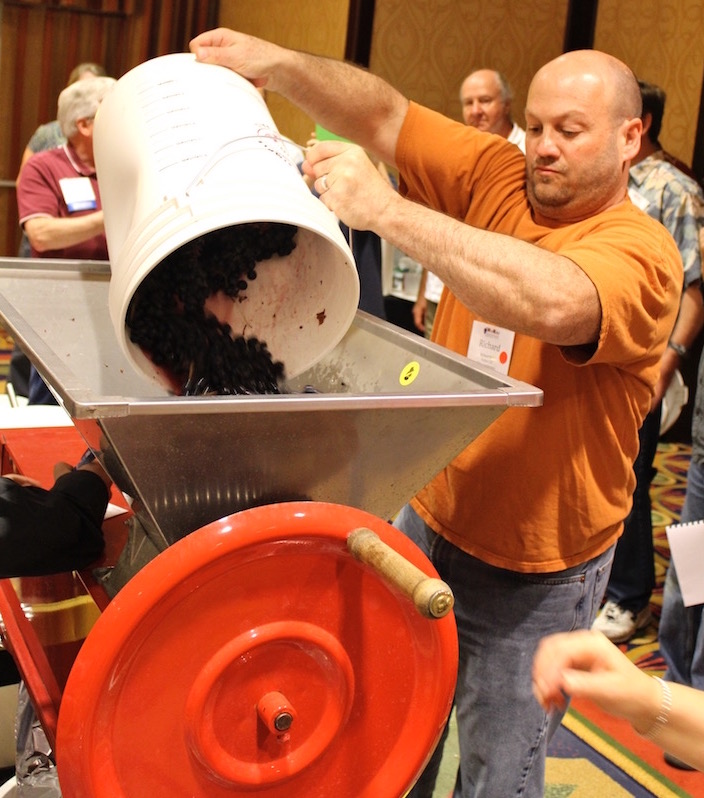
4. Acquire a Press/Crusher
Some suppliers and growers will crush your grapes for you. Some growers insist on it. You simply bring home pails of juice and skins. If you are purchasing a large quantity of grapes, this is a very economical and clean option. It saves you from the logistics and expense of obtaining a crusher, and the potential mess of the process. However, find out how your supplier crushes the grapes before asking them to do it for you. For red wine, you want gently crushed grapes, and the skins, without the stems. For white wine, you want only the juice, not the skins.
While many growers have the proper facilities for this, a supplier may not. I once purchased Cabernet Sauvignon grapes that had been shipped up from California through a supplier who — for two dollars — violently crushed my grapes in a massive machine with a giant auger. The result was several pails of clear liquid, minus skins. The skins were ejected out the back, into a pile of other skins and seeds. After a bit of haggling, I convinced him to let me go to the pile and collect some skins on my own, by the handful, and dump them into my pails. I won’t go into what kind of wine I ended up with. This brings us to the next option:
Crushing at Home: If you are bringing home lugs of grapes to crush yourself, the amount you buy will determine the size and choice of the crusher/destemmer you need. For large quantities of grapes, renting is an option, especially if you are sharing the cost and occasion with others. If there is a demand in your area, you might need to book the crusher in advance. If your quantity varies from year to year, you can rent a different size. If making wine becomes a large annual event with friends, a purchase might be more to your liking. The question is what kind should you use?
Types of Crushers and Presses
Crushing grapes is more than mechanically extracting juice. How you crush can have an affect on wine quality. The press you choose may depend on the wine you are making. When making red wine, you will be pressing your grapes twice: first when you break the grapes to extract juice, and again when you press the skins after a period of fermentation. White wine grapes only need to be pressed once, and the skins will be discarded. Having said that, there are three devices for extracting juice from grapes:
Basket Press: The classic wine press. A tall cylindrical basket made from wooden slats with gaps in between, so that, when a piston is hand cranked down from above and compresses the grapes, the juice runs out of the basket and into a container, leaving the skins and stems behind.
Bladder Press: Similar to a basket press, in that a bladder inflates and gently presses the grapes in a stainless steel cage, allowing the juice to run out, while the skins and stems remain behind to be discarded later.
Basket and bladder presses are ideal for pressing white wine grapes while retaining the skins and stems. They are also ideal for pressing wine from red skins after a period of fermentation.
Crusher/Destemmer: A machine that mechanically removes the grapes from the stems and breaks up the berries without really crushing them, allowing the whole broken fruit and skins to fall into a vat, while discarding the stems out the side. Destemmers work well for red wine. Large destemmers are motor operated. Very small ones are hand cranked.
Of course, the traditional fourth option is to simply use your feet. It worked for centuries. Some Old World wineries still use feet. It may sound unsanitary, but consider that your clean feet are a lot cleaner than the grapes.
The thing to remember is — if you end up with a press or crusher that is too small, the crush event becomes prolonged and labor intensive. If you are a handyman, you can consider making your own crusher.
5. Prepare Fermentation Vessels
The quantity of grapes — and the amount of grape varieties you make wine from will determine your fermentation vessels. You have many choices when it comes to what type of vessel to ferment in. Consider these options:
Primary Fermentation Pails: No matter how much wine I make, I have always found primary pails the easiest and most economical to work with. They are cheap to buy. Food grade. Easy to stack, store, and replace. And you can work with your wine one batch at a time, and make more than one varietal in a season. If you are sharing winery space with friends, everyone knows his batch. They are great for beginning winemakers. If something goes wrong with one batch, you still have the others. When suppliers or growers pre-crush your grapes, they usually do so in primary pails.
If you are using pails from last year, inspect them carefully. Bacteria and spoilage organisms can lodge in deep scratches in the soft plastic. Clean them well with diversol, and then sanitize with sulfite solution. Rinse well, with hot water. If in doubt about their condition, discard it and go buy a new one. It’s worth it.
How many pails should you have? Keep in mind, that juice fermenting on skins in a primary pail should only be filled three quarters full. If your primary is a 5-gallon (19-L) pail, fill it to 4 gallons (15 L). When fermentation begins, wine and skins expand. You will need space to contain this expansion, and to punch down the cap.
Food Grade Bins: If you are making a large quantity of the same varietal and want something larger than several pails, you can ferment the whole thing in a food grade plastic bin. Local grape suppliers often carry them. Make sure any fermentation vessel you use is food grade. Although you may be tempted to buy something large and cheap, some plastics can impart an off taste to the wine during fermentation.
Carboys and Demijohns: Inspect and sanitize glass carboys that have been sitting since last year. Clean with diversol, and sanitize with sulfite, and rinse with hot water. If you are using plastic carboys, note any deep abrasions that may have harbored spoilage organisms. If in doubt, buy a new one.
Stainless Steel Tanks: Clearly the coolest, but also the most expensive, option for fermenting wine. As an alternative to finishing fermentation in glass carboys, stainless steel tanks with a floating lid are wonderful. They take less space than carboys, and their volume is adjustable. If you’re in the market for one this harvest, but want more insight, check out “Stainless Steel Tanks” in the February-March 2004 issue.
6. Inspect, Replace or Prepare Small Equipment
There are the invaluable pieces of small equipment and odds-and-ends you want on hand in the winery on crush day. These are items that you will wish you had at the moment, and don’t want to find yourself running to the local store in the middle of your work. You may already have these items, but after sitting unused for a year, they need to be checked, repaired or replaced. Here is a short list of things you will need post-crush:
Racking Hoses and Siphons: After sitting for a year, tubing can harden and crack, or collect mold, bacteria or spiders in the lines. Check your lines before harvest day to make sure they are in good shape. Clean and sanitize them well. If you are not sure of their shape, it’s worth the few bucks to replace them.
Airlocks and Bungs: Airlocks can last years, but your bungs are rubber and need to be replaced when they get hard and discolored.
Stainless Steel Kitchen Strainer: For straining skins and other unwanted leftover solids off your wine after primary, a strainer is very helpful. Funnels, measuring spoons/cups, and a graduated two-liter pitcher, mortar and pestle: These items are most handy when preparing yeast starters, nutrient measurements, and sanitation solutions and crushing Campden tablets. A funnel will help you to insert things into the neck of your carboys, when needed.
7. Prepare Sanitizing Equipment and Spray Bottle
Possibly one of your most important pieces of equipment is a two-dollar spray bottle to quickly sanitize everything that comes in contact with the must or wine. If you’ve already got one, check it. I have found that the hand pump can deteriorate in a year, rendering it useless. It may need to be replaced. Prepare a few wine bottles — or a 1-gallon (4-L) jug-of sodium metabisulfite solution. It saves you from having to stop what you’re doing and make it up later while you’re in the middle of something.
8. Confirm Winery Temperature Control
Most wine yeast needs to ferment between 70 and 85 °F (21 and 29 °C). Confirm the temperature of your designated fermentation area. If your winery is a cool basement, like mine, you may need heating belts for primary pails to prevent the yeast from becoming sluggish or stuck.
9. Prepare and Stock Your Home Wine Lab
Every home winery needs a small lab. A few crucial test kits and chemicals can make all the difference when it comes to making great wine. If you have some chemicals on hand from last year, they may have a shelf life. Make sure your winery has a fresh supply of crucial chemicals.
Once your grapes are crushed — but before you pitch yeast — you will want to determine three crucial elements in your must: sugar level, acid content and pH. These numbers help you determine if your must needs to be adjusted with acid or sugar. If you pick up your grapes at a grower, they may already have provided the above information. Even so, stock your wine lab with the ability to adjust it yourself. You will need:
Three Scale Hydrometer: to determine the specific gravity of your must and potential alcohol level of your wine. This will help you decide if you want to add sugar. For more information on sugar, check out “How Sweet It Is” in the August-September 2002 issue. You can ferment wine without a hydrometer, but you will not have any idea of the likely final alcohol content or if the wine has really finished fermenting.
pH Meter: Knowing pH will also help you to determine if an acid needs to be added to adjust it. Good pH meters can cost a bit, but are worth every penny. If you have a pH meter, check the batteries and calibrate it.
Acid Test Kit: Testing for acid goes in conjunction with testing pH. Knowing your must’s acidity is important. Winemaking suppliers offer acid test kits to help you determine if an acid blend is necessary for your must. Acid test kits have a shelf life. If yours is a year old, consider buying a fresh one. For detailed information on pH and acid, check out: “Acidity a Balancing Act,” and “pHiguring out pH,” in the Spring and Summer 2001 issues.
Yeast: If you know in advance what grapes you will be fermenting, research the best yeast for your wine. Some yeast strains are common stock items and can be picked up any time from your retailer. But if you want special or liquid yeast, you may have to order it well in advance, and store it in your refrigerator at home. Pick up a bit more yeast than what you think you are going to need, as a back up in case a yeast starter goes wrong or if you end up with a stuck fermentation. To help select the right yeast, check out the “WineMaker Yeast Guide” in the June-July 2006 issue.
Yeast Nutrient/Yeast Energizer: One of the common causes of a stuck fermentation is lack of yeast nutrient. Even with a high sugar level in grapes, yeast can starve to death without nutrient supplements. Both yeast nutrient and yeast energizer should be on hand to add — if necessary — at various stages of fermentation.
Potassium Metabisulfite/Campden Tablets: If your grower or broker has not already sulfited your must, you will need the potassium metabisulfite on hand to stun your must before pitching cultured yeast. This will allow your yeast to colonize without competition. The recommended dosage is 50 ppm. Before adding sulfite, ask your supplier or grower if this was already done. Tablets are pre-measured, and crushable with a mortar and pestle, or between two spoons. Powder needs to be weighed or measured. Choosing powder or tablets is a matter of preference. Sulfite will also be necessary to stabilize your finished wine in the weeks and months ahead.
Tartaric Acid/Acid Blend: Grapes contain three types of acid: tartaric, malic and citric acid. Once you test your must for acid, you may wish to balance with an acid blend, before pitching the yeast. If you wish to adjust pH, you will need to have some tartaric acid on hand.
Potassium Bicarbonate (Chalk): If you find that your must is too acidic and you are unable to blend with a lower acid must, you can reduce the acidity by adding chalk.
Order MLF Cultures: Not all wines need MLF. But most reds improve from it, as do some whites. Decide in advance if this is what you want for your wine. Malolactic cultures may need to be ordered in advance. It is wise to have the culture on hand well before crush. MLF cultures are offered in single envelopes for 5-gallon (19-L) batches.
MLF Chromatography Kit: Along with the culture, you will need to know when MLF is complete. This kit may not be needed for up to ten weeks after crush day, but acquiring it in advance can’t hurt.
Clearly, being prepared for crush day — and beyond — can contribute to the quality of a great wine. At a minimum, adequate preparations will allow your winemaking tasks to go more smoothly. Hopefully this checklist, with pointers towards where to find more information on many important topics, will take some of the stress out of your pre-harvest decisions and winery preparations.
After the rush of crush and primary fermentation has passed, further decisions can be made at a more leisurely pace. In the meantime, you can look forward to step ten on the checklist:
10. Be Festive
No explanation necessary.

