In the beginning, there was wine . . . just wine. There wasn’t “wine” (made from grapes) and “country wine” (made from fruits other than grapes). A pomegranate wine is mentioned in the Bible, in addition to wines of “the vine,” but the author of Song of Songs — the book in which it is mentioned — did not express the modernview that it was a lesser wine. If you take as much care selecting your ingredients and crafting your country wine as grape-wine makers do with theirs, you can make a wine that can hold its head high among the Cabs and Chardonnays of this world.
Here are some tips for maximizing the country winemaking experience. Most of these apply to the other kinds of wine as well.
1. ALL FRUIT ARE NOT EQUAL
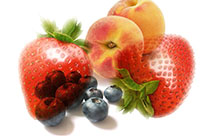
There is no comparison between supermarket fruit and just-picked ripe fruit. Commercial fruits are picked when the grower thinks they are ripe enough to make it to the farthest market without spoiling. The fruit go to a sorting plant where they are culled, sorted by ripeness, packed for shipping and either sold on contract or sold to jobbers. The jobber may take actual possession of the fruit and store it temporarily or sell it as it is being sorted and packed. It is loaded onto trucks and transshipped to many distribution points around the country. There it is offloaded in warehouses, broken down to deliverable lots, reloaded onto trucks with other produce, and shipped out to retail stores and supermarkets. There it is offloaded again, transferred to displays and eventually sold.
If the fruit are strawberries from California or peaches from Georgia, they could have been picked five days before they appear in our market. If the picker and the sorter and the jobber and the buyer each do his job perfectly, those strawberries will just be turning red enough to look ripe when they arrive at our retail market. After 3–4 days on display, they will be deep red and look luscious. After 5–7 days, they will be showing signs of age or spoilage. The same with those peaches — their blush will deepen as they arrive at the retailer and for several days thereafter, but after a few days they begin to deteriorate internally. And they should. By now it’s been 8–11 days since they were picked. And think about all that produce from Chile, Peru, Ecuador, Panama, etc. that has been off the vine, bush or tree even longer.
In truth, most fruit is picked so early that it never ripens. It changes color, gets softer and may shed a tiny bit of acidity, but it does not increase its sugar content. With a few exceptions (persimmons come to mind), a fruit is as ripe as it will ever be the moment it was picked. The U.S. Department of Agriculture measured the average store-bought peach as containing 8.7% sugar. A tree-ripened peach might contain as much as 13–15% sugar. Those California strawberries will average 5.7% sugar, while plant-ripened strawberries reach 11–13%.
On the other hand, some fruit are perfectly ripe when picked. Depending on ripeness, they might be sent to be canned, processed into puree for pastries, pies, yogurt, ice cream, jam, jelly or, if really ripe, juiced or flash frozen.
There are two ways to look at this. All factors being optimized, there is an order of freshness and an order of ripeness. Freshness means the whole, unprocessed fruit and rates it with respect to texture, flavor, natural sugar, acidity (both TA and pH), color, and tannin (if any). On that scale, in descending order of freshness when consumed (or prepared for wine), are fresh picked, roadside farm or orchard outlet, co-operative outlet and retail store. On a scale of optimum ripeness, the descending order is fresh picked, roadside farm or orchard outlet, flash frozen fruit, co-operative outlet, juice, canned fruit, concentrate and retail store.
Of course, when supermarkets feature “locally grown” produce, it should be up there with the roadside farm or orchard outlet on the first day it is displayed. We have to decide if we want to try to capture freshness or ripeness. Either way, growing our own or visiting a U-Pick-It farm immediately before we start the wine can’t be beat if we know how to pick ripe fruit.
2. FREEZE (SOME) FRUIT OR BERRIES BEFORE USING
Freezing, even flash freezing, does not lock in freshness — it destroys it. But it does lock in ripeness. Freshness and ripeness, as we have already seen, do not equate. We will lose flavor when we freeze fruit or berries, but probably not much. What we will lose is texture. That is the main point of freezing fruit for wine — to break down the texture and release more juice. Other reasons are to postpone its use or to store small harvests until we have enough for a batch.
Freezing just picked blueberries, cranberries, gooseberries, figs, peaches, nectarines or many other fruit for later use makes sense. Ice crystals breach their texture and it breaks down upon defrosting. With only light crushing, they ferment much better than they would have fresh. But unless we are growing our own strawberries, plums, kiwifruit, passion fruit, mangos, jujubes, guava or papayas and have too many or not enough or just can’t start a wine right now, there is little advantage in freezing them; they pretty much disintegrate while fermenting whether fresh or defrosted. In other words, freezing them does not really release more juice. Some fruits suffer from freezing and defrosting — bananas, pawpaws, soft pears and melons. Hard pears, apples, pineapples and citrus fruit will keep a fairly long time if stored correctly; if they must be frozen, it is best to juice them and freeze the juice.
There is a difference between home freezing and commercial flash freezing. We can flash freeze fruit in our home freezer, but we have to freeze the berries or fruit pieces individually and then consolidate and package them.
Finally, we cannot make eisewein (ice wine) by simply freezing grapes in our freezers. That topic is well beyond the scope of this article, but it is a misconception many have.
3. WHEN IT MATTERS, MEASURE THE JUICE
Most of us begin making country wines by following winemaking recipes. These tell us how much of this and how much of that to use, but they are not always precise when it comes to total volume.
Many country wine recipes are established for one gallon (~4 L) but actually make a little more than that so we have some to top up with. The recipes do not say so, but we are expected to transfer the liquid and pressed juice from primary to secondary and put any extra in an appropriately sized wine bottle and seal it with an airlock. (A #3 bung fits most wine bottles, but those with very narrow mouths take a #2.)
However, we may want to be more exacting than this. When we are working with whole fruit or berries, this can be a problem because we don’t really know up front how much juice the fruit will yield. It then becomes necessary to press the fruit or berries and measure the juice before the must is constituted. We might want to do this to determine the volume of juice or better balance the must before pitching the yeast.
If the fruit is soft and easily pressed, such as blackberries, raspberries, kiwi-fruit, etc., tie them in a pressing bag and press to extract the juice. If hard (apples, cooking pears) or semi-hard (peaches, plums, nectarines) fruit, thaw if frozen, chop or crush it if not already in that condition, add just enough water to cover fruit, and add pectic enzyme as required. After 10–12 hours, the fruit should be transferred to a pressing bag and easily pressed to release the juice.
Citrus should be manually juiced. Pomegranates are best juiced by separating the seed sacs and heating them until the sacs break while stirring. Bananas are not juiced, but sliced and cooked in water until a gray scum stops forming on the surface. This takes anywhere from 25–45 minutes. Skim the scum off with a large spoon, strain and discard the fruit and use the water.
We now measure the volume of juice, note this, and subtract it from the total volume of wine we are making. The difference is the amount of sugar, water and other ingredients required to make up the total volume.
4. UNDERSTAND POTENTIAL ALCOHOL
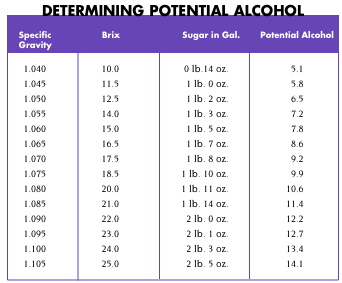
There are three ways to refer to the sweetness of a must — Brix, specific gravity (SG) and potential alcohol (PA). Both Brix and specific gravity are scales utilized to measure the relative amount of sugar in a juice or must.
Brix is expressed in degrees, each degree equivalent to one gram of sugar (specifically sucrose) per 100 grams of grape juice. While one degree of Brix equates to one percent of sugar, the rule of thumb that 2 °Brix will ferment to 1% alcohol is an approximation only. The predicted alcohol level of the wine is expressed as: degrees Brix multiplied by 0.55 equals percent alcohol. In other words, 22 °Brix does not ferment to 11% alcohol, but slightly over 12%. Brix is named after its inventor, Adolph Brix.
Specific gravity is the density, or weight per unit of volume, of a substance divided by the density of distilled water. The density of distilled water is 1 gram per cubic centimeter, or 1.000. Specific gravity is always expressed to the third digit right of the decimal point — the SG of distilled water is not 1, but 1.000. An SG of 1.050 indicates that the substance is 5% heavier than an equal volume of distilled water, the difference being sugar, nutrient and acid. One can calculate the potential alcohol (PA) from the SG, but it is much simpler to use a look-up table or chart.
More often than not, recipes tend to make too much alcohol, either because the person using the recipe uses a higher alcohol yeast than intended, uses a sweeter fruit or less water than the recipe developer used or the winemaker doesn’t understand how to balance a finished wine. Too much alcohol throws the wine out of balance and makes it “hot” on the palate. This may be just fine at a frat party and for those who just want a buzz, but it is not good wine.
Thus, the importance of knowing the original Brix or specific gravity of a juice or must is knowing how much potential alcohol is contained in that number. In the table on the opposite page, we can see the relationship between SG, Brix and PA. Because most country wines require that we add sugar to the must, knowing the PA of the must is crucially important. Whether measured in SG or Brix is immaterial as long as one understands the relationship between those numbers, the amount of sugar required to generate those numbers, and the PA also represented.
There is one line on the chart everyone ought to know by heart. An SG of 1.090 is produced by two pounds of sugar dissolved in one gallon of distilled water, with a corresponding Brix of 22 and a PA a tad over 12%. For most fruit wines, 13.5% is about the maximum one should attempt if we want a balanced table wine.
5. ALL SUGAR IS NOT EQUAL
It is quite possible to take 4 lbs. (1.8 kg) of fresh blackberries and make a number of different wines with them using exactly the same formula and method but varying the type of sugar. Without going too deeply into the math, 4 lbs. (1.8 kg) of blackberries contain 5 oz. (143 grams) of natural sugar. If we use those berries to make a gallon of 12% alcohol wine, we need to press the berries, add 1 lb. 11 oz. (0.77 kg) of sugar to the juice and top up to an even gallon of liquid. We can then add the pulp back if we desire for the first week or so of fermentation.
To change the finished wine, all we need do is change the sugar we add. We can add Barbados, brown, cane, corn, demerara, dextrose, fructose, glucose, honey, jaggery, levulose, maltose, maple, molasses, Muscovado, piloncillo, sucanat, treacle, Turbinado or a number of other sugars. Each will produce a slightly different wine.
Do not use powdered or confectioner’s sugar in wine. Yes, it will dissolve quickly, but it contains cornstarch to keep the sugar molecules from sticking together in one huge lump and it will produce a persistent starch haze.
6. CREATE THE PROPER VOLUME
Suppose we press our fruit and get 1.5 quarts (1.4 L) of juice. Do we drop in the hydrometer? No, unless we are just curious. Suppose we are making a gallon batch and want to add an 11.5-ounce (330 g) can of frozen grape concentrate to enhance body. We do this now and then top up to exactly 1⁄2 gallon (1.9 L). Now we take a hydrometer reading.
Suppose the SG is 1.080. If we added a half-gallon (~2 L) of water to this to make up a full gallon (~4 L), the SG would only be 1.040. So we treat it as 1.040 and see from the hydrometer table (on page 30) that we need to add 1 lb. 2 oz. (0.51 kg) of sugar to reach 1.090, a good starting point. We add the sugar first (as syrup) and then bring the volume up to one gallon. Then, just to be sure, we take another hydrometer reading. If the SG is a tad low, add sugar. This would also be a good time to test for titratable acidity (TA) and pH and make corrections if warranted. If we want to add the pomace (pressed pulp) to the primary, we can tie it in a nylon straining bag and do it now. The volume of the must increases, but the amount of liquid remains unchanged.
7. ADD SUGAR AS SYRUP
Even very finely granulated sugar does not dissolve easily. The easiest and most exacting way to add sugar is as simple syrup. Measure the amount of sugar needed to be added and set it aside in a bowl. Now take half that amount of water and bring it to a boil. Obviously, half the amount refers to volume, not weight. If we added 1 lb. 8 oz. (0.68 kg) of white granulated sugar and its volume was 3 1⁄4 cups (769 mL), we would bring about 1 5⁄8 cups (384 mL) of water to a boil , turn off the heat and stir in the sugar. Stir until completely dissolved and the liquid is clear, which could be 2–5 minutes. If adding honey, 3⁄4 cup (177 mL) of honey equals one cup of sugar; dissolve in an equal amount of water, continue boiling while stirring to bring all impurities in the honey to the surface, skim off impurities with a spoon.
Adding sugar as syrup allows it to be integrated easily into the juice or must by simple stirring. Stirring also micro-oxygenates the must enough to allow yeast to rapidly reproduce. After about three days, the yeast will have consumed most of the free oxygen in the must and will be fermenting vigorously.
When a recipe says to add half the sugar initially and the rest at a later date, adding a syrup eliminates the possibility that nucleation points on the grains of sugar will cause the must to erupt in foam generated from suspended or dissolved carbon dioxide (CO2).
8. SELECT THE YEAST CAREFULLY
Wine yeasts are cultured and commercialized because they impart or promote certain characteristics. These characteristics are well known, but often depend on fermenting at the proper temperature or adding specific nutrients. If we cannot satisfy the specific requirements of a specific strain, we should select another strain.
9. RACK AS OFTEN AS REQUIRED
Wine needs to be racked as often as needed; there isn’t any optimum number. Hasten clearing by stabilizing early and fining to pull down the yeast. Look at the bottom of the secondary every 30 days or so, lifting it and looking at it against a dark background in strong light. It is not ready for bottling until it has gone a reasonable period without dropping any “dust.”
10. DEGAS EARLY
Yeast convert sugar into ethanol, carbon dioxide (CO2) and a few minor byproducts. As fermentation slows, less and less CO2 is produced. Eventually, the CO2 does not create enough pressure inside the carboy to push through the water in the airlock. When that happens, the CO2 has to go somewhere, so it goes into the wine. When a wine becomes saturated with CO2, it lies. A hydrometer will say the wine is not quite finished, but the saturated gas is lifting the hydrometer. A test for titratable acid (TA) shows 0.92 instead of the 0.65 we expected; carbonic acid, a byproduct of the saturated CO2, is elevating the reading.
When a wine appears to have finished and the hydrometer says it almost has, degas the wine. Whether one uses a Fizz-X agitator, a plain old wooden dowel or a vacuum pump, stop after a few seconds to see how the wine reacts. If a lot of bubbles burst loose, aggressive degassing could produce a volcanic-type eruption. Degas in short spurts until the danger of a blowout is past. After degassing, wait 2–4 hours and do it again. If no notable amount of gas is released, the operation is probably successful. This is a good time to check the SO2 level and add potassium metabisulfite if needed. Wait 24 hours before analyzing the wine further.
PATIENCE IS A VIRTUE
Many country wines taste quite rough immediately after fermentation. It is difficult to believe a parsnip, beetroot, agarita, pea pod, salmonberry or even dandelion wine will ever become acceptable, let alone exquisite. But every day, someone opens a wine last evaluated as “yuck” and discovers the miracle of aging. It would take a book to explain this transformation, so accept that very few wines without an identifiable fault ever deserve to be tossed out. All they need is patience.
Country wine is the informal term that has been used for years to define fermented beverages made from ingredients other than grapes. This can include fruits, vegetables, flowers and herbs. Wine made with honey is called mead and wine from apples is cider (5 to 7% alcohol). Every home winemaker should make room in his or her cellar for country wines. They taste fresh and fruity; they reflect the aroma and flavor…
When a wine comes up lacking, the solution may just be blending a totally different type of wine with it. Grape wines and wines made from other fruits often have complementary characteristics that lend themselves as a key ingredient in the other.

