 Establishing a vineyard is an exciting and rewarding adventure. Like all of life’s challenges, your success or failure will be dictated by the amount of research, planning, effort and perseverance you exhibit throughout the process. If you’ve read my last few articles you know one thing is certain — there’s a lot to do before putting vines into the ground. Your vineyard “system” needs to be in perfect working condition before vines can be planted. You need to install the trellising and install and test the irrigation equipment. The soil needs to be tested. In addition, vineyard pests need to be held in check. Installing a vineyard is not something you do on a whim some weekend.
Before planting a vineyard, it is advisable to talk to a local horticulturist or nurseryman about how grapevines will grow in your specific locale. Ply the local experts with kindness and wine, and ask every question you can come up with. You may also need to ply some friends with beer to get them to help out over the growing season. As my favorite wine-country truism goes, “It takes a lot of beer to make wine.”
Ordering dormant vines
I suggest that you plant dormant grapevines because they establish themselves — start growing and adapting — in the piece of ground where they are going to live permanently. Green-growing grapevines were raised in a sheltered environment and often die in the field from exposure or shock. While many wilted green-growing vines will sprout secondary buds and do fine in the long run, my experience has shown me that dormant vines are clearly the smart choice for planting material.
Purchase dormant vines early to make sure the nursery has the exact materials you are looking for. Ordering early assures you don’t have to settle for “leftovers.” I recommend you order dormant grapevines up to one year before planting. A good grapevine nursery wants to know what their customers need in advance. This knowledge aids them in deciding what scion material — sometimes called clone material — to graft onto rootstock to prepare orders. Vines that are going to be planted in an area with known soil pests, such as nematodes or phylloxera, are commonly planted on hardy, disease-resistant rootstocks. These rootstocks are bred from native vines, which are resistant to American soil pests. Call a good nursery at least a few months before spring and let them know how many vines you will need. Be sure to specify that you want to purchase dormant grapevines. Make sure the type (cultivar) of vines you order —Norton, Chardonnay, Merlot or whatever variety you choose — are appropriate for your climate and vineyard.

Order ten percent more vines than you think you will need. The extras will come in handy in case you need a few extra or miscounted. It’s easy to plant them, according to the directions below — but at two-foot by two-foot spacing, in an out-of-the-way corner of your vineyard. The following year you can dig them up, trim the roots and growth, and use them to replace the vines that didn’t take in the “official” vineyard.
Call the nursery every few months and give them updates on when you’d like the dormant vines taken out of cold storage and delivered. The best time for delivery is usually in the spring after the possibility of hard frosts has passed. Dormant vines are usually dug up deep in dormancy (during the winter), trimmed, and then bundled into 20–25 vine bunches, tied together and bagged. The bags of grapevines are filled with moist wood chips and put in a large wooden crate that is also filled with moist wood chips.
Plant requirements
Plant after the worst threat of frost is over and the ground begins to warm. In California, this is usually around March or April, but will obviously be later for cooler parts of the continent. Deciding when to plant is tricky. The earlier you plant, the more growth you will get in the first year, but there will also be a greater chance of frost damage. You can plant grapevines all the way through late spring to early summer, so don’t rush it. You can even plant in June or July, but you won’t get as much growth your first year. A vineyard is a long-term investment, so there’s no reason to put the vines in the ground until you and the soil are absolutely ready.
Dormant grapevines are vines that have been grafted to rootstock, or grown on their own roots, at least a year previously. The grapevines were put in the soil and allowed to callous and grow for a season. They were then taken out of the ground, trimmed, placed in moist wood shavings, and put in cold storage in bundles for delivery to vineyards.
The cold temperatures in storage — usually about 35–40° F (1.6–4.4° C ) — give the vines their “chilling requirement” as well as keeping them from growing before they are planted. For a vine to have successful budbreak and to be fruitful, it needs 250 hours per winter below 45° F, although many regions get over 800 hours of chilling.
Receiving dormant
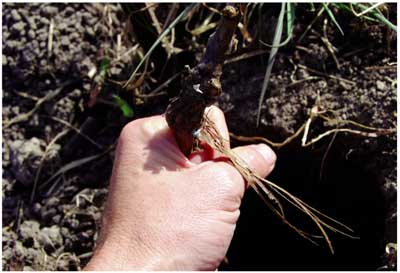
Most dormant grapevines are already two to four years old, and are fairly hearty, with trunks almost as thick as a man’s finger. When your vines arrive, I suggest you cut a few up in front of the driver or salesman to show you are serious. Make sure the center of the vine still shows green tissue. The vines should bend and not snap like a dry stick. Ensure there are uniform, bulging calluses at the graft union. Hold the bulging top of the vine — where the last year’s growth has been trimmed to a single “spur” — and bend it gently back and forth to make sure it is still green and elastic. Dormant vines that break at the graft union — where rootstock meets the clone wood or scion wood — are of poor quality and will provide more headaches than pleasure.
When you sign the invoice saying you have received the vines in good condition, make sure you feel comfortable that your vines are of acceptable quality. Many times vines sold to home vineyards are the ends of odd lots that nurseries are trying to get rid of.
Cut a randomly selected vine in half with a sharp knife, and then bend the halves to check that they are green and somewhat elastic. If you see dark, gooey spots inside the vine’s tissue, chase the delivery driver off your property, wielding the diseased wood like a knife, shouting threats of litigation.
The “head,” or top, of the vine should have been trimmed at the nursery to a two-bud spur. If this trimming not been done, just count the small, bumpy buds on the spur and cut through the third bud to concentrate the vine’s growth.
Planting dormant grapevines
Now that you’ve guaranteed you have good dormant planting materials, you should be ready to prepare the vines for planting. The vines should be warmed to the ambient temperature of the vineyard site over five to ten days before planting. However, you want the vines to remain moist so they don’t dry out needlessly.
Most vines come in bagged bundles of twenty or so. You can either open the bags or poke holes in them. Keep them in a shaded area, still enclosed in moist sawdust and shavings, while they acclimate. If the sawdust dries out during this process, just hose down the bags until moist again.
Take the vines out of the bags and sawdust the night before planting. Soak the roots in five-gallon buckets of water. The tops of the vines can stick out of the water, or you can soak them in larger bins so that the entire vine gets soaked. Take the vines into the field in these same buckets — you can use the water in the buckets to give the planted vines a first drink.
Don’t make the mistake of taking too many vines into a sunny field to plant. You do not want the vines to be out of water, soil or moist sawdust for more than an hour before they are planted to avoid dehydration.
Each vine should be removed from the water bucket as it’s planted. Trim the root tips with sharp pruning shears so that the root ends will be vital and fresh when put in contact with soil. I usually take the entire root bundle in my hand, stretch the roots out like I was giving them a haircut, and then trim the last few inches of all the roots with a quick snipping motion, taking care to cut off broken or crushed roots as well.
Efficiency is key to the planting of dormant vines. I recommend having a strong helper digging holes with a post-hole digger or a narrow-bladed planting shovel, and another helper following behind to plant the vines. The hole should be about six inches across and at least 18–20 inches deep. Do not just stick a shovel in the ground, yank it back and forth to open a crevice and toss a vine in. Do everything you can to assure the walls of your hole are loose and not compacted further than the soil would be naturally.
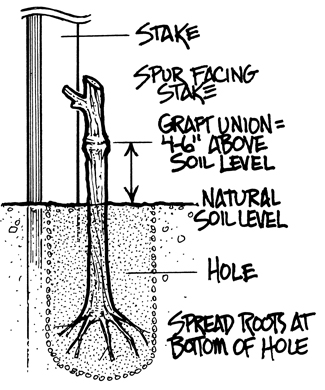
Drop the vine in the hole and then spread the roots out so roots are facing the sides of the hole, as well as facing down into the subsoil. Packing the dirt back into the hole, around the vine, is an art form in itself. We cut the handle off a standard garden hoe so that it’s only about 18 inches long and use the butt end to compact the soil as we fill it back in. We use the hoe end to pull dirt into the planting crevice. Pack well, but don’t damage the roots.
It is also important to make sure that the graft union is at least four to six inches above the finished soil level, as the vine will settle a bit in the dirt. If you are planting on rootstock, the graft union is the bulge a few inches under the “spur” where new growth will sprout on the top of the vine. If you bury the graft union, roots will sprout underground from above the rootstock, and the vines will prefer them to the stock. You will soon have vines growing from their own roots rather than from the rootstock, which defeats the purpose of rootstock.
If you have training stakes in the vineyard, plant the vine so that it is no further than a few inches from the stake, with the “spur” turned inward so that it almost touches the vertical stake. This will make it easy to tie growing shoots to the stake.
Review and mounding
Make sure you keep the vines moist and cool prior to planting. Trim the roots, make a deep hole and position the vine with your hand to a correct depth that keeps the graft union above the ground. I tell my planters I want the union four finger-widths above the finished soil level. Then sweep the soil back into the hole, packing it firmly in with the butt end of a sawed-off hoe. Don’t leave air gaps in the soil. This would be an appropriate time to water the vine to help the soil settle and soak the root area.
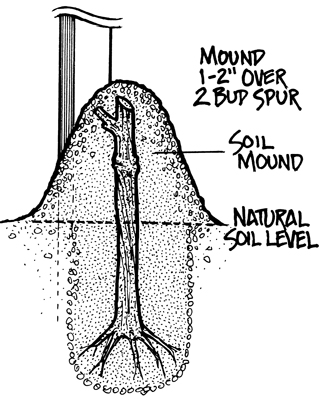
Once you have compacted the soil back to the natural soil level, you’re still not quite done. You need to make a soft soil mound over the part of the vine that protrudes from the ground. Use soft, broken soil — not hard clumps — and cover the vine so that the whole vine has one to two inches of soil covering it. This keeps the growth buds moist and protected from the sun as the vine acclimates. It will also discourage rabbits and other pests from nibbling off new growth as it emerges. Loosen the top of the mound if it dries and begins to clump. Within a few weeks, you will see green growth poking out from the soil mounds. At this point, carefully loosen the soil mounds on a cool, cloudy day and remove them so the natural soil level is restored.
Planting a vineyard is hard work, but here’s some good news — once a vine is planted and established, it’s pretty hard to kill. If you get decent rainfall and have a mild winter, your vines should grow healthy and produce fruit for making wine. Rainfall in the range of 20-30 inches per year seems about optimal and, for best results, winter temperatures should not hover constantly below 14° F (-10° C). If you get eighty-five percent of the vines to take and grow, consider your home vineyard planting a success.
Once the vines are in the ground, you have about three years until you have usable wine grapes. During those years, the vines will need to be cared for and tended to. In the next issue, I’ll tell you in detail how to care for your vineyard during its first few years. For now I’ll just supply a quick overview of these critical years.
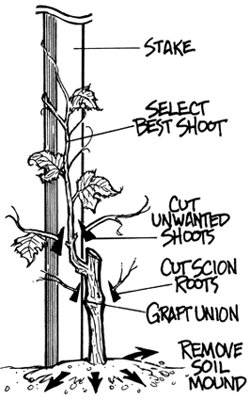
Once the vines sprout, you’ll have to start thinking about vine training. Initially, stakes are used to support the growing vines. You should start staking when the longest vines reach about six inches in length. The shorter vines in that bunch should be removed, leaving only the longest vine to grow upward. At this point, some vineyards use grow tubes, which are slender plastic tubes that surround the vine, to thwart pests.
If the vine’s growth seems stunted, you probably have less nitrogen in the soil than the vine would prefer for full, vigorous growth. High nitrogen levels are not good for established vines that are producing fruit, but young vines can benefit from the application of some nitrogen-rich fertilizer.
If you’re lucky, the vine will reach the top of the stake by the end of the first year. In the second year, your vines should start growing on the trellis and by year three you should have grapes. And once you have grapes . . . well, you know what comes next.
So you have decided to elevate your hobby to the point of growing your own fruit for winemaking? This is a huge step that should not be taken lightly. Once you plant that first vine you have entered the world of farming. Farming is by no means something for the faint of heart. There are so many variables that can take the best of plans off course in your wine growing for…
Pruning Your Backyard Vineyard Pruning grape vines during dormancy is a vital practice for keeping your vines in balance. Grape growers discovered thousands of years ago that cutting off up to 90 percent of the previous year’s growth from a dormant vine will limit the crop and vegetative growth of the vine in the following season, increasing the quality of the wine made from the vineyard. Simply put, pruning promotes balanced vines…

