 How can you improve the best wine you can make? Make vinegar!
Now this might seem like an absurd thing to say. It might appear to be some kind of joke. But just as winemakers think they are improving grape juice by making wine, vinegar makers think that they are improving the wine by making vinegar.
The marketplace suggests they are right. Vinegars often sell for more than the wines from which they were made. And though this might seem crazy, it does make sense. Who is going to take a wine, work on it for at least a few months, and then sell it for the same price or less than they could have sold it for if they had done absolutely nothing?
There are economic reasons for professional winemakers to turn good wine into great vinegar. Say, for example, a good winemaker has a bumper crop of great grapes from which she makes a good wine. She knows that this huge supply not only costs her money for storage but decreases the overall value of her wine because the demand is never likely to catch up with her supply. If she can add value to some of her product and shift it to another market, she will save money on storage, increase the relative value of her wine, and invent a new profit center in one stroke.
And though vinegar isn’t as quaffable as wine, it has many advantages. You can soothe mosquito bites, cure athlete’s foot, and make a salad with vinegar, though you might prefer to use it in the salad prior to using it as an athlete’s foot cure. Unfortunately the cost of shipping, inventory management problems, marketing problems, and so forth have created a market dominated by distilled vinegar. The result is that very few people know how wonderful vinegar can be.
Vinegar at Home
As a home winemaker you are in a great position to make vinegar with deep, rich flavors that far surpass most of what’s available on the mass market. The taste possibilities are more numerous than yeast in a wine barrel.
There are four basic steps to making vinegar. First, you must make a wine or get alcohol from some other fermentable sugar source. Then you introduce acetic acid bacteria to the finished wine.
The acetic acid bacteria eat the ethanol and chemically change it into acetic acid, the stuff that makes vinegar taste like vinegar. Then you age and flavor the vinegar to taste. There are many methods to turn wine into vinegar, and they all have one thing in common: getting air to the vinegar bacteria. There are three classic methods of doing this, and these methods each turn out decidedly different products.
Submerged fermentation is the way large vinegar companies make most of their products. It involves saturating the vinegar culture with fine air bubbles. Some amateur vinegar makers try this also, but they often fail because it is easy for overoxidation to occur.
The solera method uses a battery of barrels to create some of the finest vinegars available today. This is how balsamic and sherry vinegars are made. This is a very good way to make vinegar at home, but it requires a very good knowledge of wood and the vinegar-making process.
Orleans Method
The Orleans method is the best way to start making vinegar. Basically the Orleans method, which was proposed by Louis Pasteur, involves trying to create the ideal conditions for the vinegar bacteria to make vinegar, as they would in nature. You try to provide them with food (wine), air, and a dark, warm environment.
The proponents of this method point out that the time it takes allows flavors to develop that don’t develop in faster methods. However, things can go wrong during that extended time as well. Examples of natural products from which vinegar is currently made include but certainly are not limited to root crops, grains, tree saps, grasses, and fruits.
Grapes are one of the many fruits from which vinegar can be made. And just as you would be short-changing yourself if you limited your winemaking to grapes, you also would be short-changing yourself by making only grape-wine-based vinegar. But grapes are a good starting point for your first vinegar.
Ground Rules
Start with squeaky clean equipment. There will be a full-scale microorganismic war going on in your vinegar and the more of your vinegar bacteria’s enemies you wipe out, the better chance the bacteria have of making good vinegar for you.
Avoid the use of sulfites. They are used to reduce the activity of vinegar bacteria. That is, of course, just the opposite of what you want. So if you are making wine for vinegar making, don’t use any sulfites.
If you are buying wine for vinegar making, test for sulfites. There are sulfite testing kits available at winemaking supply stores. If that is something you don’t want to do, labs will also conduct the tests for you. Preferably, the wine you start with should contain 20 parts per million or less of free SO2.
Vinegar
Ingredients:
- Two quarts (1.9 L) of grape wine without sulfites
- One quart (950 mL) of wine vinegar with live bacteria (vinegar starter)
Equipment:
- One-gallon (3.8 L) sun tea jar
- Half-gallon bottle for aging
- Roasted oak chips for aging
- Funnel (optional but very useful)
- Bottles for packaging, storing, and further aging
- Labels (optional but very useful)
Keep in mind that this is just the starting point. This is the cheapest and simplest way to get started. There are other ways to duplicate the Orleans method. You could, for example, buy an oak barrel or a ceramic pot. Both of these offer some advantages and disadvantages to the glass jar that is used here. But according to a recent poll, eight out of 10 vinegar bacteria agree that they would be just as happy to make vinegar in a $3 sun tea jar as in a $150 wooden barrel.
Step by Step:
Making vinegar using the Orleans method is deceptively simple. Deceptive because the simplicity depends a lot on everything going as planned. The hardest part is getting a strong culture going. Once you have it going, just keep adding unsulfited wine after you siphon off the finished vinegar. This method is simple and cheap enough that you can start over if it doesn’t work the first time.
Fill the sun tea jar half full of your wine. This could be any kind of wine you want as long as it is about 9 percent to 10 percent alcohol. Though theoretically this should give you about 8 percent to 9 percent acetic acid strength, in practice it will likely yield about 5 percent to 6 percent acetic acid strength. If your wine’s alcohol content is too high, dilute it with distilled water or use tap water boiled in a stainless steel pot.
Add the one quart of starter. This amount of vinegar will acidify your culture enough that other microorganisms will find it difficult to survive there.
It is best to purchase the starter from a winemaking shop. There was a time that you could use commercial unfiltered, unpasteurized vinegars as starters. But lately these commercial vinegars have bacteria that seem to have been weakened quite a bit, so you will probably have better luck if you buy the starter, which contains just the bacteria.
Remove a half-gallon of vinegar and place it in a half-gallon glass bottle for aging. The remaining vinegar will serve as your future starter. Store the remainder in an air-tight container in a dark, cool place.
Set the half-gallon container in a warm place, 75° to 85° F (24° to 29° C). Temperature is rather important to the process. Though 75° to 85° F is the optimal temperature for most strains of vinegar bacteria, they will grow and produce vinegar in a much wider temperature range. As you get down to around 60° F (16° C), the bacteria will almost stop production. Near 140° F (60° C), they will die. Keep the container covered with a lid, cheesecloth, or paper towel with a rubber band. When you rack, use the spigot at the bottom of the container so as not to disturb the cap.
Test for acid strength by taste or titration. If you are just going to use your vinegar for salads, you should be able to tell when it is strong enough by tasting it. However, if you are going to use the vinegar to preserve food, it is important to titrate it. This is the only way to tell if the vinegar is strong enough to kill harmful bacteria that might live in the food you want to preserve. (See Pucker Up — How to Titrate, below.)
Once you have a strong vinegar, which takes four to six weeks, you can add any type of flavorings you want. Then the real fun starts.
Aging, Filtering, Bottling
When your vinegar is finished, you will have a fresh and rather harsh vinegar. It will need to be aged to bring out its best qualities.
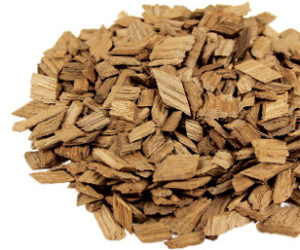
There are a number of woods that can be used to age your vinegar. Roasted American oak is a good place to start. You can graduate to other woods once you get the hang of it. Barrels are quite popular and look nice. The downside is that there is a good chance that your vinegar will mother (fall to the bottom of the barrel). The barrel has only a small bung hole and a smaller spigot hole, whereas the sun tea container can be opened from the top. Since the sun tea container can be opened easier than a barrel, the mother can be removed easily from the sun tea container. But it builds up in a barrel. This can make the rather expensive barrel useless.
The solution is to use roasted wood chips. If you have a larger tank, larger pieces of wood or slats work nicely. Saw dust should be avoided completely. It is quite easy to overuse the wood chips and come up with vinegar-flavored wood tea. About a tablespoon per gallon (15 mL per 3.8 L) is plenty.
During aging, much of the larger particles fall to the bottom of the storage container, leaving a rather clear product. But some people like a really clear product. Doubled coffee filters can be used to make a very decent product. Pour the vinegar through the filter into a large container and bottle it from there. Winemaking supply shops offer more choices for clearing your wine. For example a diatomaceous earth filter also can be used.
Once you’ve aged and filtered (if desired) your vinegar, it’s time for the finishing touches. Bottle size is completely up to you. Much of the same equipment and supplies used for bottling wine can be used for vinegar making. Just remember to use stainless steel or glass. And certainly no aluminum or iron should come in contact with the vinegar.
Don’t forget to label your bottles with the source wine and other details. Take as much pride in your vinegar as in your wine. Vinegar making can be an exciting hobby that can bring you hours of pleasure. And if you should open one of your bottles of wine in front of guests and find that it has turned to vinegar you can say, “I guess I mislabeled that one.”
Pucker Up – How to Titrate
To tell when the vinegar is ready, you will need to test it. This can be done in a few different ways. The most reliable is to titrate it against a base.
Most people lack the equipment and the confidence to do this. While titration might seem difficult at first, with a little practice you can get quite good at it. You will probably want to buy a kit from a winemaking supply store. The kit will likely have instructions, but here is a simple example of what you will need and how it is done.
The acid testing kit is made up of:
- Two small (about one cup or 240 mL each) clear vessels, one to hold the base and one to hold the acid; another small (about one cup) clear container in which to conduct the test
- One 5-cc and one 10-cc syringe;
- Four ounces (118 mL) of laboratory grade 1 normal sodium hydroxide; 0.1 normal sodium hydroxide can also be used and is recommended, for safety reasons, for the novice.
- One electronic pH meter
The process of titrating is best explained by the seller of the kit. The titration test involves adding your vinegar to a sodium hydroxide solution. By measuring the amount of vinegar you need to add to create a neutral solution, you can determine the amount of acid in your vinegar.
Once you have completed your titration, you will need to use this formula to determine the percentage of acetic acid your vinegar contains:
mL NaOH x n NaOH x 100 x 0.060 ÷ mL vinegar = % acetic acid
This means that the number of milliliters (mL) of sodium hydroxide (NaOH) multiplied by the normality (n) of the sodium hydroxide, multiplied by 100, then multiplied again by 0.060, and then divided by the number of milliliters of vinegar (mL vinegar) needed to neutralize the sodium hydroxide equals the number of grams per liter of acetic acid in the solution of vinegar or the percentage of acetic acid in the vinegar.
Example:
You put 2 tablespoons 30 mL of 0.1 normal sodium hydroxide in a small container and keep adding vinegar slowly until your pH indicator says that it is neutralized. You will need to add the vinegar very slowly and stir. As the pH approaches neutrality, reduce the speed in which you add the vinegar. It is important not to pass neutral or pH 7.
At that point you see that you have added 2 mL of vinegar. Your plugged-in formula then looks like this:
30 x 0.1 x 100 x 0.060 = 18 ÷ 2 = 9% acetic acid


