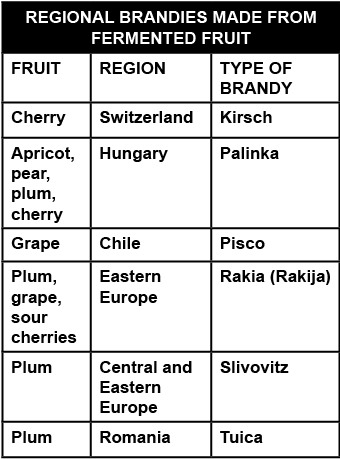
Distillation 101: When Wine Becomes Brandy
There are few places in the world where home distilling is legal. I am lucky to live in one of them right now, New Zealand. I am from the United States where it is a federal crime, a felony, to distill spirits for consumption. I know plenty of people who have home distilled in the United States, but that does not make it any more legal. Keep local laws in mind as you journey ahead!
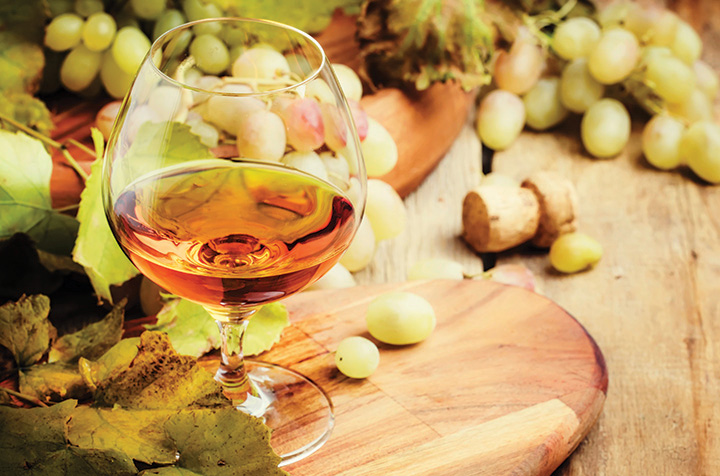
The art and science of distilling is what separates making wine from making brandy. You might not realize it, but your wine is halfway to brandy, the spirit of apples, grapes, and any other fruit you can think of. Although numerous spirits can be made from fruit, brandy is the base spirit that comes out of the still when you distill your wine, sometimes referred to as a wash when it is coming out of the fermenter for distilling.
As a winemaker, the addition of a still can add a fun layer to the hobby of home winemaking. Let us look at what steps are needed to make brandy as a home winemaker from start to finish. Although this may not include everything you need to feel comfortable to start, I hope it gives you an idea of the process and what might be involved should you want to make the leap into distilling.
Using Fruit for Distilling
Fruits are a fun fermentation project and make a great “wash” (fermented wine) to distill. Often fruit adds its flavor to the finished spirit, creating a lovely brandy reminiscent of the fruit you harvested, foraged, or purchased. Fruit varies significantly in its sugar content but fructose and glucose, the sugars present in fruit, are easily fermentable. For easy fermentation at home fruit is often frozen and then thawed to break down the cellular structure; from fresh or frozen it is then crushed, pressed, squeezed, or mashed directly into the fermenter. The yeast has an easier time getting to the sugar in liquid form than trying to get to it through the solid fruit flesh or skin.

Although fruit is the core of any brandy, it can also be used for schnapps, sweetened liqueurs, gins, and vodkas. The most common fruits used for fermentation are apples, pears, and grapes. The easiest way to use fruit in fermentation is to start with pure fruit juice. You can also use fruit concentrate, which can help increase the level of alcohol in your fermentation as it is not as diluted as juice. Sometimes fruit and sugar are added to the same wash to increase the ABV potential of the fermentation. Some fruits may only give you 4 to 5 percent ABV in a wash, quite low compared to most washes. Grapes, on the other hand, are little sugar vessels and, just as in wine, may give you sugar that produces a wash from 12 to 14 percent ABV. Just remember the more you can break down the fruit, the better chance it has to completely ferment. Fresh fruit is often added to a fermenter in a nylon bag or in a muslin cloth so that the leftover solid matter can be removed at the end of fermentation. Prior to that, leave it in — it still contains some sugar!
Let us look at a general overview of the entire process from fermenting, to distilling, to bottling.
Step 1: Fermenting
Turning sugar into alcohol is a critical step in the winemaking process, and also in the distilling process. While you can purchase wine, beer, or cider with the intent to distill it, these beverages were not made for distilling, so your results may vary. When you ferment your own alcohol, you have more control over the outcome. You will choose a yeast that is quite efficient at absorbing sugar and creating alcohol as a by-product. At times, you may choose a yeast to provide and emphasize flavors from the sugary fruit, while other times you may select a yeast to produce a clean, neutral flavor. Thus, by fermenting you are in the driver’s seat during the creation of alcohol and the initial
flavor development.
You likely already have the basic equipment needed for fermenting your wash, as it is the same as for fermenting wine. This includes:

• Fermenter (at least 6 gallons/23 liters) with a lid or stopper
• Airlock
• Specific gravity hydrometer
• Racking cane with plastic tubing or auto-siphon with plastic tubing
Step 2: Distilling
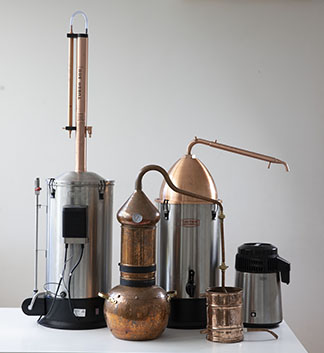
The distilling process itself is the one step unique to making spirits (as opposed to making wine), in that you are separating and then concentrating the alcohol. That’s the basis of distillation — separate the alcohol from the water as vapor in the boiler of your still, and then recondense it into liquid in the condenser of the still for collection. Wine usually isn’t over 15 percent alcohol by volume (ABV) for a reason: It hasn’t been distilled. Many spirits are around 40 percent ABV, though sweetened aperitifs and liqueurs are often less. Let’s assume you will use a still to do this, though there are other methods such as freeze distillation. Still types are covered in more depth in my book How To Distill, but you’ve probably seen one online, at a homebrew shop, or maybe on a distillery tour. It has:
• A boiler
• A closed dome or column on the top for some amount of refluxing (re-condensing of vapor inside the still)
• A condenser arm or tube that cools the vapor back to liquid form
The use of a still to perform distillation to concentrate alcohol is the biggest difference between making spirits and making wine.
The equipment you will need for distilling includes the following:
• Still (a pot still is preferred for brandy)
• Proof and tralle hydrometer for measuring alcohol of spirit
• 12 to 15 collection jars (16 oz. or 500 mL) for making cuts
• Distiller’s parrot or 250 mL glass test jar (cylinder) for measuring your spirit proof
• Water source for condenser arm of still
• Heat source for still boiler
• Boil enhancers/chips (optional, for a more even boil)
If you’re unsure about how or what from your cuts jars to blend when doing a single distillation run, it’s a good idea to be more cautious and put less in from your heads and tails (roughly the top third and bottom third, respectively) than you’d estimate. A safe volume is 60% (though you could do less if you’re not happy with the flavor of the jars) of what you collected, working from your middle jar. So, if you collected 10 jars, your six middle jars could be blended to form your brandy for aging or drinking.
Step 3: Polishing
If you are looking for a nice, clean, and neutral-flavored spirit post-distillation then polishing is the answer. This filtration step can improve your spirit by taking out impurities created mostly during fermentation. If you are aging your spirit on oak, a small amount of these flavors can be good! But if not, they can leave a nasty off-flavor and aroma in your clear spirit. If you are careful how you collect your alcohol, leaving the heads and tails separate, you can blend these in post-distillation in smaller quantities that cut down on the harsh flavors, and maybe add some character to your spirit. Or, if you are making a whiskey that is going to be aged a long time, a polishing step can be less critical and maybe not
even necessary.
The equipment you will need for polishing brandy (optional) includes the following:
• Activated carbon
• Carbon filter to hold the activated carbon
• Collection vessel for polished spirit
Step 4: Aging
Aged or matured spirits are usually easy to identify. The yellow, amber, or brown color you see in spirits like whiskeys, rums, brandies, and tequilas comes from the aging process, usually from contact and time with toasted or charred oak or another type of wood. The burnt parts of the wood begin to color the spirit almost immediately and new bold and beautiful flavors like vanilla and caramel will develop in the spirit given time. At home, this can be done with charred oak chips, staves, or spirals in a glass jug or jar, or by putting your spirit directly in a small toasted or charred wooden barrel.
The equipment you will need for aging brandy (optional) includes the following:
• Toasted or charred oak barrel (minimum 2 gallons/6 to 8 liters) or oak chips, staves, or cubes
• Muslin cloth (or coffee filters)
• Glass aging jug or vessels (if not using a barrel)
• Glass or stainless steel barrel thief or wine thief (for taking samples if using a barrel)
• Stainless steel racking cane and silicone tubing (for transfer if using a barrel)
Step 5: Blending and Bottling
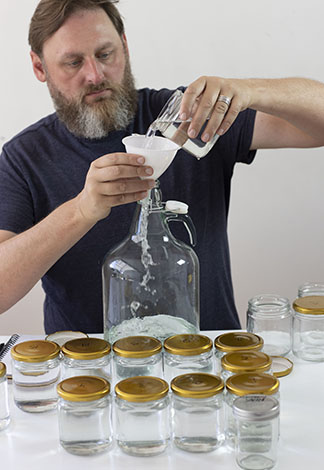
There are numerous things you can still do after distilling, polishing, and/or aging to improve your spirits. The first that comes to mind is blending, which gives many home winemakers a leg up as they already have experience blending wines. Part art, part science, the title of master blender is a position at many large distilleries that takes years of apprenticeship and experimentation, learning the common flavors and off-flavors associated with distilling and aging — and really understanding your own palate. Honing your own sensory skills can be valuable to blending your own spirits. Obviously, to blend spirit, you’ll need more than one around. This can be created from a single run by leaving some spirit clear and unaged, or by aging spirit on different types of charred or toasted wood.
Packaging your spirit in a properly corked, waxed, and labeled bottle may not be seen as critical by all in the hobby distilling community, but it is a nice touch. True, maybe you will decide your collection jug is the best final package for your particular spirit! However, the classic way to finish most spirits is a clear glass bottle (500 or 750 mL being common sizes), as a clear bottle offers a good look at the spirit itself.
The equipment that you will need for blending and bottling include:
• Glass or stainless wine thief
• Assorted small glass test jars or beakers
• Journal or note pad
• Tasting glass
• 100 to 250 mL graduated glass test jar for blending
• Spirit bottles of your choice
• Glass or stainless pitcher or auto-siphon with silicone tubing (optional)
• Spirit bottle corks or caps
• Bottling wax and tin can for melting the wax (optional)
• Labels
Now that you’ve read a general overview of the process you might be quite interested in moving ahead with learning more and purchasing a still. A pot still will be the way to go if you’re interested in brandy. A column still, which is quite easy to identify by its taller cylindrical column coming straight up off the boiler, offers more reflux than a pot still. Reflux is the process by which vapor rises in the still and recondenses inside the still falling back toward the boiler to be revaporized. This creates a higher proof alcohol from the still, but also strips the spirit of flavor. A pot still offers less reflux, which in turn means more flavor in your brandy. A simple way to begin is by investing in a small stovetop still, or by purchasing something like the Still Spirits Air Still. Most stovetop stills are pot stills, as is the Air Still. If you also brew beer and use an electric brewing system, consider seeing if still attachments are available, as they are for some models.
If you are unfamiliar with much of the distilling equipment, start researching what’s available to you. If you haven’t yet purchased a still or are interested in digging deeper into the process, be sure to check out the book How To Distill from which the prior text and the following recipe are excerpted.
Easy Brandy Recipe
The following recipe is about as easy as it gets to make 5 gallons (19 L) of wash for brandy. As you’ll notice, it’s an overly simplified home wine recipe. If you have wine in a fermenter this can be used, but for your first distillation, keeping it simple. Not using a more expensive and delicate wine seems a good idea to me. This recipe will make about 5 gallons (19 L) of wash:
OG: 1.040–1.060
FG: 0.990–0.992
ABV: 5–8%
YOU WILL NEED:
• 5 gallons (19 L) 100% grape juice or 100% apple juice
• 5 tsp. Fermax Yeast Nutrient
• 5 g Lalvin EC-1118 yeast
• 60 g light to medium char oak chips (see the sidebar if you would like to toast your own oak chips)
Make sure all equipment and surfaces have been cleaned and sanitized.
MAKE THE WASH
1.Add 5 gallons (19 L) of room temperature juice into your empty fermenter. If using, stir in the 5 tsp. of yeast nutrient.
2.Sprinkle the Lalvin EC-1118 yeast over the juice.
3.Close your fermenter with a lid or stopper and airlock. Let it ferment between 72–84 ˚F (22–29 ˚C) for 14 days.
DISTILLING AND AGING
4.Follow the instructions that came with your still, as they should guide you toward producing a clear spirit, our current goal.
Once you are ready to distill, be sure to:
Discard the first 50 mLs out of your still. This is the foreshots and can contain methanol.
Begin collecting in bulk, slowly ramping up the temperature on your still, stopping collection around 20% ABV.
After emptying your still of the backset (the leftover liquid), transfer your collected wash to the still again for a double distillation, making cuts every 500 mLs, stopping collection around 20% ABV.
5.Starting with the jar from the middle of your run begin blending your cuts jars together. Taste and smell the jars. Be sure when blending cuts to keep spirit with some of the fruit aroma as it is critical for the drinker to understand and appreciate the fruit in the brandy. You may only use small parts of jars nearer the start and end of your run.
Optional: Age on medium char oak for a minimum of three weeks and up to two years.
6. Take the portion of your spirit run you’ve decided to keep and cut (dilute) to 40 percent ABV with clean water. Bottle and enjoy!
Tips:
You can make brandy from a traditional wine kit as well, which will produce a stronger wine (wash) from which to distill from. This means you’ll get more brandy in the end!
Toast Your Own Chips:
Even if you have found toasted oak chips or cubes, maybe even used barrels that have been repurposed into chips, you might want to play with your own toasting. Perhaps you want to try out a different local, indigenous hardwood. Simply take your chips, cubes, or staves and preheat your oven to around 400 ˚F (205 ˚C). Lay out the wood on a baking sheet, not too deep, maybe a couple of layers at most. Place it in your oven and after an hour check your chips (you can check earlier if they were already toasted). They should now be at a nice medium toast. You can play with temperatures: 300–350 ˚F (149–177 ˚C) will accentuate wood character; 350–400 ˚F (177–205 ˚C) will impart sweetness; 400–450 ˚F (205–232 ˚C) will add vanilla and toasted flavors; higher will achieve flavors of almond and burnt sugars.
This article contains excerpts and images from the book How To Distill by Aaron Hyde, printed by Harvard Common Press and releasing November 2, 2021.