From Grape to Glass
Nothing feels as satisfying and authentic as making your first batch of wine from fresh grapes. And there’s no better time to try it than in early autumn, when grapes all over North America are ripening in vineyards and backyard gardens.
There are many kinds of wine grapes to choose from, depending on where you live. Vitis vinifera is the classic choice for flavor, varietal character and historic authenticity. This famous European wine-grape family includes such renowned varieties as Chardonnay, Merlot, Zinfandel and Cabernet Sauvignon. In the United States, to make a sweeping generalization, V. vinifera grapes thrive in California and the Pacific Northwest. They also grow well in microclimates scattered from New York to the Great Lakes, to the mid-Atlantic states and beyond.
Those who live in colder, wetter climates may not be able to find V. vinifera grapes grown locally. Don’t be discouraged. Fine hybrids and Vitis labrusca grapes, which are less susceptible to cold and disease, may be growing near your home. Search the Web and contact your local university extenstion program to find out who is growing wine grapes in your area and reach out to them. Other options include ordering grapes through your favorite local winemaking shop or from a produce wholesaler. (See “Buying Fresh Grapes” in the August-September 2011 issue of WineMaker.) No matter what grapes you use, the general techniques, equipment and ingredients are the same. Here’s an overview of some key steps along the way.
Inspecting the Fruit
Winemaking starts with inspecting the grapes. Make sure they are ripe by squishing up a good double handful, straining the juice and measuring the sugar level with a hydrometer. The sugar density should be around 22 °Brix — this equals 1.0982 specific gravity or 11% potential alcohol — and the fruit should taste sweet, ripe and slightly tart.

The grapes must also be clean, sound and free of insects and other vineyard debris. Discard any grapes that look rotten or otherwise suspicious. Also, it’s very important that all the stems are removed, since they will make your wine bitter.
Keeping it Clean
Winemaking demands a sanitary environment. Wash all of your equipment thoroughly with hot water, boiling what you can. It’s also wise to arm yourself with a strong sulfite solution to rinse any equipment that comes in contact with your wine. To make it, add 3 tablespoons of sulfite powder (potassium metabisulfite) to a gallon (3.8 L) of water and mix well
Adusting the Juice: Acids
Adjusting the juice or “must” of your wine is critical. Luckily, it’s also easy. Acid content is measured with a simple titration kit; you can buy one at a winemaking supply shop. The ideal acid level is 6–7 grams per liter for dry reds and 6.5–7.5 grams per liter for dry whites.
Here’s an example: If your must measures 5.5 grams per liter, then you need to add 1 gram per liter of tartaric acid to bring it up to 6.5 g/L. Since 0.2642 gallons equals 1 liter, 1 g/L is equivalent to adding 3.8 grams of tartaric acid to your one-gallon batch. Add this powder in one-eighth teaspoon intervals, checking acidity carefully after each addition, until the desired level is reached. You can buy tartaric acid at your supply shop.

You also need to monitor the sugar level with your hydrometer. The must should be about 22 °Brix for both reds and whites. To bring the sugar concentration up, make a sugar syrup by dissolving one cup sugar into one-third cup of water. Bring it to a boil in a saucepan and immediately remove from heat. Cool before adding in small amounts, one tablespoon at a time, until the desired degrees Brix and specific gravity is reached. To lower the sugar level, simply dilute your must or juice with water.
The temperature of your must can also be adjusted to provide the perfect environment for yeast cells. Warming up the juice gently (don’t cook or boil it!) is an easy way to bring it to pitching temperature without damaging the quality of the wine. Fermentation can sometimes reach into the 80 to 90 °F range, though the 70 °F range is standard for reds (whites often are fermented at cooler temperatures).
If your grapes have been refrigerated or are too cold, use this unorthodox but quick trick: Heat up a small portion of the juice in the microwave, mix it back into the fermentation pail and re-test the temperature. An electric blanket wrapped around the fermentation pail also works, but takes longer. For cooling, add a re-usable ice pack and stir for a few minutes. Pitch the yeast when the temperature reaches 70 to 75° F for reds and 55 to 65 °F for whites.
Racking the Wine
“Racking” means transferring the fermenting wine away from sediment. You insert a clear, half-inch diameter plastic hose into the fermenter and siphon the clear wine into another sanitized jug. Then top it off and fit it with a sanitized bung and fermentation lock. This can be a delicate operation and it’s important to go slowly. You don’t want to stir up the sediment or lose suction in the siphon.
Bottling the Batch
Bottling may sound complicated, but it’s really not. To bottle your wine, you simply siphon your finished product into the bottles (leaving about 2 inches of headspace below the rim), insert a cork into the hand corker, position the bottle under the corker and pull the lever. It’s always wise to buy some extra corks and practice with an empty bottle before you do it for real.
Wine bottles can be purchased at home winemaking stores, or you can simply wash and recycle your own bottles. These supply stores also rent hand-corkers and sell corks. You should only buy corks that are tightly sealed in plastic bags because exposure to dust and microbes can spoil your wine. Corks can be sterilized just before bottling, with hot water and a teaspoon of sulfite crystals.
A one-gallon (3.8-L) batch will yield about five standard-size (750 mL) bottles of wine. If the fifth bottle isn’t quite full, then either drink that bottle or use smaller bottles to keep the wine. The key is to have full, sealed containers that are capable of aging.
Now you’re ready to make your first batch of fresh-grape wine. Red wines always are fermented with the skins and pulp in the plastic pail; the solids are pressed after fermentation is complete. White wines are always pressed before fermentation, so only the grape juice winds up in the fermenting pail. Good luck!
New equipment
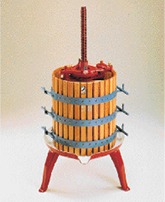
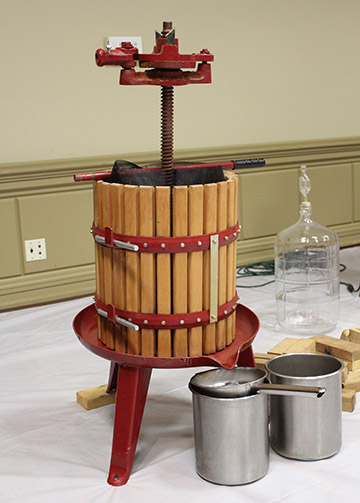
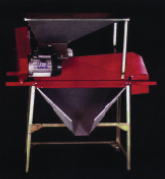
Crusher and Press
The major difference between winemaking from concentrate or juice and winemaking from fresh grapes is that the latter requires extracting juice by mechanical means, specifically crushing and pressing. The crusher is used to break the grape skins in order to expose the juice in preparation for maceration when making red wines, or to ease pressing and juice extraction in white winemaking. The most basic crusher, the manual crusher, consists of two aluminum fluted rollers, a hopper and a flywheel-crank assembly. A motorized version that greatly simplifies crushing is also available, at a greater cost.
An important drawback of the crusher is that stems are crushed rather than separated from the must. Therefore, stems need to be removed manually, a tedious and messy task. Stems should ideally be removed to avoid imparting harsh tannins or increasing the wine’s pH. A crusher- destemmer (often called crusher-stemmer) is another solution. It first crushes grapes and then channels them through a screen that allows grapes to drop into the fermenter, but expels stems out an exit chute for disposal. Both manual and motorized models are available.
The wine press (often called a basket or vertical press) is used to apply pressure on crushed grapes to extract juice. The basket press is the most popular type because it is efficient and well-priced. This press consists of a cylindrical hardwood basket to hold the crushed grapes, as well as a ratchet mechanism and hardwood blocks for exerting pressure. Mechanical bladder presses are also available and use an inflatable device to press out juice.