Build Your Own Garage Wine Cellar
I have been making wine for about 27 years starting with a small winemaking kit I received as a Christmas gift. I had an interest long before that time as I had two uncles and my grandfather who made and stored their finished wine in their underground cellars. After spending a weekend with one of these relatives, I became more enthusiastic about making my own wine and started gathering information.
I started out with small batches of fruit wines, as fruit was readily available at that time of year, and used the kitchen sink and counters to prepare for the wine making process. It wasn’t a problem as it was my wife who gave me the winemaking kit in the first place. As long as I cleaned up to her satisfaction, I could continue to do it there.
In California, homes with cellars are few and far between so I had to find a place to keep the fermenting and finished wines. I chose the closet in my den as the place to make things happen as it was on the north side of the house. Although the temperature remained cool during most of the year, the temperature was significantly higher in the summer time and not ideal for wine.
I bought another house (not because of the wine) and again the den was on the north side of the house. This time I knocked out the plasterboard on the inside of the closet and lined it with insulation. As long as I kept the door closed during the day, it was a more suitable place to ferment and store my wines. Some time later, I had to transform the den into a baby’s room but was still allowed to keep my wines in the closet.

About three years later, I had to vacate the closet as my daughter had to have a place to hang her dresses and other clothes.
What do I do now, I thought. A fellow winemaker suggested that I build a wine cellar — similar to one he had built — in my garage. We had not kept the cars in the garage for three years, so that was a great idea.
The Wine Garage
So I could control the environment better and not take over the entire garage, I needed to build an enclosure — just like a little wine cellar — inside the garage.
I decided to make the enclosure out of 10 separate 4-foot-by-7-foot panels so that it can be taken apart if necessary and can be enlarged just by adding more sections. I decided on a 7-foot height so that I could stand inside comfortably but would still have storage on top of the cellar for bottles and carboys.
Materials
Lumber
- 1-inch-by-6-inch lumber from framing, about 36 board feet per panel
- 20 4-X-7-ft. sheets of paneling
- Wooden shims
Misc.
- R-19 insulation
- duct tape
- expandable foam filler
Hardware
- 1-* screws.
- finishing nails
- 3-3 * in. hinges
- metal-reinforcing strip, 3 in. wide and 6 in. with screws
Putting It Together
Using 1-inch-by-6-inch lumber, I made a frame for each section with vertical braces at 16-in. centers held together using 1-* screws. I then nailed a 4-by-7-foot piece of paneling on one side using finishing nails. After completing that, I filled the sections with R-19 insulation and then fastened another panel to the other side with finishing nails, thus completing a section. The completed sections were put aside for later assembly.

I made two sections differently. One panel had to include a door and the other an opening to incorporate a 5000-BTU-capacity air conditioner. The size of the door was 76 in. high x 40 in. wide. I built the panel for the door in the same manner as the previous panels. The main section was made with an opening left to accommodate the door. Instead of verticle bracing, I used a double brace placed at 6 in. from the end to give added strength for the door hinges. The door was hinged to the inside of the frame using 3-3 * in. hinges placed 14 in. from the top and bottom and the center hinge placed at 38 inches from the top.
I made the opening for the air conditioner 24 in. wide and 16 in. high. A frame was built and placed and fastened with screws on one side of the main section. The actual location is based on personal preference, whether it is on one side of the main section or the other or in the middle. Accessibility to electrical power must be a consideration. The air conditioner frame was supported underneath with two supports placed at 8 inches and 16 inches running vertically from the bottom of the main frame. The final support was located on the side and on one side by 1 in x 6-in. support at 24î, the size of the frame.
Assembling the Cellar
Now came the time to assemble the sections into the wine cellar. First I had to determine where to place the wine cellar, as it had to be accessible to electrical power and the door would not interfere with any appliances, doors, water heater, and so forth already in the garage.
I placed the first two sections (they formed one side) against the garage wall with the electrical outlet nearby. I screwed a flat piece of metal-reinforcing strip, 3 in. wide and 6 in. long on the top of the sections, crossing the joint. This held the sections together.
Next I placed the two back sections, one of which included the opening for the air conditioner, perpendicular to the side sections and fastening the sections at the top with metal-reinforcing strips. I followed this with the two sections that formed the third side.
Finally I put the front two sections, including the door section, in place and fastened with the strips. I used wooden shims to make sure that the door section was level and that the door opened smoothly.
Finally I placed the final two sections on the top of the enclosure and fastened them together with the metal strips. I sealed all of the joints with duct tape. A while after I completed my cellar I went back and expandable foam filler to reseal the joints. The sealer is more effective and can be found in most good hardware stores.
Interior Decoration
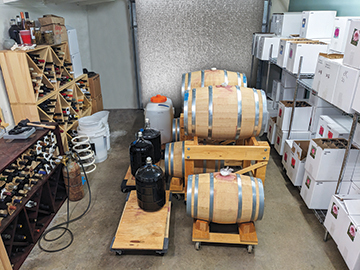
With the shell of the cellar complete, the next step was to set up the inside with work tables and shelves for storaging finished wine and various winemaking equipment. My main table is 84 in. long, 20 in. deep and 38 in. high. I placed it on one side, away from the door. I covered it with a laminate for durability, which also made it easy to keep clean. This is mainly used to hold the 5 gal. carboys for fermenting. I use a second table that is 64 in. long, 20 in. deep, placed at the same height along the back wall. I use this table mainly used as a worktable.
I constructed the tables using 2 x 4 s for the top frame with 2 braces placed at equal intervals for stability. I used 2 by 4s for the legs as well. Was this mounted along the back wall or did you use four legs?? I placed one leg at each end of the shorter table and added a third leg in the middle of the longer table. This gave added strength in order to hold a number of five-gallon carboys at one time as each one weighs well over 35 pounds.
Next I built two separate sections of shelves on the wall opposite the long table to be used for wine storage and designed so those bottles could be stored both horizontally and vertically. Each section was 76-in. high, 31 in. wide and 11 in deep — the distance between the front wall and back table is 62 in. so this is as wide as I could squeeze in. The distance between the shelves was determined by what was going to be places on them. For instance, the bottom shelf is higher so that it could be used to store more wine bottles or larger size containers. The next group of 4 shelves was designed to hold wine bottles horizontally in two to four layers, and the top section is used for vertical bottles.
I built a final section of shelves that were placed on the end of the back table, lining up with the other shelves. This was for storing small wine making equipment, chemicals, and wineglasses, making them accessible to the work area. Also the shelves are used for wine testing chemicals and apparatus such as a gram scale, pipettes, beakers, hydrometer, vinometer, air locks and other small equipment. Shelves can be used for a variety of purposed including a bookshelf for keeping all wine-related book, recipes and other information.
I use some of the space under the tables for wine stored in boxes, utility drawers, and miscellaneous storage.
To make this complete, I attached a 4-ft. florescent lamp to the middle of the ceiling, giving adequate lighting to most of the area. I covered the floor with indoor-outdoor carpeting, which is a little easier on the feet than concrete or tile when working but it could also be washed in the event of any accidental spills.
I considered laying a tile floor. While it would have been easier to clean, the liquid from any spills would tend to run under the tables due to the slant of the garage floor. This would make cleaning more difficult if boxes or other items were stored under the tables. I felt that the carpeting would absorb any liquid and then could be taken outdoors and hosed off with water and left to dry. This type of carpeting dries fairly quickly.
I built additional shelves on the back outside wall for general garage storage and a working desk was place on the outside of an outside wall. In most cases, people do not even realize that the cellar is taking up this space in the garage. The wall was used for hanging siphon hoses, funnels, a wine thief, and other winemaking items.
Temperature Control
With the addition of the air conditioner and a thermostat, I am able to maintain the wine’s cool temperature. A 5000 BTU air conditioner is generally the smallest available and more than adequate for an area of this size. The air conditioner is tied to a thermostat so that the temperature can be regulated to a specific temperature. A good temperature for storing wine is from 60-65 degrees. The important part of temperature is not only keeping it cool, but also keeping it at a constant temperature where there are not wide variations during the day.
If a thermostat is not used to regulate the temperature then the use of a timer will enable you to, at least keep the cellar cool, without keeping the air conditioner on all the time. How long and how frequent the unit is turned on and off will often depend on the outside temperature. A thermometer can be used to monitor the inside temperature and will be of help in setting the duration the air is on and how frequent it is turned on. You will have to do it by trial and error in order to accomplish this.
The air-conditioned cellar can also be used for cold fermentation, generally for white and fruit wines but can be used for red wines as well. Low fermentation temperatures are necessary to retain the fruit characteristics of the grapes, and producing high quality white table wine is very difficult unless fermentation temperatures can be dept below 60 degrees. Fruity, white, or blush wines like Riesling, Chenin Blanc or White Zinfandel are produced by fermenting well-clarified juice at temperatures between 40 and 55 degrees. Quality Chardonnay and Sauvignon Blanc wines are often fermented in barrels at temperatures ranging from 55 to 65 degrees.
In addition, cold settling of white juice can be a benefit of an air-conditioned cellar. Reducing the amount of solid material is an important step in the production of high quality, white table wine. A minimum amount of solid material in the juice produces a cleaner, fruitier wine. The juice should be cooled to less than 50 degrees and allowed to settle from 12 to 24 hours. light to all parts of the cellar. Although it does not have a sink or running water, it is adequate for all other winemaking operations.
In addition, cold settling of white juice can be a benefit of an air-conditioned cellar. Reducing the amount of solid material is an important step in the production of high quality, white table wine. A minimum amount of solid material in the juice produces a cleaner, fruitier wine. The juice should be cooled to less than 50 degrees and allowed to settle from 12 to 24 hours.
The cellar can have other uses other than making wine or just for wine storage. I find that it is kind of a hideaway as well as a second office. I have a small television set and a cassette player with speakers that makes it more enjoyable I am working there. In the summertime, it is the coolest place and a good reason to make frequent visits to check on the wines.
To give the cellar a little more ambiance, I hung clusters of plastic grapes and vines from the ceiling. By inserting small cup hooks in the ceiling, the grapes can be hung quickly and at the same time the hooks are hidden by the grapes. The remaining wall space was used to hang photographs and mementos and the many wine competition awards garnered over the years.