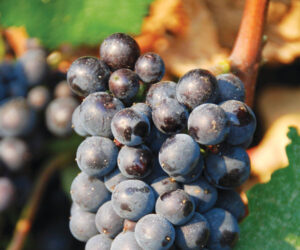
Deeply saturated in color and crimson red is the first impression to hit your senses when glancing at Carmine. After a few swirls of the rich liquid in the wine glass, aromas of black cherry, pepper, a hint of mint and a bouquet of vanilla waft from the bowl.
The complex flavors in the mouth echo the aroma and bouquet. The finish is long lasting as the tannins coat the insides of the mouth. This is the taste of Carmine (pronounced kar-meen), a grape born in America and deserving more attention.
Carmine was developed by Dr. Harold Olmo (1909–2006), acclaimed American viticulturist, plant geneticist and professor at the University of California at Davis. It has been reported that Philip Wagner (1904–1996), founder of Boordy Vineyard and Nursery and author of “Grapes into Wine” and “A Winegrower’s Guide,” convinced Dr. Olmo to produce a grape with good tannin structure that could survive the cold.
One of the primary goals was to develope a hearty grape that could translate into a marketable wine for colder climates. Doug Moorhead, owner of Presque Isle Wine Cellars in the town of North East, Pennsylvania and his cousin, John Moorhead, have grown Carmine since the late 1960s with success. Carmine can also be found in varying amounts in the coastal regions of California, Michigan, New York, Ohio and Oregon.

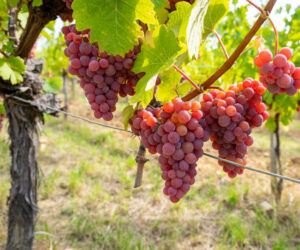
Carmine is a vinifera cross of Cabernet Sauvignon and Carignane — both much more popular and produced winegrapes. While the size of the grape berry is not considered large, it is slightly larger than the Cabernet Sauvignon grape and has a loose cluster.
Carmine buds late and is harvested late (mid- to late October), making it winter hardy. As a wine, Carmine has been described as having a capsicum (pepper) aroma and flavor.
Young vines exhibit fruit with a strong mint character along with a medicinal taste. As the vine matures (3 years in the ground) fruit harvested has a reduced mint character without the medicinal flavor and ample black cherry and briar fruit flavor.
Its inky black berries impart deep color pigments to the wine. Malolactic fermentation imparts additional complexity to Carmine and tames its acidity. It also marries well with American and French oak.
Not many examples of this wine are available in the marketplace because it is often used for blending to extend the volume of other wines. Blending with Carmine can also add a rich depth of color to many wine styles. Likewise, blending as little as 5% of another red wine such as Cabernet Franc (another cold climate grape) can add additional flavors to the Carmine.
Robust wines like Carmine need food to complement their flavor. Big red wines beckon red meat and game. Carmine can saddle up to the full flavors of heavy smoke or rich sauces. Light up the grill and get the coals hot!
Tired of making the same varieties each year? Expand your winemaking repertoire. Try making Carmine and learn more about the charms of this fine red wine.
Carmine at a Glance
Appearance:
deeply saturated crimson, with a plum hue.
Aromas and flavors:
cherry, capsicum (if harvested too early), a hint of chocolate and spice, toasty and vanilla (when oaked). Fruit from young vines can exhibit a strong mint and/or medicinal character. Wines made from established vines (4 years in the ground) retain a hint of mint with no medicinal character.
Robust wines like Carmine need food to complement their flavor. Big red wines beckon red meat and game. Carmine can saddle up to the full flavors of heavy smoke or rich sauces. Light up the grill and get the coals hot!
Tired of making the same varieties each year? Expand your winemaking repertoire. Try making Carmine and learn more about the charms of this fine red wine.
Carmine Recipe
Yield: 6 gallons (23 L)
- 72 to 84 lbs. (32 to 38 kg) Carmine grapes
- Pectic enzyme (liquid —18 drops or 3 drops per gallon; powder — follow manufacturer’s directions)
- 1 pkg. Lalvin 71B-1122, Red Star Pasteur Red or Prise de Mousse, Lalvin RC-212 (these are 5-gram packages) Alternate yeasts: BM45, Brunello, Fermirouge (these come in larger 500-gram packages, only 5 grams are needed for small batches)
- 6 teaspoons complete yeast nutrient
- Sparkolloid or Kieselsol/Chitosan fining agents, if the wine is to be consumed early
- Potassium metabisulfite *
*Make a sulfite solution by adding 1 oz. (41/2 level teaspoons or 28 grams of potassium metabisulfite to 1 cup water (8 oz. or 228 mL); stir to dissolve.
The typical addition for wine: Use 1 teaspoon (4 ml) of sulfite solution for each gallon (128 oz. or 3.8 L) of must/wine.
Note:
This should not be confused as a dry addition of sulfite. (Store metabisulfite solution in a glass jar with the lid lined with plastic wrap to avoid interaction with the metal. Label the jar “Sulfite Solution for Wine.”
First Addition:
At crush, add 6 teaspoons (24 mL) of Sulfite Solution or 1/4 teaspoon (1.6 gram) potassium metabisulfite powder. Note: If a malolactic culture is to be added, you may choose to add only 3 teaspoons (12 mL) of sulfite solution or not to add sulfite until after the malolactic conversion is complete.
Second Addition:
Upon completion of the fermentation (-1.5 °Brix or 0.992 specific gravity), add 6 teaspoons (24 mL) of Sulfite Solution to 6 gallons (23 L) wine. Note: If a malolactic culture is added, do not add sulfite until after the malolactic conversion is complete.
Third Addition:
At first racking (3 to 6 weeks after fermentation is complete), add 5 teaspoons (20 mL) of sulfite solution to 5 gallons (19 L) of wine.
At Bottling:
As needed, to achieve 35 to 45 free ppm (parts per million) SO2. Note If you possess a pH meter, follow SO2 recommendations for pH level. Refer to Sulfite Calculator on the WineMaker Website at www.winemakermag.com/sulfitecalculator/index.html for free sulfur dioxide levels additions.
Optional style additions:
If malolactic culture (if total acidity is above 0.7 or additional complexity is desired) oak (2–3 ounces or 56–84 grams) oak chips or oak powder (medium toast)
Step by Step:
1. Inspect grapes, discard any fruit with mold.
2. Crush grapes. Place in 10- or 15-gallon (38- or 56-L) food-grade primary fermenting vessel with a wide opening so that the cap (layer of skins, seeds and stems) can be easily punched down several times a day.
3. Take a hydrometer reading. Record the °Brix/Potential Alcohol/Specific Gravity in the record book.
4. Test for acidity using an acid test kit. Adjust acidity if it is too low. Beginning acid levels may be 0.7 to 0.9 and can be lowered using one of several methods after fermentation is complete. A final total acidity (TA) of 0.55 to 0.65 is desirable. Record the total acidity in your record book.
5. Check the pH of the must (juice), if you have a pH meter. Record the pH in your record book.
6. Add the pectic enzyme, stirring thoroughly. Record the addition in the record book.
7. Add the complete yeast nutrient in 1 to 2 cups of must. Stir to dissolve. Add to the primary fermenting vessel. Stir thoroughly. Record the addition in your record book.
8. Add the potassium metabisulfite (see recommendations above). Stir thoroughly. Record the addition in the record book. Cover the fermenter. Wait 24 hours.
9. Hydrate the yeast by sprinkling it over a half cup (120 mL) warm water (no higher than 105 °F/41 °C). Wait 5 minutes. Stir. Add to the must and stir thoroughly. Record the type of yeast used.
10. Add oak, if desired at this time or wait until the fermentation is complete.
11. Insert a floating thermometer (attached to a sanitized string for easy removal) and take a temperature reading. Record the initial temperature. Take a temperature reading each day. Note: Remember to take the thermometer out of the must before you punch down the cap. The temperature will rise and then begin to fall as the fermentation progresses.
12. Cover the fermenting vessel with a sheet of clean plastic or the fermenter lid.
13. Punch down the cap at least twice a day using a sanitized paddle or sturdy long handle spoon.
14. Determine when you wish to press. Press when the °Brix reading on the hydrometer is at 2 to 0 °Brix (1.010 to 1.000 specific gravity). Press using rice hulls to increase yield without increasing pressure (1 lb. for every 100 lbs. grapes/or 0.45 kg/45 kg) or Cellulose Press Aid (1 lb. for every 133 lbs. grapes 0.45 kg/60 kg).
15. Transfer wine into a carboy.
16. Allow the wine to ferment completely. The hydrometer reading will be between 0 °Brix to -1.5 °Brix (1.000 to 0.992 or 0.994 specific gravity). If a malolactic culture is added, do not sulfite at this time. Adding the metabisulfite now will arrest the malolactic fermentation. Sulfite the wine after the malolactic fermentation is completed (using a ML chromatography kit to confirm the malic to lactic conversion). Consult the malolactic instructions for full details.
(If a malolactic culture will not be added, you can sulfite the wine at this time. Add 5 teaspoons (150 mL) of sulfite solution.)
17. Add oak at this time (if it has not been added in step 10 or if additional oak character is desired.
18. Add Sparkolloid or Kieselsol/Chitosan fining agents. Follow manufacturer’s directions.
19. Fill the airlock one-half full with water and attach it to a rubber bung/stopper. Fit the stopper into the neck of the 6 gallon (23 L) carboy. The stopper should not be flush with the top of the bottler. For easy removal, the top surface of the stopper should be about 3/8” above the lip of the carboy.
20. In 3 weeks rack the wine away from the sediment (known as lees) into a sanitized 5 gallon (19 L) carboy and a 3-L bottle. This is known as the first racking. Note the difference in the sizes of the carboy. Keep the air space to a minimum.
21. Add 5 teaspoons (150 mL) sulfite solution in the 5-gallon carboy and a scant teaspoon in the 3-L bottle. Or, if you have a pH meter, adjust the SO2 levels accordingly.
22. Keep the wine in a cold area, if possible, to hasten the dropout of sediment and excess tartrates. An extra refrigerator set at 33 °F (1 °C) is handy for this stage of winemaking.
23. In a month to six weeks, rack the wine away from the lees and into a sanitized carboy. The yeasty taste will most likely be gone after this racking (second) and the fruity flavors will be evident.
24. Continue to store the wine in a cool area. Change the water in the airlock periodically or replace the water with an ounce of sulfite solution.
25. After another six weeks, rack the wine one more time into a sanitized carboy.
26. Check the acidity using an acid test kit. Record the information in your record book.
27. Taste the wine. Record your impressions. If additional nuances of vanilla or toasty bouquet and flavor are needed, add more oak. Wait several days and taste the wine again before racking the wine away from the oak.
28. Check the sulfite level and adjust if needed. Free sulfur reading at bottling will be approximately 35–45 ppm free sulfur dioxide. If you have a pH meter, consult the free sulfur level chart.
29. Filter the wine, if desired, for a brilliant appearance. Allow the wine to age for approximately 6 months to a year from the time the fermentation was started.
30. Sanitize the equipment and bottles before bottling. If corks are used, allow the bottles to remain upright for several days before laying them on the side to age. Enjoy!

It’s a legendary grape with a storied history and one of the most revered in the wine world. But it is also a cantankerous grape to grow and make wine with. Chik Brenneman shares some best practices for handling Pinot Noir in the winery.
While it may not look like a white wine grape, Gewürztraminer is well known to produce world-class white wines. Learn some best practices to work with this grape varietal that can thrive when grown in cooler climates.

