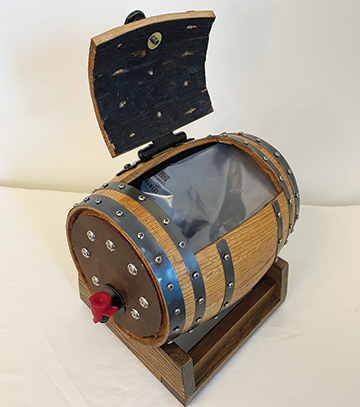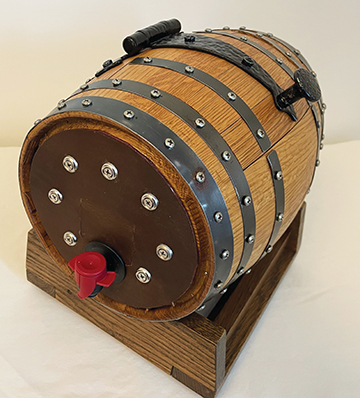

Woodworking and winemaking go together in my cellar, so when I have the opportunity to combine the two, I jump at it. This story started with a gift from a good friend for helping him make some wine. For my time and effort, he thanked me with a beautiful 5-liter (1.3-gallon) oak barrel.
I used the barrel for aging wine in for years and when I took it out of service, I couldn’t throw it away. I spent some time thinking of ways to repurpose it, trying to come up with something useful, thoughtful, and practical, and then I could give it back to my friend.
Two years later, it was still on my workbench. The ideas I came up with just didn’t work. A lamp, a flowerpot, a candy jar . . . none of the ideas were good enough.
And then it came to me, I didn’t have to make the barrel into something it wasn’t, all I had to do was to make it a better barrel.
So, I cut a hole in the top, fitted one head for a spout, built a stand, and put furniture finish on everything. Then, I gave it back to my friend, and today it’s hard at work at his home, serving wine. The secret is inside of the barrel is a bag that contains the wine, so there is no worry about wine oxidizing as samples are poured over days, weeks, or months.
I rate the skill level necessary for this project as “moderately difficult.” Most of the tools needed are what woodworkers have in their tool chest. Aside from the cost of the barrel, the materials aren’t too expensive, though the blunt point screws do add to the cost as they will likely need to be bought in a quantity of at least 100 (though I will detail a cost-saving way to make them from self-tapping screws in this article, which is what I did for this build).
It is also important to note that the 5-liter (1.3-gallon) barrel you purchase for this project may come with a stand, though I haven’t particularly cared for the look or sturdiness of the ones that have come with the barrels I’ve owned, so I have also made new stands.
Let’s get started.
Needed Materials
QUICK TIP: All of the screws used in this barrel project use blunt point screws. These screws are necessary for the successful completion of this project. Do not use pointed nose self-tapping screws.
5-liter (1.3-gallon) oak barrel (the barrel will include a bung, spigot, and possibly a stand)
6” strap hinge with screws (cut self-tapping ends off these screws and file smooth to make “blunt point screws”)
Cabinet door knob
2 pcs 8” x 8” x 3 mm full grain cowhide, tooling leather
Box of 100 stainless steel screws. (#6 x 3/8” Phillips pan head sms (sheet metal screws), blunt point)
Box of 100 stainless steel screws. (#6 x 1/2” Phillips pan head sms, blunt point)
3-liter “bag-in-box” bags with spout
7 stainless steel screws (#8 x 3/4”, Phillips flat head sms) (Cut self-tapping ends off these screws and file smooth to make into blunt point screws)
7 #8 stainless steel countersunk washers
Small container oil base wood stain
Small container polyurethane wood finish
Wine box from bag-in-box wine, empty (This empty cardboard box will be used as a template for the project)
Fasten Barrel Hoops to the Staves
Place the barrel on the stand with the bung hole on the bottom. The bung hole now becomes a drain hole. You no longer need a bung hole on the top of the barrel, and someday, you may need a drain hole on the bottom.
If the hoops are loose or have become misaligned, move them back into their original position and use painter’s tape to hold in place until the hoops have been fastened to the barrel with screws.
Stave #1
Start by selecting a stave on the bottom of the barrel near the drain hole. The bottom of the barrel is the best place to start drilling holes. If you make a mistake here it cannot be seen when the barrel is secured to the stand.
Put a piece of painter’s tape from one end of the stave to the other end, with an edge of the tape applied to the center of the stave. This is your guide for drilling holes through the hoop and into the stave. Always drill holes in the center of the stave, never drill holes in a stave joint (see Photo 1).

Using a 7⁄64” drill bit, drill one hole through each bilge hoop, continuing through the barrel stave, using the edge of the painter’s tape as your guide. Start the #6 X 3⁄8” blunt point screws to the holes and tighten the screws until they are seated on the hoop, then back off one turn. Leave the screws loose because the hoops may need adjustment as they are fastened to the other side of the barrel.
On the same line, drill one hole in each quarter hoop, continuing through the barrel stave, again, using the edge of the painter’s tape as your guide. Start screws and tighten. Back off one turn.
Drill one hole in each head hoop, continuing through the barrel stave, again, using the edge of the painter’s tape as your guide. Start the #6 x 1⁄2” blunt point screws. Theses longer screws, are used on the head hoop because the screws need to reach the wooden head of the barrel to stabilize the project.
Stave #2
The next stave to select is on the other side of the barrel. Go halfway around the barrel to select this stave. Before adding the painter’s tape, make sure the hoops are seated correctly on the barrel. The hoops should be uniformly spaced before taping.
Similar to the first stave, add painter’s tape to the stave. Make sure one edge of the tape is centered down the middle of the stave.
Using the painter’s tape as your guide, drill holes through the bilge hoops, quarter hoops and head hoops, continuing to drill each hole through the stave. Start screws and tighten. Back off one turn.
Stave #3
This stave is halfway between stave #1 and stave #2.
Same procedure. Add tape, drill, tighten screws, back off one turn.
Stave #4
This stave is on the opposite side of the barrel from stave #3. It is also halfway between stave #1 and stave #2.
Same procedure. Add tape, drill, tighten screws, back off one turn.
You now have six hoops fastened to four staves. Each stave will be approximately one-quarter way around the barrel and the hoops will have uniform spacing. Gently tighten by hand all 24 screws, until each hoop is seated on each stave.
Remaining Staves
The barrel has been stabilized by fastening staves #1–4 with screws. You may now continue to drill and fasten the balance of the hoops to the balance of the staves, fastening one stave at
a time.
Follow the same procedure: Tape, drill, and fasten hoops to staves with screws. It is no longer necessary to back off the screws.
Bend Strap Hinge
Bend the strap hinge to the radius of the bilge of the barrel. Clamp the strap hinge with a bench vise and tap with a hammer to reach the rough radius. Follow up with vice grip pliers to reach the correct radius. Both the barrel hinge-leaf and the door hinge-leaf need to fit the radius of the barrel (see Photo 2).

Select the Door on the Barrel
Set the barrel on the stand with the drain hole at the bottom. Align the strap hinge to the top of the barrel so all the screw holes align on staves, not stave joints. Tape the hinge to the barrel with painter’s tape. Then identify the staves that will be used to make the new door and tape all four sides to mark the door on the top of the barrel (see Photo 3).

Mark the holes for the strap hinge to the top of the barrel with a marker
Mark the Bilge Hoops Left and Right
Find the stave joint on the bottom of the new door and mark each bilge hoop with a pencil (see Photo 4a).

Find the stave joint on the top of the new door and mark each bilge hoop with pencil (see Photo 4b).

Mark the bilge hoops once more with pencil, 1⁄4” beyond the barrel hinge leaf that is sitting on the hoops. This portion of the bilge hoops, (under the hinge), will be cut out, allowing the barrel hinge leaf to be fastened directly to the stave (this can be seen in Photo 2). The barrel hinge leaf can not be assembled over the bilge hoops.
Remove both bilge hoops from the barrel. Cut the bilge hoops with a hack saw on the marks for the bottom of the door, top of the door, and for the portion of the hoop that is removed so the strap hinge can be installed on the stave. After cutting, round over and file smooth all cuts made in the bilge hoops with the metal file and 120 grit sandpaper.
Reinstall the two short bilge hoop sections to the proposed door area with screws.
Reinstall the two long bilge hoop sections with screws, from the bottom of the door, under and around the barrel, to the strap hinge base.
Fasten the Strap Hinge and Doorknob to the Barrel
To make “blunt point screws” from the self-tapping sheet metal screws supplied with the strap hinge, hold the pointed end of the screw in a bench vise, cut off tip of screw with hack saw and file smooth with metalworking file and 120 grit sandpaper. We can’t have any sharp points protruding into the barrel that may rip a bag.
Drill pilot hole in scrap piece of white oak to determine drill size to use. Drill pilot holes for strap hinge and fasten to barrel with your blunt point screws.
Assemble doorknob to stave using the hole on the end of the strap hinge.
Cut Door in Barrel

Tape the barrel with painter’s tape, marking the top stave joint and bottom stave joint for the new door.
Use the large hack saw to make the first cut in the staves to make the new door (see Photo 5).
Facing the barrel, rest the hack saw blade next to the inside edge of the quarter hoop on the right-hand side. This edge of the quarter hoop faces the strap hinge.
Cut slowly, keeping the hack saw blade at 90 degrees to the barrel. Stop cutting when the hack saw blade is within 1⁄4” of the stave joint marked with the painter’s tape. Remove the hack saw from the cut.
Facing the barrel, rest the hack saw blade next to the inside edge of the quarter hoop on the left-hand side. This edge of the quarter hoop faces the strap hinge.
Cut slowly, keeping the hack saw blade at 90 degrees to the barrel. Stop cutting when the hack saw blade is within 1⁄4” of the stave joint marked with the painter’s tape. Remove the hack saw from the cut.
Use a mini hack saw to finish the door cuts. Starting with the cut next to the right-hand quarter hoop, hold the blade of the mini hack saw at 90 degrees to the face of the barrel and insert the hack saw blade into the kerf of the cut made by the large hack saw. Continue cutting until reaching the stave joint on the bottom of the door. Reverse direction and finish cutting the stave joint on the top of the door. Then do the same on the left-hand side. As you finish the last cut, the staves will come free and the new door will swing open.
Cut Barrel Head for Spout on Wine Bag

Set the barrel on the stand with the drain hole on the bottom. Find the barrel head with the 1⁄2” hole. This head will be drilled with two more holes in this procedure.
With the 1⁄2” hole at the top of the head, measure from the bottom edge of the head (on the flat surface) and place a pencil mark 1⁄8” above the bottom edge of the head. Remove the barrel from the stand and place the barrel on the floor with the head, (marked with pencil), facing up (see Photo 6).
Using a 2” diameter hole saw, place the edge of the hole saw on the pencil line and drill through the head. This is hole #1.
Drill hole #2 with the hole saw directly above hole #1, overlapping hole #1 by 1⁄2”. This means after drilling, the two holes will form a figure eight (see Photo 6). Sand the edges of the holes drilled in the head.
Put the barrel back on the stand with the drain hole on the bottom. The two 2” diameter holes will be on the lower side of the head, and the small 1⁄2” hole will be on the upper side of
the head.
Cut the Leather to Fit the Head
Use a utility knife and cut the piece of leather in a circle to fit over the flat part of the head.
Check the cardboard template, (from the wine box), to see if the cardboard spout hole fits the spout on the new bags. If not, make an adjustment in the cardboard template to fit the new spout before cutting the leather.
Position and center the cardboard template for the spout on the leather. The bottom of the spout hole in the template should be 3⁄4” above the bottom edge of the leather. Cut the spout hole and spout flap with the utility knife (see Photos 7a and 7b).

Fasten Leather to Barrel Head
Use 7 stainless steel #8 X ¾” flat heat screws and cut these screws to make ½” blunt point screws, sawing off the ¼” from the point.
Position leather on barrel and line up spout hole in leather over lower drilled hole in head. Drill pilot holes in leather and pilot holes in the head in a circular pattern. Fasten leather to head with the newly cut blunt point screws and #8 stainless steel countersunk washers. Hand tighten.
Finish the Barrel
Stain with oil base wood stain (I chose golden oak color).
Let dry and topcoat with clear-satin polyurethane wood finish. Let dry, scuff with 220 grit sandpaper and topcoat again with clear-satin polyurethane. This completes the conversion of the barrel to a bag-in-barrel dispenser, but we have one final step.
Attach the Stand to the Barrel

If your barrel came with a stand then you can use it. I recommend attaching rubber feed to the corners so it doesn’t slide around. I chose to build a new stand for my barrel that is more durable and is made from scrap pieces of red oak I had lying around my woodworking area and then finished it with stain and polyurethane (see Photo 8). From the photo you should be able to get a good sense of how it was built. Holding each cross support (which the barrel will rest on) against the barrel, I traced the bottom outline of the barrel and then cut the rounded section about 5” (15 cm) wide so the barrel can sit in the cradle.
Whether you use the stand that came with the barrel or build one, you will need to attach it to your barrel with screws from the inside of the barrel (reaching through the door).


