Build a Better Sprayer
After several years of spraying my 1⁄3-acre vineyard with a backpack sprayer, I had to find another way. I needed to design a sprayer that I could build myself using inexpensive parts and materials. My design uses a lawn tractor, a tow-behind wagon, and a backpack leaf blower. I bought the remaining parts for less than $300.
I had several design objectives. One was a design that was easy to build, but also easy to assemble for use or disassemble for storage. I also wanted to be able to use the wagon and leaf blower for other purposes. However, the main objectives were to make it easy to use, time efficient, and less strenuous.
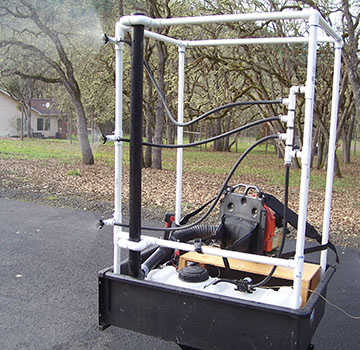
With this DIY pull-behind vineyard sprayer I’ve cut my spraying time in half, replaced walking the vineyard strapped to a heavy backpack sprayer with riding my lawn tractor, and thanks to my 15-gallon (57-L) tank, mix my spray fewer times. It also allows me to easily disassemble it for indoor storage of the tank, pump, and nozzles, and outdoor storage of the PVC framework and blower tube.
Building your sprayer
Building the sprayer is not difficult, but its design is dependent on the size of the tow-behind wagon and the sprayer tank. The dimensions of the tank should be such that it fits into the wagon with space left for a leaf blower platform and a battery. The tank should also not be significantly taller than the depth of the wagon, otherwise it could interfere with the connection between the blower tube and the leaf blower. The sprayer tank should have a minimum of 1 gallon (4 L)-per-minute, 12-volt electric pump. I use a 15-gallon tank, with pump and hose, purchased from Harbor Freight Tools for less than $100.

Unlike some DIY designs I have seen that use metal, I opt to use PVC for the structure framework. PVC is less expensive, lighter, easier to work with, and easy to replace if a mistake is made in assembly or it becomes damaged. Most all PVC/ABS parts can be purchased from the local hardware store; however, sprayer nozzle parts will require a trip to your local farm and ranch store. If those sources fail, there are always internet sources such as IrrigationDirect.com.
Begin construction with a dry fit (without PVC cement). Start with placing four 1-inch side-outlet corner-elbows at four corners inside the wagon. Measure the widths and lengths from inside elbow to inside elbow. This should be the same as the wagon bed less 31⁄4 inches. Reduce that measurement further by 1⁄2-inch to ensure the fit is not too tight when the framework is placed in the wagon.
Cut two sections of 1-inch PVC to the measured width and two to the measured length. Glue it up and check to see if it properly fits. If it doesn’t fit, use it for the top section and adjust accordingly. If it fits, repeat the process for the top section. Mark which section is “top” and “bottom.”
Now finish the framework by adding the vertical posts. I used 60-inch (152-cm) vertical posts, which provides about 80 inches (203 cm) total height (add wagon bed height plus a couple inches from the fittings), which should be an adequate height for most vineyards. Of the four posts, one side will have a horizontal cross-member to secure the leaf blower and blower tube. The height of the cross-member should be about 7 inches (18 cm) above the top edge of the wagon.
At this point, you should decide which side the sprayer nozzles will be located. Normally, the location would be opposite to the side you get on and off the tractor. Note that a right-hand side sprayer simplifies the design of the blower tube. The cross-member will be on the same side as the sprayer nozzles and is the same length as the horizontal piece at the bottom of the framework.

Glue two vertical posts on one side (i.e, long side) of the bottom section and dry fit the two vertical posts on the opposite side. Now add the top section, gluing the same two glued vertical posts and dry fitting the other two posts. Mark the framework “front” and “back,” which will indicate a left-hand or right-hand location of sprayer nozzles and blower tube.
Now remove one of the dry-fit vertical posts, cut and insert a 1-inch tee-fitting such that is will be about 7 inches (18 cm) above the side edge of the wagon. Be sure the total length remains the same (i.e., 60 inches/152 cm) by cutting off the vertical pipe to allow for the added length of the tee-fitting. First, glue the cross member to the tee fitting. This will help align the tee-fitting in the right direction. Then glue the post into the bottom and top sections. Remove the other dry-fit vertical post, cut as before, insert tee-fitting, and glue up and add to framework.
The next step is building the blower tube, which is comprised of a vertical ABS tube with air holes. It is attached to the framework with two PVC assemblies using 1-inch elbows, 1-inch snap-tees (also called saddle-tees), and 21⁄2-inch (6.4 cm) lengths of PVC pipe. Dry fit, do not glue together (it should remain as a dry-fit). Snap one assembly onto the top horizontal pipe at the tailgate corner of the framework and snap the other assembly below onto the cross-member.

To construct the blower tube, insert the 10-foot (3-m) section of 2-inch ABS pipe through the two attachment assemblies. Dry fit an ABS elbow on the bottom end (it will not be glued until the final test of the sprayer). Turn the outlet side of the elbow such that it rests on the side of the trailer. Then mark the tube at the top. Remove the tube and add 2 inches in length and cut. Next, using masking tape, tape a tape-measure to the side of the tube. The tape-measure should be about 1⁄2-inch wide. Using an awl (or similar pointed tool), mark the tube every 21⁄2 inches (6.3 cm) starting 5 inches (12.7 cm) from the top, alternating from one side of the tape-measure to the other side (the marks should alternate from side to side, 1⁄2-inch apart). Stop marking 2 inches (5 cm) from the bottom. Drill 5⁄16-inch diameter holes at each awl mark.
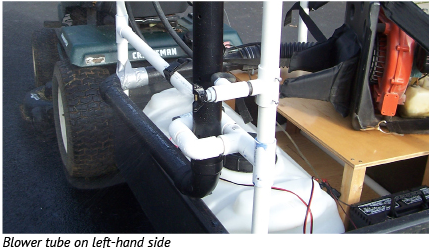
Glue the ABS cap on the top of the tube, slide the tube through the two attachment assemblies, and dry fit the elbow. If the nozzles and blower tube are to be on the right-hand side, the blower tube is done for now. If it is to be on the left-hand side, point the outlet side of the elbow to the front of the wagon with the holes in the blower tube facing outward. Glue the leftover piece of ABS pipe into the elbow. It must be long enough to extend to the vertical post (see photo on top-right of this page). Note the pipe will be cut such that an elbow can be added just short of the vertical post.
The next step is building the sprayer nozzles and manifold. They are attached to the vertical post using snap-tees. As such, they may be easily positioned up and down the vertical post for appropriate spray coverage of the grapevine. It also allows the tank/pump assembly to be disconnected from the framework and stored separately.
The sprayer nozzles and manifold are assembled using threaded fittings. The sprayer nozzle requires a snap-tee, 1⁄2-inch nipple, tee, barb adapter, bushing, 3⁄8-inch nipple, nozzle tip, and winged nozzle cap (see Parts List on page 44 for full description of each item). Before assembling, drill two 1⁄8-inch holes in the saddle of the snap-tee and insert a stainless steel sheet metal screw in each hole. Assemble as shown in the photos below. Note that a snap-tee acts as a cap or plug since the saddle is not pre-drilled.

The manifold is assembled using four tees, five nipples, two snap-tees, an elbow, and a barb adapter (see Parts List at the end of this article for full description of items).
Snap the sprayer nozzles and manifold onto the vertical posts of the framework. Locate the nozzles on the rear post, near the top, middle, and bottom, respectively. Locate the manifold in the middle of the front post with the bottom outlet facing down. During final assembly, the hoses will be cut to required lengths and secured with hose clamps.
The final step requires the framework, the blower tube, and the nozzles/manifold to be assembled and placed in the trailer wagon. This step locates the sprayer tank, constructs the leaf blower platform, and connects the hoses, electrical, and leaf blower.
The leaf blower must not sit in the bed of the wagon as its exhaust will overheat the surrounding area (i.e., melt/warp PVC pipes, sprayer tank, etc.) and will likely damage the leaf blower. For that reason, a platform must be built that will sit alongside the sprayer tank. It should be built such that it tightly fits between the sprayer tank and the side of the wagon. Its height should be the same as the side of the wagon bed. Its width should be between the sprayer tank and the PVC pipe along the bottom of the framework. Its length should be such that a 12-volt deep cycle battery can be placed in the wagon between the platform and the wagon tailgate. Alternatively, the tractor’s battery can be used instead of a separate battery placed in the wagon.
Place the sprayer tank in the wagon with the framework. If possible and logical, the tank drain plug should be towards the tailgate and the pump should be towards the front. Position the tank forward and along the right side of the wagon with the spray nozzles.
To make a rigid platform, cut a piece of plywood for both the top and bottom. Separate the two pieces of plywood using four corner posts, wood screws, and wood glue.
The sprayer tank should include a hose and wand. Cut the hose free from the wand and discard the wand. For the first hose connection, bring the hose from the pump to the inlet on the manifold facing down. Cut the hose to loosely connect to the manifold using a hose clamp.
Using the remainder of the hose, connect the manifold outlets to the spray nozzles. First, bring the hose to the top nozzle inlet and cut so that it loosely connects the top outlet of the manifold. Use a hose clamp to secure it. Do likewise for the middle and bottom nozzle inlets to the corresponding manifold outlets.
Your wire connections depend on whether you use a separate battery or the tractor’s battery. Plan accordingly. You may need extra wire to attach to the tractor’s battery. Take the zip cord wire and connect the inline switch at the end of the zip cord. Splice in the other end of the zip cord on the positive side (red) of the power wire going from the pump to the battery (do this while battery is not connected).
Locate the inline switch near the tractor’s driver seat (a hook mounted on the tractor may be necessary). Plan to have all wires on the same side as the sprayer nozzles to avoid tangling yourself getting on and off of the tractor.
Most backpack leaf blowers have a removable extension blower nozzle. Remove the extension and place the leaf blower on the platform with the blower nozzle inserted into the bottom elbow of the blower tube. Unless it has a tight fit, use duct tape around this connection.
Note that the connection on the left-hand side blower tube is different than the right-hand side connection. You may want to use duct tape to secure the elbow to the post depending on how rigid the connection is.
Next, use the leaf blower straps to secure it to the framework. The belly strap hooks around the cross-member between the two posts. Secure each shoulder strap to the opposite posts.
For testing and final adjustment, partially fill the tank with water. Loosen the set screws and adjust the height of the sprayer nozzles. Be sure the set screws on the sprayer nozzles firmly grab the vertical post. Finally, ensure each nozzle tip is oriented for a vertical spray pattern. Start the leaf blower and then turn on the pump.
Now, final adjustments to the blower tube can be made to orient the holes in the proper direction. Rotate the blower tube to achieve the best mixing of air and spray. Turn off the leaf blower and pump. Mark the alignment of blower tube with the elbow and glue in place.
For storage, pull the snap-tees loose from the vertical posts. Store tank, hoses, and nozzles together.
Operating the sprayer
Operating the sprayer (while wearing appropriate safety gear) is easy. Assemble your sprayer onto your tow-behind wagon, mix your spray, and you are ready. Before starting down the first row the height of the three sprayer nozzles can be adjusted to best cover the vines. This is done by sliding the sprayer nozzles up or down on the vertical post of the PVC framework to the desired height. Once done, use the set screws to lock them in place.
Now start your leaf blower, tractor engine, and switch on the pump. The blower-tube will shake the vine foliage to provide good spray coverage. At the end of the row, turn off the pump with a switch located near the steering wheel, make the U-turn for the next row and turn the pump back on. Since the spray nozzles are on only one side, you will need to establish a pattern that allows two passes on each row, heading in opposite directions.