After years of making wine in various locations throughout my house out of necessity and lack of a dedicated space, I recently had to evaluate my process. For years I fermented grapes in my garage, stored my bulk wine in a crawl space underneath my house (pumped in and out), and bottled it in the kitchen (again transferred via pumped). Also, my winemaking equipment and carboys were scattered about. I knew that I had to centralize the process.
Luckily, I have a large garage, which I knew could house my home winery. My objective was to make one stall into a winery and use a common cooling system for both the winery and wine cellar. I decided to turn the stall on the far end of the garage with two exterior walls and a singlewide garage door into my new winery.
My wine cellar was not fancy and neither would be the winery, but it had to be functional. The winery had to be separated from the garage to keep it clean. Importantly, it had to be relatively easy to build, low-cost, sufficiently insulated, include lots of storage for equipment and bulk wine, include a place for a wine lab, and be temperature-controlled. Now that I’ve completed the project, I realize there are likely other winemakers who face the same burden I used to of having multiple winemaking areas for different stages of the process. Whether you have a stall in your garage available, or another space, I believe many home winemakers may be able to glean some useful information for their own project based on the work I did.
Choosing the Insulation
A wine cellar should be insulated between R16 and R25, but my winery is a place for making wine, wintertime bulk storage, bottling, and lab work. My design uses 4×8 flat sheet, rigid insulation foam boards. Expanded polystyrene (EPS) foam board (white) provides about R4 per inch (2.5 cm) while polyisocyanurate (Polyiso) foam board (grey or yellow) provides about R6 per inch (2.5 cm). Generally speaking, the higher the R-value, the more expensive the foam board. One layer of 2-inch (5-cm) white, foil covered, foam board would provide about R8 and since I wanted to control temperature in the 50–75 °F (10–21 °C) range, it would be good enough in southern Oregon. If it was for summertime cold storage, then two layers of 2-inch (5-cm) grey/yellow foil-covered, foam board (R24) might be needed, so consider how you will use your own space when making this decision.

Planning for the Winery
My planning started with deciding where the walls and door would be. Using construction metal studs/tracks would not work as studs for foam boards. My plan was simple: Have the local sheet metal shop fabricate sheet-metal tracks, 2-inch (5-cm) wide and 2-inch (5-cm) high on each side. Since the height of my garage is about 9.5 feet (2.9 m) high, I ordered 10-foot (3-m) long tracks. The tracks would fit together with a 45-degree miter if it was a corner and a square cut if it was a T. Also, wherever two foam-boards met one another, it would take two tracks, fitted together back-to-back (as shown in the images below).
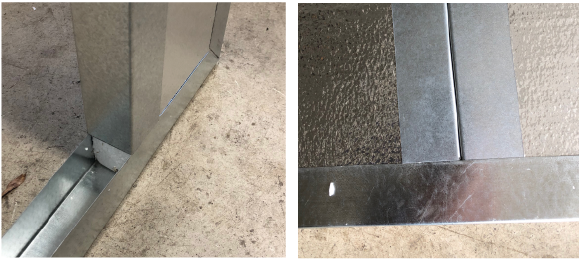
Now for the hard part: How many tracks did I need? I wanted to order the correct amount and not return several times. I had to draw out each wall on paper. If you were to have two layers of foam board, you might want to stagger the joints, so some tracks could be 4 feet (1.2 m) while others would need to be 2 feet (0.6 m) wide. Staggered or not, all joints should be taped with HVAC aluminum foil tape, and back-to-back tracks are screwed together.
Before construction I had to evaluate the electrical needs: For heating and cooling and for winemaking equipment. A licensed electrician may be needed. Depending on the design, wiring the electrical might be the first step.
Working Around Garage Door Rails
My winery walls go from floor to ceiling, however, if the garage stall you choose has a double-wide garage door, then the winery walls would need to stay underneath the garage door rails and the design would include a ceiling. Because everyone’s garage situation is unique, the following DIY description is kept somewhat generalized.
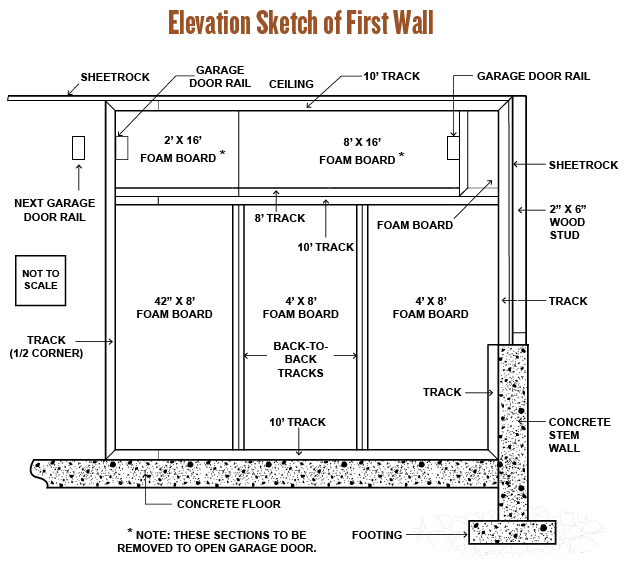
In my situation, the plan had at least two walls and a door. The first wall would extend from the exterior wall to just past the second overhead garage door rail. The rails are about 8.5 feet (2.6 m) above the floor, so a full height sheet would fit underneath the rail. If the rails had been less than 8 feet (2.4 m) above the floor, then I would have planned to cut the foam board to fit underneath the rails (more on this later). Another option would be to remove the rails, but that would require the garage door to be fixed in place. In any case, a partial foam board would be needed to reach the ceiling. The sketch of the first wall (below) shows each track for my situation.

Including a Bump-Out and Locating Entry Door
The remaining walls would run alongside the garage door rail. In my garage, I wanted an 8-foot (2.4-m) long workbench to fit against this wall, so the wall would bump out the width of the bench beyond the 8-foot (2.4-m) point. The bump-out would also provide rigidity to the wall and be the location of the entry door. To add to the rigidity on both sides of the entry door, the doorposts were 6 inches (15 cm) wide (requiring three layers of foam board). Beyond the entry door, the wall would extend to the exterior wall.
Constructing the First Wall
With the tracks in hand from the sheet metal shop, I started the installation of the first wall about 18 inches (46 cm) in front of the garage door. The wall extended from the exterior wall past the overhead garage door rails, or about 11.5 feet (3.5 m) wide. Since the concrete stem wall was not flush with the sheetrock, the track was cut into two sections: The bottom section against the concrete wall and the top section against the sheetrock. Keeping the tracks plumb, I attached them to the walls using anchor screws (two for concrete and three for sheetrock). Both sections of the track were cut at a 45-degree miter on one end to connect, which was later connected to the tracks at the floor and at the ceiling. I used a power miter saw with a blade for metal to make my cuts.
Then the floor and ceiling were marked for the next tracks, keeping the wall square with the exterior wall. Again, two tracks were cut at a 45-degree miter on one end and installed on the floor and the ceiling using anchor screws. Since the wall was longer than 10 feet (3 m), two short sections were cut with a miter as they would connect to a corner post. Similarly, these were installed with anchor screws.
A major construction difference between this and a normal house wall is that the walls are filled in with foam board as you install the tracks. Although the tracks are like studs in a house, once all the tracks are in place, the foam board cannot be squeezed in — it must be installed as you install tracks on two or three sides.
I installed the first section of foam board with the foil side facing out. If you have a concrete stem wall like mine, notch the foam board accordingly. A utility knife that extends out 2 inches (5 cm) works well to cut the foam. I slid the first foam board into the floor track and into the wall track. On the topside of the foam board I placed a horizontal track. With tracks on three sides, I cut to length two tracks for the fourth (vertical) side of the foam board. One track was inserted into the first foam board and then using three sheet metal screws I connected the two tracks together (back-to-back). I continued this process until the wall reached the corner and I slid in the final foam board. A final floor-to-ceiling track, cut with 45-degree miter on both ends, served as one-half of a corner post.
Now, the reason why I kept the foam board underneath the rails. With the garage door closed, I filled in the top section, working around the garage door rails. I kept the section between the two rails as an intact 8-foot (2.4-m) section that I can easily remove if I need to open the garage door (shown in the illustration above). The remainder of the open spaces were filled in with smaller sections.
Constructing the Remaining Walls
With the first wall complete, the winery turned the corner with a new wall and installation of track as the other half of the corner post. With three sheet metal screws, I attached a track, with 45-degree miter cuts on both ends, to the side of the previous wall’s corner post. Again, I planned out this wall by marking the floor and ceiling, keeping it square to the previous wall and the exterior wall. Because the first 8-foot (2.4-m) wall left space for a workbench, the wall bumped out the width of the workbench. This meant inserting a short wall (25 inches/64 cm wide) with an inside corner and then an outside corner.
Installing Entry Door Frame
With the insulated walls installed, the next step was the insertion of the left-hand post for the man-door. For rigidity sake, I used one 4-foot (1.2-m) track and several 6-foot (1.8-m) tracks for this post, thus it required three pieces of foam board, 2 inches (5 cm) wide each.
Measure the door dimensions before installing the next section. My pre-hung door had a threshold (doorsill) that needed to be removed to allow dollies to move carboys and other large equipment through the passageway. Additionally, the right-hand casing had to be shortened slightly because of a sloping floor.
Once completed, the wall returns to 2-foot (0.6-m) tracks. Very importantly, since the foam board slides into the tracks, the final section of foam board overlaps the previous section. After all the walls are completed, the entry door is installed.
Covering the Window and Track Joints
The window in the winery was tightly fitted with foam board, blocking out light and transfer of heat. All holes, particularly around the rail, are filled with insulation. Most all joints are covered with aluminum foil HVAC tape, with the exception of the top section of the first wall between the rails, thus allowing its easy removal and the garage door to be opened.
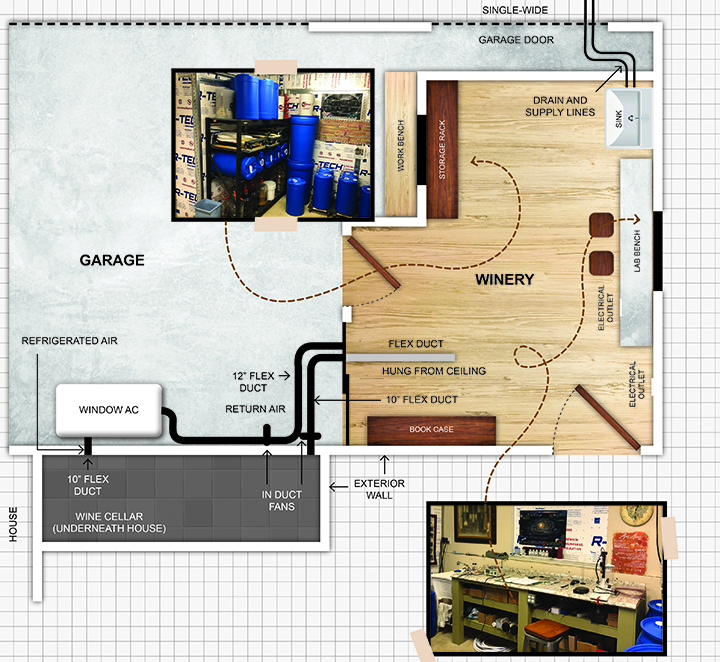
Adding a Lab Bench and Sink
An old workbench was painted and a pre-fab countertop covers the top to provide a nice cleanable surface for wine lab work or bottling. A heavy-
duty extension cord connects to an easily accessible power outlet at the front of the workbench.
Underneath the workbench are two rows of shelves to allow storage of equipment and chemicals. Small cardboard boxes or clear plastic bins help organize chemicals and equipment. Opposite the workbench a heavy-duty storage rack provides a place to store carboys, dollies, and other miscellaneous items.
A sink next to the workbench is attached to the wall using Velcro sticky-back tape. I didn’t have water access in the garage and didn’t want to have the added expense of adding it. Instead, the faucet connects to a culinary water hose and outside faucet. When not in use, the hose is disconnected from a 3-foot (0.9-m) long hose, which connects to a “Y” going to the hot/cold tubes on the faucet. The wastewater connects to a flat drain hose leading to the yard that can be rolled up and put away. A short 2×4 is used to hold the garage door open when the sink is in use.
Temperature Control
Heating for the winery is provided with a ceiling-mounted electric heater. A common cooling system connects the wine cellar to the winery. The wine cellar is underneath the house where the crawl space is about 5-feet (1.5-m) high. Access is from a trap door inside the house. The cellar flooring was installed over a drain pipe, pea gravel, visqueen plastic sheeting, two layers of concrete board, and remnant floor tiles. Wine bottle racks were installed and anchored to the footings. It is not a thing of beauty, but it is functional.
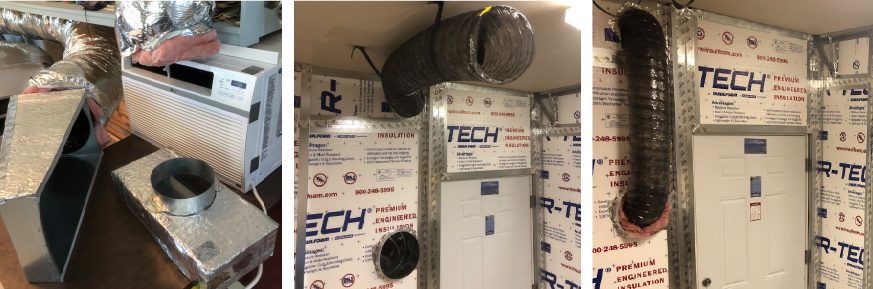
However, my plan was to adapt a window air conditioner (AC) to a duct system. The refrigerated air would enter the wine cellar first, then the air would flow from the wine cellar to the winery, and then return to the AC.
The window AC is set up on a table in the garage. I had the sheet metal shop fabricate two “boot” type ducts. The refrigerated air boot covers the outlet of the AC and connects to a flex duct going into the wine cellar. The 10-inch (25-cm) diameter flex duct chosen provided approximately the same surface area (square inches) as the outlet on the AC. The return air boot covers the inlet of the AC and connects to a 12-inch (31-cm) flex duct. This size provided approximately twice the square inches of a 10-inch (25-cm) diameter duct.
The two boots are connected to the window AC using sticky back Velcro strips and duct tape. The cool air flex duct goes to the near end of the wine cellar. At the opposite end of the wine cellar, a duct fan is inserted into the 10-inch (25-cm) flex duct, which goes into the winery near ceiling level. A connector splice collar is used to pass through the foam board. Inside the winery, the insulation around the flex duct was removed and directed to the opposite side. The return air inside the winery is a couple of feet below the inlet flex duct. This is important as when the winery is being heated or not needing cooling, the cool air inlet duct can be routed directly to the return air duct. This is easily accomplished by pulling the inlet flex tube out of its ceiling straps and inserting it into the return air duct and packing insulation around it. Since the return air duct run is about 25 feet (7.6 m), a duct fan was inserted at approximately the half-way point on the 14-inch (36-cm) duct.
If the minimum desired temperature for the wine cellar is consistent with minimum setting on the AC unit, then the two duct fans should be adequate for proper operation. However, if the desired temperature for the cellar is below the minimum setting on the AC, then that temperature can be achieved with the installation of a CoolBot.
With the CoolBot configuration, the installation is somewhat tricky. First, the duct fans are a must, otherwise the AC will likely freeze up due to a lack of sufficient airflow. Second, a 2.5-mm mono extension cable is needed to place the CoolBot room temperature sensor in the wine cellar and away from blowing refrigerated air. Third, the AC temperature sensor and the CoolBot heater (which are wrapped together with aluminum foil) need to be located inside the AC, but off to the side from the fins and not insulated or touching anything metallic. Finally, the CoolBot heater delay should be set to d4 if cooling the wine cellar only, and set to d9 if cooling both the wine cellar and winery.
Overview
That’s the nuts and bolts of my winery build. Of course there are many little details specific to my build that I skipped for this article. Similarly, you will have aspects specific to your situation to figure out as well. But, the benefits of having a winery with temperature control vs. using multiple rooms (on multiple floors) has been worth every penny and all of the hours spent planning exactly how I wanted the winery designed.

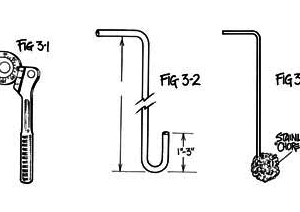
Build a cart to roll your fermenter around easily, a stainless racking cane, and cap plonker.
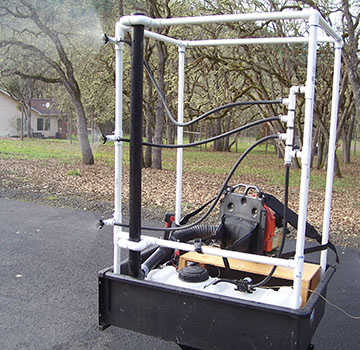
When your home vineyard grows to a certain size a hand-held or backpack sprayer just won't cut it. Use these plans to build a tow-behind sprayer to save time and effort while executing your spray program.

