
Over the years I have accumulated lots of pieces of fairly delicate labware to perform a number of winemaking tests. After recently remodeling my garage winery with some cast off kitchen cabinets I got for free from a remodeler, and building my temperature controlled Barrel Room (WineMaker June/July 2010), I found that the laboratory equipment ended up scattered in drawers, on shelves and countertops and weren’t very well organized. I decided to build a toolbox that would collect, organize and protect all my precious pieces of equipment and bottles and jars of chemicals.
I considered a number of box sizes and shapes and, remembering my builder-Dad’s myriad carpentry toolboxes, recalled one that contained his brace (a hand crank style drill) and bits and the scores of drills and other attachments that he stored in it. His tool box was an upright box that hinged at the back and opened up like a clamshell to reveal all of his tools. It was filled with little compartments, improvised rubber tool holders and clamps that kept all the pieces secured in place while it rode around on in the back of his old Chevy truck.
I thought a box like his could do well to safely store my labware, and also provide a nice backdrop on my counter for my analyses. I could set it up on my countertop, unlatch the two sides and open it up and have all the necessary tools at my beck and call.
I set about taking inventory of all my labware and other things that are lab work related, taking measurements and photos of each to help rough-out the layout of the compartments on paper and figure out how to secure the fragile pieces in place when moving the box from the counter to its storage space.

In summary, I found I had:
• Test tubes
• Pipettes and pipette bulb
• Hydrometers
• Graduated cylinders
• Erlenmeyer flasks
• Beakers
• Syringes
• Stoppers with air tubes and impingers for free SO2 testing
• pH meter and probe
• Refractometer
• Thermometers
• Chromatography paper
• Gram scale
• Reagents, chemicals, and empty glass and plastic storage bottles
• Burette Stand
• And several other items that are still on my wish list
After more thought, I decided I wanted to keep the burette stand and scale on the counter instead of in the box because I use them for more functions than just the lab work and didn’t want to go to the box each time for them.
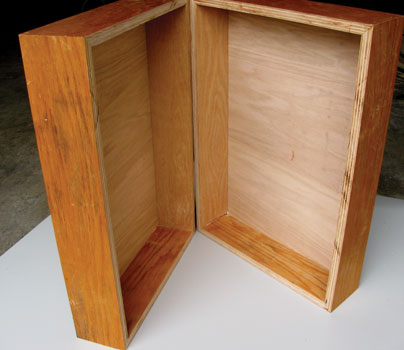
With the toolbox being an upright “clamshell,” I laid out all the fragile glassware on the left side and the reagents, hardware and less fragile components on the right. After a memorable visit to Paris, I decided to call the left, glassware side the Left Bank and the reagent side the Right Bank.
Glass is stronger when set on edge rather than laid flat, so I started with the most delicate pieces, the pipettes, and other volumetric devices, which I wanted to stand vertically in the box.

On the right side, I planned to build several sizes of compartments for different sized bottles of chemicals. The ones I usually store are:
• Sodium hydroxide pellets and solutions (0.1 and 0.01 N strengths)
• Hydrogen peroxide 3%
• Potassium hydrogen phthalate
• Phosphoric acid
• Malic, Tartaric and Lactic acid standards
• Formic Acid (Chromatography Solvent)
• Phenolphthlalein
• Methylene blue
• pH buffer solutions
With all the equipment set out together, I then laid them out on a piece of half-inch plywood to get them optimized for space efficiency and protection. Then with a visual reference for the final size of the cabinet I was able to determine that it should be 16 inches (41 cm) wide by 24 inches (61 cm) tall, and each side of the clamshell would be 4 inches (10 cm) deep.
Materials List
One piece 1⁄2-inch x 4-foot x 4-foot piece of shop grade plywood
One piece 1⁄8-inch x 2-foot x 2-foot piece of plywood
Wood glue
1-inch brad nails
Two 3-inch butt hinges
Two 1-inch hinges
Two draw clamp trunk latches
One utility handle
Six #6.5 bungs
Miscellaneous scraps of 2x and 1x pieces of pine
Putting it together
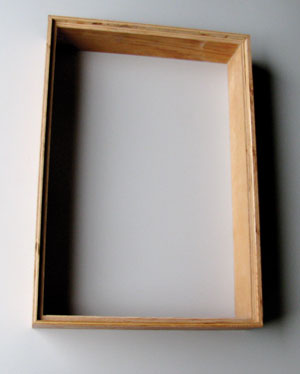
1. Building the Boxes: I cut out the frames for each side of the box by ripping 41⁄2-inch (11 cm) wide strips of the plywood. Then I mitered, at 45 degrees, four pieces of these rips each at 16 inches (41 cm) and 24 inches (61 cm) respectively. For strength and appearance, I then rabbetted one inside edge of these pieces to 1⁄4-inch (0.63-cm) wide by 1⁄2-inch (1.3-cm) deep that will allow for the 1⁄2-inch plywood front and back cover to rest flush into the frame and have minimal plywood edges exposed. After gluing and nailing the pieces into an identical pair of rectangular frames, I then fit, glued and nailed the half-inch plywood front and back pieces into the frames, ending up with two half-boxes that make up the sides of the box.
2. Pipette Holder:
The pipettes (one 25 mL, one 10 mL and two 2 mL) will stand sentinel in the lower right corner of the Left Bank. To provide support for them, I cut a block from a 2 x 6 down to 4 inches x 4 inches x 1-1⁄2 inches (10 cm x 10 cm x 3.8 cm). I drilled holes down into the edge, just slightly larger than the diameter of the pipettes, and all the way through the block. Lots of glue and a clamp to hold it in place and the pipettes have a new place to live.
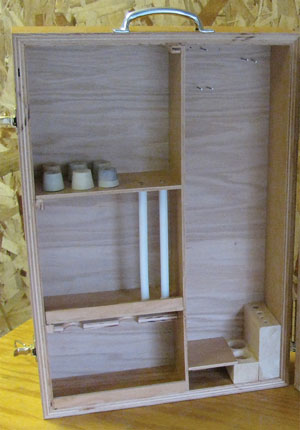
3. Divider Framework:
While the glue was setting up on the pipette holder, I cut, assembled and installed a divider framework for the rest of the glassware side of the box. These were cut from the 1⁄8” plywood and glued and clamped together. Note the 1⁄2” x 1⁄2” blocks I fastened to the frames to allow me to nail them in place. Again, I applied wood glue on all the edges making contact and the framework is secured in place.
4. Free Sulfite Test Section:
The top section of the Left Bank was designated the Free Sulfite Test Section. I perform my aeration/oxidation testing with two large test tubes supported in my burette stand, and have three pairs of these test tubes so I can prepare the following test setup while another is bubbling away for 10 minutes. To support these test tubes, I screwed six #6.5 rubber bungs to the top of the section’s shelf. The tubes fit down over the bungs which hold them in place securely. Next to the test tubes, I drilled a couple holes through the shelf so my impinger/stopper assembly can be supported. In order to protect the thin, fragile, glass impingers, I installed a couple of 1⁄4-inch (0.63 cm) plastic pipes directly below the holes held in place with some silicone caulk that the glass impinger tubes slide into.’
5. Center Section: Below the Sulfite Test Section, my collection of beakers (500, 250, 100, 50 and 25 mL) are stored like a set of Russian nesting dolls and sits next to my plastic wash bottle filled with distilled water. An extra, small test tube also shares this shelf.
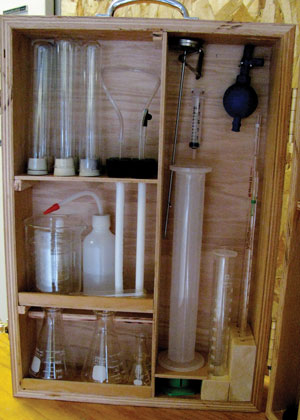
6. Erlenmeyer Flasks: Below this section are my Erlenmeyer flasks (two 250, one 50, and one 25 mL) rest with a neck support for the larger ones.
7. Graduated Cylinders: Next to my pipettes, I placed my graduated cylinders. I have two 100 mL cylinders that have a plastic support base. So I made a similar support stand to the pipettes’ stand by cutting a 2-inch by 11⁄2-inch x 4-inch (5.1 cm x 3.8 cm x 10 cm) base and drilled 11⁄4-inch holes in it, which allows the cylinders to slide in firmly. My 10 mL Nalgene cylinder fits upside down into one of these glass cylinders. A little shelf from this block supports my larger Nalgene 500 and 250 mL graduated cylinders with the 250 mL cylinder slipping upside down into the larger one. (You don’t have to organize your box exactly this way. I mention my arrangement to show you that — with a little organization — you can pack a lot into a fairly small space.)
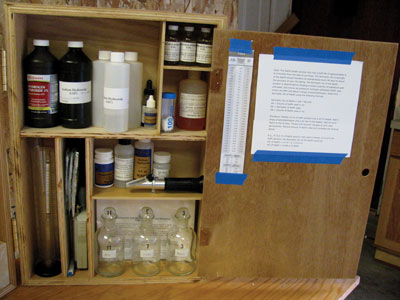
8. The Right Bank: The Right Bank is full of reagents, supplies and equipment needed for all my tests. I laid out my larger bottles of reagents including hydrogen peroxide (3%) and premixed 0.1 N sodium hydroxide that I keep stored in a used up H2O2 bottle. When I dilute the the 0.1 N solution to 0.01 N (a more unstable solution), I keep it in a plastic bottle and usually discard it when testing is complete unless I plan on additional tests in the near future. Methylene blue and phenolphthalein dropper bottles fit well into this section as well. These reagents are useful for free sulfite testing and total/titratable acid tests.
9. Malolactic Test Section: When testing for the completion of malolactic fermentation, a set of acid standards are required as well as solvent and chromatography paper. The three acid standards — tartaric, lactic and malic, all stack well over the formic acid solvent and the micropipettes needed for the test. The chromatography paper stands up in the lower right corner of the Right Bank.
10. Hydrometer Slot: I have two hydrometers — a triple scale one that I keep in its plastic test jar and a short range hydrometer that I keep in a plastic sleeve. These stand up on end in the lower left corner of the Right Bank. In addition I store my old glass/mercury thermometer in this slot in case I find the need for a second backup thermometer.
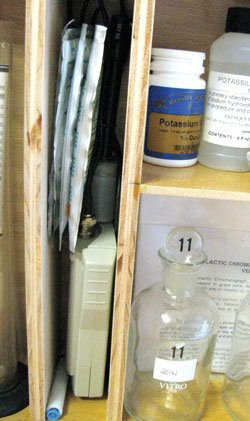
11. pH Meter: I use a handheld pH meter for the majority of my tests, but also have a pen style meter for use in the vineyards. The slot next to the hydrometers safely stores my pH meter. I can keep the probe connected to the meter, and — with the cable wrapped and tied to the probe with a wire twist tie — the probe stands on top of the meter with its probe submerged in a little jar fitted with a gasket on top that is filled with electrode storage solution. The standardizing buffer solutions, which come in disposable sachets, slide in right next to the probe. The meter comes with a tiny screwdriver for calibrating prior to use. I glued a 1⁄4-inch (0.63-cm) pipe in the lower corner of the slot to keep it handy.
12. Sample Jars: In front of the chromatography paper, I found just enough room for my three glass bottles that I got off Craigslist (along with a lot of other glassware). These are great for collecting larger samples for testing prior to inoculating my must with yeast.
13. Miscellaneous Chemicals, Refractometer: A final 1⁄8-inch shelf glued in above the chromatography paper supports several miscellaneous chemicals, including solutions for standardizing sodium hydroxide solutions (potassium hydrogen phthalate), sodium hydroxide pellets and other chemicals. The space in front of them is just right for my hydrometer.
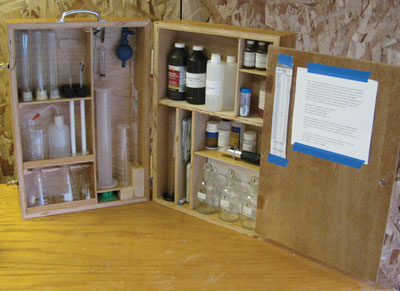
14. The Divider: After getting all the pieces assembled and installed in the Right Bank and Left Bank I suddenly realized that the stuff on the right bank could easily tumble into the left bank and possibly break some glassware, so in order to solve that problem I made a hinged divider between the sides. This was a piece of the 1⁄8-inch plywood and I drilled a 3⁄4-inch (1.9 cm) finger hole into it to facilitate easily opening it. The divider is attached to the frame with a pair of 1-inch hinges. The beauty of this divider is that not only does it keep the contents of the right bank securely in place, but it gives me a bulletin board to post my most used charts and protocols for easy reference.
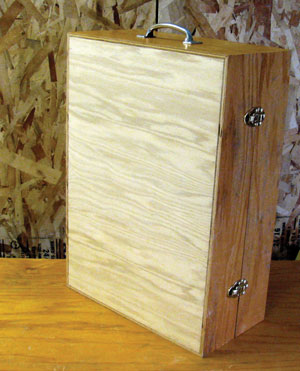
15. The Hardware: The two halves of the clamshell were finally stacked tightly together, held aligned with some clamps and then I installed a pair of 3-inch butt hinges (optionally a piano hinge would work equally as well). On the top, I screwed in a metal carrying handle. And in order to keep from scratching my counters when opening the toolbox, I installed some furniture feet felt pads on the bottom of box.
This little box has really consolidated all of the scattered pieces of lab equipment into an organized place and has made working with my wines much more pleasant and efficient. I feel that the fragile pieces are much safer, and know exactly where to look for that little bottle that I may only need once a year — but when I need it I don’t want to search through drawers, boxes or wherever else I may have stashed it.
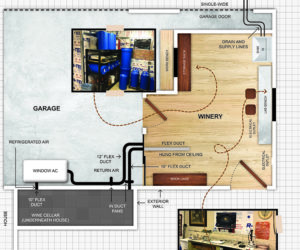
After years of making wine in various locations throughout my house out of necessity and lack of a dedicated space, I recently had to evaluate my process. For years I fermented grapes in my garage, stored my bulk wine in a crawl space underneath my house (pumped in and out), and bottled it in the kitchen (again transferred via pumped). Also, my winemaking equipment and carboys were scattered about. I knew that…

Realizing the large temperature swings in his garage don’t make for a great environment to conduct fermentations, a home winemaker converted chest freezers to temperature-controlled “cellars” that cool or heat to a preset temperature for both fermenting and bulk aging his wines.

