Setting Up a Home Wine Lab
Setting up a home winemaking lab might seem a bit intimidating for winemakers who are more focused on the artistic side of wine production. One thing to keep in mind is that the most common wine analyses are relatively easy to master with practice, and with only a few exceptions the chemicals used in the tests are relatively harmless. The great benefit of performing lab analyses now as opposed to in the past is the expansion of analysis options at different price points and the ubiquity of both written instructions and tutorial videos available to help perform analyses correctly.
In this article we will explore the equipment and supplies needed for a home winemaking lab, including some different options at various price points. This article is the first in a series of three that you will find in this issue. The other articles discuss the utility and frequency of lab analyses in more detail, as well as how to perform benchtop trials for additives and fining agents.
It is perhaps easiest to think about equipment chronologically from harvest through packaging, so we will begin with harvest sampling.
Pre-harvest to Pre-fermentation
The common tests for determining fruit maturity are: Sugar concentration (°Brix), acid concentration — known as titratable acidity (TA) — and pH.

The classic tool for measuring sugar concentration prior to fermentation is the refractometer. Traditional refractometers, which are calibrated and read by eye, are relatively inexpensive (around $30–$70). Digital refractometers are easier to calibrate and read but cost around $200–$300.
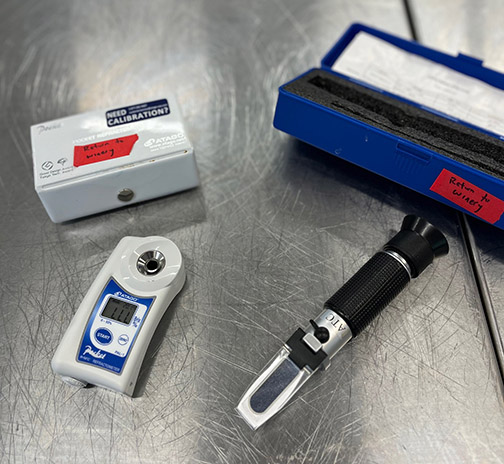
Refractometers give an accurate calculation of sugar concentration in simple solutions, however they are not reliable for calculating sugar content in complicated solutions like fermenting wine (the alcohol produced during fermentation also impacts refractive index, thus making sugar concentration alone impossible to determine). Therefore, hydrometers have been the standard method of measuring density (and inferring sugar concentration from the density measurement) during fermentation when refractometers are no longer indicative of sugar content. Hydrometers are inexpensive but require a fairly large sample volume to use if making small batches of wine. Collecting samples for hydrometer readings can be time-consuming to prepare during red wine maceration when solids need to be separated from the sample.
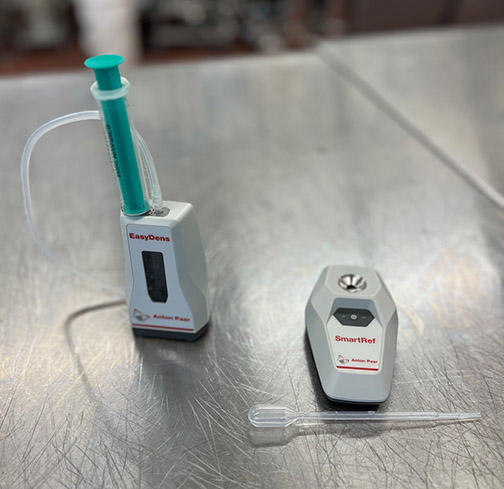
There are also digital density meters available, which require a much smaller sample volume to read, but in the past these were quite expensive (around $3,000) and thus out of reach for most home winemakers. A few years ago, however, Anton Paar introduced a smaller digital density meter that is read through a Bluetooth-connected mobile phone app, which currently costs around $500. In addition, Anton Paar has recently introduced a combination analysis system with both a refractometer and digital density meter connected to the same mobile phone app. When measuring both refractive index and density in the same sample, it is possible to calculate the sugar concentration and the alcohol content, a very useful tool for wines as well as other complicated mixtures like beer, liqueurs, and kombucha. The two combined meters cost around $750.
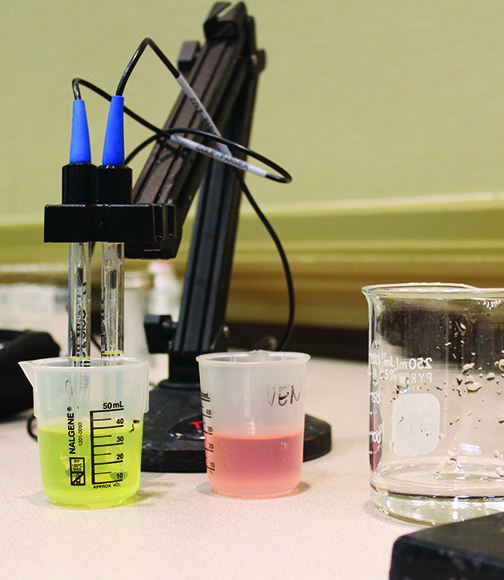
To measure the pH, a pH probe and meter are required. Simple units that contain an integrated probe and display cost around $50–$75. More complex units with a replaceable probe can cost $150–$750. Vinmetrica also offers a combined analysis kit for pH, TA, and SO2 for about $600. Buffer solutions are required to calibrate a pH probe, and probe filling and storage solutions may also be needed, depending on the specific probe. It’s important to mention that to obtain an accurate pH result the sample liquid needs to be in motion around the probe. The easiest way to keep the sample in motion is to utilize a magnetic stir bar and stir plate, but with practice you may also use a swirling hand motion to keep the fluid in motion around the surface of the probe. This swirling sample motion is also helpful when performing other titrations, like those used to measure TA and SO2.
When measuring the TA, a burette and burette stand are most commonly utilized, along with a volumetric pipette and some small beakers to hold the sample. The total cost of this traditional lab setup might be around $150 new, or you may find this equipment in the reuse market on sites like eBay. The burette and stand may also be used for yeast assimilable nitrogen (YAN) determination with the formalin method, as well as free SO2 testing, so there is some overlap in equipment use with the burette and stand. If a burette and stand are cost prohibitive it’s also possible to perform the titration for TA using a graduated syringe. Kits with a graduated syringe and sodium hydroxide reagent sell for around $15. It’s a little more difficult to read the graduated syringe accurately, so TA measurement may not be as accurate or precise as using a burette. TA measurement endpoint detection may be performed either with a pH meter, or by utilizing phenolphthalein as a color indicator. Using phenolphthalein is cheaper than purchasing a pH meter, but it’s easier to detect the titration endpoint more repeatably with a pH meter, especially for red wines. The titrant for TA measurement is most commonly 0.1M sodium hydroxide.


Measuring the concentration of nitrogen-containing compounds that yeast can utilize in grape must, called YAN, is important to ensure a healthy ferment. There are two important components of total YAN — free ammonia ions and amino acids that may be assimilated and utilized by yeast. Commercial wineries utilize an ammonia ion probe to measure free ammonia and an enzyme/spectrophotometric method to measure free amino acids, which are yeast assimilable. A simpler method for total nitrogen estimation is called the formalin titration and utilizes a relatively straightforward titration with a pH probe. A reagent kit for performing formalin titration is available from Vinmetrica (it costs around $40), but the test is most accurate when used with a pH meter and burette to perform the titration. This analysis uses sodium hydroxide and formaldehyde as the titrants. Formaldehyde is a carcinogen and therefore should be handled with gloves and safety glasses in a well-ventilated room and must be neutralized prior to disposal. Vinmetrica provides the neutralizing agent with the reagent kit.
Alcohol and Malolactic Fermentation
Moving from the juice stage to fermentation, measuring sugar drop and residual sugar and malic acid are considered most critical for wine quality. Because hydrometers measure density and we infer sugar concentration from the density measurement, they most accurately infer sugar concentration prior to fermentation, when there is a lot of sugar in the sample and little other compounds. This is not the case at the end of fermentation, when little sugar remains, and the alcohol generated during fermentation causes a decrease in solution density. The impact of alcohol on the density of the solution means that the hydrometer reading is often -1 to -2 °Brix at this stage, making it impossible to determine how much fermentable sugar remains in the new wine from the hydrometer reading. Both home winemakers and small- to medium-size producers use sugar pill tests to determine residual sugar in finished wines. The pills are relatively inexpensive (around $40–$50 for a box of 20 or 36) but are getting harder to find (the Aimtab brand on Amazon and some home wine retailers). The test is performed in a simple test tube, and the only supplies needed are the test tube, some tweezers to handle the sugar pill, and a disposable dropper to dispense the sample and water. Larger wineries often utilize enzyme-based test methods to measure residual sugar, and also malic acid concentration after malolactic fermentation. These methods can give very accurate and repeatable results but require a spectrophotometer to determine the sugar or acid concentration. Most spectrophotometers cost $3,000–$5,000 new.

If malolactic fermentation is desired it can be important to measure the malic acid concentration to determine when MLF is complete. Besides the enzyme/spectrophotometric method mentioned previously, there are several other options. A relatively inexpensive method is paper chromatography, with a kit that can be used for several years costing about $100. Vinmetrica also offers an alternative method that utilizes enzymes to generate CO2 gas, with the volume of gas produced equivalent to the malic acid concentration. The Vinmetrica malic acid kit is about $200 and the analysis method is relatively straightforward.
Post-Fermentation and Aging
Once fermentation is complete, alcohol concentration may be estimated from the initial sugar concentration, but it’s also possible to measure alcohol content with several different methods. The ebulliometer is a piece of analysis equipment from the Victorian era that is still commonly used. This method utilizes the difference in boiling point of the sample compared to pure water to estimate the alcohol content. New ebulliometers cost around $1,300, but used ebulliometers may be found on eBay or other websites. Ebulliometers are accurate with wines containing about 2% or less residual sugar. Sugar increases the boiling point of liquids, so in sweet wines the impact of sugar is difficult to differentiate from the impact of alcohol. Vinmetrica also offers a titrimetric method for determining alcohol that costs around $300. Finally, brewers often use mini-distillation glassware to isolate the alcohol in beer and then measure the density of the distillate (with hydrometers or density meters) to determine the alcohol concentration in the sample. This method works well but is time-consuming. Mini-distillation kits cost from $75–$300, depending on the heating source.
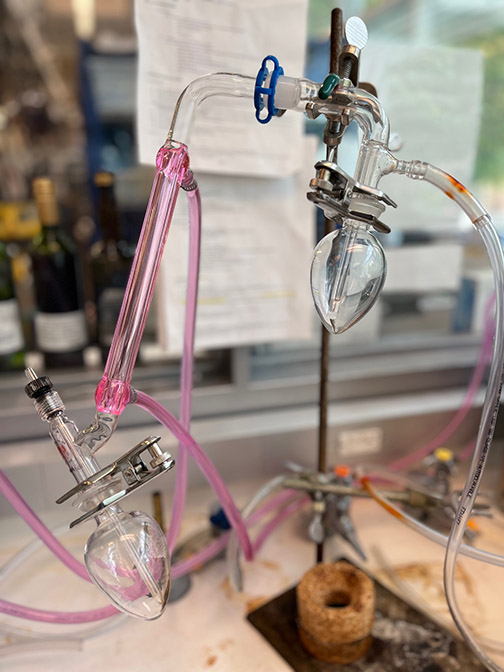
Use of potassium metabisulfite is an important tool for ensuring microbial stability and preventing premature oxidation of young wines prior to packaging. When sulfites are added to wine several things can happen: They can bind with compounds in the wine like sugar and acetaldehyde, they can be consumed in oxidative reactions, or they can exist in a “free” form that provides an antimicrobial and anti-oxidative function. Thus, the free form of SO2 is most important for stability and therefore the type of SO2 most frequently measured in wine. Free SO2 may be measured in several different ways. Commercial wineries most often use the aeration/oxidation (AO) method. The AO method is a relatively straightforward separation and color titration, but requires glassware and either a vacuum pump or aquarium pump to remove SO2 from the wine sample. The classic glassware setup for the AO method runs around $400. MoreWine! also sells a kit with more basic glassware for around $120. The reagents required for this method include hydrogen peroxide, AO indicator solution (a mix of color indicators), and 0.01M sodium hydroxide.
Another common method for measuring free SO2 is the Ripper method, which utilizes titration with iodine and a color change when excess iodine reacts with starch added to the sample. This method is relatively inexpensive (the only cost is the reagents, volumetric pipettes, and a burette and burette stand), but the test must be performed quickly and requires a keen eye and some training to perform accurately. The titration end point color change can be especially difficult to detect in red wines, and for this reason several companies have adapted the Ripper method to utilize an ORP probe to measure the endpoint instead of using the starch/iodine color interaction. Hanna Instruments offers an auto-titrating SO2 analysis system for about $1,600. In addition to their combined analysis kit mentioned earlier, Vinmetrica also offers a manual titration analysis kit for this method for about $350. Reagents for this method include a 1% starch indicator solution (if performing the manual Ripper method), 0.02 N Iodine solution, and 25% H2SO4 (sulfuric acid) solution. If purchasing a specific probe or analysis system, the reagents are often sold as a kit from the equipment supplier.

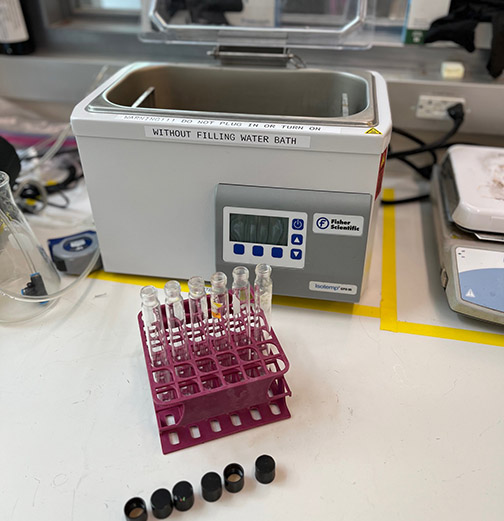
During aging, most red wines are only checked periodically for free SO2 and sensory analysis. White and rosé wines, however, are checked for protein stability and bitartrate stability. Protein stability testing begins with filtering a wine sample so that it is brilliantly clear, then heating the sample for some time to determine if a protein haze develops. Filtration in labs is often performed with centrifugation, then small filter pads and pad holders that are connected to vacuum pumps, or disposable filter tips connected to a syringe. For home winemakers, a paper coffee filter and time might suffice. The equipment needed for a heat test itself are test tubes, preferably with screwcaps, and a hot water bath or oven to heat the samples. Winemakers often perform a bentonite fining trial at the same time as they check protein stability so that if the wine is unstable, they determine the minimum amount of bentonite to add to the wine to promote stability. To mix up a bentonite slurry for this test you will need a balance to weigh out the bentonite, a graduated cylinder to measure the water volume, and a stir bar and stir plate to effectively mix the bentonite into the water. It’s possible to determine by eye if a protein haze has developed after heating, but commercial winemakers often utilize a turbidity meter to report a hard number. Unfortunately, turbidity meters start around $800 and require calibration standards that can be as expensive as the meter. For home winemakers, assessing protein stability by eye is adequate.
The easiest way to assess potassium bitartrate stability is by eye, looking for crystal formation in a wine sample stored in the refrigerator or freezer. For this test you only need a clear sample tube with a cap, like a flat-bottomed test tube or a centrifuge tube.
Filtration and Packaging
Commercial wineries run a myriad of tests at this stage to ensure the wine meets acceptable parameters for pH/acid, residual sugar, alcohol content, free SO2, dissolved oxygen, color, astringency, microbial stability, etc. For home winemaking the most important test prior to bottling is perhaps free SO2. We’ve covered the equipment for most of these tests in previous paragraphs and we’ll discuss the rationale for when and how often to perform these tests in this article.
General Labware and Final Thoughts
It is helpful to have a dedicated lab bench or tabletop for performing wine analyses, but if your living space is at a premium, most lab equipment can be kept in a storage bin. Burettes are of particular concern in handling and storage, as they are long and the tip is easy to chip or break. Most reagents for simple analyses will last a long time in storage. If possible, storing acids and bases separately and in a leak-proof secondary container is best (if the reagents do leak they can rust or corrode metals and cause a mess). It’s nice to have access to a sink for rinsing glassware and disposing of samples and reagents, but a bucket may also be used.
Besides the equipment mentioned for specific tests it is nice to have several sizes of beakers and graduated cylinders available to measure and hold liquids. For several lab tests it’s important to dispense an accurate volume of the sample to be measured. Volumetric pipettes work best for this as they are very accurate and easy to read and use. The downside of volumetric pipettes is that they dispense only one sample volume, so you will have to purchase several for different tests. Graduated pipettes also work and are often included in simpler test kits. They are nice because you can dispense different sample volumes from them, up to the maximum volume held by the pipette. However, in my opinion they require a bit more attention and skill to dispense accurately. Either pipette type requires a pipetting bulb to pull the sample into the pipette.
When using test tubes, it’s convenient to have a test tube rack to hold them upright, but you can also place them in a slightly larger container like a beaker or cup, or build your own rack from wood or cardboard. It’s also convenient to have a squeeze bottle of deionized water for rinsing probes and small glassware, and a jug of deionized water for diluting samples. Finally, a small drying rack is helpful for getting the rinse water out of lab glassware.
Now that you have an idea of analysis options in terms of labware and supplies, it’s important to think about which analyses are most critical to making quality wine, and that also fit into your own winemaking philosophy, goals, and budget. Next, read this article for information on the when, why, and how often questions regarding wine analyses.