Balancing Wine Acidity
In addition to making wine, the two of us are experienced wine judges who judge at numerous amateur and commercial wine competitions annually. Through this experience, trends begin to become apparent, such as an improvement in recent years on issues regarding sulfur dioxide levels (possibly due to the attention this publication has paid the topic). That said, the past year’s wine competitions have presented more wines with acidity issues. Issues around acidity seems to be an ongoing question from home winemakers, so let’s take a deeper dive into how acidity affects the sensory impacts to wine quality and present some tools and tips around acid management.
First, let’s take a look at acidity in food. Acidity is that sensation that makes the mouth water, thus the pooling of saliva behind the front lips. Think of the quenching sensation that a squirt of fresh lemon gives to iced tea — iced tea, which has tannins. There are comparisons between food and wine that can’t be ignored.
Acid is a critical building block towards the structure in wine, as it is for food. It is the taste and perception of a wine. Acid provides flavor intensity, longer finish, and stability to tannins in a wine. When tannins are applicable, the wine is more complex for improved cellar aging and drinkability. Acid contributes to a sensory balance to wine. When acidity is out of check, too high of acid can make alcohol levels and tannin levels be perceived higher than they are. Too high of acid affects the nuances of the varietal’s characteristics, which become overwhelmed and lost. Then there are wine faults in those wines that result from too high of acid mixing with too high of alcohol.
Low acidity impairs the balance of sugar levels in wines with residual sugar. Even if the wine is dry, as with a dry white, low acidity will increase the perception of the wine being fruitier and therefore mistaken as “sweet.” When considering white wines and sparkling wines, too low of acid makes these taste flabby, instead of bright and refreshing. Acid lends to the wines holding up to being chilled. Have you ever noticed that an over-chilled glass of Chardonnay can develop a bitter note and seem lacking in fruit characters? That is because Chardonnay is a varietal known for low to medium levels of acid and often served too cold.

The same goes for red wines: Too low of acid makes wine taste flabby and the finish of the wine is diminished, not to mention that it will age poorly. Yet too high of acid will make a moderate alcohol level of 13.4% be perceived higher on the palate. The tannins in a higher acidic wine will come off more gritty and astringent instead of silky smooth.
Outside of sensory considerations, acidity is also a very important part of maintaining a healthy environment for your wine to age without risk of spoilage. Microorganisms that can affect a wine do not like an acidic environment. In addition, the higher acidity, and therefore lower pH, will allow you to use less SO2 in your wine for stability.
Based on our judging experience, it would seem that amateur winemakers often fall into a couple of different scenarios in relation to mismanaging acid in their wines:
1. They rely primarily on pH readings to assess acidity and do not determine actual titratable acidity (TA).
2. They make acidity adjustments to get their wine into the proper range (of pH or TA) without taking into consideration the sensory impact, thus making wine by the numbers.

It is important to note that a pH or TA reading in the desired range does not necessarily reflect the “best” sensory experience of that wine. For instance, a measurement of 3.6 pH can easily be presumed to be fine, providing a reasonable acid level, when in actuality there remains room to add acid and create a better balanced wine. Adding just 0.05% can change the outcome of the wine to a more favorable light. How do you know? Taste it and evaluate the differences the added (or reduced) acid makes.
Testing for Titratable Acidity
TA and pH measurements tell very little about the underlying acid mixture in wine. The principal acids within grapes are tartaric and malic, contributing 90% or more of the total (or titratable) acidity. There are also citric and other organic acids, but these constitute a very small percentage of total acidity. Then there is the fact that there are various combinations of these acids within the wine that can give you the same pH or TA value. At the point of testing, some of this relates back to what Mother Nature gave us and also what the winemaker does.
There are several options available to the home winemaker to test for total (titratable) acidity. The solutions and methods we’ll discuss can range widely in cost and accuracy, but accuracy of test results will increase if you invest in good equipment. The more accurate your test methods are, the better you can finetune adjustments that will ultimately provide the best sensory impact.
TA is expressed as either “g/L of acid,” or in tenths of a percent of acidity. Both terms are equivalent and can be used interchangeably by moving the decimal point; e.g., 6.5 g/L = 0.65% TA.
The optimum TA value as tartaric acid for red table wines is considered 6–8 g/L and for white table wines, 7–9 g/L. Ice wine is typically higher in acid while many other dessert wines and fruit wines usually have a slightly lower TA. The optimal range for Sherry is 5–6 g/L and fruit wines around 5–6.5 g/L. Remember that these are only guidelines. The acidity of your wine will depend on alcohol content, residual sweetness, and personal taste. One of the important points of this article is making more use of the sensory aspects to finetune acidity adjustments.
The principles behind acidity testing are pretty much the same although exact methods and equipment might differ. Sodium hydroxide (a base) is used to neutralize the acidity of a fixed amount of wine or must sample, which is added one drop at a time. When a pH of 8.2 is reached all of the acid will have been neutralized and, based on how many drops of sodium hydroxide were used, we can then calculate the amount of acid that was in the sample. Several test options are available:
Send Samples to a Lab
Using a commercial laboratory is a good option until you know you are committed to the winemaking hobby. If you don’t have a lab nearby, you can mail your samples to a lab to be processed, taking care with temperatures, packaging, and delivery speed. A single TA analysis can cost $20 per sample, plus shipping based on costs at our local lab. Labs may supply you with small containers to put your samples in for shipping. You may also benefit from having a more comprehensive analysis panel done that includes things like pH, volatile acidity (VA), and SO2 for additional cost.
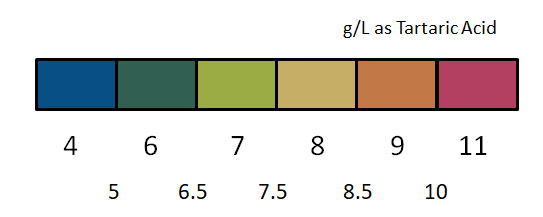
Tests Using a Color Chart
There are test methods available that use a color chart to identify the acid level based on a color match of the test sample. These are easy to do and do not need specialized equipment. An individual test can run around $3. However, accuracy is limited and is based upon subjective color matching. Their benefit on a cost/accuracy basis may be for testing grapes prior to harvest or checking juice before fermentation begins. This method does not have the accuracy to make refined additions after fermentation where even a 0.2 g/L change can have a significant sensory impact.
TA Test Kits
These are simple and do not require expensive test equipment. Typically supplied are a reaction vial about 75–100 mL in size, a 10-mL syringe, 0.1N sodium hydroxide solution, and 1% phenolphthalein indicator in a dropper jar. A test kit costs as little as $13 and will allow for several test samples.

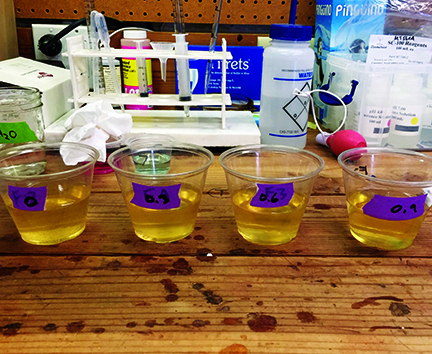
Test kits will come with detailed instructions, but the basic premise is you take a wine sample, dilute it with distilled water, add a few drops of the phenolphthalein indicator, and then add the sodium hydroxide solution via the syringe to the sample incrementally. With white wines, as you continue to add sodium hydroxide the test solution will start to turn magenta. Eventually you’ll reach a point where a faint pink color stays for 30 sec or more. This is the endpoint of the reaction and the amount of sodium hydroxide solution used will determine the acidity measurement of the wine.
With red wines, the darker color pigments of the test sample make the interpretation of the end point much more difficult. As the test proceeds certain color pigments in the wine will change and the test solution will begin to turn gray. Once you see the gray color of the solution begin to turn slightly green, this is the endpoint.
Titration with a pH Meter
pH is a measurable quantity in wine. TA is also indirectly measured, but we taste TA, we measure pH, and we use pH as the mechanism to measure TA. A pH meter allows you to more accurately determine the endpoint of the titration. This will allow you to dial in final acidity through more incremental acid adjustments. With tartaric acid, achieving a pH of 8.2 through the incremental addition of sodium hydroxide indicates that all the acid has been neutralized and that no excess base has been added to the solution. Bob Peak’s article “Testing for pH: What the big pHuss is about” (www.winemakermag.com/technique/testing-for-ph-what-the-big-phuss-is-about) provides more information on this. Handheld pH meters can cost upwards of $100 or more. The pH measurement also allows you to make more exact SO2 additions.
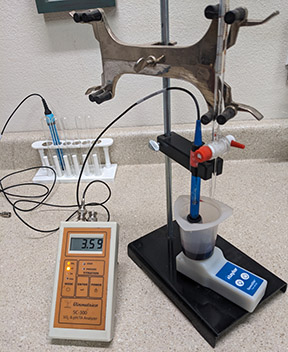
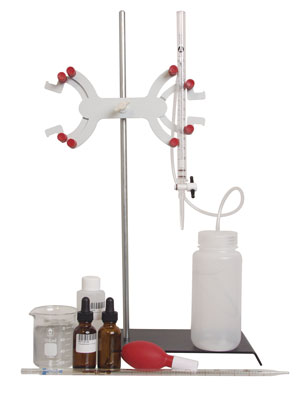
Laboratory Tabletop Setup
This uses the same process described earlier with the handheld pH meter, but allows hands-free use and can provide even more accurate measurements. The setup typically includes a desktop meter with separate probe, magnetic stirrer, titration burette, reaction vial, and a stand to precisely hold the equipment in the reaction vial. You will need the necessary reagents for the titration. The use of a burette vs. a syringe to deliver the sodium hydroxide to your sample allows more control and precision. The meter you purchase will dictate what specific reagents you will need and in what concentrations. The cost of this setup can range widely based on the specific meter purchased. Some meters can measure SO2, pH, and TA, which is great for the advanced winemaker.
Pre-Fermentation Testing and Adjustment
It will be helpful to understand some basic considerations of acidity development within the vineyard. The first consideration is that knowing the acid propensity of a grape varietal helps one determine the phenolic ripeness of the fruit and when to harvest it. Harvest decisions are not just about Brix. For instance, for red grapes, Barbera is going to typically have higher acidity than Zinfandel. And for those of you on the East Coast, you all know how the non-Vitis vinifera hybrid varietals present challenges with their high acidity. White varietals will also have higher acidity.
Environmental conditions also influence acid levels. Cool growing climates will produce grapes with higher acidity levels and consequently hot growing climates will produce grapes with lower acidity. The time of day that the grapes are harvested will also impact acidity level. A cool early morning harvest will give higher levels of acid vs. a harvest that occurs in the middle of the day with warmer temperatures. Nearby large bodies of water and elevation of the vineyard will also impact acidity.
All of this reinforces the importance of testing both pH and TA of your must. You will have better success if acid adjustments are made before fermentation. The lower the acid of your must is, the more important it is to raise it pre-fermentation. Adjustments at this point allow you to make larger additions and have them integrated into the wine. Additions after fermentation may impact the wine if tartaric additions go above 1.5 g/L. Excessive additions can make your wine bitter. In addition, post-fermentation additions can result in precipitation of bitartrate crystals.
Since acid drops somewhat during primary fermentation and cold stabilization (for a white wine), you may want to raise the acid slightly above the desired level of your finished wine. If you are doing malolactic fermentation, then acidity will drop further. Accounting for these potential drops in acidity and making a compensating adjustment now will allow you to minimize larger adjustments later on.
It is important to note that pH does not determine TA. There is indeed a relationship between pH and acidity in that higher pH is going to have a relative lower acidity and vice versa. But, acidity and pH are different and you should not use the terms interchangeably. Different grapes with the same pH will likely have a different TA. Grape skins contain potassium that gets leached out and raises the pH by an unpredictable and sometimes significant amount. Different grapes will also likely have different amounts of the acid components producing different reactions to acid adjustments, so there is not a “one size fits all” solution from a pH reading.
Post-Fermentation Testing and Adjustment
If you’ve made acid adjustments prior to fermentation don’t expect that the wine’s TA will be the same after fermentation. Primary and secondary fermentation will likely cause a drop in acidity, and the end state is unpredictable. TA and pH should be tested shortly after the completion of fermentation to evaluate further corrections. Corrections should be made soon after completion of fermentation in order to allow the acidity changes to fully integrate within the wine.
Acidity measurement right after the completion of fermentation will be impacted by the CO2 produced from fermentation present in solution which forms carbonic acid. Although carbonic acid is a weak acid, it can still make your titration readings artificially high and cause improper adjustments. You can remove the CO2 in solution in one of two ways. Take your sample and boil it for about 20 seconds. Or put your sample into a small sealed container (a 100-mL plastic bottle is great) that you can shake vigorously to release the CO2 out of solution. Remove the cap to release the CO2 from the container. Repeat this a couple of times until there is no release of pressure.
Now it’s time to test again and, if needed, make acid adjustments. Even though your wine might be in the acceptable range, do not neglect the fact that an adjustment (addition or reduction) may improve sensory qualities. Go slow, making incremental adjustments to avoid overcorrection.
The point we wish to emphasize is that improved results will occur when the winemaker gets away from making wines just by the numbers and relies on his or her palate to confirm what adjustment level will result in the best wine. Evaluate all of the sensory aspects of the wine — its aroma, its mouthfeel, its impression on your palate. If you think there are sensory components lacking despite having the “right numbers,” do a bench trial for acid adjustment to evaluate what will improve your wine.
Bench Trials
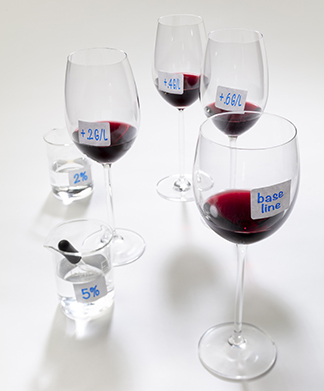
Bench trials are a fun part of winemaking. The best time to conduct an acid bench trial is in the post-fermentation phase when final acid adjustments are to be evaluated. Subtle changes in acidity can have remarkable impacts to how your wine tastes and its aromas. Table 1 shows an example acidity bench trial.

What is a bench trial? Basically, you take several samples of your wine and make incremental adjustments — in this case tartaric acid — in each sample. And then evaluate the impact of the adjustments. Compare each sample to one another and see which you like best. When you (and maybe others) have chosen the favorite, base your addition rate to the entire batch of wine on the results of your trial.
Greater details on how to perform bench trials are available in WineMaker’s archives, so we won’t go too deep into the process here. We typically do a bench trial for any acid adjustment we make. We like to use a 2% or 5% solution of tartaric acid to make additions to the samples used for tasting. Using an eyedropper to make the additions, 1 drop is approximately 0.05 mL. Make sure the glass for each example is the same so as not to influence the sensory evaluation.
Now what? Swirl, smell, sip, and make comparisons. Hopefully you have made the addition rates so that your samples are somewhat under, optimum, and over a target addition for your sensory evaluation. You can always do another bench trial with larger or smaller increments of the tartaric solution to dial in the optimum addition rate and find the best wine.
What About High Acidity?
We noted earlier how environmental conditions impact wine acidity. Whether it be in the pre-fermentation or post-fermentation phases, if your must or wine has excessive acidity there are indeed ways to correct this. However, lowering acidity is not as easy as raising it.
If you have the ability to influence the harvest date or time of day, use that first to get your grapes in the right acidity/pH range naturally. More hang time in the vineyard may allow acidity to drop. However, this may also produce grapes with higher sugar levels, so you may have to address the increase in alcohol. Adding water to your must, known as amelioration, will reduce both Brix and acid levels. There are online calculators that will provide details on the amount of water to reduce Brix and acidity.
Most winemakers do malolactic fermentation for red wines, which will drop acidity through the conversion of malic acid to lactic acid (this is because malic acid is a diprotic acid and lactic acid is monoprotic, so the contribution of lactic acid to overall TA is half that of the malic acid). In addition, lactic acid expresses a softer taste on the palate. If this is not part of your regimen and you are dealing with high acidity, then it should be a consideration, even for a white wine.
If you are dealing with a low-alcohol, high-acid must, in addition to adding water to drop acidity, you may also need to add Rectified Concentrated Grape Must (RCGM) or sugar to prevent the alcohol from dropping too low from the increase in volume. This is known as chaptalization. Although it is not allowed for commercial wineries in many winemaking regions, the home winemaker doesn’t need to worry about such regulations. Also, a small sugar addition will offset the sensory impacts of the wine’s high acidity. Online calculators will provide details on addition rates. A bench trial is highly recommended.
Next to adjustments in the vineyard, the next best way to reduce acid is to blend with another wine that has lower acidity. This could be done before fermentation by co-fermenting the grapes together, or by blending the wines after fermentation. There are calculators to help determine the results of a blend based on the acidity of each varietal, or you can do it by hand using the Pearson Square. A bench trial should also be used to confirm the blend from a sensory standpoint.
Acidity can also be reduced chemically. This is accomplished either through the addition of calcium carbonate or potassium carbonate. There are downsides to both, summarized in Table 2.

The Finished Product — An Award Winning Wine?
At this point you have all of the tools and information to better manage the acidity in your wines, but there is one vital consideration to leave you with to produce the best possible wine. This is shifting the focus from wine by the numbers to an increased use of your sensory skills to inform your decisions. Do your bench trials and swirl, sniff, sip! This may be a new and unfamiliar way of testing your wine, so take the time to figure out how to recognize the sensory nuances of a wine. Creating a more refined palate will assist you with your winemaking. If you think you are lacking in those skills, invite others who have more experience in this area to assist. There are also many good online and in-person courses available. And keep in mind that the more experience you have at this, the easier it will become.