Your Best Crush and Press
Crush is the day winemakers who grow grapes, or work with fresh grapes, look forward to most. But, before the grapes show up there are preparations that need to be made in order to make the most of your crush and press. Let’s go over how to prepare and make this day go as smoothly as possible.
The Space is the Place
Crushing operations are typically done outside, and in a commercial winery this space is known as the “crush pad.” The process of sorting and crushing grapes can make quite a mess, so it’s a good idea to do this in an area (such as a cement pad, or driveway) that can be sprayed down at the end of the day with a garden hose. I don’t recommend crushing in the yard (unless you lay a tarp down under the crusher) as grape debris in the grass is not easily cleaned up and will inevitably attract fruit flies. It’s nice to have your home crush pad close to where the wines are being fermented for ease of transfer from crusher to primary fermenter, but not mandatory. If your crush pad is far from the cellar, the grapes can be crushed into a shallow tub, which can be transported to the cellar where the wines will be fermented.
Fermentation should be done inside where you can have some control over the elements, be it your garage, cellar, or in a room of the house where temperatures won’t fluctuate too much throughout the day. Temperature control should be a consideration when fermentation commences, and depending on whether you are fermenting red or white wines, home winemakers have come up with lots of ways to keep temperatures under control. For example, reds are typically not allowed to get above 85 °F (29 °C) and whites are fermented at cooler temperatures in the range of 55–65 °F (12–18 °C). Brew belts (which wrap around the fermenter) and space heaters can be used to keep a red fermentation warm. White wine carboys can be submerged up to the neck of the carboy in a tub of water and 1-gallon (3.8-L) bottles of frozen water can be added to the water bath as needed to keep the temperature in the proper range throughout fermentation. Frozen water bottles can also be sanitized and added directly to a red wine must to tame a fast and hot fermentation.
What you need to crush
If you’re lucky enough to live near a home winemaking store, it’s likely they’ll have a lot of equipment to rent for the day. This is an arrangement that needs to be secured in advance of crush as other winemakers will be competing for availability. If you have your own vineyard, or if you make a lot of wine, you can also buy the equipment you need both used or new. When considering your purchase, keep in mind that this equipment is often only available at certain times of the year, usually in the spring. Here is a list of what you will need:

Sorting Table: Before the grapes touch the crusher they should be sorted. This is especially important for those of you with your own vineyard, or if you have chosen to go with a U-pick vineyard. The grapes I’ve seen from distributors are typically pretty clean and may require significantly less sorting. Although, there may be moldy clusters due to the grapes being shipped across the country; keep an eye out! I use an 8-foot (2.4-m) folding table with a tarp on top (which can be sanitized) and a simple 2-inch x 4–inch (5-cm x 10-cm) wooden barrier secured with C-clamps around the parameter of the table to prevent any rogue grapes from falling off. I can then load the grapes by the bucket onto the table to be sorted through. Sorted grapes are pushed off the open end of the table into a tub, which is then loaded into the crusher. This is where it really pays to have a couple of helpers pick out M.O.G (material other than grapes); this can be anything from bugs to poor quality grapes, and in my neck of the woods . . . the dreaded stink bug.
For those bringing in really big batches of grapes: When you bring home a 1⁄2-ton macro bin of grapes, it may be difficult to use a pitchfork to transfer grapes from the bin, to the table and then to the crusher. In this case just keep your eyes open for foreign objects in the grapes and go from the bin to the crusher.
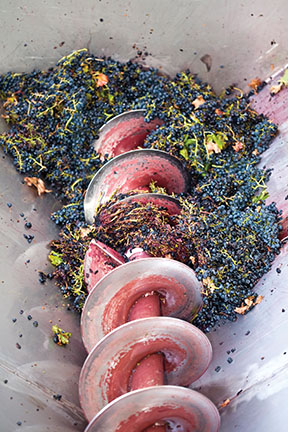
Crusher/Destemmer: A crusher/destemmer mechanically crushes the grapes and then separates them from the stems. The grapes fall from the bottom of the crusher and the stems come out of the end of the unit into a waste can. These units can either be motorized or can be operated manually with a crank. When figuring out what model is a good fit for you, be sure to consider if you’ll have help on crush day. If you’re a lone crusher, the motorized version can crush and de-stem the grapes while you load the hopper. Whereas if you can recruit help from friends and family (folks always seem eager to help as they are interested by the process of winemaking) you can save money and get a manual-crank version instead (one person operates the crusher while the other loads the hopper.) Another thing to consider is crushing output. Motorized crushers have an output of approximately 3,000 lbs. (1360 kg) per hour as opposed to the manual crusher, of which the output is as fast as you can crank it. This can be the difference between making short work of crushing or an all-day affair. A crusher/destemmer can be set up a few different ways: Placed directly on top of the fermenter, on two saw horses over a tub, or mounted on a stand made for the unit.
A less expensive option is a crusher without a destemmer. The grapes and the stems are all collected in the receiving vessel. This is fine when processing small lots of grapes, but removing stems by hand will get old fast the more grapes you work with.When all else fails, one last piece of equipment to crush grapes is just below you (your feet.) All I can say in regards to this is: I Love Lucy Season 5, Episode 23. Better to just rent
a crusher!
Scale: For weighing fruit. This is important for vineyard owners who keep yearly yield records, or you may want to confirm that you got the quantity you paid for from the distributor.
A must plunger: For punching down the cap. This can be purchased online or built by attaching an oak wood-round to a 1-inch (2.5-cm) oak dowel rod. If you plan to perform sur lie aging on your white wines (aging on the lees), you’ll need a long-handled spoon that you can sanitize for stirring.
Pressing Equipment
Pressing is simply putting the grapes under pressure to extract the juice. There are two common types of presses you can use at home:
Basket press: A basket press is a tall wooden basket made of wood slats with spaces in between. The must is scooped into the basket while juice flows out of the press and into a collection bucket. Once the basket is full, wood blocks are placed over top of the grapes inside and a ratchet assembly is cranked down upon the wood blocks applying intense pressure to the grapes. There are all different sized presses, which makes them affordable; even if you have to buy a small one and fill it over and over to get the job done.
Bladder Press: A bladder press is the more efficient of the two types of presses, and it can make short work of pressing day (especially if processing white wines where the crushing and pressing operations are performed in the same day). Unlike a basket press, a bladder press has a stainless steel cage that is filled with must and a bladder is filled with water which expands, pressing the grapes from the center of the unit out. There are a few models available to home winemakers, all with a higher price tag than most basket presses. One thing to keep in mind with a bladder press, however, is that the pressing will not have as much force as a basket press, so if you are working with varietals that have harder berries, this type of press may not get everything out of the must that you might want. It’s worth trying out both types of presses, if possible, to make an informed decision before you purchase anything.
A scooper: For transferring grapes to the press, this can be a 1⁄2-gallon (2-L) water pitcher or stainless
steel pot.
Food-grade buckets: Get at least two, to use in conjunction with a strainer or colander (read on) to catch wine coming out of the press.
Funnel and two strainers: For pouring wine into carboys or demijohns. The second strainer is another line of defense to prevent any solid matter getting into the vessel.
Primary Fermenter: Your choice of fermenter will vary depending on your lot size. You can use anything from 5-gallon or 6-gallon carboys (19-L or 23-L), 15-gallon (56-L) demijohns, or even a variable capacity stainless steel tank. In my home winery, for example, I use FDA-approved, food-grade plastic Brute trash cans as fermenters for maceration and fermentation of red wines. These come in sizes from 10 to 55 gallons (37 to 208 L) and can be stacked inside each other when not in use. Remember to choose the correct size. Red wines in primary fermentation need room for cap rise and foaming from fermentation. Plan on needing 10 to 15 gallons (37 to 57 L) of capacity for every 100 lbs. of crushed grapes (1-1.3 L/kg.) You can ferment around 65 lbs. (29 kg) in a 10-gallon (38 L) bucket, over 200 lbs. (91 kg) in a 32-gallon (121 L) food-grade Brute trash can, and close to a ton (900 kg) in a half ton bin. (The half-ton refers to weigh of whole clusters when it is used as a harvest bin.) For help figuring out which fermenter is right for you, see “Choosing the Right Fermenter” in the August-September 2012 WineMaker.
A drill-mounted stirrer: For mixing additives into the must.
Food-grade tubing: For racking and/or pumps for transferring the wine around the winery. For help in deciding which wine transfer method is right for you, see my article “Moving Wine With Pumps” in the April-May 2017 issue of WineMaker.
Testing Equipment
There are a number of parameters that need to be tested in order to be sure that your must is in the right range for a healthy fermentation. Most grapes coming from distributors of California grapes are usually in range (i.e. they’ve reached an acceptable sugar level to be harvested.) But Mother Nature has her way and the must may need sugar added, acid increased or reduced, or even the pH adjusted. Below are tests a home winemaker should be able to perform to get the must in line on crush day.
Hydrometer and refractometer: These instruments are used to test the sugar level in wine. Because you only need a few drops for a test sample, a refractometer is a convenient and quick way to test levels in a must prior to fermentation — this is great for testing a juice sample when you first get your hands on the grapes. A hydrometer is used to monitor the progress once fermentation has started.
Acid test kit: Acid levels are better adjusted prior to fermentation so any additions can be integrated into the wine over time. For more on adjusting acid, check out the story “Measuring and Adjusting pH & Acid” in the June-July 2009 issue of WineMaker.
pH Meter and Calibration: It’s said the pH is the most important parameter to be measured in wine. pH can affect a myriad of factors in the must; from sulfite effectiveness to color, even the wine’s ability to age. A pH meter can also do double-duty as an acid tester too. When the quality of your wine depends on these measurements it is easy to see why these are valuable instruments for all home wineries. Calibration solutions are needed to ensure you’re getting accurate measurements (4.0 and 7.0 calibration solutions). NaOH 0.1N or 0.2N (sodium hydroxide) is needed to perform acid testing.
Malolactic testing: If you’re planning to perform malolactic fermentation (MLF) on your wine, the end of MLF will need to be determined for a stable product. A paper chromatography test is typically done after pressing and fermentation has completed. This test is sold in kits from various winemaking stores.
Winemaking journal: For every winemaking action I perform, I write it down. If you don’t document it, it didn’t happen. Don’t rely on trying to remember what you did the last time; write it down in a journal. If you get good results, you can go back to those notes and do it again!
Digital scale: Forgo the use of teaspoons and tablespoons and other imperial measurements and get yourself an accurate digital scale to measure any of your additives. They can be had at a low price. When trying to be economical in buying a scale be sure to check the reviews so you get yourself a good quality unit.
Additive Stock List
Here is a list of additives for the must on crush day. Some are optional, such as OPTI-RED or Booster Rouge®, but some are obviously needed, such as yeast and sulfite solution. Ensure these are well stocked in your home winery before crush day. Nothing would be worse than having to run to the store on crush day, or even worse having to wait a few days for an online order to be delivered.
Yeast Dry active yeast comes in 5-gram packets good for up to 6 gallons (23 L) of must. Liquid yeast options come in a variety of packaging.
Sulfite solution
Tannin (eg: Scott’Tan FT Rouge)
Pectic enzyme (eg: Lallzyme )
Oak (Chips, Cubes, Dust)
Yeast Nutrient (Fermaid® K, Super Ferment, etc.)
Sugar
Tartaric acid
Potassium bicarbonate (Acid reduction)
Optional additives to build body and increase mouthfeel:
OPTI-RED
OPTI-WHITE
Booster Rouge®
Booster Blanc®
Post-fermentation additives including but not limited to:
Malolactic bacteria culture
Aging tannin (e.g. Scott Labs Tannin Complex)
Fining agents such as bentonite, Sparkolloid, gelatin, Polyclar etc.
Cleaning and Equipment Check
As you wait for the grapes to come in, what is a winemaker to do? Oh yes, I almost forgot, cleaning! For those of you who own your crushers and presses, the weeks before the grapes are harvested are a great opportunity to inspect your equipment for defects to ensure everything is in working order. Check your glass carboys for cracks, check for scratches in your food-grade plastic fermenters and stainless steel tanks. Any equipment needing to be fixed should be addressed far enough in advance of crush to make sure spare parts aren’t on back order, and you get them in time to test out any repairs. Take your equipment apart and clean all the nooks and crannies. I’ll admit, by the time I’m done with my last crush of the year (I typically do around six rounds of crushing) I’m sick of cleaning the crusher, and as a result grape debris may be left behind. This is a big reason to take the unit apart as the grapes start to ripen and really get in there before the new crush.
Take this opportunity to also thoroughly clean the winery and crush area. Clean out the cobwebs from the ceiling, mop the floor, clean and sanitize all your work surfaces, and make sure mold hasn’t found its way into the cellar. A well cleaned and sanitized winery is paramount to winemaking success. There is a reason every winemaker says the most important aspect of winemaking is sanitization. Shortcuts should not be taken at this stage of the game.
Make Something Great
Don’t let all the preparation and list of supplies and equipment intimidate you from getting a few lugs of grapes and creating something great. The key is to just be prepared and organized. If you make mistakes, learn from them and improve upon the process for next year. Invite plenty of friends and family, set out snacks and past vintages. Encourage folks to bring their own wine and have a wine tasting the same day. It could be made into a party while delicious wine is being made. Good luck and have fun this harvest!
Crush and Press step by step
Crush
The day has come, the grapes are in, and now you’re ready to rock this.
• Set up shop the night before. Ready the crush pad, winery, lab table, and get everything organized. This way all you will need to do the next day is quickly sanitize your equipment. A spray bottle full of sanitizing solution is very helpful for this.
• Once the grapes are on the crush pad and ready to go, it is important they be crushed immediately. Allowing the grapes to wait too long to be crushed, and letting them warm up, could have a negative oxidative impact on the outcome of the wine; especially when making white wine.
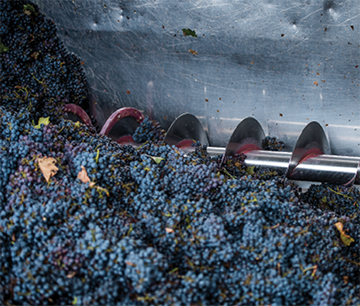
• When it’s time to start, gently dump the grapes onto the sorting table. If it’s not a grape or a stem, or if it is a grape you wouldn’t eat, discard it.
• Move the sorted grapes off the table and into a tub. You can either fill the hopper until it’s full and crush as you fill it; or fill several tubs of sorted grapes and crush them all at once.
• Run the grapes through the crusher/destemmer and into your fermenter or collection tub.
• Once the crushing is done add enough sulfite solution to reach 45–50 ppm. Do not exceed 50 ppm if malolactic fermentation is desired later in the process. It may be beneficial to add sulfite to every 10 gallons (38 L) of must coming out of the crusher. Otherwise, you can crush the whole lot and add sulfite then. Adding sanitized frozen bottles of water to the holding containers of must to keep things cool will also inhibit oxidation as the grapes are pressed the same day. Just make sure the juice has reached ambient temperature before adding the yeast.
• After the crush, test the sugar level, acid content, and pH of the must, and make any adjustments as dictated by the style of wine you want to make.
• Red wine must is allowed to ferment on the skins until it has reached 0 °Brix or close to it. For white wine, the must is immediately pressed unless a short-term cold soaking is desired. When working with white grapes and crushing and pressing is done in the same day, be sure to plan ahead and allow yourself ample time to get the job done.
Press
Now it’s time to press the grapes. In a perfect world, we would crush red grapes on Saturday and press the next Saturday. But in my experience in home winemaking, nothing is perfect and things don’t always work out the way you planned. Maybe the fermentation temperatures were a bit high and you reached 0 °Brix by Thursday and you can’t press until Saturday. If needed, add sanitized frozen water bottles to the must to keep it around 45 °F (7 °C) and blanket the must with CO2 or Argon to buy some time. This is temporary and pressing should be carried out as soon as possible.
• Sanitize your press and receiving equipment thoroughly, including wooden half-circle caps and blocks, must scoopers, buckets, strainers, and receiving vessels.
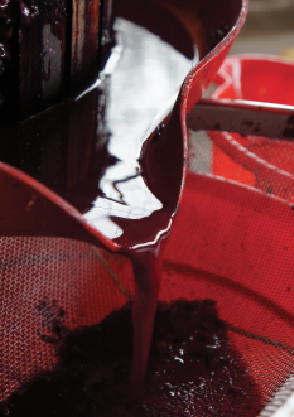
• Scoop the must into the press allowing the juice to run into the receiving bucket; do this until the press basket is full.
• For a basket press: Once you’re at capacity in the basket of the press, push down on the grapes with your hands to coax out a little more free run juice. Now, place wooden half-circle caps over the grapes and stack the wooden blocks to a height above the top of the basket. Thread the ratchet onto the press and spin it down to meet the blocks. Insert the ratchet keys and handle and crank the ratchet mechanism to apply pressure until the juice starts flowing, at this time stop cranking the press until the juice flow slows down or stops before applying more pressure. Repeat this process until the grapes have been fully pressed. Free run and pressed run juice can be kept separate and blended later in the process. Taste often and stop if the wine gets too harsh or tannic. When using a basket press, I recommend dismantling the basket and breaking down the cake and then refilling the press once more with the just-pressed skins to ensure you get as much juice as you can.
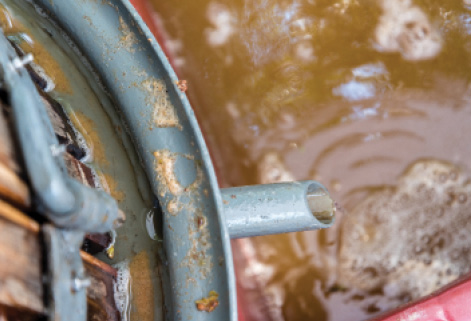
• For a bladder press: As described for the basket press, fill the basket of the bladder press to capacity. Screw on the lid, turn on your water and sit back and watch the magic happen. With both presses, refill the press as needed until your must has been pressed. For full instructions on using a bladder press, head to http://morewinemaking.com/public/pdf/wpressBLADDER.pdf
• When filling your fermentation vessels with must, be sure to leave a few inches of headspace to compensate for any foaming from the last of fermentation. After about 24-48 hours, rack off of the gross less and allow fermentation to finish. The fermenter can be fully topped up at this point.