Flower Power

As the old saying goes, “If life gives you lemons, make lemonade.”
This was essentially the reasoning for my introduction to fermentation after my wife and I bought a house on a 5-acre, derelict, old apple orchard in rural Ypsilanti, Michigan, where we set out to raise our three children. The apple trees had not been pruned in at least a decade, so the fruit that came off those trees was very small and hard — not ideal for eating.
Not wanting to see the apples go to waste, even if they weren’t the best looking fruits, we cooked and canned apple butter, apple jelly, and extracted apple juice from them with a stainless steel Mehu-Liisa steam juicer. We put the juice into sanitized, recycled wine bottles, and stored them in our basement. At some point I discovered the winemaking hobby and a whole world of adventure opened up.
After being bit by the winemaking bug, our entire derelict orchard began to offer other opportunities for home fermentation. I found a cherry tree, which took on some interest. Then there was a bush that bore some unusual looking fruit, which led me to learn what a persimmon is and what persimmon wine tastes like. Life gets very interesting for home vintners.

After several years exploring the world of fruit wines, we moved to Vermont and bought a 100-year-old house with a postage stamp backyard planted chock-a-block with raspberry bushes. My wife is a Master Gardner, and she set to transforming the side lawn into flowerbeds and other fruiting bushes. In addition to the raspberries, there were two very mature lilac trees, rose bushes, and maple trees on the property. My days of making orchard wines became a thing of the past, and new winemaking opportunities were born. And like most yards in the area, we also had an abundance of dandelions growing intermingled with grass throughout the yard.
Making Dandelion Wine
The first wine I made in Vermont continues to be one of the first wines of every season; dandelion wine. This is because dandelions are among the first flowers to bloom each year. These weeds grow wild everywhere around our neighborhood, though one must be careful not to pick dandelions from a lawn that is sprayed with chemical fertilizers, herbicides, or pesticides. It’s best if you can find a large yard or field away from roads where dandelions have been exposed to vehicle exhaust.
While I’ll detail the process of making a dandelion wine, know that this is a similar process I use for wines from other flower petals including the roses, lilacs, and other flowers around my house.
Harvesting

For dandelion wine, harvest only the yellow blossom, leaving behind the leaves and stems. As I pick, I usually sit on a garden trolley so I don’t have to bend over so much. If you have kids, grandkids, or children in the neighborhood, I hear they are very good at this chore too, and may even work for ice cream.
I put the flowers into a grocery sack, picking approximately 8 qts. of flowers (roughly 2 lbs./0.9 kg), which will be used to make a 5-gallon (19-L) batch of dandelion wine. Of course the amount produced can be increased or decreased based on the bounty of dandelions picked. You can also go heavier or lighter on the ratio of dandelions-to-water, which will impact the flavor intensity.
My basement is my processing area where I have a sink and worktable. I use a small plastic bucket and take a handful of flowers out of the bag at a time. Then I rinse them with cool water, making sure that all dirt, green matter, and insects are discarded. Earwigs are common on flowers and other fruits we harvest, but a good rinse should do the trick of motivating them to crawl out.
Then I put the petals in a strainer bag and keep loading that bag as I go along.
Maceration #1
After the strainer bag is filled with the flowers, I add 2 lbs. (0.9 kg) of white sugar, making sure that the sugar is mixed throughout the flowers. Into that bag I also add 2 lbs. (0.9 kg) of organic white raisins (or sultanas). The whole bag is then put into my primary fermenter, which is a typical 5-gallon (19-L) white plastic bucket with a lid that has a hole drilled through it for an airlock.
Then I take a wooden rolling pin (more recently I had a woodworker create a large wooden “masher”) and press, pound, or grind the sugar and raisins together in the strainer bag. It’s probable that some juice will begin to appear from this process. I loosely put the lid on the primary fermenter and go about my business for a couple of hours and let the flowers, sugar, and raisins macerate to extract the flower juice and essences. After an hour or so, I return and add 2 quarts (1.9 L) of filtered water and let it sit overnight. All water additions are at room temperature.
Maceration #2
The next day, I lift the mass of flowers, sugar, and raisins out of the water and put the bag in a small plastic bucket. Then I add another 2 lbs. (0.9 kg) of white sugar and again make sure that it is mixed throughout the soppy strainer bag. Once the sugar is distributed, I begin mashing with the rolling pin again. Similar to the first maceration, I let it sit in the bucket to macerate for another hour before adding it to the primary fermenter with the original liquid. Again, I add 2 quarts (1.9 L) of filtered water and put the lid loosely onto the primary fermenter and let sit overnight. By this time the water is very cloudy, maybe even opaque and very yellowish.
Maceration #3
A third maceration is a repeat of the second that takes place the following day. This brings the total water additions up to 1.5 gallons (5.7 L). Along with the final water addition I add 1 Tbsp. pectic enzyme (to help break down the pulp), ¼ tsp. tannin (to help the wine clear and extend the shelf life), 1 Tbsp. ascorbic acid (to reduce the chance of browning or spoilage), 2 crushed Campden tablets (to inhibit wild yeast), 1 tsp. yeast nutrient, and 71B-1122 yeast. With these additions, it’s time for fermentation to begin. I put the lid on tight and seal the primary fermenter with an airlock.
Then, I wait for the fermentation to stop before I use a racking cane to siphon the liquid into the secondary fermenter. Fermentation starts in late April and by mid-May it starts to clear. By early June it is usually clear, though I leave it sitting quietly in my cellar into late November when, after tasting, I bottle it and let bottles rest until Christmas dinners at which time we begin to enjoy them!
Other Wines
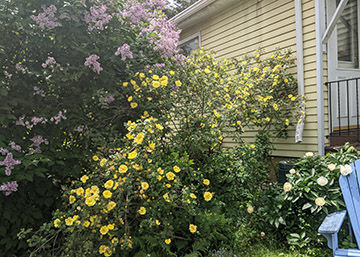
In the photo below you see a lilac tree and next to it is a yellow rose bush near our side stairs. Once I got into making flower wines, I couldn’t help but vinify the rose and lilac flowers. Should you try flower wines, I learned that the more floral the flower, the more that the wine takes on those aromas transformed into taste. The flavors are difficult to describe, but when you smell the flowers they are easier to imagine.
And then the question becomes, what quantity of sugar and/or variety of sweetener does your palate prefer to accompany the blossoms? Determining this answer relies on bench trials, as each person’s palate and preferences differ. I follow a similar recipe and process with all of my flower wines as described in my dandelion process, though sugar levels and addition rates may differ depending on the final outcome I am going for. This is where taking notes that you can refer back to each year is critical as adjustments from batch-to-batch are common when dialing in preferred flavors.
Foraging for Fiddlehead Ferns
Another unique plant we have in the forests of Vermont are fiddlehead ferns. Areas where they grow are known to the aficionados of fiddleheads and their locations are passed around, or not, at coffee shops and pubs. These ferns are popular among foragers, and some keep their locations close to the vest, similar to the best fishing holes.
You must pay special attention to the ferns you harvest because bracken ferns, which resemble fiddleheads in one stage of their growth, are toxic if not downright poisonous. I mistakenly harvested enough brackens to fill a 5-gallon (19 L) bucket and showed them to one of my friends at the farmers market to check whether indeed they were fiddlehead. They weren’t. I took a much closer look at the fiddlehead ferns he was selling in his stand at the farmers market and noted the difference. I dumped my bracken ferns into our backyard compost pile. The lesson is to do your research and study before you waste an entire morning gathering the wrong ferns (or worse).
My fiddlehead fern wine is made with 8-quarts of fiddleheads macerated with 2 lbs. (0.9 kg) of sugar, 2 lbs. (0.9 kg) of golden raisins, and 2 lbs. (0.9 kg) of dried figs. These I pound with a rolling pin and let sit for six hours before pouring 2 gallons (8 L) of hot water over them. The next day I add 1 lb. (0.45 kg) sugar and 1 gallon (3.8 L) of water. Then I add D-47 yeast, 1 Tbsp. acid blend, 1 Tbsp. yeast nutrient, 1 tsp. tannin, and 3 crushed Campden tablets. The specific gravity measures 1.090 before the fermentation. When fermented to dryness, I wound up with a wine with a potential alcohol around 12%.
I often wind up bottling these wines at the end of September, which means that I crack bottles open at autumnal gatherings — especially Thanksgiving. Curiosity always peaks from guests as I tell them I have a fiddlehead fern wine to share, and the flavor does not disappoint, though it is quite unique for someone who has never had it before. It is not a bright, sweet white grape wine, or aromatic, floral wine. It’s more comparable to an amber ale in flavor. Backsweetening is an option, though I do not choose to add any sweetness.
Parsnip and Fig Wine
One of my personal favorite homemade wines is parsnip and fig. Mrs. Grieve’s A Modern Herbal book notes that parsnips are a vegetable that has been cultivated as far back as the Roman era. She writes:
“. . . in Holland, parsnips are used in soups, whilst in Ireland cottagers make beer by boiling the roots with water and hops, and afterwards fermenting the liquor. A kind of marmalade preserve has also been made from them, and even wine which in quality has been said to approach the famed Malsmey of Madeira.”
A vegetable wine that would qualitatively be like a Madeira Port . . . how would you do that? Interest piqued, I started experimenting. I went deep and dark. For sweetening I decided to up my game from adding raisins to adding figs and go from white sugar to brown sugar.
In making parsnip wine, and other hard vegetables, the recommendation is to boil them. The 5-gallon (19-L) recipe calls for 11 lbs. (5 kg) parsnips plus 2 lbs. (0.9 kg) golden raisins and 2 lbs. 7 oz. (1.1 kg) dried figs. I boil the parsnips in batches until cooked, before pouring them and a total of 5 gallons (19 L) of the hot water they boiled in over the dried figs and raisins.
To that, I add the juice of 10 lemons, 1 tsp. grape tannin, and 1 tsp. yeast nutrient and start with 10 lbs. (4.5 kg) of dark brown sugar. To ferment, I pitch Wyeast 4767 (Port Wine) yeast. Five days later I add 4 lbs. (1.8 kg) more dark brown sugar. Then after four more days, and tasting the wine, I add an additional 6 lbs. (2.7 kg) more.
After tasting again, I transferred the batch to a secondary fermenter and went through the usual process of gradually letting it clarify and then bottling. I made 24 bottles and have been storing these in my wine cellar for years now. Each bottle seems to get smoother and richer the longer it ages.
Using Steam Extractors (sidebar)
The Mehu-Liisa mentioned in this article is a Finnish-made, stainless steel steam extractor. Like many steam extractors, the lower section holds the water and sits over the burner of your stove. Next up is the pan that collects the juice from the fruit. There is a tube leading from this pan out to whatever bottle, jar, or container you’re going to use to collect the juice. The top pan/basket holds the fruit. Also, there is a lid to seal the device.
My suggestion is that you start the juice extracting process with the containers into which you’re going to collect the juice because once the steam-extracted juice begins to flow, it is “go time” and that juice is dangerously hot.
Sometimes I reuse wine bottles, which I sanitize and have at the ready. Because the Mehu-Liisa is a steam extractor, I warm the bottles prior to filling to make sure the hot juice won’t burst a bottle. Many times, I use quart canning jars that I have sanitized, or at least run through my dishwasher to make sure they’re nicely clean and warmed.
Because the juice is coming out at a very high temperature, once it goes into the bottles, or the jars, it is as if it has been through a canning process. If I will be using the juice within a few days, I collect it in bottles and cork them. If I won’t be using the juice that soon, I’ll use quart-size (1-L) canning jars and close the lids tightly after collection. After the jars sit for a while, you can hear the typical “pop” of the jar lid sealing as the liquid cools. These jars may be stored safely for months.
REFERENCES:
• Massaccesi, R. (1976). Winemaker’s Recipe Handbook.
• Grieve, M. (1994). A Modern Herbal. Tiger Books International.