Time is running out to enter the 2026 WineMaker International Wine Competition. Get expert feedback on your wines from experienced judges and compete for medals in the world’s largest competition for home winemakers.
Wine kits contain all the ingredients you need to make a great wine, but the catch is that you have to actually make it. To get from a collection of ingredients to sharing a bottle of wine with some friends, you will need the proper equipment, an understanding of your kit’s contents and a feel for the basic steps and procedures for making wine. In this section, learn about the basic skills you will need to know and what gear to buy so that you can get started to make a great kit wine.
Gear Guide — The Basic Tools For Making Wine From Kits
In the old days of winemaking, equipment came in many shapes and sizes. An old pickle crock here, a discarded water jug there and maybe some whiskey barrels that fell off the back of a truck — this was the equipment that homemade wine was made in.
Today, you don’t have to borrow Grandma’s pickle crock. With the advent of modern materials and advances in technology, an impressive range of choices is available for the home winemaker. And with these better choices comes better wine. But to make good wine, you need the right equipment.
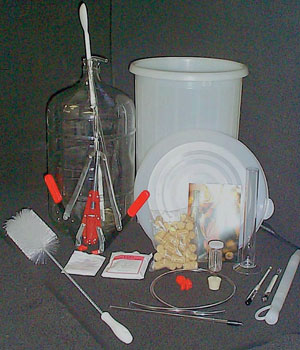
The simplest way to accumulate your gear is to buy a complete equipment kit. These kits contain most of the essentials for your first batch. Or you could collect your home winery piece by piece. Either way, the following equipment will get you started making wine from juice, concentrate or kits.
Primary fermenter
The basic wine fermenter is a 7.5–12 gallon (30–46 L) food-grade plastic container. It should come with a cover that allows you to attach an airlock. Even though the volume of wine made in your kit is only 6 gallons (23 L), you will need the extra fermenter volume to deal with foaming during primary fermentation. Trying to use a 6-gallon (23-L) pail for primary fermentation, or a 6.5-gallon (25-L) carboy, is a short route to disaster. If you make the kit to the full volume, it will foam over onto the floor. If the kit contains oak powder, elderflowers or other additives in suspension, you could have a scale-model volcano on your hands.
Don’t re-use other food containers as a wine fermenter. Some 7.5-gallon (28-L) pails, commonly available used from food service companies, have held pickles or salad dressings. The aromas and flavors of the food will have sunk in the plastic and will contaminate your wine. If you already have a bucket from beer making, don’t use this for making wine either. Hops from the beer can sink into food-grade plastic, and nobody likes a crisp, hoppy Zinfandel.
Also, use only food-grade plastic containers. Garbage cans, and other plastic containers, have petrochemical or metal-based plasticizers and coloring agents. Your wine will leach these out. In addition to changing the flavor of the wine, these compounds could make you ill.
The best way to find the six-gallon (23-L) mark is to take your six-gallon (23-L) carboy, fill it with water right up to the neck and then dump it into your primary fermenter. Wait for the water to stop sloshing around, then mark the outside of the fermenter with a permanent marker.
Carboy
A carboy is a six-gallon (23 L) bottle-shaped container made of glass or food-grade plastic. This is where your wine goes after primary fermentation. As with choosing a primary fermenter, getting the right size carboy is crucial. Get a carboy that holds the entire volume of your wine with little or no space left over. You could scrimp by splitting the must between a 5-gallon (19-L) carboy and a one-gallon (8-L) jug, but this makes complying with the manufacturer’s instructions much more complex, as you would have to split up additions of acids and fining agents.
The 6.5-gallon (25-L) carboys — widely available at homebrew shops — are unsuitable. They leave too much headspace above the wine, which leads to oxidation and spoilage.
Plastic or glass are equally appropriate materials for a fermenter. Glass is easier to clean because you can see where it’s dirty. It’s also more fun to watch. However, plastic is generally cheaper and lighter . . . and I’ve never, not even once, seen a dropped glass carboy bounce.
Airlock and rubber bung
A bung is a slightly-tapered rubber stopper with a hole in it. The airlock fits into it and helps to form a valve that seals the carboy. The airlock prevents oxygen and spoilage organisms from entering, while allowing fermentation gas to escape. For the most part, glass carboys take a #6.5 bung while plastic fermenters use a #11. Before purchasing a bung, check the size to make sure it will fit your fermenter.
The airlock must be half-filled with water and attached to the carboy. Some people fill the lock with sanitizing solution, and this works too.
Siphon hose
A siphon hose is six feet (1.8 m) of food-grade tubing attached to a rigid acrylic rod, with a spacing tip on the end. The siphon hose is used for transferring wine from one container to another while leaving the sediment behind. The rigid rod prevents the tubing from collapsing when draped over the edge of the pail or carboy. The spacing tip on the end of the rod prevents the siphon action from sucking sediment up off the bottom of the pail or carboy. When the hose gets stained from repeated use, throw it away and get a new one. The soft vinyl is difficult to clean properly, and hoses are cheap to replace.
Siphon filler
While it’s possible to fill bottles by pinching the end of the hose to stop the flow, a siphon filler makes this a much neater, faster operation. A siphon filler is an acrylic tube with a needle valve on one end; this slips over the end of the siphon hose. The wine will only flow when the valve is pressed against the bottom of the bottle. You can then withdraw the filler and spill only a few drops of wine before moving on to fill the next bottle.
Spoon
Your winemaking spoon should be stainless steel or food-grade plastic, approximately 28 inches (70 cm) long so it can reach all the way to the bottom of the carboy and fermenter. The best ones are made of polycarbonate plastic, the same stuff in riot shields and motorcycle helmets. They won’t break even with vigorous stirring, and wine kits require lots of vigorous stirring. What if your spoon is too big to fit in the neck of your carboy? Turn the spoon upside-down, sanitize the handle and stir with that.
Wooden spoons are useful for activities like stirring cookie batter and applying correction to bratty future winemakers (thanks, Mom), but they aren’t appropriate for winemaking as they tend to harbor bacteria and wild yeast.
Floating thermometer
Good thermometers are essential for ensuring that your must is at the right temperature for fermentation. They’re also useful for checking the temperature of your fermentation room. The most convenient floating thermometers feature a plastic cap with a ring on top. This allows you to tie a string to them and drop them into the carboy to check the temperature of the fermenting must. The thermometer can then be hauled out by the string.
There are also stick-on liquid crystal thermometers, such as the Fermometer, that resemble a strip of plastic with temperature readings on it. Like that scourge of the 70s, the mood ring, the appropriate temperature number will change color to match the heat of the must. Simply stick these to the outside of your carboy and in minutes you’ll have an accurate reading of the must inside.
Winemaking thermometers don’t contain mercury, but they do contain volatile chemicals, like toluene. If you break one into your must, discard the batch immediately.
Probe-type metallic thermometers — like meat thermometers — don’t break easily, but the inexpensive ones tend to be less accurate. Check them against a good-quality glass thermometer before use.
Hydrometer
Looking much like a glass thermometer, a hydrometer measures specific gravity and is used to monitor the progress of fermentation. A hydrometer consists of a glass tube with some steel shot sealed in the base, and a strip of marked paper on the inside. Just as a human body floats higher in the ocean because of the salt dissolved in the water, a hydrometer floats higher in must because of the dissolved sugar. As the yeast eats the sugar and makes alcohol, the hydrometer will sink lower and lower. By measuring the progression of this sinking, you can accurately track your fermentation. The test jar is a clear, tall, footed tube. Fill it with a wine sample using the thief (described below), drop in your hydrometer, and you will be able to easily read the results.
Wine thief
No, a wine thief is not your thirsty brother-in-law. A wine thief is a hollow glass or plastic tube with a hole in each end. Once sanitized, it is used for removing samples from the carboy. Poke the pointy end below the surface of the wine, and allow the tube to fill. Once it reaches the desired level, place your finger over the top and keep the thief upright as you move it to your sample container. (If you tilt it, it will dribble). Some people use a turkey baster, but the soft rubber of the squishy part is difficult to keep sanitary — remember, everything that comes into contact with your wine has to be sanitized — not to mention the potential for gravy contamination.
Wine bottles
To bottle a single batch of wine made from a wine kit, you will need thirty 750 mL bottles to bottle six gallons (23 L) of wine. If you’re going to save bottles instead of buying them brand new, you’ll need to clean them rigorously.
A word on screw-cap bottles: The glass in the neck of these kinds of bottles is too thin to take the strain of an expanding cork and easily shatters under corking pressure. The screw caps themselves are not designed for re-use, and often won’t seal correctly.
Corks
You’ll need thirty corks, of the standard #9 die size, for your wine bottles. Make sure you get them fresh from a shop with good storage and good turnover. How long should your cork be? Which cork is right for you? Look realistically at how long you expect to store your wine before drinking and figure out how much cork fits in your budget. The cheapest cork isn’t always the best deal, and if you do decide to keep some bottles for the future, you may find yourself having to re-cork them in a few years. Conversely, if you are making a wine kit you intend to drink within the next three months, a very long cork might be a waste of money.
Another thing that comes into play when choosing a cork is the bevel. This is the tapered edge that some of the less expensive corks have around the top and bottom of the cork. This allows easier insertion with hand-held corkers, and prevents the edges of the corks from chipping during shipping and storage.
The thing to remember is that the bevel actually reduces the amount of surface area in contact with the neck of the bottle. This contact is what prevents the passage of wine past the cork. If you have a 1.5-inch long cork, but 1⁄4 inch is bevelled off of each end, the cork is effectively only 1 inch long.
If you wind up with some wacky flagon bottles, like Portuguese Mateus bottles, they require a #8 die-cut cork, not available everywhere. Save these bottles for sticking candles into to match your red-and-white tablecloths!
Corker
You may be able to borrow a corker from your local winemaking shop for a nominal charge. Some offer the use of it free with the purchase of a kit. The twin-handle, hand-operated units work tolerably well, but the larger floor corkers are head-and-shoulders above them. While more expensive, they use mechanical advantage and a set of interlocking jaws that “iris” shut to carefully compress the corks and insert them precisely into the bottles. They also hold the bottles steady in a spring-loaded base. They are a little difficult to describe, but are really worth the extra money.
Impact corkers and single-handle models crush corks so badly that they require soaking the corks to mush before they can be used. This is not conducive to a good cork seal.
Measuring cup
A 500 mL (2 cup) measuring cup is useful for mixing and measuring, dissolving additives and similar tasks. A cup made from borosilicate glass, such as Pyrex, is useful if you need to dissolve anything in boiling water.
Brushes
Carboy and bottle brushes are good for scrubbing goo out of narrow-necked vessels. Sturdy brushes are essential for cleaning chores.
Optional equipment
There are many pieces of equipment that, while not absolutely necessary, make winemaking much easier. A bottle sprayer is an attachment that screws onto your kitchen sink. It will blast water vigorously all the way to the bottom of your carboy, helping dislodge gunk and rinse away cleaners and sanitizers. A bottle tree will hold your bottles upside-down in a very compact space, useful for draining and storing them (when they’re upside-down, dirt and dust can’t settle inside). A trolly or cart can be very useful for moving carboys around your home winery. A full carboy is quite heavy, and a broken glass carboy is dangerous and expensive. For instructions on building your own carboy cart, read “Carboy Projects” in the February-March 2009 issue of WineMaker. Finally, bottle labels can help you distinguish between different batches of wine and add a touch of class. You can design these yourself or find a shop or supplier who will design them for you.
Kit Winemaking 1-2-3
First things first: Read the instructions
Before doing anything, read your kit’s instructions from beginning to end. All companies have instructions that cover their specific kit — with “specific” being the key word here. What works with one kit won’t work with others — and what works with fresh juice or grapes will turn out undrinkable swill with kit wines. Your instructions might differ from what you read here. In that case, obey the instructions that come with the kit. In this section, I’m necessarily genericizing the procedures to cover as wide an array as possible of kits.
Next thing next: Cleaning and sanitation
Next, clean and sanitize the necessary equipment — a primary fermenter and lid, spoon, thermometer, hydrometer and test jar and wine thief. You can use any good unscented winemaking or homebrewing cleaner. One-Step, Sparkle-Brite, TSP and others are all good.
Once the equipment is clean and well rinsed with clean water, you can sanitize it. My personal preference is for metabisulfite rinsing. It’s cheap, fast and easy. All you need to do is mix three tablespoons (about 50 g) of metabisulfite powder in one gallon (~4 L) of cool water and it’s ready to use: dip, sluice or spray each piece of equipment and either let it drip completely dry or rinse it with clean water. (For practical purposes, municipal tap water is sanitary and safe for rinsing).
Also, before you throw away the kit’s packing materials, record the production code and wine type in case you have a problem with or question about the kit for the manufacturer.
Now, let’s make a kit!: Day one
All right! Open up the kit box and check your instructions: some kits not only have more than one packet of any type of ingredient, others actually have more than one bag of concentrate or juice. A second, usually smaller, bag of juice is most likely a sweetening pack to be added after fermentation is finished. Many wine kits require the addition of Bentonite on the first day. This might seem a bit odd at first because Bentonite is a fining agent used to clear cloudy wines after fermentation. However, adding it on the first day accomplishes a few things. First, it adds some solid material to the juice, which is very clear. Yeast breed more quickly in an environment with suspended solids. Second, the Bentonite will have plenty of work to do in a couple of days when the kit is fermenting. By including a relatively small amount on day one, it clears the wine as it goes along, recirculating and churning with the action of the fermentation, and you can avoid adding a lot more on clearing day a few weeks later.
Some Bentonite dissolves very easily and can be simply stirred into hot water in the bottom of the primary fermenter. Others require a bit more work to dissolve and can be mixed in a jar or bottle with hot water or whipped in a blender in a few minutes.
Now, grab that big bag of juice. Carefully pop the cap off of the bag and pour it into the primary fermenter. Most wine kits have flaps and slots to insert the neck of the bag, making it easy to pour. Try not to splash, as red grape juice stains like the blazes and even white grape juice is pretty sticky. And, spills that are not cleaned up can attract insects and serve as a breeding ground for spoilage microorganisms. Add one gallon (4 L) of warm water to the bag to rinse out any remaining juice, and add it to the fermenter. Waste not, want not!
Top up fermenter to the 6-gallon (23-L) mark with lukewarm water. Remember, your wine kit has probably been designed to ferment at 65–75 °F (18–24 °C). If you make it up with cold tap water the temperature could be too cool for the yeast to start fermentation and you’ll be forced to hang around till it warms up enough to pitch the yeast.
Stir the juice and water mixture vigorously for a full 30 seconds. This is one key to success, and where a lot of people fall down on the first day. Concentrate and water have wildly different coefficients of viscosity. In regular-talk, this means that, much like oil and water, they don’t want to mix together very well. If you just dump the water into the primary, or even if you just stir gently, you may not be stirring hard enough to mix them. Get aggressive and whip the wine with your spoon. Don’t be afraid to introduce some air into the must — oxygen on the first day not only isn’t harmful, it can also help speed fermentation by increasing yeast growth!
Now, grab your sanitized wine thief. Draw a sample of the juice, and drip it into your test jar. Float your hydrometer and check the specific gravity — just look across the surface of the liquid it’s floating in and read the numbers on the lines right at the level of the juice. (For more information on using a hydrometer see the sidebar on page 9). The gravity should read between 1.070–1.090, depending on the wine type. Be sure to record this wherever you’ve put the kit code and type.
If your wine kit contains an ingredient pack that needs to be added (oak powder or chips, elderflowers, grapeskins, etc.). check with the instructions on how to add them. They might advise you to poach the oak in boiling water, or place the elderflowers into a cheesecloth bag. Most kits, however, just ask you to tear open any packages and sprinkle them into the primary fermenter with the must. If your kit has more than one package of each ingredient, be sure to add them all. Be sure to stir them under the surface of the liquid. Don’t worry if they float on top a bit. They’ll get wine-logged and sink after a day or two.
Ensure that the temperature of the juice is within the range specified in the kit. Colder temperatures may cause the kit to be slow to start, the fermentation may take longer than specified in the instructions. If the kit is much warmer than instructed the yeast might produce some off flavors. In extreme cases, overheated wine may suffer a “heat stroke” and the yeast will quit entirely. If your must is too cold or too hot, leaving the must at
room temperature for several hours may be sufficient to bring it in range.
Finally, it’s time to pitch the yeast. At this point, the yeast will begin consuming the sugars in the must and converting them into ethyl alcohol, carbon dioxide (CO2) and heat. The must will start changing from grape juice toward being wine. Again, instruction sets may vary on whether to re-hydrate the yeast or sprinkle, so consult them first. Once the yeast is in place, cover the primary fermenter and place in an area with an appropriate temperature, whatever is mentioned in the instructions — usually 65–75 °F (18–24 °C). If the lid for your primary fermenter has a hole for an airlock and bung, be sure to put the bung in, attach the airlock and fill it with water.
You should see visible signs of fermentation within 24–48 hours. The airlock will start gurgling and a layer of foam will develop atop the must. If you don’t, don’t panic: instead, grab your hydrometer and check the gravity reading. If it’s moved downward at all, things are happening as they should. Wait the specified amount of time in the instructions and get ready for the next step.
The basic steps for making a wine kit are similar, but not always the same, depending on the manufacturer. Always be sure to read the kit instructions completely before you begin. Knowing what to expect is the best way to prevent mistakes during the winemaking process.
The next step: Racking to the carboy
Usually after 5–7 days, the kit is ready to move from the primary fermenter to the carboy. You’ll need to clean, sanitize and rinse your siphon rod and hose, hydrometer and test jar, wine thief, carboy, bung and airlock. Rinse well. Most kits ask you to check the gravity and rack the wine when it hits 1.010 or less, but your kit might be different. Remember, check your kit’s specific instructions!
To rack the wine, put the primary fermenter up at least three feet on a sturdy table. Carefully siphon the wine into a clean, sanitized 6 gallon (23 L) carboy. Leave most of the sediment behind. This will leave a space at the top of the carboy. Check your instructions whether or not to top up your carboy at this point. Attach an airlock and bung to the carboy and return your carboy to your fermentation area until the next stage (usually around ten days later).
At this point your wine is nearly finished fermenting, but the yeast still has a lot of work left to do. The wine will probably smell yeasty and a bit sharp. Don’t worry, it’s going to be just fine with a little time.
Step three: Racking (maybe . . .), fining and stabilizing
After the specified waiting period, you’ll need to check your specific gravity again to make sure you’ve hit the target. This will also be where you estimate your alcohol content. You’ll need to clean and sanitize your hydrometer, test jar, wine thief, spoon, and — depending on whether or not your kit requires racking at this stage — the siphon rod and hose and a carboy. If you don’t have a spare carboy, you can get around this by racking from the carboy to the (clean and sanitized) primary fermenter and then back again to the carboy after it’s been cleaned and rinsed. It isn’t necessary to sanitize the carboy you’ve just been using: after all, it’s either sanitary and the wine is fine or it isn’t, and re-sanitizing won’t help. Just get it cleaned out to receive the wine.
Now, a moment of digression: to rack or not to rack before fining? It seems self-evident that you should rack the wine into a clean container before you add fining agents and stir it up. After all, the goal is to clear the wine, so get it off the gunk, yes?
For some kits, the answer is actually “no.” The fining agents used in these kits are extremely specialized, and actually perform better if you don’t rack the kit before adding them. They rely on the mass of yeast sediment stirred back into suspension to trigger the clearing action. They may not clear at all if racked before the finings are added! Be sure, as always, to consult your kit’s instructions!
Draw a sample of the wine and check the specific gravity. Make sure it matches the specified target gravity in your instructions before proceeding. A little lower is OK, but higher isn’t — you might need to wait for the wine to finish before proceeding.
Some kits ask you to check the specific gravity on at least two consecutive days to make sure that the wine is completely finished fermenting. This is a pretty darn good idea, even if you’ve hit the upper end of the specific gravity range. If the fermentation has been cool, the specific gravity may still be dropping. Wines that haven’t finished fermenting won’t clear, and trying to stabilize them leads to problems — better to be safe than sorry.
If you want to know your alcohol content, now is the time to estimate it. Look up your initial specific gravity, subtract the gravity reading you just took, and then multiply the numbers to the right of the decimal by 131.
If your kit instructions ask you to rack before fining and stabilizing, rack your wine. If it doesn’t require racking at this time, check your instructions and gather up your additives. Generally there will be two stabilizers, metabisulfite and sorbate and one or two fining agents. They all need to be added separately, with a lot of vigorous stirring in between each addition. Adding the fining agents together or all at once might be more convenient, but the fining agents can actually work against each other and “gloop up” in the carboy, or even encapsulate the stabilizers and render them ineffective. The best way to add the stabilizers is to dissolve them in cool water, just to make sure they’re completely soluble before they go into the wine. Dissolve the metabisulfite in a quarter cup of cool water, add it to the carboy and stir.
Stir hard. Stir really, really hard.
Nope, that’s not nearly hard enough. Stir much, much harder. Now, keep it up for at least two minutes, with tendons creaking, elbows snapping and sweat flying off your forehead — that’s almost hard enough.
The thing is, almost 90% of the failures I see in kit wine are related to insufficient de-gassing and stirring. Because kit wines are made in such a short time, unlike commercial wines, they don’t get a chance to expel or evolve all of the carbon dioxide (CO2) the yeast generates during fermentation. Carbon dioxide gas in suspension makes the wine bitter (it produces carbonic acid in solution), prevents the wine from clearing and traps off aromas — leaving the wine stinky, even if it does clear properly. Bottom line: you have to stir until it’s not fizzy anymore, if you want the wine to clear up and taste good.
Next, dissolve the sorbate in a quarter cup of cool water, add it to the carboy and stir very vigorously for two minutes to disperse the stabilizers and drive off CO2.
The second juice bag
Make sure there’s room in your carboy for the contents of the pack, which may be called a sweet reserve, wine conditioner, süssereserve or F-pack. You may need to remove a couple of cups (500 mL) of wine for this purpose. Reserve this extra wine for topping up the carboy at the end of the fining and stabilizing process.
Shake the bag, carefully remove the cap, and gently pour contents into the carboy. Stir vigorously for 60 seconds. Your gravity will now read between 0.005 to 0.020 points of gravity higher than your last reading, depending on the kit style.
Finally, shake up the contents of the fining packages (gelatin, chitosan or isinglass, protein or polysaccharide clarifiers). Carefully cut open the corner of the pouch or pouches (there may be more than one — check your instructions) and pour contents into carboy. Stir vigorously for another two minutes to drive off CO2 gas.
At this point, almost all kits ask you to top up the carboy to within two inches (5.1 cm) of the bottom of the bung, to reduce the amount of surface area of wine exposed to the atmosphere, thus reducing the exposed area of wine that could pick up oxygen, and spoil. Use cool water, or reserved wine from the sweetening bag step, if available.
A lot of people are uncomfortable with adding any water to the kit at this point, concerned that it might water down the final wine and make it taste, well, watery. Strangely enough, this is something wine kit companies have actually thought a lot about. I can’t speak for every kit company, but it is common practice in the industry to make the kits roughly 4% stronger than necessary to hit the prescribed style of wine. This means that in a 6-gallon (23-L) kit, you can add an extra quart of water (920 mL) and still have the wine taste right. Finally, ensure the airlock is filled halfway with water and reattach the bung and airlock. Put your carboy back into your fermenting area and wait the specified number of days given in the directions (usually at least a week, and up to three weeks) for the wine to clear.
Racking and bottling
At the end of the specified clearing period, check to make sure your wine is brilliantly clear. The best way to do this is to use your clean, sanitized wine thief to pull a glass from the carboy. Take it into a darkened (but not completely dark) room and shine the beam of a flashlight through it.
Look at the light beam passing through the wine (not directly into the flashlight). You shouldn’t actually be able to see the beam if the wine is truly clear. If you do see the beam from the flashlight, that means tiny particles in the wine are reflecting the photons as they pass through the wine, scattering them and making the beam visible, like dust-motes in a sunny room. If your wine is clear, you can proceed to bottling. If it isn’t, don’t bottle it! Cloudy wine in the bottle will eventually throw visible sediment and may change in flavor and aroma over time. Patience and time are the two best antidotes for cloudy wine.
Bottling
As I mentioned above in “Gear Guide,” for bottling you’ll need thirty regular wine bottles, thirty corks and a corking machine. You can save old wine bottles and clean them thoroughly with an overnight soak in hot water and Tri-sodium-phosphate (TSP). Give them a good rinse with plenty of hot water and inspect them for goo or stubborn stains. You can also buy new bottles.
You also need a corking machine. While a lot of folks still use “hand corkers,” which rely on brute power to force corks into the bottle neck, a real treat is the Italian or Portuguese “floor corker.” These beauties make corking easy as pie, with their self-adjusting bottle platforms and great mechanical advantage.
Another helpful tool is a bottling wand, which is an acrylic rod that attaches to the end of the siphon hose, with a little needle valve on the end. It allows you to fill the bottles by just dipping the wand into the bottom of the bottle and it reduces splashes and drips. They’re not expensive and really beat using a hose clamp or your thumb to control the flow of wine into the bottles. Clean and sanitize your siphon rod, hose and siphon filler. Rinse well! If you’re concerned about disturbing the sediment on the bottom of the carboy when bottling, clean and sanitize a primary fermenter or carboy, rack the wine into it, and bottle from there.
1. Siphon your wine into bottles. Make sure to leave two finger-widths of space between the bottom of the cork and the level of the wine in each bottle. If you don’t leave enough space, the cork may pop back out, too much space and the air in the bottle will oxidize the wine.
2. Seal with a good quality cork.
3. Leave the filled bottles upright for three days before laying them on their sides for aging, to allow the corks to seal. Store bottles in a dark, cool, temperature-stable place.
Using A Hydrometer
“How exactly do I use a hydrometer?” you might ask yourself. As mentioned on page 8, taking a hydrometer reading is done by floating the device in a sample of wine. To get an accurate reading, however, you need to follow a few guidelines:
• Make sure you have a testing jar, which looks like an enlarged test tube with a stand at the base. Most hydrometers come with a testing jar and hold between a half cup and 2 cups (118 and 473 mL). Strain or coarsely filter your sample before pouring it into the sample jar.
• Once your sample is in the jar, float your hydrometer in the liquid. Give the hydrometer a spin (like you would with a top) in order to eliminate air bubbles from the instrument’s sides and rid the juice of as much CO2 as possible. Air bubbles and residual CO2 gas would both affect the buoyancy of the hydrometer and throw off the accuracy of your reading.
• After you’ve floated the hydrometer and given it a spin, wait a moment to allow everything in the jar to become still, then take your reading at the meniscus. The meniscus is the point where the hydrometer actually breaks the surface of the liquid, forming a funnel-shaped lip. Take the reading from the lowest point of the meniscus rather than the top (see image).
Picking The Right Kit
he modern wine kit, with its gleaming plastic bag in a jazzy-looking box, didn’t start out as a miracle of modern technology. Arguably, the first wine kits were actually used in ancient Mesopotamia. People of the first civilization in this area would store a mixture of sprouted, crushed grains and dried dates against future need. When the time came, they would crumble this concentrated source of sugar into water, and allow it to ferment with the natural yeast present on the dates.
Modern wine kits first began appearing in the 1970s. They featured cans of pasteurized grape concentrate and packages of acid, nutrient and yeast. While complete, and capable of fermenting into a wine-like beverage, they were actually pretty bad. Awful, really, but at least they made an alcohol-containing beverage. Modern wine kits still follow the format of ready-to-dilute-and-ferment stuff in a package, but they have come a long, long way since the old days.
There are three common types of wine kits. There are five-liter (1.3 gallon) kits that contain mainly concentrate. Concentrate is grape juice with some of the water removed. There are 7.5-liter (1.9 gallon) kits that have a blend of concentrate and juice. These kits are sometimes called four-week kits. Then there are premium kits, usually 15–16 liters (3.9–4.2 gallons) in volume, with a large percentage of fresh juice in the blend. Premium kits are sometimes called six-week kits.
Most people assume that the volume of liquid in the kit determines the quality of a wine kit: The higher the volume of raw materials, the higher the quality. While this is generally true, it fails to take into account whether or not a kit is appropriate for your needs.
Some winemakers need wine for early drinking, to flesh out a cellar of fresh juice and grape wines that require longer aging. Others like the quality of the premium kits and want to build up a stock of well-aged bottles for the future. No single kit can do both these things.
A kit designed for a long maturation will not taste good after a few months. On the other hand, a kit designed to mature quickly will taste quite good in only a few weeks, but won’t improve significantly if you’re trying to build up a multi-year cellar. The bottom line is, if your kit wine isn’t at its peak when you plan to serve it, it’s not the right kit for you.
So which kit is right for you? First, we have to understand what goes into the kits, and how it influences the flavors and age-ability of the wine. The ingredients we’re concerned with are concentrate, juice and sugar.
The other things — like yeast nutrient and grape acids — go in all kits but don’t have a bearing on quality, just on fermentation characteristics and the balance of acidity and strength.
The Raw Materials
Sugar
There is a perception that if a kit contains sugar it has been made from inferior concentrates, or it has been made with less concentrate and “stretched” with added sugar.
The addition of sugar to wine actually has a history going back hundreds of years, or perhaps even longer. Sugar is added to wines to increase the alcohol content without influencing other flavors. Alcohol is, of course, an important component in the flavor and structure of a wine.
The practice of adding sugar to must is called chaptalization, after a minister in Napoleon’s government, M. Chaptal. Some of the greatest (and most expensive) bottles of wine, including many Premier Cru Burgundies of France, have been made from chaptalized must.
The grape concentrates used in wine kits often come from very hot growing regions, such as California or the south of France. The grapes from these regions are very ripe, and used for the full volume of the kit they would make a heavy, clumsy, “overflavored” wine with poor balance. By reducing the volume of this very intense concentrate with sugar — usually sucrose — a more balanced wine can be achieved without lowering the alcohol content. The bottom line on the sugar is that it is there to increase the alcohol content. If the kit has low levels of flavor and aroma, it is due to a flaw in manufacture or process, not sugar content.
Concentrate
Concentrate is grape juice with the water removed. There are several ways to do this. You can boil the water off in a vacuum concentrator, squeeze it out in a reverse-osmosis unit, or sublimate it off with a conical distillation unit. The most important thing that the different processes can control is the level of total dissolved solids (TDS) of the concentrate. The higher the level of total dissolved solids in the concentrate, the more flavor.
Juice
Winemaking grape juice is made from pressings of fresh grapes. The juice is often clarified by fining and light filtration. It can be varietal juice, or a blend of different grapes. The two most important factors in juice quality are the absolute quality of the grapes used and the level of retained solids in the grape juice.
The Solid Facts
Kits are made from combinations of juices, concentrates and sugar. What separates them is the level of total dissolved solids. Total dissolved solids is what is left over after every bit of the water is removed from the kit. The more total dissolved solids, the more aroma and flavor compounds a wine will have. Back in the old days, concentrate-only kits (usually a 100-ounce can of thick syrup, and regardless of whether you were making red or white, it was brown) were made from grape juices diverted from the baking industry and the levels of TDS in them were almost negligible. Modern methods have allowed for concentrates with high levels of dissolved solid material and can deliver very good results. Manufacturers specializing in high-TDS concentrate kits specify this in their advertising and marketing materials, so there’s no chance of confusing their products with the “bad old days” kits. Having noted that, most manufacturers rely on single-strength, unconcentrated grape juice to give their kits a boost in TDS, and premium kits (those containing mostly juice) usually have the highest TDS levels of those in the manufacturer’s line-up.
When a kit has high levels of solids, however, it also winds up with high levels of fermentation byproducts and “green” flavors and aromas. “Green” refers to the flavor compounds in the wine kit that will, over time, change into the more mature flavors and aromas that make great wine. A kit with lower TDS levels will have fewer of these green characteristics, and be ready to consume sooner. A kit with higher TDS levels will have more of these compounds, but it will take longer to mature.
The Kits
Old-School Concentrate-Only
With their low levels of TDS, concentrate-only kits mature very quickly as they produce very few “green” flavors. Within a week or two after recovering from bottle shock, they taste nearly as good as they ever will, rewarding consumers who need wine in a hurry. Most produce wine that you can drink after six weeks.
Concentrate and juice
With more varietal juice content, and higher levels of TDS, concentrate and juice kits mature at a slower rate than concentrate-only. Although they drink quite well after only a month in the bottle, they show their best after approximately three months for whites, and six months for reds. These times depend on a series of factors including the kit, the vintage, the size of the bottles they are stored in, the corks used, and — most importantly — the storage conditions. There can be no guarantee of a date for maturity, just individual conditions, and individual wines.
Premium kits
With very high levels of varietal juice and high levels of total dissolved solids, premium kits don’t drink especially well for the first few months. In fact, most whites don’t open up for six months, and most reds need at least twelve months.
This is not to say they taste bad. Indeed, by three months of age they easily surpass the concentrate-only kits in taste and aroma. But they continue to develop fabulously. Indeed, while acknowledging the aging differences mentioned above, most premium kits will actually improve for years.
“Super-premium” kits
Super-premium kits have the highest levels of TDS. Super-premium kits are usually marketed as limited versions of a regular premium kit, and are often vineyard designated. They contain the finest (and the most expensive) juices available. They require patient aging to show their charms and develop over an even longer period than regular premium kits. These kits are designed for cellaring.
Fresh juices
Fresh juices have the highest levels of dissolved solids by far, but this makes the early drinkability trade-off very unfavorable. Correctly made white wines from fresh juice taste raw and green for 18 months, and only start to show quality after two years. With reds, the green period doesn’t pass for two years, and only after three years do the flavors truly meld and mellow. Another problem with fresh juices for many consumers is the level of winemaking skill needed to process them correctly. Unlike a kit there is no guarantee that they will turn out at all. Fresh juices are not balanced for acidity, potential alcohol, flavor and aroma as wine kits are. With kits, this has been done for you.
So, although a concentrate-only kit may initially reward early drinking, it will not develop the flavors and aromas that the higher TDS kits will. By contrast premium and super-premium kits don’t drink nearly as well while young, but continue to develop over time. Fresh juices ultimately make the best wine in the hands of a skilled winemaker, but drinking them when they are less than two or three years old wastes their potential.
Which kit is right for you? Plan your cellar and know your needs (see the advice on page 72). If you make wine kits appropriate to your drinking timeline, you’ll always have plenty ready to drink!
What’s In A Name
If you’ve been looking at the kit shelves recently, you’ll have noticed something funny. Not funny ha-ha either. Some of the kits have really weird names. In fact, some of them have names that sound French or Italian, but don’t actually mean anything in either language. Also, the wacky names don’t seem to have a commercial equivalent. It’s not like you can go into your local bottle shop and ask for a Vieux Château du Roi (possible translation: Roy’s Old House). Not all of the kits are oddly named. Chardonnay, Cabernet, Merlot and the other grape varieties are all there, but there are a significant number of tongue-twisters.
So what are wine-kit manufacturers up to? Is it a horn-swoggle? The answer, like the answer to most complicated issues, involves lawyers. At the dawn of the modern wine kit era (the 1980s), manufacturers had a problem with consumer acceptance. People wanted to feel sure that the kits they were buying were like the wine they could purchase from the store. So, in order to guide people who wouldn’t know Cabernet from Cab Calloway, they produced kits that not only replicated commercially-available styles, they gave them the proper names of those styles. People felt a lot better about buying wines with names like Bordeaux, Châteauneuf-du-Pape or Chablis. In those cases, they felt like they knew what they were getting.
In 1994, along came the French lawyers and the Institute Nationale d’Appellation d’Origine (INAO). They launched a court action claiming that terms such as Burgundy and Beaujolais were copyrighted under French law and that no Canadian wine manufacturer could use them. While it may be debatable whether the kit manufacturers were really hurting the French wine industry, they had a point. They also argued and won that point in court. (The reason this drama played out in Canada is that most kit manufacturers are located in that country.)
In order to keep continuity in their product lines, the manufacturers and the Canadian Home Wine Trade Association (CHWTA) got together, and — with input from the kit-making public — renamed the products. Some of the names carried over well enough, as with Vieux Château du Roi for Châteauneuf-du-Pape, while others fell a little short in terms of easy recognition. In some cases, the names were goofy enough to doom the kits. Pommard was a fabulous wine, rich and delicious. Renaming it Chat Dormant (sounds like a sleepy cat to me) scratched it off the production line-up. What follows is a list of the old names and the new, CHWTA-approved trademarked names:
Old Names New Trademark
Anjou Anjille
Beaujolais Bergamais
Burgundy (Bourgogne) Bourgeron
Entre-Deux-Mers Brise-de-Mers
Pomerol Cavignac
Chablis Chamblaise
Pommard Chat Dormant
Claret Clairval
Domaine Minervois Clos Minier
Côtes-du-Rhone Côteau Royal
Médoc Côteau Sur Mer
Brouilly Domaine des Brumes
Alsace Blanc Fleur De Blanc
St. Émilion Jermillon
Hermitage L’Alsy
Tavel La Flutée
Muscadet Manoir Blanc
Pouilly Fuissé Ruisseau Blanc
Moulin à Vent Tourne-Vent
Graves Val-de-Grace
Macôn Val-du-Domaine
Châteauneuf-du-Pape Vieux Château du Roi
Bordeaux Bordailles
Côtes de Provence Vin de Taradeau
Now, by convention, every Canadian kit wine manufacturer who makes a kit modeled after the Chablis style will use the name “Chamblaise,” making it easier for consumers to identify kits across different product lines. Although it’s easy to poke fun at some of the names, with my tin ear any of my efforts would no doubt sound worse.
An interesting wrinkle to this came up in the aftermath of the change. Manufacturers began making up proprietary, copyrighted names for new kit formulations. The first of these wines were formulated to match the Italian Amarone-style, which is made from partially raisined grapes. This was the first style because manufacturers were answering consumer demand for very strong, dark red wines. They were given Italian-sounding names that had a little zing: Luna Rossa, Rosso Fortissimo. There are now quite a few of these proprietary products. In fact, there are too many to list here. Your best bet is to look at the literature provided by your retailer, which will give you the closest commercial style.
Wine has a thorny problem when it comes to selecting names. Some wines are labeled with their dominant varietal, which can make it easier to determine what’s in the bottle. On the other hand, some varietal names are downright weird, making it difficult to sell those wines (e.g. Lemberger, Rkatsiteli, Gesundheit, Touriga Nacional). Also, unless you read the fine print, you may not be getting all the varietal information you’re paying for — sure, it’s a Syrah, but it also contains 13 other grapes in it!
When I teach wine education I give two three-hour classes on reading labels and make it an open-book test. Nobody but a government regulator could enjoy learning all the dubious esoterica of label regulations and conventions. Which brings us back to my favorite topic, wine from kits — and in this case, how they are named.
Varietally named, non-denominated
When a wine kit is named after a specific varietal grape, that’s what it’s made out of — your Cabernet Sauvignon from a reputable kit manufacturer is made from juice and concentrate derived from Cabernet Sauvignon grapes. When it’s a blend of two or more grapes, the dominant variety is named first (i.e., Cabernet-Merlot). Sometimes the manufacturer will offer specific percentages in multiple blends, but not always as the raw materials can change from batch-to-batch, and batch sizes tend to be very small (often less than a thousand kits at a time) it would be nearly impossible to keep a current, accurate list of the precise formulation available for every kit in the retail market.
Varietally named, country denominated
If kits come with a country denomination (like French Chardonnay) then the origin of the grapes will be from that named country. This allows the manufacturer to copy a specific style of varietal wine from a country by exploiting the flavors commonly attributed to that particular wine — most wine drinkers have a firm idea of what an Australian Shiraz tastes like, so producing a Shiraz from Australia gives the manufacturer a good chance of reaching a specific market demand.
Varietally named, region denominated
Again, the varietal naming convention applies, but the further designation of a specific growing area (i.e., Murray River, Napa, or Mosel Valley) more specifically pinpoints the terroir of famous growing regions.
Napa has a very high name recognition and produces great fruit, the Mosel Valley makes great Rieslings, etc. Once again, by getting the grapes from a specific growing region the kit company can reach out to a consumer who has either tasted wine from the region previously, or who has at least heard of it in relation to a positive wine message.
Varietally named, vineyard denominated
Varietal naming again, but vineyard designation is a huge deal. Every time you get more specific with a juice origin, you increase the complexity of your kit manufacturing operation significantly. That’s because when you’re producing a simple, non-denominated varietal you can stir all of your Cabernet Sauvignon into a big tank, blend for consistency and quality and go along your merry way, using it in your kit as needed.
When you’re dealing with the specific fruit of a single vineyard, you’re obligated to hold the grape material in a single tank, unblended and on its own, for as long as you offer that kit. This is fine if you’ve got only one single-vineyard designated kit, but a pain if you’ve got a dozen of them! Wine kit companies (much like commercial wineries) are chronically challenged for tank space. However, with a single-vineyard designation, like Woodbridge Ranch 41, you can offer not only the prestige of a good vineyard producing quality fruit, but the change in character that the harvest brings every year, rather than a dependable but similar year-in-year-out varietal kit.
Limited release
Over the years kit companies have offered single-time kits, under the names “Project Cellar,” “Limited Edition” and “Restricted Quantities.” The source of origin for these kits varies widely, but it’s usually at the top of the regional/vineyard denomination, and is often explained in the marketing materials that a company includes with the products.
Traditionally named
With an increase in international trade legislation, traditionally named kits are going the way of the Dodo (which didn’t make good wine anyway). Like many things that are changed for no apparent reason, it involves lawyers. At the dawn of the modern wine kit (the 1980s), manufacturers had a problem with consumer acceptance. People wanted to feel sure that the kits they were buying were like the wine they could purchase from the store. So, in order to guide people who wouldn’t know Cabernet from Cab Calloway, they produced kits that not only replicated commercially available styles, they gave them the proper names of those styles. People felt a lot better about buying wines with names like Bordeaux, Chateauneuf-du-Pape or Chablis, because they knew what they were getting.
Then came the French and the INAO (Institut National des Appellations d’Origine). They launched a court action claiming that terms such as Burgundy, or Beaujolais were copyrighted under French law and that no Canadian manufacturer could use them. While kit manufacturers probably weren’t hurting the French wine industry, they had a point (a point that they won in court).
In order to keep continuity in their product lines, the manufacturers and the CHWTA (Canadian Home Wine Trade Association) got together and with input from the kit making public, renamed the products. Some of the names carried over well enough (like Vieux Château du Roi for Château Neuf du Pape) while others fell a little short in terms of easy recognition (Chat Dormant: who wants to buy a wine that puts the cat to sleep?). In some cases, the names were odd enough to doom the kits (Pommard was a fabulous wine, rich and delicious. Renaming it after a terminally sleepy cat scratched it off the production line-up for most manufacturers).
Proprietary named
In the aftermath of the name-change, kit manufacturers began using proprietary, copyrighted names for new kit formulations. By doing so, they were able to achieve several objectives simultaneously: One, they had a stable name that the French couldn’t make them change. Two, they got the chance to apply cool-sounding names to their wines. Three, they got to market specifically against those names (when he’s advertising Cabernet, a marketing specialist worries that he’s advertising everybody’s Cabernet, but if it’s copyrighted Chateau Whosis, it is his alone).
The first of these were kit wines formulated to match the Italian Amarone-style, which is made from partially raisined grapes. They were given Italian-sounding names that had a little more zing: Primo Rosso, Luna Rossa, etc. There are now quite a few of these proprietary products. In fact, there are too many to list here. Your best bet for finding this information is to have a look at the brochures provided by your retailer, which will give you the best link-up for the style.
Inside The Box — The anatomy of a Wine Kit
While traveling one summer, spreading the good word about wine kits, I read an op-ed piece in a Toronto newspaper by an obviously nostalgic — not to say maudlin — writer. He was lamenting the passage of his father’s efforts at grape winemaking. Pop hadn’t gone to his eternal reward, he was just too dern feeble to crush and press anymore. The writer’s father had switched from grapes to pails of fresh juice. But at least, the author commented, he wasn’t using any of the “mysterious powders and potions from the chemistry set at the local winemaking shop.”
My initial reaction was deep-seated anger, always amusing in a 300-pound powerlifter, and the desire to show the writer something most people never get to see — his own intestines. I quickly realized, however, that my attitude was uncharitable. Most people who write for magazines and newspapers do so because they are not competent to do much of anything else. If his fact-checking was suspect and his attitudes unexamined and specious, it was actually my fault. Me, personally.
No, really, I have to blame myself. After all, what are those white powders and mysterious cloudy liquids in the wine kits? What goes into the bag of sticky syrup that makes up your must? Is it anything like “real” winemaking? Nobody has ever explained this in print (or anywhere!) before, so it looks like I’d better step up and set things right.
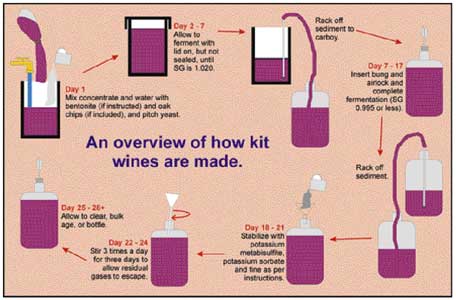
In the following section under the “Make Your Kit Wines Shine” heading, I present a sidebar article describing how wine kits are made. While this covers the physical aspects of factory production, it leaves out the good stuff —such as how we choose kit styles, how we select which raw grape juices and concentrates we use in our kits, and our long-term market strategy and proprietary kit formulations.
Just kidding on that last one! But kits are really like icebergs. No, they don’t make James Cameron rich, but there’s more going on beneath the surface than seems upon first glance at the bag of juice and the mysterious packets of powder. To learn the inside dope (from the inside dope), read on. And don’t miss the sidebar to this article at the bottom of this page under the “What Is That Stuff” header, which explains what all those powders and liquids are in the kits, and what they do to your wine.
Choosing kit styles
The one thing wine kit manufacturers don’t want to do is to be trendsetters. (If you saw the way I dress, you’d see that — for the most part — I’m genuinely successful). We want to be trend-followers. Our market (that’s you) is made up of people who enjoy commercial wines and make kits for the joy of the lifestyle, interest in the hobby and the happy pleasure of making something with their own hands. Market research shows that kit makers are more likely to try a wine kit of a style they’re already familiar with, either through having consumed it or from having seen it advertised or mentioned in print. Rather than hoe our own row by introducing brand-new or little-seen styles and varietals — and therefore having to do our own advertising and education — we observe commercial sales trends and stay 18 months to two years behind the big wineries.
An excellent example of this was the “mist” products introduced a couple of years ago. Launched by a major winery, these “refreshment beverages” combine a light wine base with fruit juices for a social wine intended for party and patio. Marketing information showed that it was the fastest-growing beverage category in North America only one year after its introduction. The R&D department swung into action and we made our own mist wines, with excellent results. As my friend Michel says, “If you want to plant a seed, follow the plow, do not go ahead of it!”
So, we do our research on which wines to make. The next step is to find the right juice and concentrate. The one thing that my columnist friend failed to understand is this: You can’t make good wine in a laboratory. Good wine is made in the vineyard, and it starts with good grapes. Nothing a chemist or a winemaker can add or formulate can make a good-tasting wine without them, and this goes double for wine kits.
Choosing the right juices and concentrates
We don’t always mimic commercial trends. We also work like a market chef, picking and choosing among the best ingredients. While we don’t actually own any vineyards (we’re kit manufacturers, not grape-growers!), we have many growers, brokers and suppliers on the lookout for top-quality juices and concentrates. When they find a particularly high-quality supply, we try to find a way to use it. The fresh juice and concentrate industry is large and very well established, so kit wine companies enjoy access to grapes from many different vineyards and producers, as well as harvests in the Northern and Southern hemispheres.
If a high-quality juice or concentrate doesn’t fit into a company’s regular kit lines — either through scarcity (it couldn’t be kept in supply all year) or because of its high price-point (it would drive the cost of the kit through the roof) — a manufacturer can offer a one-time kit. These are usually available as “Limited Edition,” “Restricted Quantity” or “Special Offering” kits. By removing the juice or concentrate from the regular product line-up, the manufacturer need not worry about harvest differences changing their regular kits (more on that below) and can utilize small lots of interesting grapes.
Going to trial(s)
This involves a lot of fermentation trials and a lot of lab work, as well as endless rounds of product testing. We get all of our raw samples as clarified juice or concentrate. They’re made up just like a regular kit and bottled after about six weeks of aging, at which point a test panel convenes to assess them. This means I actually spend a significant portion of my time sitting around and drinking wine. Before you ask, “How can I get that job?,” keep in mind that I drink more lousy wine than any other human being you’ve ever met. Many wines are called, but few are chosen.
We also do these kinds of trials for juices and concentrates for use in existing kits, to make sure that the juices and concentrates not only fit the bill for laboratory specifications, but also have the right organoleptic (flavor and aroma) qualities. Not only do the trial wines have to taste good, they also need strong varietal character (typical of the grape variety), and must be consistent with the previous vintage used to make the kit. You wouldn’t want your Chardonnay to be crisp and fruity and then suddenly change it to one with muted fruit quality and a soft finish. It’s not fair to winemakers who enjoyed the kit last time!
As you might expect, consistency from harvest to harvest is a major challenge for kit manufacturers. While vineyards celebrate vintages — “Try the ’97; it’s fruitier than the ’98!” — we would face grumpy kit makers if they couldn’t rely on us to make a kit taste the same from one batch to another. This is why we usually use more than one concentrate or juice in every kit — to blend for consistency. Again, as I mentioned in the section about choosing kit styles, kit companies are following the plow. The champagne houses in France make their cuvées from many different lots of grapes. They have an expected house style and don’t want to disappoint their any of their good customers who expect to taste the same delicious wine from vintage to vintage.
From grapes to juice
When the grapes are ripe they are harvested and taken to a winery. Winemakers add sulfite and crush the grapes. At this point white and red grape processing diverges.
White grapes are pressed and the juice is pumped into a settling tank. Enzymes are added to break down pectins and gums, which would make clearing difficult after fermentation. Bentonite is added to the juice and re-circulated. After several hours the circulation is shut off, and the tank is crash-chilled below freezing. This helps precipitate grape solids and prevents spoilage.
When the tank is settled and the juice almost clear, it is roughly filtered and then either pumped into tanker trucks for shipment to the kit facility or into a vacuum concentrator. Juices from overseas (Europe, Australia and beyond) would be pasteurized at this point, to prevent spoilage in transit. They are then packed into thousand-liter (about 300 U.S. gallons) shipping containers made of special super-high-density polyethylene. The containers get shipped inside standard shipping containers, but are always held below the waterline of the shipping vessel: it’s cold down there, and the juice arrives in great condition.
Red grapes have to be processed differently. If you’ve ever peeled a red grape, the flesh is pale yellow, nearly colorless. Almost all of the color, flavor, and aroma in a red grape is contained in the skin. When making red wine, commercial wineries place the crushed red grapes, skins, pulp, seeds and all into a primary fermenter, where yeast is added. As the yeast converts the sugars in the pulp into alcohol, the alcohol dissolves the soluble materials out of the skin, releasing the color and a lot of flavors and aromas. When the fermentation is nearly completed, the juice is run off and the skins are pressed to extract the last bit of wine.
So the red grapes are crushed, sulfited and pumped into a maceration tank, where they are held near freezing to prevent spontaneous fermentation. Special enzymes are added to the must, which break down the grape skins, releasing color, aroma and flavor. In essence, these enzymes do the job that alcohol does in grape winemaking fermentation. After two to three days, the red must is pressed and settled in much the same way as whites, with all of the beautiful color and flavor you’d expect.
Concentrate!
Concentrate is made by removing the water from fresh grape juice. In its simplest terms, this is just like boiling down beef stock to make gravy. You boil off the water as vapor (steam) and what’s left behind is the concentrated essence of what you started with. This is all fine for gravy, but if we boiled our grape juice down in open vessels, the water vapor wouldn’t come off until the temperature reached 212 ˚F (100 °C). By the time the water boiled off, the high heat would have cooked the grape juice to a thick caramel, and — whether you started with red or white juice — it would be brown. The high temperatures would also cook off all the juice’s aromas as well!
Kit companies get around this by using vacuum concentrators. Vacuum concentrators work like the reverse of a pressure cooker. When a pressure cooker is sealed, the pressure inside rises, which in turn causes the temperature at which the water will boil to rise. Things cook very hot and quickly. If you do the opposite, however, and apply reduced pressure to your boiling vessel, the temperature at which water boils will go down. As an aside, this is why cookbooks sometimes say, “For every 1,000 feet above sea-level, add X minutes extra cooking time.” The pressure is much lower on mountain tops, to the point that it’s nearly impossible to cook rice or boil potatoes on a high peak. The water boils while the potato is only just warm, and it takes forever to cook!
If you apply a hard-enough vacuum to a tank, water can be made to boil at very low temperatures. When a vacuum concentrator is running, steam will be coming off at a great rate. But if you could reach inside the vessel and stir the boiling grape juice with a bare hand, it would be no warmer than bath water. At temperatures this low, browning and caramelization are prevented and the juice retains good color and flavor.
To the factory!
The juices and concentrates are then shipped to the kit facility in Canada. (Almost all such facilities are in Canada, as there’s nothing to do here in the snowy months except curl and make wine). There they are pumped into nitrogen-purged tanks, tested for quality and stability and held at freezing. Keeping the juices and concentrates below 32 °F (0 °C) both speeds up the formation of wine diamonds (crystals of potassium bitartrate from the tartaric acid naturally occurring in the wine) and preserves them until they are to be used. The juice itself stays liquid because the sugar content prevents it from freezing.
By purging the tanks with nitrogen gas, we prevent oxygen contact. If the juice or concentrate was exposed to air for any length of time, it would begin to oxidize. This would take place in the same way that the exposed surface of a cut apple spoils. When you cut an apple in half, it immediately begins to brown from oxygen exposure. In half a day the apple is completely brown, mushy and awful tasting. By purging all the oxygen from our tanks with inert nitrogen gas, we prevent this oxidation, ensuring that the juice stays in pristine condition.
After the quality control checks are passed, the juices and concentrates are blended into the formulations that make up the different kits. The formulation is adjusted, tested and approved; then the must is pumped through the pasteurizer. The pasteurizer rapidly heats and then cools the must, killing yeast and spoilage organisms but not burning or caramelizing it. From there it goes into the bag filler which purges the sterile bags with a double flush of nitrogen and then fills each bag to a very strict tolerance.
The bags are then automatically capped and loaded into the kit boxes that come from the box former, after which the packaged additives are placed on top. The boxes are sealed, shrink-wrapped and packed on a skid for a quality assurance microbiological hold. Depending on the product, this hold can be from three days to more than a week while one of the kits is held in a bacterial incubator and examined for signs of bacteria or yeast activity. If it passes, it is then shipped to the warehouse.
Kits are usually made in extremely small runs, but on a frequent basis. This ensures that inventory is always low and that our kits are always fresh. While kits generally have an 18–24 month shelf life, at Winexpert, we find that it is generally less than three months from the date of manufacture until our kits are fermented and in the bottle.
From our warehouse the kits are shipped to dealers, who form an important final link in quality control for wine kits. Manufacturers rely on knowledgeable, experienced dealers both to represent the product correctly and to help you, the consumer, achieve maximum success with every kit.
While there’s little magic in manufacturing wine kits, there is always a little romance: the right juice, the right concentrate and a good harvest year all combine to allow you to make rich, delicious wine quickly and easily, with a pretty good guarantee of success every time. What could be more romantic than that? And by the way, I sent that newspaper writer a wine kit with my compliments for his dad. After all, it’s only fair to let him in on how good a wine kit can be!
What Is That Stuff
Stabilizers and preservatives
There are two different stabilizers typically used in kit winemaking: potassium or sodium metabisulfite and potassium sorbate. The FDA in the United States and the CFIA in Canada control their use, but — used in the correct amounts — they are safe additives that are widely used in food processing of all kinds.
Potassium or sodium metabisulfite
Used as a source of sulfite in winemaking, metabisulfite prevents oxidation, which causes browning of the must. Metabisulfite also suppresses bacteria and wild yeast. Typical concentrations used in kits range from 15 to 50 parts per million (ppm) at bottling. The legally allowable limit of metabisulfite for commercial dry table wine is 70 ppm.
Sulfite, both in the powder form and in the dissolved solution, is a respiratory irritant. People with asthma or emphysema should not inhale sulfite powder or the vapor from a strong sulfite solution. Sulfite comes in sodium and potassium form. While sodium metabisulfite is slightly more active and a bit cheaper than the potassium form, this has no bearing on its flavor or preservative effect.
Potassium sorbate (sorbic acid)
Potassium sorbate, usually just called sorbate, prevents renewed fermentation in sweet wines and inhibits reproduction of mold and yeast. Combined with the sulfite in the kit, it helps to ensure that the wine remains stable during storage and cellaring. Some people believe that sorbate kills or suppresses yeast and bacteria. This isn’t exactly correct. What sorbate does is prevent the ability of these organisms to reproduce.
Stabilizers are used with wine kits in the following manner: When the wine is finished fermenting, a combination of sulfite, sorbate and fining agents is added. The sulfite stuns the yeast and prevents oxidation of the juice. The fining agents drag solid material, including yeast cells, out of suspension. The sorbate prevents any remaining organisms from reproducing to the point where they could affect the appearance, flavor or long-term stability of the wine. It’s a one-two-three punch that ensures clear, stable wine.
Fining agents
Used to clarify wine before bottling or long-term storage, fining (rhymes with “dining”) agents work on the principle that the particles clouding up wine have an electrical charge — a bit like static cling. As the saying goes, opposites attract. So, a positively charged fining will attract negatively charged particles and bind with them in a process called adsorption. This makes the particle/fining complex too heavy to stay suspended in the wine. The complex will then sink to the bottom of the carboy, leaving the wine brilliantly clear.
Bentonite (montmorillonite)
Bentonite is a type of clay — a naturally occurring hydrated aluminosilicate of sodium, calcium, magnesium and iron. It’s used for other things, such as reinforcing the walls of a drilling shaft when drilling, beauty parlor mud masks and kitty litter. The adsorptive properties of bentonite are useful everywhere!
A primary fining agent for wine, bentonite is also useful when added to a clear juice or must prior to pitching the yeast to speed the onset of fermentation.
Colloidal silica (kieselsol, silicon dioxide)
A solution of silicon dioxide (think beach sand) in water suspension, colloidal silica was invented to replace tannin, which used to be a popular fining agent. When World War I soaked up all the available fining tannin for use in gas masks, winemakers had to turn to another negatively charged fining agent. Colloidal silica can be used alone, but is more commonly used in conjunction with gelatin, which is described next.
Gelatin
A positively-charged fining agent, it can be used alone or in conjunction with colloidal silica and usually found in the kits in a liquid form. The most powerful of the organic finings, gelatin can also remove tannins (polyphenolics) and coloring particles (melanoidins) from wine. Don’t exceed the recommended dosage, or you may lighten your wine. Gelatin is animal-derived, usually rendered from swine. If this is a concern, due to religious or dietary restrictions, agar gelatin can be substituted.
Isinglass (icthyocolle, fish glue)
A positively charged fining agent like gelatin, isinglass is extremely gentle and usually won’t strip wine of its color and aroma. Derived from the powdered swim bladder of tropical white fish, it is usually dissolved in
liquid suspension.
Flavor and aroma additives
In the dawn of prehistory (before 1985), wine kits often contained a plethora of extras, from banana chips to packages of raisins or dried fruits of all sorts. These were included in an attempt to compensate for the aromatic and flavor shortcomings of the primitive concentrates they used.
As concentrate production methods have improved and varietal character has risen to match fine commercial varieties these additives have fallen out of favor. (I mean, really, bananas?) However, a few flavor and aroma enhancers remain in use, not to compensate for any defect or flaw in the kits, but to maintain continuity of some kit styles.
Oak chips and oak powder
Oak, in chip or powder form, comes from the heartwood of American or European oak trees. It may be toasted. Oak introduces desirable flavors and aromas into wine, including vanilla, smoke and wood-like flavors, all associated with high-quality, barrel-aged wines.
Powdered oak is usually added to the beginning of a fermentation, and gives a very smooth oak character and a subtle vanilla finish. Chipped oak is often added after fermentation is complete, and lends a more aggressive “woody” character.
Elderberries
Elderberries are the dried fruit of the European elderflower bush. Most come from Belgium, although they do grow in all temperate climates. They lend a rich “plummy” flavor to red wines, along with deep bricky-red color. Added to must prior to pitching yeast, the berries must be pushed under the fermenting wine every day to keep them moist. The distinctive character is not appropriate to all wines and they’ve fallen out of favor with all but a few traditional-style kits.
Dried elderflowers
Elderflowers are the dried flowers of the European elderflower bush. Most come from Belgium, although they do grow in all temperate climates. Added to must prior to pitching yeast, they lend robust aromatic complexity to white wines, but nowadays are only seen in a few German-style, Riesling-based kits.
 Gear Guide — The Basic Tools For Making Wine From Kits
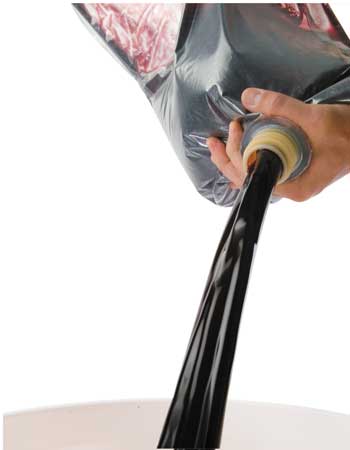 Kit Winemaking 1-2-3
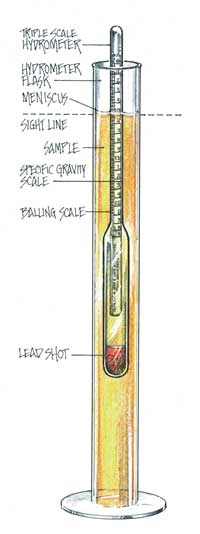 Using A Hydrometer
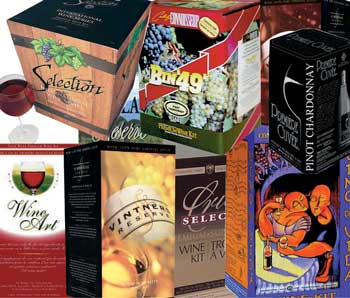 Picking The Right Kit
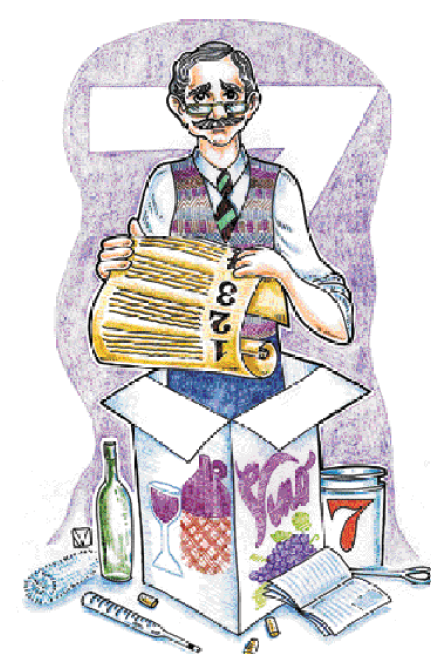 Inside The Box — The anatomy of a Wine Kit