Making Wine From Grapes
 Grape Wine
Ah yes . . . grapes! Now that we’ve covered the science behind the winemaking process, you are ready to gather some grapes and start making wine from scratch. From the gaze of a fruitful vineyard to the pride of a successful harvest, wine grapes bring an element of authenticity to the winemaking process that one cannot find elsewhere. Like any ancient art form, winemaking lacks exact documentation, but evidence as far back as Mesopotamia suggests that viticulture and winemaking existed over 8,000 years ago.
Back then, the world was still flat and people lacked the scientific knowledge that has demystified the world as we know it. To our good fortune, we can now explain the miracle of how a grape is transformed into this fine beverage the world has celebrated for millenia. In fact, Alison Crowe, WineMaker’s “Wine Wizard” columnist and a professional winemaker in Napa, California provides a wealth of this information in “From Grape to Glass” below. Following this, techniques in maceration (the process in red winemaking of letting the crushed grape solids soak in the juice) are described. Armed with this knowledge you are ready to jump in foot first and begin making wines from grapes.
From Grape to Glass
by Alison Crowe
Nothing feels as satisfying and authentic as making your first batch of wine from fresh grapes. And there’s no better time to try it than in early autumn, when grapes all over North America are ripening in vineyards and backyard gardens.
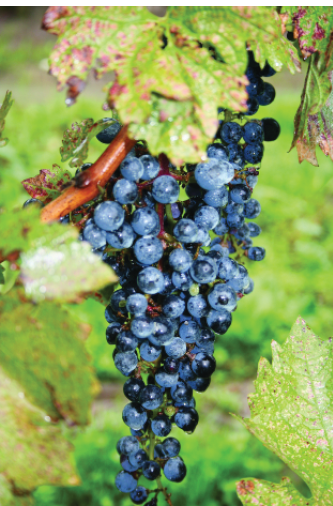
There are many kinds of wine grapes to choose from, depending on where you live. Vitis vinifera is the classic choice for flavor, varietal character and historic authenticity. This famous European wine-grape family includes such renowned varieties as Chardonnay, Merlot, Zinfandel and Cabernet Sauvignon. In the United States, to make a sweeping generalization, V. vinifera grapes thrive in California and the Pacific Northwest. They also grow well in microclimates scattered from New York to the Great Lakes, to the mid-Atlantic states and beyond.

Those who live in colder, wetter climates may not be able to find V. vinifera grapes grown locally. Don’t be discouraged. Fine hybrids and Vitis labrusca grapes, which are less susceptible to cold and disease, may be growing near your home. Search the Web and contact your local university extenstion program to find out who is growing wine grapes in your area and reach out to them. Other options include ordering grapes through your favorite local winemaking shop or from a produce wholesaler. (See “Buying Fresh Grapes” in the August-September 2011 issue of WineMaker.) No matter what grapes you use, the general techniques, equipment and ingredients are the same. Here’s an overview of some key steps along the way.
Inspecting the Fruit
Winemaking starts with inspecting the grapes. Make sure they are ripe by squishing up a good double handful, straining the juice and measuring the sugar level with a hydrometer. The sugar density should be around 22 °Brix — this equals 1.0982 specific gravity or 11% potential alcohol — and the fruit should taste sweet, ripe and slightly tart.
The grapes must also be clean, sound and free of insects and other vineyard debris. Discard any grapes that look rotten or otherwise suspicious. Also, it’s very important that all the stems are removed, since they will make your wine bitter.
Keeping it Clean
Winemaking demands a sanitary environment. Wash all of your equipment thoroughly with hot water, boiling what you can. It’s also wise to arm yourself with a strong sulfite solution to rinse any equipment that comes in contact with your wine. To make it, add 3 tablespoons of sulfite powder (potassium metabisulfite) to a gallon (3.8 L) of water and mix well
Adusting the Juice: Acids
Adjusting the juice or “must” of your wine is critical. Luckily, it’s also easy. Acid content is measured with a simple titration kit; you can buy one at a winemaking supply shop. The ideal acid level is 6–7 grams per liter for dry reds and 6.5–7.5 grams per liter for dry whites.

Here’s an example: If your must measures 5.5 grams per liter, then you need to add 1 gram per liter of tartaric acid to bring it up to 6.5 g/L. Since 0.2642 gallons equals 1 liter, 1 g/L is equivalent to adding 3.8 grams of tartaric acid to your one-gallon batch. Add this powder in one-eighth teaspoon intervals, checking acidity carefully after each addition, until the desired level is reached. You can buy tartaric acid at your supply shop.
You also need to monitor the sugar level with your hydrometer. The must should be about 22 °Brix for both reds and whites. To bring the sugar concentration up, make a sugar syrup by dissolving one cup sugar into one-third cup of water. Bring it to a boil in a saucepan and immediately remove from heat. Cool before adding in small amounts, one tablespoon at a time, until the desired degrees Brix and specific gravity is reached. To lower the sugar level, simply dilute your must or juice with water.
The temperature of your must can also be adjusted to provide the perfect environment for yeast cells. Warming up the juice gently (don’t cook or boil it!) is an easy way to bring it to pitching temperature without damaging the quality of the wine. Fermentation can sometimes reach into the 80 to 90 °F range, though the 70 °F range is standard for reds (whites often are fermented at cooler temperatures).
If your grapes have been refrigerated or are too cold, use this unorthodox but quick trick: Heat up a small portion of the juice in the microwave, mix it back into the fermentation pail and re-test the temperature. An electric blanket wrapped around the fermentation pail also works, but takes longer. For cooling, add a re-usable ice pack and stir for a few minutes. Pitch the yeast when the temperature reaches 70 to 75° F for reds and 55 to 65 °F for whites.
Racking the Wine
“Racking” means transferring the fermenting wine away from sediment. You insert a clear, half-inch diameter plastic hose into the fermenter and siphon the clear wine into another sanitized jug. Then top it off and fit it with a sanitized bung and fermentation lock. This can be a delicate operation and it’s important to go slowly. You don’t want to stir up the sediment or lose suction in the siphon.
Bottling the Batch
Bottling may sound complicated, but it’s really not. To bottle your wine, you simply siphon your finished product into the bottles (leaving about 2 inches of headspace below the rim), insert a cork into the hand corker, position the bottle under the corker and pull the lever. It’s always wise to buy some extra corks and practice with an empty bottle before you do it for real.
Wine bottles can be purchased at home winemaking stores, or you can simply wash and recycle your own bottles. These supply stores also rent hand-corkers and sell corks. You should only buy corks that are tightly sealed in plastic bags because exposure to dust and microbes can spoil your wine. Corks can be sterilized just before bottling, with hot water and a teaspoon of sulfite crystals.
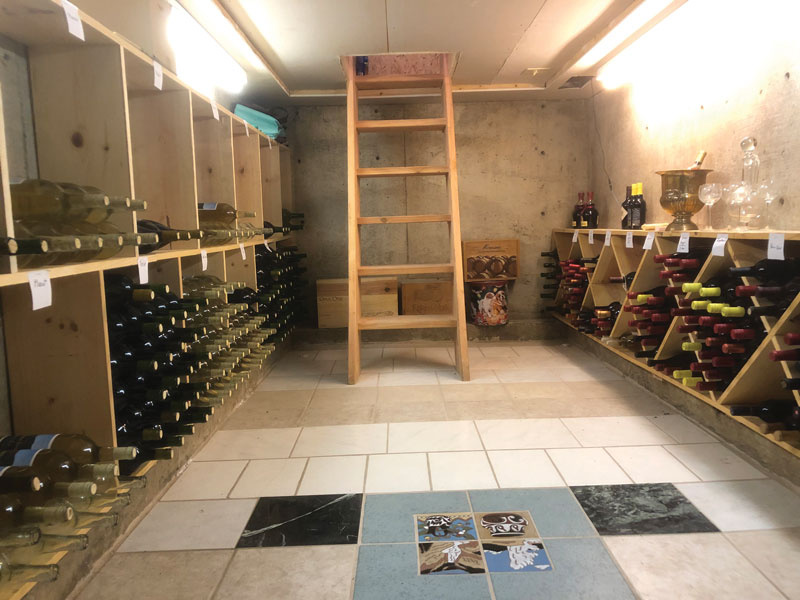
A one-gallon (3.8-L) batch will yield about five standard-size (750 mL) bottles of wine. If the fifth bottle isn’t quite full, then either drink that bottle or use smaller bottles to keep the wine. The key is to have full, sealed containers that are capable of aging.
Now you’re ready to make your first batch of fresh-grape wine. Red wines always are fermented with the skins and pulp in the plastic pail; the solids are pressed after fermentation is complete. White wines are always pressed before fermentation, so only the grape juice winds up in the fermenting pail. Good luck!
New equipment
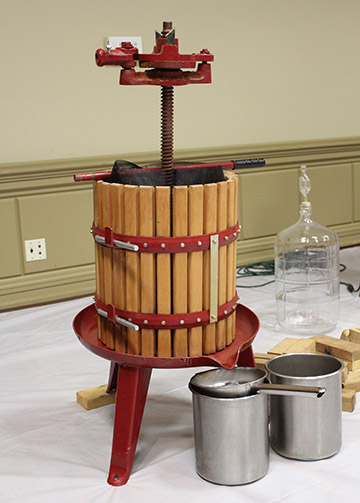
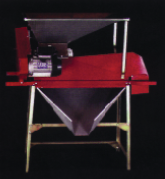
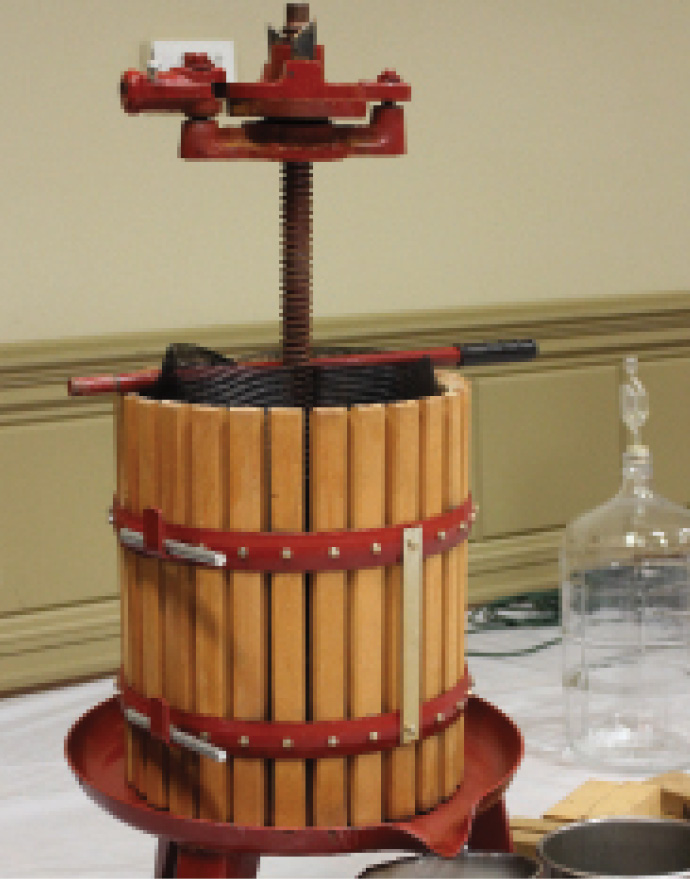
Crusher and Press
The major difference between winemaking from concentrate or juice and winemaking from fresh grapes is that the latter requires extracting juice by mechanical means, specifically crushing and pressing. The crusher is used to break the grape skins in order to expose the juice in preparation for maceration when making red wines, or to ease pressing and juice extraction in white winemaking. The most basic crusher, the manual crusher, consists of two aluminum fluted rollers, a hopper and a flywheel-crank assembly. A motorized version that greatly simplifies crushing is also available, at a greater cost.
An important drawback of the crusher is that stems are crushed rather than separated from the must. Therefore, stems need to be removed manually, a tedious and messy task. Stems should ideally be removed to avoid imparting harsh tannins or increasing the wine’s pH. A crusher- destemmer (often called crusher-stemmer) is another solution. It first crushes grapes and then channels them through a screen that allows grapes to drop into the fermenter, but expels stems out an exit chute for disposal. Both manual and motorized models are available.
The wine press (often called a basket or vertical press) is used to apply pressure on crushed grapes to extract juice. The basket press is the most popular type because it is efficient and well-priced. This press consists of a cylindrical hardwood basket to hold the crushed grapes, as well as a ratchet mechanism and hardwood blocks for exerting pressure. Mechanical bladder presses are also available and use an inflatable device to press out juice.
New Skills: Master Maceration
by Daniel Pambianchi
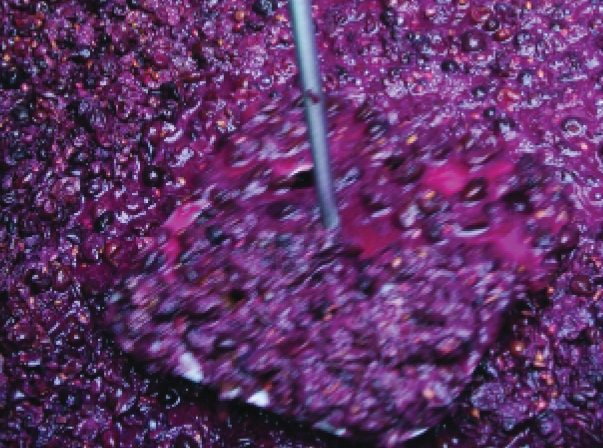
Maceration is the process in red winemaking of letting the crushed grape solids soak in the juice. It is during maceration that key compounds are extracted from the grape juice and solids, giving red wine its body, flavors and color. These compounds are known as phenols and mainly comprise of tannins, color pigments and flavor compounds. The concentration of phenols in wine depends on maceration techniques, such as cold soaking and cap management.
Effects of Maceration
It is during maceration that red wines acquire part of their structure. The amount of phenols extracted during maceration depends on a number of factors that will need to be managed and controlled. These include the maceration period and temperature and cap management (pumping-over and punching-down operations).
As a general rule of thumb, the longer the juice and grape solids are in contact, the more tannin and color will be extracted, and the more full-bodied and colored a red wine will be. The amount of phenol extraction is high in the early days of maceration and continues, albeit at a slower rate, in the final days. Color extraction, on the other hand, happens within the first few days to one week and then subsides. There is very little color extraction after the tenth day or so.
For maximum phenol extraction, you want to prolong the maceration period as much as possible until little or no extraction occurs. The challenge is to retard and slow down fermentation, which would otherwise greatly reduce the maceration period and the level of extraction. The fermentation temperature will rise rapidly up to 90 °F (32 °C) or more, if not controlled, and will cause a rapid fermentation or may cause a stuck fermentation. The solution is cold soak pre-fermentation.
By dropping the temperature of the juice and grape solids down to 46 °F (8 °C) or lower, you effectively prolong maceration and inhibit fermentation. For a full-bodied, deep-colored red wine using grapes which have been cold-shipped to your house, cold soak the juice and grape solids up to two weeks before initiating fermentation by placing sealed freezer bags full of ice into the juice. When using freshly picked grapes, you will need to store the grapes in a cooler — not a practical solution for most home winemakers — or use the freezer-bag method. Be sure to stir the juice and solids during cold soak to distribute the temperature evenly, and add approximately 50 mg/L of sulfite to prevent volatile acidity from forming. Punch down the grapes at least twice a day to prevent microbial spoilage. When ready to start fermentation, inoculate the must with yeast.
During maceration, keep the fermenter covered and properly sealed with a tarp (water-proofed canvas) to prevent bugs from invading the sweet juice. Fruit flies, in particular, can introduce microorganisms like Acetobacter — which causes wine to turn into vinegar — to your wine. Carbon dioxide (CO2) gas produced during fermentation will get trapped between the cap (the mass of grape solids above the juice) and the tarpaulin, thereby protecting the juice from oxidation and microbial spoilage. During cold soaking, when no gas is produced, inject CO2 gas under the tarp from a tank to protect the must from oxidation. Inject enough gas to form a layer above the must, and quickly tie down the tarp to prevent gas from escaping.
During fermentation, the grape skins will form a cap and rise to the top of the must. This is known as “cap rise.” To prevent spoilage and to maximize phenol extraction, punch down the cap three times a day. Separately or in addition to punching the cap, pump the juice over the cap.
Pumping over involves using an electric pump to recirculate juice from the bottom of the fermenter to the top (over the grape solids). This has the added benefit of dissipating some heat from the fermenting juice. Don’t overdo it to avoid oxidizing the wine. It only takes about 20 seconds for 53 gallons (200 L).
Consult your retailer about choosing the right pump. Not just any pump will do, since it has to be able to displace the grape solids that enter it. A one-horsepower, positive-displacement impeller pump with 11⁄2-inch tubing is recommended, as a minimum. If you do not have a pump, collect some juice with a bucket from the bottom of the fermenter and pour it over the cap. A fermenter equipped with a spout will prove practical.
As you will be removing the tarp frequently during punching of the cap and pumping over, the protective CO2 gas will escape. During the vigorous phase of fermentation, sufficient gas is produced to provide adequate protection. When fermentation subsides, you may need to inject CO2 gas under the tarpaulin from a tank.
When fermentation is complete and the Brix level has reached 0°, an additional week or 10 days of post-ferment maceration will be beneficial in softening the tannins. Closely monitor the wine during this phase to avoid unpleasant results such as microbial spoilage. Extended maceration is not recommended for high-pH wines, since these do not benefit as much from long extraction and are more prone to microbial spoilage.
To maximize the benefits of phenol extraction, choose a fermenter that provides an adequate ratio of juice surface to volume. A greater surface ratio allows more juice to be in contact with the grape solids, thereby increasing extraction. A 350-liter food-grade plastic fermenter is a good choice. It can hold up to 18 36-pound (16.3-kg) cases of grapes. Be sure to account for volume from the rising of the cap when choosing the size of a primary fermenter. Choose one with some extra space.
When high color and tannin extractions are desired without cold soak or extended maceration, fermentation can be carried out at the high end of the recommended temperature range of 72–86 °F (22–30 °C). This method can be used with low-tannin grapes where extended maceration provides no benefit. It also has the advantage of minimizing the risk of oxidation and microbial spoilage since the duration of must exposure to air is reduced. Many great wines are made using high-temperature fermentations.
Another trick to increase the yield of juice from maceration: Add a small amount of pectic enzymes at crushing time and ferment at the high end of the temperature range. Pectic enzymes are most effective above 80 °F (27 °C). In powder form, pectic enzymes are added at a rate of up to 1⁄2 ounce per gallon (4 g/hL). The powder should be dissolved in a small amount of cool water first. In liquid form, add up to 3 drops of pectic enzymes per gallon (4 L) of wine. To avoid extraction of overly harsh tannins don’t use pectic enzymes if macerating with stems.
White wines do not tend to benefit from maceration since no color extraction is required and tannins are not desirable. Some commercial winemakers macerate their crushed white grapes for up to 24 hours to give their wines a little more structure and color, but the practice is not recommended for home winemakers due to the increased risk of oxidation and phenol over-extraction.
 RED wine Case Study: Making Cabernet Sauvignon
by Chik Brenneman
There are two important keys to determining the success of any grape varietal. The first key is its adaptability to the local climate where it is planted. We have discussed in this column how many varietals are better suited to either cooler or warmer climates, and rarely is both true for the same varietal. The second key, and probably the trump card in this circumstance, is that the wines produced from any given varietal must be marketable as a varietally-labeled wine or as a significant blending component. Worldwide there are very few varieties that can rise up to these challenges. Cabernet Sauvignon, the most noble of all grapes, is one grape varietal that can meet all of those challenges.
Because of its adaptability and marketability, Cabernet Sauvignon has risen to a high level of prestige and prominence in the international wine community, and it is an internationally recognized grape that has held a market share in every major wine growing region of the world.
Cabernet Sauvignon is known for making some of the world’s most robust red wines. The grape was originally thought to be a descendant of the ancient Roman variety Biturica. Given its notoriety, you might think this grape has a long history, but that is not to be the case. Cabernet Sauvignon is native to France and — surprisingly — has only been recorded as growing in the Bordeaux region since the 17th century. DNA analysis performed at UC-Davis in the 1990s confirmed that the variety is the progeny of Sauvignon Blanc and Cabernet Franc. It was very likely the result of a chance pollination as mixed cultivars were grown side by side in vineyards at that time. I am still amazed at how these kinds of chance pollinations are discovered. The seed from that single grape had to have been deposited in the soil in some way and then germinated to develop into a full fruit-bearing plant. The odds of that happening, followed by the grape becoming the second most popular grape in the modern world, has to be staggeringly high.
In Bordeaux, Cabernet Sauvignon is predominantly grown on the left bank of the Gironde, specifically in Graves, the Médoc and Pauillac. It was once widely planted on both the left and right banks, but over the years winegrowers in the region determined which soil types the grape preferred. The limestone and gravel based soils of the left bank are best for the variety and thus plantings on the right bank shifted away from Cabernet Sauvignon. On the right bank, in St. Émilion and Pomerol, red blends now consist primarily of Merlot and Cabernet Franc, while Cabernet Sauvignon is a distant third in popularity. While Cabernet is the talk of Bordeaux, Merlot is gaining popularity — even on the left bank — as it ripens two to three weeks in advance of Cabernet on average, which can be very important in the region. However, Cabernet is still the predominant component in the first growths with better than 75 percent of the blend. The one exception being Chateau Haut-Brion, where it is only present as about half of the blend component. There are about 6,000 producers of Cabernet or Cabernet-based blends worldwide. In the United States alone there are about 750 producers. Therefore you can find a Cabernet or Cabernet-based blend in just about every price point of wines sold worldwide.
Bordeaux produces 60% of the Cabernet Sauvignon grown in France. Plantings also exist in the Loire, Midi and Provence, which produce lighter styles of Cabernet as well as rosé styles. There are many good vin de pays in the Languedoc, where it is produced as a varietal rather than a blend. It all depends on who is writing the review, but many wine drinkers have been led to believe that the best Cabernets come from Bordeaux. However, The Judgment of Paris wine competition in 1976 swayed many opinions in the international wine world about Cabernet’s reign in Bordeaux and the rest of France. That year Cabernet wines from the Napa Valley in California scored comparatively to similar wines from France, signaling that France had an up and coming rival.
Today the acreage of Cabernet in California is about equal to that of Bordeaux at about 75,000 acres, and it is grown in all of the state’s reporting wine districts. Fruit quality in the Napa Valley is considered superb and many high quality wines are produced there. Some of the wines have even achieved cult status and sell in excess of $1,000 for a 750-mL bottle. Alas, not all the wines produced in the Napa Valley cost that much, but bottle prices of $50-100 are the norm. In 2010, not a good year by California standards, the Napa Valley (District 4) crushed 50,487 tons, more than every grape reporting district except the northern San Joaquin Valley (District 11) which crushed more than 96,000 tons. District 11 incorporates much of the fruit into varietal wines by companies including Constellation Wines, Gallo and Bronco Wine Company, who sell at price points from $7–$17 per bottle. The high quality of the fruit commands high price per ton, and most prices range between $4,000–$8,000 with a range of $1,000 to $50,000 per ton in District 4 (yes, you read that last figure right!). Compare that with $200–$1,800 per ton in District 11. I find District 11 and Languedoc wines very affordable and drinkable, which lends to the testament of the universal nature of Cabernet Sauvignon. Because of its adaptablity, Cabernet thrives all over the world, most notably in the Maipo Valley of Chile, as well as Coonawarra in Australia and the Okanagan Valley of British Columbia. It is also an important red wine grape in New Zealand, South Africa and Italy and is growing in popularity in Spain and Portugal.
Cabernet Sauvignon grape clusters are loose with small berries and tough skin, which can contribute to some pretty harsh tannins. It can be a vigorous vine, and vigor is controlled with rootstock choice and proper site selection. Some say that if the Napa Valley had to be planted all over again, it should have been planted on the hillsides where the rocky soils are more effective in controlling vigor. The rocky soils also drain better, much like the soils of the left bank in Bordeaux. When grown on the fertile soils of the valley, tonnage is controlled through green harvesting clusters after veraison. Many winemakers believe that high fruit loads on vines lead to lesser quality grapes, but this is difficult to prove scientifically, primarily in that no one can agree what the definition of “quality” actually is. What is generally agreed on is that ripening of Cabernet is critical and several studies in the last ten years have focused on tannin and flavor maturation. It is a variety that ripens later, requiring more hang time on the vine to develop fruit flavors. This is very important in Bordeaux because the region is more likely to have a shortened growing season. (Thus blends with Merlot and Cabernet Franc help make up some of the shortfalls of ripening). The rules of the Bordeaux AOC dictate yields in order to get the grape to ripen in any given season. These loose clusters can hang long through the growing season, and research has shown that the concentrations of methoxypyrazines in the berries decrease the longer the clusters hang. Methoxypyrazines are a class of compounds that are responsible for the vegetal characters of green bell pepper — a signature flavor marker that Cabernet Sauvignon and Sauvignon Blanc connoisseurs either love or hate. The concentrations of these flavors are highest at veraison and the compounds are progressively broken down by sunlight as the fruit hangs on the vine. This often leads to the potential for very different styles of wine depending on the vintage.
If you give Cabernet a long time on the vine you will have a very fruit-forward style. Unfortunately, this fruit-forward style also comes with high alcohol levels and low acidities. When I taste wines like this I consider them fat and flabby, and they are dull and do not have much prospect for aging. It’s true that wine styles for Cabernet have changed over the years, but winemakers have long known about how best to ripen the grape. A number of years ago we made an interesting discovery in the wine cellar at UC-Davis: a treasure trove of vintage 1980 Cabernet Sauvignon wines from appellations that included Napa Valley, Sonoma, Anderson Valley, Central Coast, the Sierra Foothills and a few others. There were 24 different producers in all. Of course we had to create an opportunity to taste through them, which fell under the guise of “research.” The common component between the wines is that they had been cellared under identical conditions for more than 25 years. First of all, before we even tasted, we determined that there was not an alcohol above 14.5%. Most of the wines covered a range of 12.5–13.5% ABV. Two or three had deteriorated badly, specifically those with lower acidities and higher pH values. But the wines that showed the best were low in alcohol; acid/pH balanced, still had a lot of the bright red fruit characters and little in the way of meth-oxypyrazine. Wine styles and techniques have changed in 30 years, and there are now some winemakers hoping to create this distinct style of Cabernet from the past. After all, these are the wines that made Cabernet big in California. The parallel here to Bordeaux-based blends is the ripening and natural acidities of the grapes at harvest.
The tannins in Cabernet Sauvignon can be quite harsh, including powerful sensations of bitterness and astringency. Winemakers are not afraid to barrel down these wines for up to two years to add small doses of oxygen to help polymerize and soften the tannins. Both French and American barrels are used from a number of different coopers. Micro-oxygenation, MOX for short, is a mechanized way to add small doses of oxygen to wines, and this is commonly used to make wines sold for less than $20 per bottle. Some winemakers prefer to use age-old fining techniques with egg whites to craft their perfect cuvée.
Blending can also tame tannins. Experienced winemakers prepare their blends when the wine is young to integrate the tannins during maturation. Typical blending varieties include Merlot, Cabernet Franc, Petit Verdot and Malbec. This group is typically known as the Bordeaux blend, and in the United States the same blending schema is used in wines labeled as Meritage.
The rules of blending change from country to country, for example in Italy where Sangiovese rules, Cabernet Sauvignon is used to make Super Tuscans, and in Australia it is blended with Shiraz. In Spain you will find it blended with Tempranillo.
With respect to food pairing, Cabernet Sauvignon is the grape of kings, so think of meals that are fit for a king; Cabernet invites a hearty meal with protein; steak, prime rib, pork roasts — if they are grilled, all the better. On its own, the tannin structure, especially in a young wine, can be a bit much on the palate. Thus the proteins in the meat react with the wine tannins to soften the approach in the mouth and help bring out the fruit flavors. Pairing a big, tannic Cabernet with fish or light meat dishes doesn’t work as well because there is nothing to counterbalance the wine. As the wine ages and mellows, however, you can do some more experimenting with beef or lamb stew or even grilled pork. The pairing choice is even a bit more difficult when it comes to trying to pair Cabernet with vegetarian meals, but I would try pizza with red sauce and cheese, or pasta-based dishes with garlic. Cabernet also a good match with bitter vegetables like eggplant and greens like arugula and radicchio. This is because the bitterness in the vegetables matches the tannin bitterness in the wine. Cabernet also pairs well with cows-milk cheeses, both early ripening and aged. Unlike with meat dishes, however, it’s better to match your Cabs with milder cheeses so that it doesn’t compete with the wine (a big Cab with a big blue cheese can be too much). Try Dry Jack, Manchego, Parmigiano-Reggiano and Cheddar, or lighter blue-veined cheeses like Maytag Blue or Saga. Whatever your desires, given the popularity and abundance of Cabernet Sauvignon grapes, there is sure to be a style you like that you can make yourself.
Cabernet Sauvignon Recipe
(yield: 5 gal/19 L)
Ingredients
• 125 pounds (57 kg) fresh Cabernet Sauvignon fruit
• Distilled water
• 10% potassium metabisulfite (KMBS) solution: Weigh 10 grams of KMBS, dissolve into about 50 milliliters (mL) of distilled water. When dissolved, make up to 100 mL total with distilled water.
• 5 grams Lallemand D254 yeast
• 5 grams Di-ammonium phosphate (DAP)
• 5 grams Go-Ferm
• 5 grams Fermaid K (or equivalent yeast nutrient)
• Malolactic fermentation starter culture (CHR Hansen or equivalent)
Other equipment or needs
• 1 15-gallon (57-L) food-grade plastic bucket for fermentation.
• 5-gallon (19-L) carboy, 1-2 one-gallon (3.7-L) jugs
• Racking hoses
• Crush equipment, destemmer/crusher
• Wine press
• Inert Gas — Nitrogen, Argon or Carbon Dioxide
• Ability to maintain a fermentation temperature of 81–86 °F (27–30 °C).
• Thermometer capable of measuring between 40–110 °F (4–43 °C) in one degree increments
• Pipettes with the ability to add in increments of 1 milliliter
• The ability to measure residual sugar at the completion of fermentation
• Tartaric acid — addition rate is based on acid testing results
Step by step
1. Clean and sanitize all your winemaking tools, supplies and equipment.
2. Crush and destem the grapes. Transfer the must to your fermenter.
3. During the transfer, add 15 milliliters of 10% KMBS solution. (This addition is the equivalent of 50 ppm SO2).
4. Take a sample to test for Brix, acidity and pH. Keep the results handy. We’ll take this up later.
5. Layer the headspace with inert gas and keep covered. Keep in a cool place overnight.
6. The next day sprinkle the Fermaid K directly to the must and mix well.
7. Go back to those lab results you took yesterday. Typical Brix for this style is 24–25 °B. Typical acid levels will be 0.58–0.62%. Adjust as necessary using tartaric acid. If the acid is higher than 0.70%, don’t panic, this recipe calls for a minimum final acidity of 0.55%.
8. Prepare yeast: Heat about 50 mL distilled water to 108 °F (42 °C). Mix the Go-Ferm into the water to make a suspension. Take the temperature. Pitch the yeast when the suspension is 104 °F (40 °C). Sprinkle the yeast on the surface and gently mix so that no clumps exist. Let sit for 15 minutes undisturbed. Measure the temperature of the yeast suspension. Measure the temperature of the must. Do not add the yeast to your cool juice if the temperature of the yeast and the must temperature difference exceeds 15 °F (8 °C). To avoid temperature shock, acclimate your yeast by taking about 10 mL of the must juice and adding it to the yeast suspension. Wait 15 minutes and measure the temperature again. Do this until you are within the specified temperature range. Do not let the yeast sit in the original water suspension for longer than 20 minutes.
9. When the yeast is ready, add it to the fermenter and mix.
10. You should see signs of fermentation within about one to two days. This will appear as foaming on the must surface and it will appear that the berries are rising out of the medium. This is referred to as the cap rise.
11. You need have on hand the ability to push the grapes back into the juice to promote color, and tannin extraction. This is called “punching down” and this should be done three times per day.
12. Monitor the Brix and temperature twice daily during peak fermentation (10–21 °Brix). Maintain a fermentation temperature of 81–86 °F (27–30 °C).
13. At about 19 °Brix, sprinkle in the DAP and punchdown.
14. When the Brix reaches 4 °Brix, transfer the must to your press, and press the cake dry. Keep the free run wine separate from the press portion for now and label the vessels.
15. Transfer the wine to your carboys or 1-gallon (3.7-L) jugs. Your press fraction may only be a gallon or two. Make sure you do not have any headspace. Place an airlock on the vessel(s).
16. Inoculate with your malolactic (ML) bacteria. Check the manufacturer’s instruction on how to prepare and inoculate. Cover the tops with a breather to allow CO2 to escape.
17. Monitor the ML fermentation using a thin layer chromatography assay available from most home winemaking supply stores.
18. When the ML is complete, measure the residual sugar. You are shooting for 0.5% or lower. If the sugar is higher, give it more time to finish fermentation.
19. Add 2 mL of fresh KMBS (10%) solution per gallon of wine. This is the equivalent to ~40 ppm addition.
20. Measure the pH and titratable acidity. Most importantly you want a finished TA of about 0.55 to 0.60%. The pH is secondary but should be around 3.6. Add acid to adjust the TA prior to settling. Place the wine in a cool place to settle.
21. After two weeks, test for SO2, adjust the SO2 as necessary to attain 0.8 ppm molecular SO2. (There is a simple SO2 calculator at www.winemakermag.com/guide/sulfite). Check the SO2 in another two weeks and adjust. Once the free SO2 is adjusted, maintain at this level. Check every two months, and before racking.
22. Rack the wine clean twice over a 6–8 month time frame to clarify. Once the wine is cleared, it is time to move it to the bottle.
23. Blending the wine to integrate the press fraction back into the free run. You may not need it all, use your judgment. Fining with egg whites may be necessary to tame the tannins.
24. Filtration as desired. Consult www.winemakermag.com for tips on fining and filtration if problems are evident. Maintain sanitary conditions while bottling. Once bottled, you’ll need to periodically check your work by opening a bottle to enjoy with friends.
 White wine Case Study: Making Chardonnay
by Chik Brenneman
Chardonnay is one of the world’s most popular wine grapes, as evidenced by widespread plantings in France, Australia, South Africa, South America and the United States. The grape is thought to have originated in France, and DNA evidence supports that idea. Having been around for so long, it is not surprising that there are many clones — The Foundation Plant Services (FPS) at UC-Davis lists 63 clones, and that is just for material that they have cleaned up and certified to be virus free!
In France, you will find Chardonnay in the white wines of Burgundy, hence they are referred to as white Burgundy. It is the predominant grape in the Chablis and Côte de Beaune sub-regions, but as you move south through Burgundy it tends to be blended into more value-priced wines with the Aligoté and Pinot Blanc grapes. Outside of Burgundy, it is one of the three main varieties in the Champagne region. This grape accounts for about 60% of the total area planted in the Burgundy and Champagne regions. It is found in the Loire and other regions and the rules regarding its use vary. The Languedoc was the first region to begin marketing Chardonnay wines as a specific varietal, which was a move away from the traditional French Appellation d’origine contrôlée (AOC) dominated rules on growing and blending wines by region.
Beyond France, Chardonnay is planted throughout the world and is generally marketed as a single varietal. Cooler climate grapes tend to be higher in acid and warmer regions lower acid. Given the extent of plantings around the world, you will also find a wide range of soil types and rootstocks in use. In California, largely due to a planting boom in the late 1990s, it is the single most planted white wine grape. In 2007, there were 91,348 acres planted. This amounts to 54% of the total acreage in white wine grapes, and one fifth of the total acreage of all the wine grapes grown in the state.
Chardonnay is often made as a sparkling wine, or dry white; the former as 100% Chardonnay, blanc de blanc, or blended with Pinot Noir and Pinot Meunier in various styles. The dry white styles vary by country and region produced. In warmer regions, the fruit generally has higher Brix and higher alcohol and augmented with large amounts of oak and allowed to develop malolactic fermentation byproducts.
In my opinion, the best Chardonnay wines are from grapes grown in the cooler regions. These are wines with crisp acidity and pair best with foods. Good quality grapes when ripe present flavors of apple, pear, melon and tropical fruits. In the wine, the resulting fermentation bouquet takes on citrus and cream overtones. Subtle uses of oak and, in some rare cases, (for me at least), a partial malolactic fermentation may be suitable. Malolactic fermentation can add some mouthfeel to a sometimes thin wine. The disadvantage of the malolactic fermentation is if allowed to go to completion, the wine can be overpowered by malolactic flavors, including diacetyl, or buttery characters.
Typical Brix levels at harvest are 23.5 to 25 °Brix. Outside of this range leads to wines that are largely flat with no varietal character. The high Brix leads to higher alcohols and a total overwhelming of your taste buds. The pH is an important parameter to monitor as well, which rises as the fruit hangs on the vine longer, leading to flatter, thinner wines. That said, while pH is important and should be noted, I prefer to pay more attention to the titratable acidity (TA) of the grapes and resulting juice. The pH is important in driving the chemical stability of the wine, but it is the TA that contributes to mouthfeel and enhances the natural flavors in the grape. Target your acid levels to be around 6.0 to 7.0 g/L. Remember that this is the sum total of the weak organic acids in the wine. I will supplement acid deficient juice with tartaric acid to 6.0–7.0 g/L if the acid in the grape is too low. For partial malolactic fermentation, target for 7.0 g/L, and if you will prevent the ML, target for the lower number. Your goal here is to be in the range of 6.0 g/L on your finished wine. The variability of rootstock, soil type and region will affect the TA in the juice and even some good quality juice will require a supplement from time to time. Make sure you supplement at this stage, but don’t overdo it. I find that one of the biggest problems in home winemaking is making decisions about adding acid.
Premier Cuvée yeast works well for a Chardonnay fermentation, providing you can maintain 55–60 °F (13–16 °C). After fermentation taste your wine critically. Is the wine thin? At this point, if you are fairly comfortable with your winemaking skills consider aging the wine sur lie, which means “on the lees.” Only consider this if the lees do not smell of rotten egg, otherwise discard the lees. When aging sur lie, stir the lees every two weeks, until you are ready to begin clearing the wine for bottling.
If you had to remove the wine from the lees, you can add mouthfeel with oak products. Experiment with oak alternatives in small batches. Remove the oak before it imparts too much flavor. Remember there are other components in the product that will be extracted as well. Do not assume that a longer extraction will get more of what you are looking for.
Chardonnay Recipe (without malolactic fermentation)
Yield: 5 gallons/19 L
Ingredients
• 100 pounds (45 kg) Chardonnay fruit or 6 gallons (23 L) juice
• Distilled water
• 15% potassium metabisulfite (KMBS) solution: To make,weigh 15 grams of KMBS, dissolve into about 75 milliliters (mL) of distilled water. When completely dissolved, make up to 100 mL total with distilled water.
• 5 g Premier Cuvée yeast (also known as EC1118, Prise de Mousse)
• 5 g Di-ammonium Phosphate (DAP)
• 5 g Fermaid K (or equivalent yeast nutrient) *Wait to prepare this until the fermentation has initiated. Boil about 50 mL of water, let cool, suspend the powder and add to the juice.
Other essentials
• 5 gallon (19 L) carboy
• 6 gallon (23 L) plastic bucket
• Racking hoses
• Inert Gas (nitrogen, argon or carbon dioxide will do)
• Refrigerator (~45 °F/7 °C) to cold settle the juice.
• Ability to maintain a fermentation temperature of 55 °F (13 °C). This isn’t always possible for home winemakers, but you can control the fermentation in smaller carboys by submerging them in cold water or an ice bath, as required, and monitoring the temperature closely.
• Thermometer capable of measuring between 40–110 °F (4–43 °C) in one degree increments.
• Pipettes with the ability to add in increments of 1 milliliter
• Clinitest® tablets
• Tartaric acid
Step-by-step
1. Clean and sanitize all your winemaking equipment, tools and surfaces.
2. If using fresh grapes, crush and press the grapes. Do not delay between crushing and pressing. Move the must directly to the press and press lightly to avoid extended contact with the skins and seeds.
3. Transfer the juice to a 6-gallon (23 L) bucket. During the transfer, add 7 milliliters of 15% KMBS solution (This addition is the equivalent of 50 ppm SO2).
4. Move the juice to a refrigerator.
5. Take a sample to test for acidity and pH.
6. Let the juice settle at least overnight. Layer the headspace with inert gas and keep covered.
7. When sufficiently settled, rack the juice off of the solids into the 6-gallon (23-L) bucket.
8. Dissolve the DAP in as little distilled water required to completely go into solution (usually ~ 20 mL).
9. If you need to adjust for acid, this is the time to mix in your acid. Prepare yeast.
• Heat about 50 mL distilled water to 104 °F (40 °C). Do not exceed this temperature as you will kill the yeast. If you overshoot the temperature, start over, or add some cooler water to get the temperature just right. The end result is you want 50 mL of water at 104 °F (40 °C).
• Sprinkle the yeast on the surface of the water (not the must) and gently mix so that no clumps exist. Let sit for 15 minutes undisturbed
• Measure the temperature of the yeast suspension
• Measure the temperature of the juice. You do not want to add the yeast to your cool juice if the temperature difference exceeds 15 °F (8 °C). Acclimate your yeast by taking about 10 mL of the cold juice and adding it to the yeast suspension. Wait 15 minutes and measure the temperature again. Do this until you are within the specified temperature range.
10. When the yeast is ready, add it to the carboy and move the carboy to an area where the ambient temperature can be maintained at 55 °F (13 °C).
11. You should see signs of fermentation within about two to three days. This will appear as some foaming on the surface and the airlock will have bubbles moving through it. If the fermentation has not started by day four, you might consider warming the juice to 60–65 °F (16–18 °C) temporarily to stimulate the yeast. Once the fermentation starts, move back to the lower temperature. If that does not work, consider re-pitching the yeast as described above.
12. Mix up the Fermaid K in about 50 mL of previously boiled water (to sterilize it so you can add it to the juice)
13. Normally you would monitor the progress of the fermentation by measuring Brix. One of the biggest problems with making white wine at home is maintaining a clean fermentation. Entering the carboy to measure the sugar is a prime way to infect the fermentation with undesirable microbes. So at this point, the presence of noticeable fermentation is good enough. Leave well enough alone for at least two weeks. The cooler temperature will cause the yeast to ferment slowly.
14. If your airlock becomes dirty by foaming over, remove it and clean it and replace as quickly and cleanly as possible. Sanitize anything that will come in contact with the juice.
15. Assuming the fermentation has progressed, then after about two weeks, it is time to start measuring the sugar. Sanitize your thief; remove just enough liquid for your hydrometer. Record your results.
• If the Brix is greater than 7 °B (1.028 S.G.), then wait another week before measuring.
• If the Brix is less than 7 °B (1.028 S.G.), begin measuring every other day, and transfer to a 5-gallon (19-L) carboy (it’s ok to transfer some of the lees here), and place a fermentation lock on the carboy.
• When the Brix is about 2 °B (1.008), add 4 mL of the 15% KMBS solution (this addition is the equivalent to 20 ppm SO2).
16. Measure the Brix every other day until you have two readings in a row that are negative and about the same.
17. Measure the residual sugar using the Clinitest®. Follow the kit instructions.
• If the wine is dry, that being about 0.5% or less, add another 4 mL of KMBS (20 ppm) and begin to lower the temperature to about 40 °F (4 °C). A refrigerator works for this.
18. Taste the wine
•If there is any sulfide like (rotten egg) odors, rack the wine off the lees.
• If the wine smells good, let the lees settle for about two weeks and stir them up. Repeat this every two weeks for eight weeks. This will be a total of four stirs.
19. After the second stir, check the SO2 and adjust to 30–35 ppm free (see note at the end of the recipe)
20. After eight weeks, let the lees settle. At this point, the wine is going to be crystal clear or a little cloudy. If the wine is crystal clear, then that is great! If the wine is cloudy, then presumably, if you have kept up with the SO2 additions and adjustments, temperature control, kept a sanitary environment, and there is no visible sign of a re-fermentation, then this is most likely a protein haze. Clarify the wine with bentonite.
21. While aging, test for SO2. Maintain at 30–35 ppm.
22. Once the wine is cleared, it is time to move it to the bottle. This would be about six months after the onset of fermentation. Keep in mind this wine has had the MLF inhibited. If all has gone well to this point, given the quantity made, it can probably be bottled without filtration. Your losses during filtration could be significant. That said, maintain sanitary conditions while bottling and you should have a clean, crisp Chardonnay that pairs well with lemon-based chicken or seafood dishes.
Sulfur Dioxide Additions:
This recipe calls for specific additions of sulfur dioxide at specified intervals. Once these scripted additions are made, you must monitor and maintain to 30–35 ppm. Adjust as necessary using the potassium metabisulfite solution previously described or by methods of your own choosing.