A Brief Glossary of Some Key Terms
Brix: A scale of measuring sugar concentration in grapes, juice, must and wine. Instruments such as refractometers and hydrometers are used to measure degrees Brix in the above mediums.
Fermentation: The process that a wine (or any alcoholic beverage) undergoes where sugar is converted into ethyl alcohol. Yeast is the key component to fermentation, when it reacts with or “eats” the sugar, leaving behind ethanol and carbon dioxide.
Lactic acid: A mild acid found in wine. Malolactic fermentation transforms malic acid (a harsh acid) into lactic acid. This translates into a favorable flavor in most red wines.
Malic acid: An organic acid found in grapes and wine. As malic acid is decomposed in a grape or other fruit, the fruit becomes more ripe. This acid is a “harsh” acid and is sometimes unfavorable for particular wine styles, including many red wines.
Malolactic fermentation (MLF): A process that transforms the harsh malic acid into the more mild lactic acid. This process follows the alcoholic fermentation and is usually only administered in red wines.
Oxidation: This is one of the main causes of spoilage in wines and is caused by over-exposure to oxygen. Although some controlled exposure (aeration) is necessary, too much can cause problems.
pH: The scale of measurement for strengths of acids. pH is measured during vine growth, grape ripening and the winemaking process. Winemakers can adjust the pH in their wines through processes called acidification and deacidification.
Potential alcohol: A measurement of a must or wine that suggests what the total possible alcohol percentage would be should all the available sugar within the solution get converted into alcohol. The potential alcohol is therefore more than the actual alcohol content should residual (unconverted) remain in solution.
Tartaric acid: An organic acid found in grapes that is highly important to a wines flavor, color and overall acidity. Tartaric acid is not fully soluble in wine and the remaining “tartrates” should be left out of the bottle, as they resemble shards of glass.
Total acidity (TA): A measurement of the acid (both fixed and volatile) that a must or wine contains. It is one of the most common measurements used to analyze a wine and is often expressed in grams per liter.
Specific gravity (SG): The ratio of the weight of a volume of a wine (or any liquid) to that of an equal amount of water. It is a density measurement used to determine sugar content in wine and is often found as the corresponding equivalent of degrees Brix.
Yeast: The critical component to fermentation of wine (or any alcoholic beverage). Yeast are single-celled organisms that consume or “eat” sugar as a source of energy and leave behind the bi-product of ethyl alcohol and carbon dioxide.
Cleaning — Sanitizing
There are two skills that every winemaker needs, no matter the size of their winery: cleaning and sanitizing. Your equipment needs to be as clean and as free from microbiological growth as possible. Growth of organisms other than yeast in unfermented wine (called must) can spoil the resulting wine.
For both cleaning and sanitation, you can use household products or you can use cleaners and sanitizers designed for brewing and winemaking.
Cleaning
When cleaning your equipment, you can use dish soap and water, but this has drawbacks. Unless rinsed thoroughly, soap residue can interfere with your wine. Some popular cleaning products that work better for cleaning winemaking equipment are TSP (tri-sodium phosphate), PBW (Powder Brewery Wash), One-Step and Straight-A. Use
2 tsp. of TSP per gallon (~2 grams/L) of warm water. Use 1–2 oz. (28–56 grams) of PBW per gallon of hot water. Use 1 tablespoon per gallon of warm water of One-Step and Straight-A. These cleaners can be used safely on stainless steel, plastic and other materials.
Sanitizing
Two specific sanitizers are iodophor and Star San. Just 1 ounce (30 mL) of iodophor or Star San mixed with 5 gallons (19 L) of water makes an effective sanitizing solution.
Bleach is a cheap and effective sanitizer. 2 1⁄2 tablespoons of bleach in 5 gallons (19 L) of water makes a working solution that sanitizes with a 30-minute contact time. However, bleach can corrode stainless steel and can be absorbed by plastic, leading to off-flavors. Therefore don’t use bleach on stainless steel equipment or plastic fermenters. If you have a lot of stainless steel and plastic, stick with iodophor and Star San.
Finally, some winemakers use potassium metabisulfite powder to sanitize their equipment using 8 teaspoons (50 grams) dissolved in 1 gallon (4 L) water with 5 minutes contact time needed to sanitize.
By the Numbers
 Sugars
By Jeff Chorniak
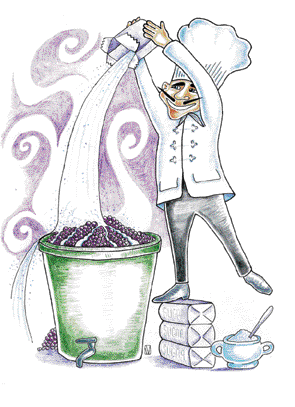
As a guide, the level of alcohol you might want to strive for in a dry red wine is about 13 to 13.5%. The average bottle you pick up at your local wine store hovers in this range. The alcohol level of a dry white wine averages about 11 to 12.5%. But for the sake of simplicity, let’s focus our demonstration on a dry red of about 13% alcohol, and conclude that the level of sugar you want to find in your must to get that should be about 24° Brix.
How to Measure Sugar in Must
What does the number 24° Brix actually tell you? The degrees Brix is the approximate percentage of sugar that exists in your must. Quite simply, every degree of Brix that your must registers is the same as saying that for every 100 grams of grape juice, about 1 gram of it is sugar; or, 1% sugar. So, if your grape must is 24° Brix, approximately 24% of your must is sugar by weight. Once the yeast start eating it, they will convert some of it to carbon dioxide, and approximately 55% of it to ethyl alcohol. So, once you know the percentage of sugar in your must, you can estimate the potential alcohol it will produce. Simply multiply your Brix reading by 0.55. Now, because yeasts differ and their living conditions vary, the exact amount of alcohol produced will waver, more or less. But this is the general picture: Brix x 0.55 = % alcohol by volume (ABV).
If you grow your own grapes, an excellent field tool for measuring Brix is the hand refractometer, a small device about 4 inches (10 cm) long that measures sugar by the way it refracts light. By putting the grape juice from a crushed berry onto the glass prism at one end and reading the scale through the lens at the opposite end, you can determine the ºBrix of your grapes.
But if you buy your grapes from the local vineyard, and the vineyard owner doesn’t give you the sugar level of the grapes, the tool you would be using to measure this yourself is a hydrometer. A hydrometer is a sealed glass tube containing a scale used to measure the specific gravity of a fluid. It looks and floats upright like a thermometer. In water the specific gravity scale would read 1.000. The thicker the fluid, the higher the tube floats, and the higher the reading. The amount of dissolved sugar in your grape juice will determine its thickness. More sugar, more thickness. Once you know the specific gravity of your unfermented juice, you will know the sugar level — and can calculate if more is needed.
 Acidity
By Daniel Pambianchi
Grapes contain a good deal of naturally-occurring (organic or fixed) acids, three of which are of enological significance: tartaric, malic and citric. Lactic acid is only present in trace amounts.
Total acidity, the concentration of all acids, is relatively high when grapes first start ripening and then subsides during maturation on the vines as the hard malic acid decreases. Grapes are harvested when the acidity level, established by the viticulturist and winemaker, is typically between 6 and 9 grams per liter. (You’ll sometimes see this expressed as a percentage, for example, 0.6% and 0.9%). This represents the acid concentration in grape juice at picking and must be balanced with the sugar content, typically in the range of 21 to 24 Brix degrees (or a specific gravity between 1.085 and 1.100).
The amount of sun exposure and rainfall during grape ripening and harvest affect the acid concentration, as well as the concentration of sugars, aromas, and eventually flavors in the final wine. Failure to harvest at the desired acidity and sugar levels can result in an unbalanced wine.
During vinification and winemaking, the acids change: Tartaric acid concentration decreases slightly while malic acid concentration decreases as it is converted to lactic acid, if desired by the winemaker based on wine style being crafted. There are other acids in wine, but they exist in trace amounts only — including citric acid.
So the three acids of enological significance in wine are: tartaric, malic and lactic. Tartaric acid is the most significant and the strongest of these acids in both grapes and wine, and is responsible for making a wine lively and fresh. Malic acid imparts a sharp, green-apple sensation. Many winemakers find malic acid undesirable and thus convert it to lactic acid, a much softer acid.
Total acidity (TA) is used to quantify a wine’s acidity and represents the concentration of all organic acids in the wine. TA is expressed in grams per liter (g/L) or, quite often, as a percentage of weight to volume. For example, a wine with a TA of 7.0 g/L is said to contain 0.70 percent total acidity.
Since all acids are factored into the TA measurement and not all have the same chemical properties, a reference point is used to qualify the measurement. In North America, tartaric acid is used as the reference. This means that the TA value represents acid concentration as if it were only tartaric acid.
Measuring Acidity
Measuring acidity in wines and musts is simple, quick and fun. A simple process known as titration is used to measure acid concentration. Titration involves neutralizing the acid content of the wine with a base solution, referred to as the titrate solution or simply as the titrate. The amount of titrate used determines the acid concentration.
Adjusting Acidity
The processes of increasing and decreasing acidity are referred to as acidification and deacidification respectively. The most widely used methods for increasing TA are the addition of acid (or acid blend) and the blending of musts or wines. For acid reduction, methods include: the blending of musts or wines, the addition of an acid-reducing solution, malolactic fermentation, cold stabilization and the addition of water.
Although these methods increase or decrease TA, each method acts on different acids and therefore yields different results in the final acid composition of wine. Selection of an acidification or acid-reduction method should therefore be based on the desired acid to be increased or decreased.
 pH
pH
By Daniel Pambianchi
pH is a close relative of acidity, specifically, the total titratable acidity (TA) for wines. TA measures the acid concentration in musts and wines while pH measures the relative strength of those acids. The pH of wines depends on the pH of the unfermented grape juice (also called the must), which in turn depends on such factors as grape variety, type of soil, viticultural practices such as irrigation, the climate during grape ripening and the timing of the harvest. For example, soils rich in potassium or grapes harvested during heavy rainfalls will tend to have a higher pH.
Why Should Winemakers Care About pH?
Two wines with similar TA measurements but different pH will be quite different and evolve differently. A wine with lower pH may show a redder color (in the case of red wines) with greater stability during aging, and will have more fruit, less complexity and less body than the higher-pH wine. The lower pH wine will also mature more slowly — and therefore age longer — and will be less susceptible to spoilage. With that in mind, TA is not sufficient when evaluating a wine. We also need to understand the relative strength of the acid components, or its pH.
It is imperative then to always monitor and control a wine’s pH to ensure that it does not fall below or rise above critical thresholds. Solutions (such as wine) can have a pH in the range 0 to 14. A pH of 0 represents a strong acid solution, while a pH of 14 represents a strong alkaline solution. Distilled water has a theoretical pH of 7, and wines are in the range of 3 to 4.
Measuring pH
A crude approximation of a wine’s pH can be measured using pH paper. To determine the pH of musts or wines, a strip of pH paper is immersed in a sample of the must or wine, and then the color of the paper is matched to a standard set of colors that comes with the kit. Each color corresponds to a specific pH level. Inexpensive pH paper can provide inaccurate results — typically varying plus or minus 1 pH unit — and is therefore not a recommended method for precise analysis.
The recommended method is to
use a pH meter with a minimum
resolution of 0.1 and accuracy of ±0.1 pH unit. A digital stick pH meter with this accuracy costs approximately $50 (U.S.). It is a worthwhile investment for people who make wine from fresh juice or grapes, when pH control is imperative. Similar to TA, the pH level should be measured before the start of fermentation, following malolactic fermentation, at the end of fermentation and following any pH correction procedures. You can also monitor the pH during alcoholic fermentation since pH is more accurate than TA measurements during this phase.
 Sulfites
By Daniel Pambianchi
Sulfite is the most effective and widely used preservative in winemaking. It safeguards musts and wines against premature oxidation and microbes that could otherwise spoil wine. It preserves the wine’s freshness, helps maintain its color and is essential for aging wines. Another common use is in inhibiting wild yeasts to allow cultured wine yeasts to carry out the alcoholic fermentation.
SO2 gas can be condensed to a colorless liquid to produce a sulfite solution with excellent antiseptic properties. These properties result from the dissipation of active SO2 to produce “free SO2,” and from some free SO2 combining with aldehyde compounds (responsible for oxidation in wines) to form “bound SO2” when sulfite is added to wine. Free SO2 is also found in musts from crushed grapes that have been sprayed in the vineyards with sulfur-based pesticides. It is also a byproduct of alcoholic fermentation, albeit in small concentration.
Two measurements widely used in commercial winemaking are free SO2 and total SO2 — the sum of free and bound SO2. Only free SO2 provides antiseptic and oxidative protection to wines and is therefore the prime consideration for home winemakers. SO2 concentrations are expressed in milligrams per liter. One mg/L is equivalent to 1 part per million (ppm).
Measuring Free SO2
Measuring the all-important free SO2 concentration is the home winemaker’s challenge. CHEMetrics manufactures Ripper-method titration cells, sold under the brand name Titrets and available at most home winemaking supply shops. This product is meant for measuring free SO2 concentration in the 0 to 100 mg/L range. Results are acceptable for dry white wines although they can have an error margin of up to 10 mg/L. Results are not as reliable for red wines or white wines containing ascorbic acid or tannin, but they are satisfactory for home winemaking purposes. In certain instances, winemakers may need to add sulfite to their wine or must. The most effective way to do this is to make a 10% sulfite solution and add the required amount determined by a sulfiting chart. The 10% solution is prepared by dissolving 10 grams of potassium metabisulfite in warm water and then topping up with cool water to the 100 mL level. Use a scale to measure your sulfite powder. To determine sulfite additions, visit WineMaker’s online calculator at: www.winemakermag.com/guide/sulfite.
Fermentation
By Jeff Chorniak
Fermentation is a chemical reaction that takes place when yeast turns sugar into carbon dioxide and alcohol.
Obviously, this is a critical part of the entire process. A yeast cell will turn approximately 55% of the sugar it eats into ethyl alcohol, and the remaining 45% into carbon dioxide gas and other byproducts. The proportion is not exact since some sugar is consumed by the yeast, and some converted to acids, esters and aldehydes. You can ferment just about anything on this planet, if sugar is present. But all fermentation, including what takes place in your must, requires yeast: a one-celled living organism. It eats, reproduces and gives your wine life.
Fermenting the Wine
Now that we’ve covered the vital elements, we can walk through a chronological model of the entire process from pitching yeast to aging.
Day 1: Grapes and Fresh Juice
The first time I bought grapes I was surprised at all the extra stuff that came with my purchase: spiders, twigs, leaves, flies and other no-see-um single-celled creatures. Fruit flies carry acetobacter bacteria. This bacteria converts alcohol to acetic acid, giving wine acetic astringency, or a vinegar taste. Another enemy is oxygen. Ever bite an apple and leave it sitting? Notice how it turns brown? Enzymes in fruit, once activated in air, turn fruit brown. The trick is to remove oxygen. The solution: potassium metabisulfite. Potassium metabisulfite produces sulfur dioxide in your must (free SO2). When used in correct proportions it stuns indigenous yeasts, kills bacteria and prevents grapes from oxidizing.
Now that you’ve subdued the three enemies of wine, take a specific gravity reading with your sanitized hydrometer to determine your sugar level and potential alcohol. Hopefully, your specific gravity will be around 1.090. That’s about 12.2% potential alcohol. If the SG is less than 1.090 you might want to consider chaptalization (adding sugar) to give your yeast more to eat, and therefore produce more alcohol. If you find that the Brix level of your must is too high (say up around 1.100), consider diluting it. Add water a bit at a time, taking readings.
Sterile juice, unlike crushed grapes, does not need to be sulfited; the supplier will have done all that for you. Some proprietors will even give you the SG, pH and Brix reading for your crushed grapes or juice. Even so, double-check it at home to determine if adjustments are needed. The ideal is 0.6 to 0.8% acid for reds, and 0.65 to 0.85% for whites. With a pH meter, look for a pH of 3.1 to 3.2 in reds and 3.4 for whites.
Pitching Yeast
There are various ways to pitch yeast, depending on whether it is dry or liquid. Dry yeast offers two ways. One: Lift the lid, sprinkle the yeast on top of your must, lower the lid and walk away. As long as the must temperature is in the low 70s °F (low 20s °C), it works.
Two: The most reliable method is rehydration. Sprinkle the yeast into a quarter cup of water warmed to 95 °F (35 °C) (no higher); in 10 minutes you’ll see the rehydrating yeast swell to a paste. Mix it into your batch. Rehydration guarantees your yeast is alive and when you pour it into your must it hits the ground running. Don’t let the yeast-water stand longer than 15 minutes; without sugar it will starve.
Instructions for preparing liquid yeast vary according to the manufacturer. Some cultures need to be incubated from 1 to 5 days before pitching. Other liquid cultures come in vials that can be added immediately.
For the first 12–24 hours after pitching the yeast, you may notice zero activity. Not to fret. Your little yeast buddies are in there, multiplying like there’s no tomorrow. Monitor your must temperature and give it a day.
Yeast Nutrients
Besides sugar, yeast needs potassium, iron, calcium, vitamin B, B1, copper, lead, zinc and other minerals. If your must lacks nutrients, you might consider adding them. Winemakermag.com offers a plethora of information on the subject. Just type “yeast nutrient” into the search engine.
Day 2–5
With juice wines, day five is a good time to rack your fermenting wine off the sediment into carboys. Racking when the SG drops to 1.020 and the vigor of fermentation has subsided is a suggested practice. This is usually around day five. Note: Keep the end of your racking tube submerged to retain a protective layer of carbon dioxide on your wine.
Batch Sizes and Carboys
The right size and type of carboy is key. After primary fermentation, fresh or sterile juice that’s sold in 5-gallon (19-L) pails should be racked to a 5-gallon (19-L) carboy. During fermentation the layer of CO2 on your wine will protect it. When fermentation is complete, top up within 2 inches of the bung. A sulfite solution in the airlock will block fruit flies and other organisms.
Day 10–17
The airlock will work regularly, releasing carbon dioxide gas as fermentation slows over the next days or weeks. When the SG bottoms out between 0.995 and 0.990 and remains there for about three days you can conclude that fermentation is over.
Fining
Fining is the act of adding a suitable “fining agent” such a gelatin, that will stick to suspended particles in your wine and pull it to the bottom. Whether you prefer to filter or fine your wine is a personal preference. The vast majority of wines you buy are filtered or fined or both. If you choose not to filter or fine you wine, aged bottles will gather sediment over time. If you don’t mind decanting your wine before serving it, then this is an acceptable alternative. For wines from juice or grapes there are various types of fining agents on the market: Isinglass (made from the bladder of fish, in liquid or powder); bentonite (clay); Sparkolloid (powdered polysaccharide extracted from brown algae), and Kieselsol (a liquid in which small silica particles are suspended).
Stabilizing
Stabilizing ensures that no fermentation will happen again. It also protects your wine against spoilage organisms and oxidation. Some home winemakers prefer not to stabilize. This also is a personal preference. While new, unstabilized wine can be enjoyable, your wine will have no immune system and will not last long.
The method of stabilizing your wine will probably be during your second (or third) racking after fermentation is complete. There are two ingredients to stabilize wine. One is potassium metabisulfite. For healthy wine, it is recommended you maintain 30 ppm of free SO2. For this you need to measure how much free SO2 you already have. To stabilize, draw a cup of wine from your carboy, dissolve your potassium metabisulfite crystals (or crushed tablets) and add it to your wine. If stabilizing during racking, pour the dissolved solution on the bottom of the receiving carboy so that the wine will immediately be protected during transfer. Keep the end of your racking tube submerged.
The second ingredient is potassium sorbate, which prevents residual yeast cells from multiplying. Sorbate is not typically necessary in dry wines. If, however, there is residual sugar above 0.995, sorbate is recommended. Half to one teaspoon of potassium sorbate for every 6 gallons (19 L) will work.
Malolactic Fermentation
By Daniel Pambianchi
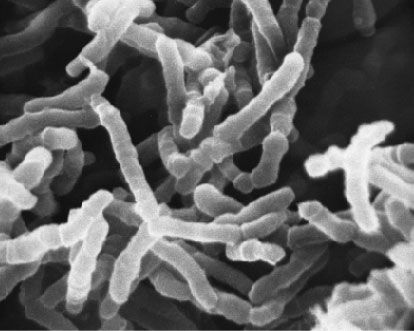
Malolactic fermentation (MLF) is a secondary fermentation occurring when malolactic (ML) bacteria become active in the presence of malic acid. Bacteria may be present naturally in fresh grape juice or wines. It could also be acquired from oak barrels previously used for MLF or a winemaker can add them from a commercial culture. MLF cannot occur in concentrates and sterilized juices because the bacteria have been eradicated during the concentration or sterilization procedures. It is also not recommended in concentrates because most are tartrate-stabilized during production and therefore contain a high proportion of malic acid. MLF would convert the malic into lactic acid, leaving the wine with little acidity, and a pH above 3.8, resulting in a flabby wine that is susceptible to bacterial infections. Indigenous bacteria will provoke MLF naturally, but results are unpredictable because the type of bacteria cannot be ascertained. Some wild ML strains may impart off-flavors and may cause spoilage at low free sulfur dioxide (SO2) levels.
Relying on bacteria from a previous MLF in oak barrels or adding a selected culture will yield reliable and predictable results. These methods give winemakers more control and therefore reduce the risks of unsuccessful MLF or microbial infection. Although carrying out MLF is not difficult, the wine must provide a suitable environment for the bacteria to have its effect, and you need to closely monitor the progress.
Selecting an ML Culture
Oenococcus oeni species are the most common ML cultures used in home winemaking and are available in either liquid or freeze-dried format. Liquid cultures are normally added directly to wine, while freeze-dried cultures first need to be rehydrated in distilled water.
Liquid cultures are less stable and therefore have a shorter shelf life. Freeze-dried cultures can be stored up to one year in a refrigerator or 18 months in a deep freezer.
Preparing for MLF
An important consideration before doing a MLF is that this fermentation will cause a reduction in total acidity in wine. Therefore, if you do not want to reduce acidity in a low-acid wine (below 6.0 grams per liter), you should forego MLF. A wine with very low acidity will become flabby and unbalanced.
If you need to increase the acidity of a batch in anticipation of conducting MLF, do so before the start of alcoholic fermentation by using tartaric acid.
For the alcoholic fermentation, select a S. cerevisiae yeast strain that is compatible with MLF, such as Lalvin’s ICV/D-47, for a higher probability of a successful MLF. Inoculate the juice with yeast and conduct the alcoholic fermentation as usual, until the specific gravity drops to 1.000 or lower, prior to starting the MLF.
MLF is usually carried out immediately following the alcoholic fermentation so that they do not interfere with each other, although some ML cultures allow both fermentations to occur simultaneously. What is most important is that you observe the culture’s environmental conditions — conditions that would otherwise inhibit ML bacteria. Let’s examine these conditions.
First: The wine’s free SO2 content should be less than the maximum (typically between 5 and 15 mg/L) prescribed by the ML culture manufacturer because ML bacteria are very sensitive to free SO2. Be sure to only sulfite the wine lightly for any batch that you plan to take through MLF.
Second: The pH should be higher than the prescribed minimum (typically 3.2) because ML bacteria are also sensitive to low pH.
Third: The wine should be above 64° F (18° C) throughout MLF for the bacteria to become active. Either warm up a cool cellar, or move the wine to a warmer room without exceeding 77° F (25° C).
Fourth: ML bacteria need to feed on nutrients, which can be found in the lees — the deposits formed during alcoholic fermentation. Therefore, do not rack your wine before initiating MLF. And make sure you observe oxygenic requirements of the selected culture. Most ML bacteria used in home winemaking are sensitive to air, and can become easily inhibited if exposed. Try to avoid operations such as racking and vigorous stirrings during MLF.
A word of caution! Many of the above conditions favor growth of spoilage organisms. Use extra sanitary precautions to avoid potential problems. Ask your supplier for the full set of manufacturer’s instructions when buying ML culture, and strictly follow these instructions.
Conducting the MLF
When ready to start the MLF, inoculate the wine with an ML culture, making sure all environmental conditions are maintained favorably throughout this phase. If you expect to conduct the MLF under a more difficult environment, first condition the hydrated culture by adding it to an equivalent volume of commercial apple juice, containing no preservatives. Apple juice has a high malic acid concentration, which will “jump-start” the bacteria. Loosely cover the container, making sure there is little air space between the culture and the cover. Keep the culture at room temperature for two to four days and then add it to the wine. Be sure to stir very gently.
To inoculate several batches, withdraw a 5 percent volume of wine actively undergoing MLF and inoculate another batch with this sample. For example, withdraw approximately 1⁄4 gallon (1 L) to inoculate a 6-gallon (23-L) batch. Be sure to minimize the culture’s exposure to air.
Oak barrels used for MLF will become heavily populated with ML bacteria. Successive vintages can be ML-fermented in the same barrels without adding any bacteria. Simply transfer the wine to barrels and MLF will start on its own. When MLF has completed, sulfite the wine to 35–50 mg/L, top up containers and return the wine to the cellar for aging at a cooler temperature.
Measuring MLF Progress
MLF can take up to to three months to complete — the point when malic acid is totally converted into lactic acid — if the wine is held above 64 °F (18 °C). Always closely monitor and control MLF. Paper chromatography, an analytical procedure used to detect the presence of malic and lactic acids in wines, is a reliable method to monitor progress.
Be sure to always monitor the pH as well to avoid potential spoilage problems. MLF causes the pH to increase. If it is allowed to progresses to an unusually high level, the wine will oxidize prematurely and become more prone to bacterial infections and spoilage.
Paper Chromatography
Paper chromatography uses a special cellulose paper immersed in a solvent containing a color indicator. Kits costing approximately $45 U.S. are conveniently packaged and sold with all the necessary equipment and chemicals and include: 30 sheets of chromatography paper, large jar with a wide opening and lid, disposable micropipets, chromatography solvent (bright orange color) and 0.3 percent reference solutions of each of
malic, lactic, tartaric and citric acid. Use the solvent in a well-ventilated area because it has a very strong and irritating smell.
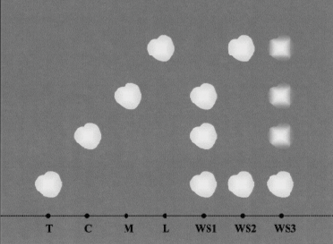
Using a lead pencil (ink will run when absorbed by the solvent), trace a horizontal line 11⁄4 inches (3 cm) from the bottom of the paper, across the long side. On the line, mark and label a reference dot for each reference solution and sample to be tested as T, C, M, and L for tartaric acid, citric acid, malic acid and lactic acid, and WS for each wine sample. The dots should be spaced at least 1 inch (2.5 cm) apart and from either edge of the paper.
Using different micropipets, “spot” each dot with a single drop of the corresponding reference acid solution or wine sample to be analyzed. Spot each dot three or four times, making sure to let each spot dry for approximately 15 minutes before re-applying (use a hair dryer to accelerate this process).
Curl the paper into a cylindrical shape around the vertical (short) axis without overlapping the edges, and staple the two ends at the top, middle and bottom. Pour enough solvent in the jar so that it is about 1 inch deep. Insert the paper in the jar and immerse it in the solvent, making sure that it stands upright, and then close the jar with the lid.
The solvent will start traveling up the chromatography paper and will cause acid components to “separate.” Allow the solvent to reach the top of the paper, which can take up to six hours. When completed, take the paper out of the jar, remove the staples from the paper and uncurl it. Hang it to dry in a warm, well-ventilated area to volatilize the solvent. Pour the leftover solvent back in its original container for other chromatography tests. After approximately three hours, yellowish spots will start appearing on the paper.
Interpreting Results
The spotted chromatography paper is referred to as a chromatogram. The figure below illustrates a typical chromatogram showing how spots have traveled and formed. For each sample, moving from the bottom edge of the paper towards the upper edge, the tartaric acid spot will have traveled the shortest distance, followed by citric, malic and lactic spots. Use the reference solution spots to help you locate horizontally the corresponding acid components of the wine samples.
When MLF has completed, you will see a clear lactic spot for the wine sample, and a very faint malic spot (a small trace always remains), as well as a tartaric spot. If any citric acid is present, a corresponding spot may be visible depending on the acid concentration.


 Acidity
 pH
pH Sulfites