Kit Wine Section
Kit Wine
by Jeff Chorniak
A typical wine kit contains only a few ingredients: A bag of preserved grape concentrate, yeast and the additives you need to make wine. Not all kits include the same additives, but common additive packs include Bentonite, oak chips, stabilizers and a fining agent. Some wine kits, such as Gewürztraminer, even include a non-fermentable sweetener to add just before bottling.
Kits also contain complete instructions that tell you exactly how to make the wine. All the pH, acid and sugar levels have been adjusted for you in advance. Red wines have already been adjusted for color as well. All you need is some basic equipment, suitable water and a bit of space.
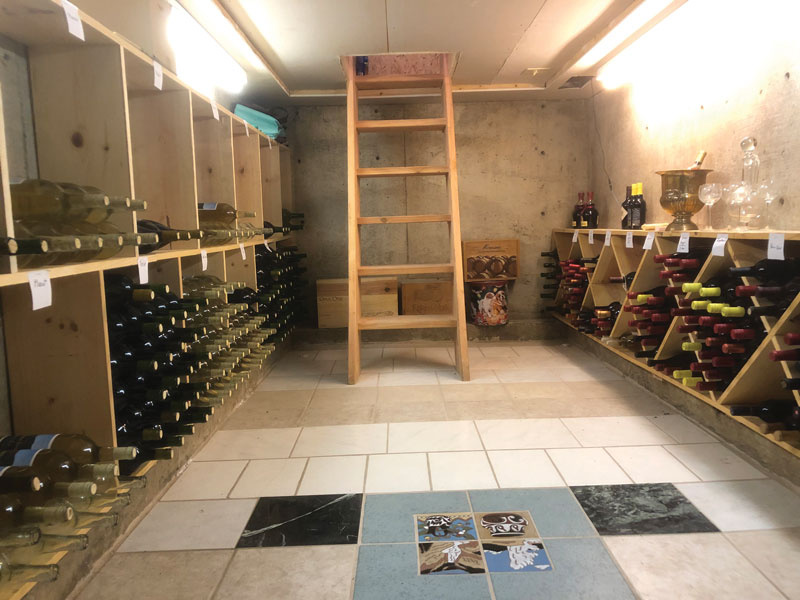
Modern kit technology is producing wines that are winning awards in the same categories as fresh grape wines at high-end competitions. Just about any vinifera varietal or blend is available as a kit. Kits vary in the amount of juice or concentrate they contain, but on average, a kit produces about 6 gallons (23 L) of wine, enough to yield about 30 750-mL bottles.
Kit wines have shorter fermentation and aging timelines. Many kits are designed to be ready to bottle within a month and only need about three months of aging to be drinkable. High-end kits can be ready to bottle in six to eight weeks and well-aged in six to nine months. Kit wine concentrates can be stored at room temperature and purchased any time of year. Winemakers no longer have to wait for harvest or worry about a vintage. For the beginning winemaker this is the perfect primer. You are virtually guaranteed excellent results as long as you follow the enclosed instructions carefully.

Before You Get Started With Kits
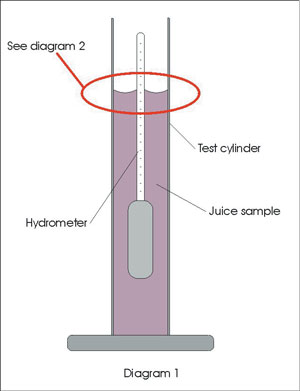
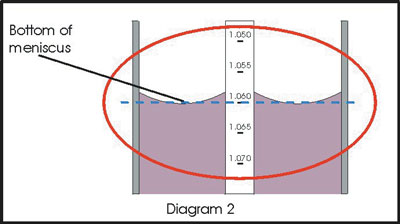
Before you jump in and get started with your kit, there are three skills you’ll need to become acquainted with and be able to administer. The first is simple: You’ll need to learn how to not only clean your equipment, but make sure it is it free of germs and bacteria. This is the process of sanitation. Home winemakers use a variety of solutions for sanitizing, but most use potassium metabisulfite. It serves a dual purpose as it sanitizes and stabilizes. When diluted with water, potassium metabisulfite releases sulfur dioxide (SO2) gas that is a highly potent bacteria killer. (For more details on cleaning and sanitation, see next section, link found on the bottom of this page.) It is perfect for sanitizing clean utensils, bottles, carboys and hydrometers, which brings us to our second winemaking skill: Measuring specific gravity. Modern technology makes this easy with a device called a hydrometer (illustration below). The specific gravity of your must (or juice) tells you how much sugar it contains, and in turn, what your potential alcohol will be. For a full description of what a hydrometer is and exactly how it works, see the equipment rundown on page five. To use a hydrometer, insert it into a test cylinder (or test jar) and with a sanitized basting bulb or wine thief add a sample of your must, concentrate or wine. Continue to add your must until the hydrometer begins to float, then give it a spin to clear it of bubbles. After it is still, you will notice that the surface tension of the your liquid creates a curve around the hydrometer stem (this is called the meniscus). Take your reading from the lower end of the meniscus to help ensure accuracy.
The third skill you’ll need to learn is racking. Racking is the process of moving juice from one container (typically a carboy) to another. Winemakers need to transfer the fermenting wine away from its sediment. This entails inserting a half-inch diameter hose (or a racking cane) into the fermenter and siphoning the clear wine into another sanitized container. After you do this, top it off and fit it with a sanitized bung and
fermentation lock. This can be a delicate operation so go slowly. You don’t want to stir up the sediment, but you don’t want to lose your siphon suction.
Anatomy of Kit Additives
Stabilizers and Preservatives
Stabilizers and preservatives prepare wine for aging by killing off unwanted yeast and bacteria that can spoil your wine over time.
Potassium or Sodium Metabisulfite: Used as a source of sulfite in winemaking, metabisulfite prevents oxidation, which causes browning of the must. Metabisulfite also suppresses bacteria and wild yeast. Typical concentrations used in kits range from 15 to 50 parts per million (ppm) at bottling. Sulfite comes in sodium and potassium form. Sodium metabisulfite is slightly more active than the potassium form, but this has no bearing on its flavor or preservative effect.
Potassium Sorbate (Sorbic Acid): Potassium sorbate, usually just called sorbate, prevents renewed fermentation in sweet wines and inhibits reproduction of mold and yeast. Combined with the sulfite in the kit, it helps to ensure that the wine remains stable during storage and cellaring. Sorbate prevents yeast from reproducing to the point where they could affect the appearance, flavor or long-term stability of the wine.
Fining Agents: Fining agents are used to clear wine of cloudiness and particles before bottling.
Bentonite (Montmorillonite): Bentonite is a type of clay. It is a primary fining agent for wine, but can also be added to clear white juice or must prior to pitching the yeast.
Colloidal Silica (Kieselsol): A solution of silicon dioxide in water suspension, colloidal silica was invented to replace tannin, which used to be a popular fining agent. Colloidal silica can be used alone, but is more commonly used in conjunction with gelatin.
Gelatin: A positively-charged fining agent, it can be used alone or in conjunction with colloidal silica and is usually found in liquid form (with kits). One of the most effective of organic finings, gelatin, can also remove tannins (polyphenols) from wine. Don’t exceed the recommended dosage, or you may remove too much tannins, which could impact mouthfeel.
Isinglass (Icthyocolle, Fish Glue): A positively charged fining agent like gelatin, isinglass is extremely gentle and usually won’t strip wine of color and aroma. It’s usually dissolved in liquid suspension.
Oaking Alternatives
Oak introduces flavors and aromas into wine, including vanilla, smoke and wood-like flavors, all associated with high-quality, barrel-aged wines.
In kits, powdered oak or oak chips are usually added to the beginning of a fermentation and gives a smooth oak character and a subtle vanilla finish. Chipped oak can be added after fermentation is complete for a more aggressive “woody” character.
Step-By-Step Wine Kit Instructions
Note: Kit instructions will vary with each manufacturer. Below is a synopsis of the common steps that most wine kits require.
A typical wine kit includes the concentrated grape juice, yeast and a collection of stabilizers and additives. These include sulfite powder, oak chips and sweeteners.
Primary Fermentation— Day 1–6:
1. Sanitize all winemaking equipment.
2. If the additive pack of the kit includes Bentonite, mix the Bentonite in a few cups of water or as instructed. Add the mixture to the primary fermenter.
3. Empty the grape concentrate into the primary fermenter, rinse the bag with warm water. Add it to the pail.
4. Add room temperature water (70–80 °F/20–25 °C) to the primary. Fill it to 6-gallons (23-L). Stir it well.
5. Draw a sample of must to your test cylinder and take a specific gravity reading (SG). It will probably read 1.080 to 1.090. Noting an SG reading before fermentation helps you calculate your alcohol after fermentation is complete.
6. If your kit includes oak chips, stir them in.
7. Pitch your yeast (rehydrate as explained in the kit’s directions, and stir it in). Note: check your must temperature to know if it is optimum for fermentation.
8. Place the lid on your primary. Do not seal the lid. The pressure of the carbon dioxide gas will create an explosion and a terrible mess.
9. Put your primary in a warm area (70–75 °F/20–24 °C), undisturbed, for about five to seven days. Check the temperature occasionally until the SG has dropped to about 1.020.
Secondary Fermentation — Day 7–14:
10. Siphon wine from the primary pail into the carboy, leaving behind the sediment (dead yeast, Bentonite, etc.).
11. Seal the carboy with an airlock and bung and let the wine finish fermenting for another 5 to 10 days (70–75 °F/20–24 °C) until your SG consistently reads the same value over two or three days (ideally at 0.995 or less). Your wine has finished. Use your starting SG and your finished SG to calculate actual alcohol.
Stabilizing and Clearing — Day 15–28:
12. With your basting bulb or wine thief, draw a half cup of wine from the carboy, stir in your pack of potassium metabisulfite and potassium sorbate, slowly pour it back into your carboy and stir it vigorously with your stirring stick and replace the airlock.
13. Do the same for the fining agent and pour it back into the carboy. Stir the wine vigorously three times a day for the next three days to release trapped gasses. Let it sit for another 14 to 20 days until your wine has cleared. Before bottling you can rack off the sediment again. Bulk age it for months in a cool area or lay it down in bottles.
 Seven habits Of Successful Kit Winemakers
By Tim Vandergrift
If you want your kit wine to turn out great every time, and avoid the pitfalls that crop up time and again, here are the seven highly fermentative habits you need to follow.
Habit 1: Read the Instructions
Kit wine manufacturers don’t randomly change the process of winemaking for their kits. However, when faced with a changed technology — such as new fining agents, different strains of yeast or a different level of solids in the raw materials — they have to alter the procedures to ensure the wine turns out correctly. Even if you’re an experienced winemaker, and you made the very same kit a short time ago, always read the instructions again — they may have changed without your notice. This is especially important in regards to racking, stirring and fining procedures, which are the aspects most likely to change.
Habit 2: Keep it Clean
Wine is food. When you’re preparing food at home, you use a clean cutting board, wipe the counter, wash your hands and use clean plates and cutlery. Now imagine your dinner had to sit a month, or even six weeks, before it was ready to eat. Unless your clean-up and preparation was intensely sanitary, your food would be spoiled long before you could eat. The same goes for wine. Unless your winemaking equipment is always kept spotless and sanitized, you’re giving environmental bacteria up to a month and a half to chow down on your wine!
Remember, cleaning and sanitation are two different things. Cleaning is removing visible dirt and residue from your equipment. Sanitizing is treating that equipment with a chemical that will prevent the growth of spoilage organisms. Everything that comes in contact with your wine must be clean and properly sanitized, from the thermometer to the carboy, from the siphon hose to the bung and airlock.
Habit 3: Write it Down
Winemaking is like any other hobby — you’ll be better able to duplicate your successes and avoid your failures by keeping records of both. You can either jot these in the spaces provided right on the instruction sheets, or get a notebook that you can keep in your winemaking area. Ideally, you should record: the date and time you started your fermentation and the type of kit, your measurements (specific gravity, temperature) and the temperature of your fermentation area.
Habit 4: Be Full of it
One thing that is crucial to the success of a wine kit is starting it out at the correct volume. Virtually all dry table wine kits start off at six gallons (23 L). Dessert wines are usually three gallons (11.5 L). On day one, you need to add the correct amount of water to make that full, 6-gallon (23-L) volume. The consequences of over-diluting are weak-tasting, low-alcohol wine that may not keep well.
The potential consequences of under-diluting are subtler and potentially more harmful. First, unless corrected, under-dilution will make a harsh, unbalanced wine. It will have a high alcohol content, but no finesse. Certainly the wine will not taste the way it is described in the manufacturer’s literature.
The wine will also take longer to ferment and may not clear well. Starting off at the correct volume requires the use of a primary fermenter with at least an 8-gallon (30-L) capacity. This is to allow room for foaming during primary fermentation, which in a wine kit can be astonishingly vigorous.
Habit 5: Stir the Pot
Wine kits generally contain the admonition “stir vigorously” somewhere within the text of the instructions. Vigorous stirring is needed on day one. This is because the juice and concentrate are viscous and don’t mix easily with water. Even if it seems that dumping the contents of the bag into the primary with the water has done the job, it hasn’t. The juice lies on the bottom of the pail with a layer of water on top. This not only throws off any gravity readings, it also overworks the yeast. The yeast may get through the diluted top layer all right, but underneath it can’t ferment the high-sugar, unmixed juices. The yeast might even quit early, leaving underfermented wine.
Vigorous stirring is also needed when it comes time to stabilize and fine the wine. The stirring has to drive off all of the CO2 the wine accumulated during fermentation. This is because the dissolved gas will attach to the fining agents, preventing them from settling out. You need to stir hard enough to make the wine foam and keep stirring until it stops foaming.
Habit 6: Temperature Control
One factor that frequently causes problems with wine kits is using the wrong temperature, or varying temperature ranges during fermentation or fining. Kit instructions tell you to ferment your wine within a specific temperature range, typically 68–78 °F (18–24 °C). Kit yeast prefer this temperature range as it provides a good compromise between optimum growth and ester (flavor compound) production. Yeast cells certainly do not like drastic temperature fluctuations.
This is another situation where kit instructions are different from grape winemaking techniques. In commercial wineries, some white wines are fermented cooler than this, sometimes below 55 °F (12 °C). Again, commercial wineries have the luxury of taking a year or so before they bottle their wines. For the home winemaker though, if the fermentation area is too cool, the wine will ferment very slowly and you’ll be stuck with fizzy, unfineable wine.
Temperature range is one thing, but temperature fluctuations are another kettle of oysters. Winemaking yeast is actually a fussy little milquetoast of a fungus. Too many cycles of hot and cold and it will decide that the environment is too hostile and it will go dormant. This will extend the length of your fermentation — and may even stop it altogether.
Habit 7: Magic Ingredient
Have you ever wondered if there was a magic ingredient that you could add to your wine to make things easier? The truth is, there actually is such a thing — it is called time. You see, wine kits are ready to bottle in 28 or 45 days — they’re not ready to drink! For most whites, and virtually all reds, at least six months is needed to smooth out the wine and allow it to express mature character. Heavy reds will continue to improve for at least a year, rewarding your patience with a delicious bouquet. So, the old kit winemaker’s secret to making great homemade wines: Add the magic ingredient of time and let it work its magic!
 Kit First Aid
By Tim Vandergrift
Your wine won’t ferment. It ferments too quickly. It ferments too slowly. It won’t quit fermenting at all! The wine won’t clear in the carboy. No, wait: It’s clear in the carboy but goes cloudy in the bottle! There are lumps of yeast floating in your fermenter and it’s the wrong color. Goodness gracious, what is that smell? These are some of the problems associated with kit wines gone awry. What follows is a high-threat troubleshooting guide for those times when good wine kits take a bad turn.
Before you do anything, you need to carefully re-read your kit instructions. Wine kits sometimes have instructions and procedures that contradict accepted techniques for typical winemaking and the instructions of other kits. There are many good reasons for these non-intuitive procedures, but they all boil down to the same thing: Wine kit manufacturers have tested their instructions and administered lab trials to ensure the best possible fermentation, clearing and stabilizing for each kit — so follow these instructions to a T!
Any departure from these instructions is the number two cause of kit wine failure (the leading cause being inadequate sanitation). If you’ve sanitized correctly, followed your kit’s instructions and still have a problem: It’s time for kit first aid!
These fixes, while applicable to almost all wines, are specifically designed to work with kits. Kits, as I am fond of pointing out, are not the same things as fresh grapes and fresh juice. Not only do you need to follow the right directions for the kits, you also have to apply the correct fixes!
Fermentation Follies
Wine Won’t Ferment
1. The Gravity of the Situation
When yeast is pitched according to kit instructions, you should see activity within 48 hours, or at least a nice, healthy scum of developing yeast on top of the must. If not, the first step is to take a specific gravity reading. If it shows a drop from the original, you’re experiencing “secret yeast.” For several and complex reasons, sometimes yeast like to hide, quietly getting to work without too much foaming or fizzing. In this case the immediate solution is to relax and to take another specific gravity reading a day later.
2. Cool Things Down
If you know you added yeast, check the temperature of the must. Kit wines are all designed to ferment at room temperature, generally a range of 65 to 78° F (18–26 ºC). If it’s much above 90 °F (32 ºC), you may have added too much hot water to the must and your yeast is likely dead. Cool the must by freezing a couple of bottles of water, sanitizing the outside and dropping them into the fermenter. Alternately, you can drape a wet towel or T-shirt around the fermenter and direct a fan at it. When the temperature is below the recommended maximum in your instructions, pitch a fresh package of yeast.
3. Or Heat Things Up
If the temperature of the must is below 65 °F (18 ºC), warm the must by wrapping it with a heating belt (available through your supply shop). Most of the time the yeast will begin fermenting within 24 hours, but if not, double-check the temperature of the must and pitch another package of yeast.
Wine is Fermenting too Quickly or Slowly
1. Is it Hot in Here?
If your wine ferments to dryness in less than half the time required in the instructions, your temperatures may be too high. Try the wet towel trick described above to cool it down. The trouble with hot fermentation is that yeast tends to generate its own heat after a certain point and you could have a heat-related yeast die-off and a stuck fermentation later.
2. Timing is Everything
If your wine ferments to dryness in less time than specified in the kit instructions, wait the minimum amount of days indicated in the instructions before racking to the secondary fermenter. For example, if the instructions say to wait 5 to 7 days, until the gravity is below 1.020, and you achieve 1.020 on the third day, cool the fermentation down to the temperature specified in your instructions and wait until day 5 before racking. This will ensure that an appropriate amount of sediment is left behind in the primary, and could prevent problems with fining and clearing later.
Wine Won’t Quit Fermenting
1. Zero In On Gravity
Sometimes a carboy will continue to bubble, long after it should have stopped. First things first: Check your specific gravity. If it’s high, give the wine a good stir, making sure the temperature is at the high end of the specified range and practice patience.
2. Fake Fermentation
If it’s in the right range, as listed in the instructions, you may be experiencing a common phenomenon. Your wine may actually be finished fermenting, but due to changes in temperature or barometric pressure it is out-gassing carbon dioxide at a rate that looks like active fermentation. This could be exacerbated if your wine fermented quite slowly (as in a cool fermentation) and is saturated with CO2.
My Wine Doesn’t Look Right!
The Wine Won’t Clear
First, don’t bottle cloudy wine. It won’t clear in the bottle, and any extra treatment to clear it up will require you to dump out all the bottles, process it and re-bottle.
1. Steer Clear of Filtering
Second, don’t filter the wine to clear it. Filtering is only good for clearing wines that are already almost completely clear. Fining agents still in suspension will sail straight into your filter pads, blocking them up quickly, and the ones that make it through will show up as sediment later on!
2. Fining: Stir Things Up
First go back to the instructions and make sure you followed the fining procedures exactly. The instructions regarding fining all contain the same phrase: “Stir vigorously,” which actually means really, really vigorously. In order for the finings to have the proper effect on the wine, it needs to be free of carbon dioxide. If it’s not, the bubbles of CO2 will float the fining particles back into suspension, over and over again and nothing will settle out. Be sure to stir the wine until it stops fizzing.
Clear Wine Goes Cloudy in the Bottle
1. Fermentation Not Finished
You can determine if the wine is continuing to ferment in the bottle by taking a sample and checking both the specific gravity and the level of CO2. If the specific gravity is higher than that recommended in your instructions for bottling, and it has a significant amount of CO2, you will need to un-bottle all of it and let it finish fermenting.
2. Fermentation Contamination
If the specific gravity is at or below the levels recommended in your instructions, but the wine is fizzy with CO2 and hazy, you may have a microbial infection. There are thousands of potential culprits, from lactic acid bacteria (spontaneous malolactic) to Acetobacter (vinegar) to air-breathing mutant yeast: All will ferment your wine after it has achieved what should be your terminal specific gravity. In this case you will need to un-bottle it, re-stabilize it with more sulfite and filter it. It will need to remain in the carboy until you are completely sure it will not ferment again in the bottle.
3. A Good Source of Protein
Protein haze is by far the most common of the three scenarios. Sometimes a fining agent will fail to clear all of the big proteins in a wine kit, or in some cases, traces of a protein-based fining agent (gelatin, isinglass) will stay in solution. When the temperature of the wine changes, these proteins become visible as a haze. As it warms up again, the haze disappears. Proteins are usually taken care of with the bentonite included in kits, but if you do have a protein haze, a small addition of thoroughly-rehydrated bentonite should take care of it. Try adding 15 grams per six gallons (three teaspoons). Wait two weeks and check the wine again.
That’s not the Right Color!
Kit is Too Dark or Too Light
1. Inconsistent Kit Color
Wine kit manufacturers are in an odd position: They make a packaged food out of a variable agricultural product. In this respect they are like producers of bread or pasta, who face harvest differences from year to year. They both blend raw materials from different areas to achieve consistent quality — kit manufacturers using grapes, rather than wheat, in this case.
However, even when all of the grapes in a kit come from a specific area, it may not be possible to completely blend away the color and flavor differences. Commercial wineries acknowledge this, and celebrate the different harvests by doing vintage tastings. Kits, however, are going to vary a bit from year to year, and unless the color change is marked by some other change (such as a loss of aroma or bouquet) you may not want to do anything to change it.
2. If You Want to Change
There are coloring products on the market, such as Grapeskin Extract and Exberry, which can be used to darken a red wine. If you must use them, follow the package directions, but keep in mind that they are not very stable colors, and could combine with any proteins in the wine and fall out of suspension later on.
What’s That Awful Smell?
Wine Smells like Matches
1. Mega-Bisulfite
Your wine may have too much sulfite, which is characterized by a “burnt match” smell, often accompanied by a tickling in the nose. However, the true level of sulfite can’t really be determined without a proper test. Until you’ve had your wine accurately tested, don’t attempt any correction of the sulfite level. Consult your instructions for the correct sulfite level in the kit.
2. Aerating
Minor excesses of sulfite (an extra 10 or 25 PPM) can be driven off by stirring small amounts of oxygen into the wine, effectively volatizing the free sulfite or binding it into bound sulfite, taking it out of action. You can stir air into the wine with a spoon, rack it with plenty of splashing, or bubble air into it with a brand-new, sanitized fish tank aerator for a short period of time. As always, test, adjust and test again.
3. Peroxide
Larger amounts of sulfite (up to an extra 50 to 100 PPM) can sometimes be treated with a hydrogen peroxide addition. Hydrogen peroxide is a very potent oxidizer. In high concentration it is used as part of the fuel mixture in rocket engines, oxidizing the fuel so rapidly as to resemble an explosion. It does the same thing in wine, oxidizing the sulfite, taking it out of action. For every 10-PPM of sulfite to be removed in 6 gallons of wine, add 4.2 ml of regular drug-store hydrogen peroxide. You must use a brand-new bottle of 3% USP-grade hydrogen peroxide, measure with a syringe to get accurate results, and above all, test before and after your adjustments are made.
Wine Smells like Rotten Eggs
1. Your Yeast Strain
Most yeast produces a small amount of hydrogen sulfide (H2S) during fermentation, producing a whiff of rotten egg. Certain yeast are famous for producing large amounts of this aroma, the Montrachet strain being particularly prone. However, this is rare in wine kits, as excess H2S is usually a symptom of low nutrients in the must, or too many grape solids — conditions that don’t apply to wine kits.
2. Air, Not Copper
If you do get this problem it can sometimes be cured by aeration, like the treatment for small amounts of excess sulfite. If it’s worse than a whiff, the fix used to be to treat the wine with copper, either in the form of metallic copper (a handful of sanitized pennies tossed in the carboy) or with a product called Cufex, which is a copper sulfate compound. The problem with this is that even in small amounts, copper is toxic to humans.
The Sunny Side of the Street
The good news in all of this is that most of these problems are actually very rare. Of the hundreds of thousands of wine kits sold every year, we see very few cases of real defects in processing. It turns out that kit winemakers are pretty savvy for the most part. With good sanitation, accurate measurements of temperature and gravity, and detailed record-keeping, you should never see most of these problems. But if you do, don’t panic: Most of the common conditions are easily fixed. Check out your options, and if you get stuck, call your retailer. Most winemaking stores have been in business a long time, and like me they’ve seen it all. They’ll help you get back on the right track, pronto.
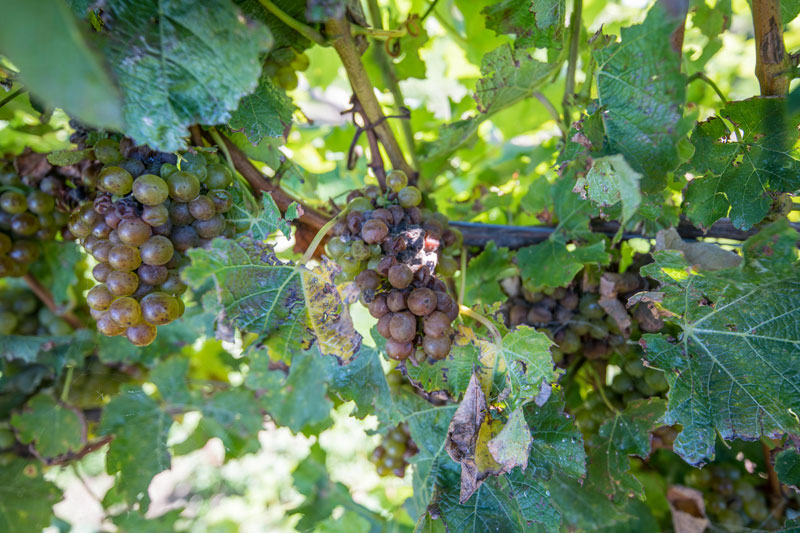
Using Juices & Frozen Musts
Making wine from juice requires a bit more hands-on attention than making wines from kits. Unlike wine kits, fresh juices often have no additive pack or instructions. Those details are left up to you, the winemaker, to obtain and follow. Likely, no pH, acid or sugar balancing has been administered on the juice. Using juice does not need to be intimidating, however. The learning curve is actually more gentle than that of fresh grape winemaking. Pure, untouched juices open the door for creativity. It is a great way to begin experimenting with different varietals and techniques.
Juice usually comes in a 5 or 6-gallon (19 or 23 L) pail. Juices are either sold sterile or fresh. Sterile juices are preserved with sulfite to prevent spoilage or premature fermentation. The acid, pH and sugar may already be adjusted. Even the color should be correct per varietal or blend.
With fresh juices, the quality of the unpreserved juice is dependent on the year and location it was harvested. Fresh juice is sold as-is, while quantities last. Without preservatives, it might have little or no shelf life.
Some juices are put in cold storage. The almost freezing temperatures stifle spoilage and fermentation of natural yeasts in the must. But before you are ready to jump into juice winemaking, you’ll need to master some basic skills that require a little know-how in the science department. You’ll need to learn how to test acid and pH levels and how to manage sulfites and yeast. The “Winemaking Science” section starting on the next page is a general overview to prepare you.
Frozen musts are also an option and are more readily available than ever. Frozen must can come from any region of the world and include a growing list of available varietals.
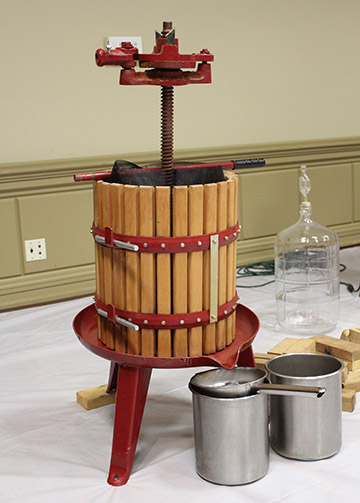
There are many advantages to working with frozen musts for beginning winemakers. Besides the advantage of having must available anytime, your capital investment in winemaking equipment can be avoided, minimized, or delayed until you really want to work with fresh fruit. You do not need a crusher/destemmer, but you will still need a wine press for the red grapes to separate the liquid from the solids. Whites are usually already in juice form (reds usually come with the skins). Further, frozen musts eliminate the lifting effort of loading the fresh grape lugs into the crusher/destemmer. Contact your local fresh grape purveyor or scout out the Internet for frozen must sources.
Once you have some experience with kit wines, you may decide to experiment with grape juices. Rather than jumping straight into the vineyard and picking or purchasing wine grapes in need of crushing, winemakers can purchase a variety of sterile and fresh juices.