Kimchi
Times have certainly been different since the onset of the pandemic in early 2020, to put it mildly. But with bad comes good, and the silver lining of the dark cloud that has lingered over the past two years has been a renewed interest in great homemade foods, especially fermented foods. And within the niche of fermented food, wild fermentations have popped up in homes across the country. I have become interested in a number of these — one of my favorites being kimchi.
Truth be told, with a small investment in equipment and free refrigerator space, the process isn’t very difficult and can expand your home fermentation horizons as well when looking for a new experience as your wines age.
What is Kimchi?
Kimchi is a term used in Korea to describe a wide array of fermented vegetables and fruits, and is the national dish of South Korea. Over the past several years, Korean food in the U.S. has experienced a rise in popularity and more Americans are familiar with some of the dishes and condiments popular in Korean restaurants. Bibimbap, bulgogi, japchae, gochujang, and gochugaru are examples of popular Korean foods and condiments. And this list would be totally incomplete without kimchi. The most common kimchi is made from cabbage, with cucumber kimchi being a solid number 2 in the U.S.
Although all kimchi is not spicy, the most popular types are easy to spot because of their red color highlights coming from the generous use of gochugaru or dried, ground, red pepper flakes. In basic food science terms, kimchi is a food preserved with a combination of acid and salt and flavored with pungent spices that may have originally been used to cover up unpleasant tastes and aromas. This latter postulate has been used to explain why so many traditional foods, especially those from hotter climates, are hot and spicy.

A quick search about kimchi written by westerners often equates kimchi to spicy sauerkraut. This description is far from useful and does not do justice to kimchi or sauerkraut! The two kimchi types mentioned in this article, tongbaechu (whole cabbage) kimchi and mak kimchi (cut kimchi), traditionally include fish sauce, salted shrimp, sometimes oysters or fish, and lots of gochugaru. All of these ingredients, including the napa cabbage (nappa in Japanese refers to vegetable leaves, so “napa cabbage” loosely translates to leaf cabbage and has nothing to do with California’s Napa Valley), contain above average levels of free glutamic acid, along with other amines and so-called 5’ (five prime) ribonucleotides that collectively contribute umami to food. The fact that tongbaechu and mak kimchi have a big depth of flavor from these umami ingredients helps explain why these kimchis work so well as ingredients in other dishes.
Getting into Kimchi
In today’s world of food journalism, picking a popular topic and running into the assignment with teen vigor is not all that uncommon, but the truth is my love of kimchi has nothing to do with 2020 or tinkering in the kitchen because of the COVID-19 blues. I love kimchi because I love Korean food, especially the spectacular dishes deftly crafted by my late mother-in-law, Sun. I had eaten some Korean foods before I met the young lady who would later become my wife, but had not been exposed to much variety. That all changed in 1989. And one of my favorite types of Korean food quickly became the amazing range of fermented vegetables that fall under the large umbrella of kimchi. It just so happened that Sun’s kimchis were truly exceptional. I became spoiled, and unfortunately never learned the art of kimchi making from a real master. My wife was also spoiled by her mom’s cooking and did not receive the secrets to Korean cooking. Such is life!
Over the past 25 years, I dabbled with kimchi making and would give up in frustration before forgetting about the frustration and trying again. This cycle waxed and waned for too long until I found a Korean cooking website called Maangchi and was finally able to produce several good batches of kimchi. This gave me the positivity previously denied, and I started applying an analytical approach to kimchi in an effort to make something that both my wife and I liked. Two real challenges with kimchi making is the space required in the refrigerator and the strong aroma that kimchi gives off inside of the refrigerator. Many Korean households in the U.S. have separate refrigerators just for kimchi to address these challenges.
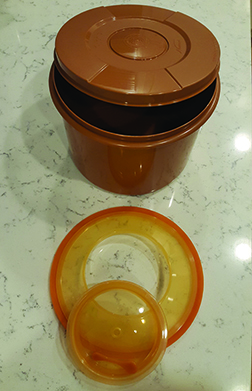
This got me thinking; there must be products on the market specific to kimchi storage, and sure enough I was able to find a line of plastic fermenters/storage containers that reportedly prevent kimchi from making the entire refrigerator smell like kimchi. A clever and useful feature of the design is a floating inner lid that keeps air away from the surface of what is beneath the lid. Maybe it was just the culmination of fine-tuning my recipe and technique, and using my new fermenter, but my kimchi went from pretty good to excellent. Without further ado, let’s get busy!
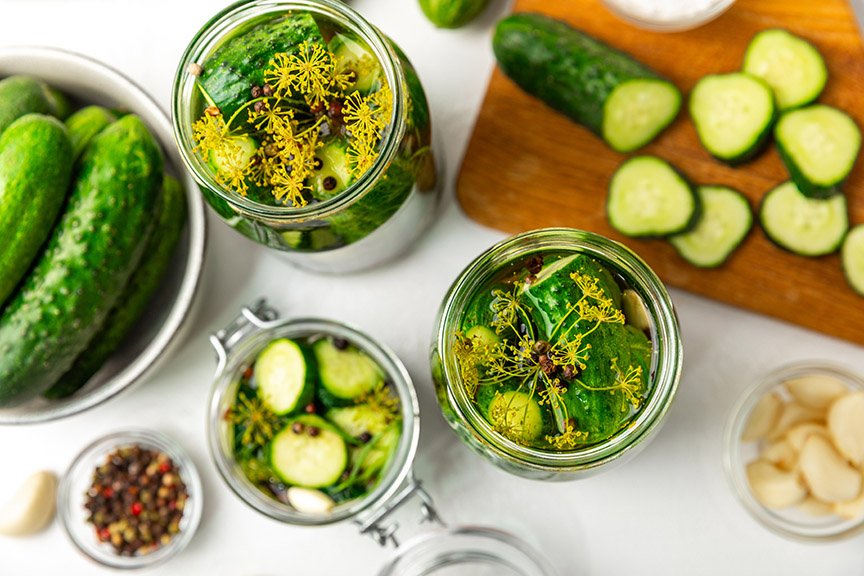
The most common type of kimchi, tongbaechu kimchi, is made from whole napa cabbages that are quartered, brined, and coated, one leaf at a time, in a kimchi paste before packing into a fermenter. This type of kimchi is removed from the fermenter (which also acts as the storage container) and cut before serving. A variation on this type of kimchi is called mak kimchi and is easier to prepare and serve. Mak kimchi is what I will be describing how to make. I encourage folks interested in crafting kimchi at home to follow the procedure in this story to help get the basics down and to become familiar with the flavor and textural changes that occur during fermentation. Just like with winemaking, variations are easier to execute after multiple wins with an established method.

Kimchi Fermenters
Kimchi is traditionally fermented and stored in earthenware crocks called onggi. Still popular today, fermentation crocks allow for easy access from a large mouth at the top and are sometimes equipped with heavy half-moons to keep the contents submerged under liquid, although this style of weight seems to be a feature of German crocks used for sauerkraut, as is the airlock/water seal that the latter have designed into the top of the crock. Korean kimchi onggi were traditionally buried in the ground to provide for steady temperatures.
Onggi permit slow diffusion of gas across the wall and likely result in a different fermentation profile compared to glass containers that block gas diffusion. Plastics do permit gas transfer and may have some benefits to fermentation in comparison to glass containers. The E-Jen fermenter that I use markets gas-permeability as a feature that improves performance; the moveable inner lid also reportedly minimizes the growth of aerobes on the surface. My normal batch size uses 8.8 lbs. (4 kg) of cabbage, and I also end up with a small amount of kimchi that I ferment in glass, which does result in a different flavor. My wife and I both prefer the kimchi fermented in our plastic fermenter with floating lid.
Units
I unapologetically use the metric system in my own cooking ingredient lists because it’s easier to use, especially when ingredient additions fall between 5 and 100 grams because this range of weights expressed in ounces requires the use of decimals and I like whole numbers. End of explanation. But, for those who prefer it, I did still include U.S. measurement equivalents for this article.
I view units as units and also refer to quarts and gallons when describing the size of pots and buckets because those units are used by the manufacturers; if you head to the hardware store looking for 8-liter buckets you will not find what you are looking to buy, so I have to refer to 2-gallon buckets and 2-quart saucepans as such.
Equipment & Ingredients
Large cutting board
Sharp chef’s knife
Colander or homemade double-bucket set-up
Mandolin (optional)
2-quart saucepan
Whisk
Kitchen scale
Vegetable peeler
Kimchi fermenter (this recipe will yield about 2.5 liters of volume and require at least 3 liters of total vessel volume)
Blender
2–3 mixing bowls
Spatula

Ingredients
Cabbage and Salt
2 kg (4.4 lbs.) napa cabbage (optionally, you can substitute up to 200 grams (7 oz.) of napa cabbage with baby bok choi)
120 g (4.2 oz.) coarse kosher salt
Porridge
130 g (4.6 oz.) water
20 g (0.7 oz.) sugar
15 g (0.5 oz.) sweet rice flour*
Kimchi Paste Components
120 g (4.2 oz.) Korean radish*
90 g (3.2 oz.) minced garlic
80 g (32.8 oz.) minced white onion
60 g (2.1 oz.) matchstick carrots
55 g (1.9 oz.) Korean coarse red pepper flakes (gochugaru)*
35 g (1.2 oz.) Three Crabs Brand Fish Sauce (Vietnamese nuoc mam nhi)*
15 g (0.5 oz.) salted fermented shrimp*
10 g (0.4 oz.) whole green onions
5 g (0.2 oz.) minced ginger
* These ingredients are carried in most Korean markets.
Shopping
The best place to gather specialty kimchi ingredients is a Korean market, but some larger grocery stores with a good selection will have most of the ingredients required for mak kimchi. Napa cabbage is often priced significantly lower in Asian markets, and you will often find it easier to buy large heads of napa cabbage there than in regular grocery stores.
Although very good kimchi can be made from less-than-perfect cabbage, you really want to buy the best looking heads available. This is also true of all of the other fresh vegetables that are used in the kimchi paste.
Kimchi Making
This process takes about three hours from start to finish, and you will not have much downtime between steps. It’s important to set aside enough time to completely finish the process and have your kimchi in the fermenter before settling down for glass of wine, so be prepared to be busy. This is a great team project if you can recruit some help.
Cabbage Prep
This is the rate limiting part of the process, so get the cabbage prep completed before doing other work. Start by removing any wilted outer leaves and weigh your cabbage. I am a spreadsheet fiend and have developed a calculator to drive my entire ingredient list proportionally to cabbage weight, as well as giving me a few levers for tweaking the spice level and wetness of the finished product. This recipe is based on a single cabbage and you should be able to find one that weighs about 2 kg (4.4 lbs.) at the store. I usually double this recipe because it doesn’t add much work or time, and also because my 5-liter kimchi fermenter is totally filled, with a bit of extra, when starting with about 4 kg (9.7 lbs.) of cabbage.
Rinse the cabbage, cut lengthwise into eighths, and then cut these wedges into pieces that are about 1.5 inches (4 cm) wide. I cut the wedges from the end opposite the base because the base of the cabbage head holds the leaves together when cutting. Almost all of the cabbage is used except for the solid bit near the base. Using a large, sharp, chef’s knife makes this job relatively easy.
I constantly move cut cabbage from my cutting board into a 2-gallon bucket (2.5 kg max/bucket) during prep. After moving ~500 grams of cabbage (a quarter of it) into the bucket, sprinkle 30 grams (1 oz.) of kosher salt on top of the cabbage, and repeat this layering process until the bucket is filled. Allow this to rest for 30 minutes, give it a gentle stir to move the cabbage pieces around in the developing brine, and let it rest for another 30 minutes. Repeat process for a total brining time of two hours. The purpose of the brining step is to pull water out of the cabbage tissue and to prepare it for fermentation. Don’t worry about the large amount of salt being used in this step (yes, it’s a lot!) because the cabbage will be rinsed before the prep is over.
Porridge Prep (Done while cut cabbage is brining)
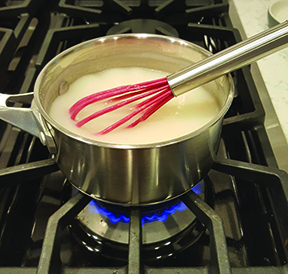
Combine cool water, rice flour, and sugar in a 2-quart (2-L) saucepan. Gently whisk to make a solution, then heat while constantly stirring until starch gelatinizes (solution becomes a translucent gel and the texture turns silky). The transition from starch solution to a gelatinized paste happens very quickly and the feel of the whisk movement will be obvious. Once the starch gelatinizes, turn the heat off and allow the porridge to cool to room temperature before making kimchi paste. Occasional stirs after cooking help speed up the cooling process.
Kimchi Paste Prep (Done after porridge prep)
Mince the garlic, onion, ginger (a trick to mincing ginger is to peel the ginger using a vegetable peeler to easily strip the outer peel while minimizing waste), then combine in a blender with the fish sauce and fermented shrimp. Blend on a low-to-medium speed until all solids are pureed. The fish sauce and shrimp have pungent aromas, so be careful not to blow the top off the blender and paint the ceiling. Leave this mixture in the blender until needed.
Wash the green onions, carrots, and radish, and allow to drain in a colander before cutting. Cut the green onions on a bias into 3⁄4-inch (2 cm) pieces. Peel carrots and cut into matchsticks (julienne cut). Peel radish (or part of the radish depending on the size) and julienne into 2–3 inch (5–7 cm) strips; this is easiest to do using a mandolin if you have one as the texture and size of this vegetable is perfect for slicing with a mandolin. I only use my mandolin for the radish prep because carrots and mandolins spell sliced fingers. Please be careful!
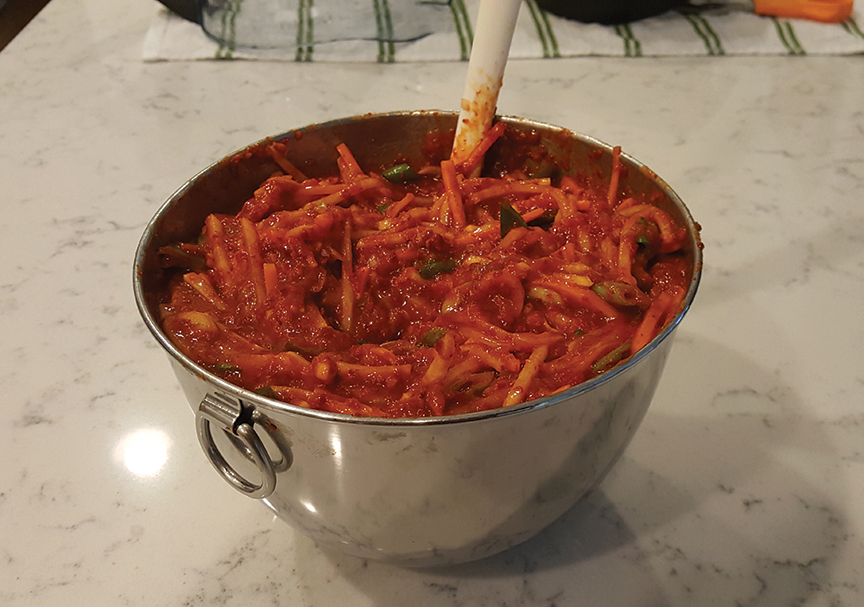
Transfer cut green onions, radish strips, and carrots to a large mixing bowl, add the gochugaru, puree from blender, and cooled rice starch porridge. Gently mix with a large spoon or spatula until uniform. This mixture is your kimchi paste; set aside until cabbage is rinsed and ready to be mixed with the paste.
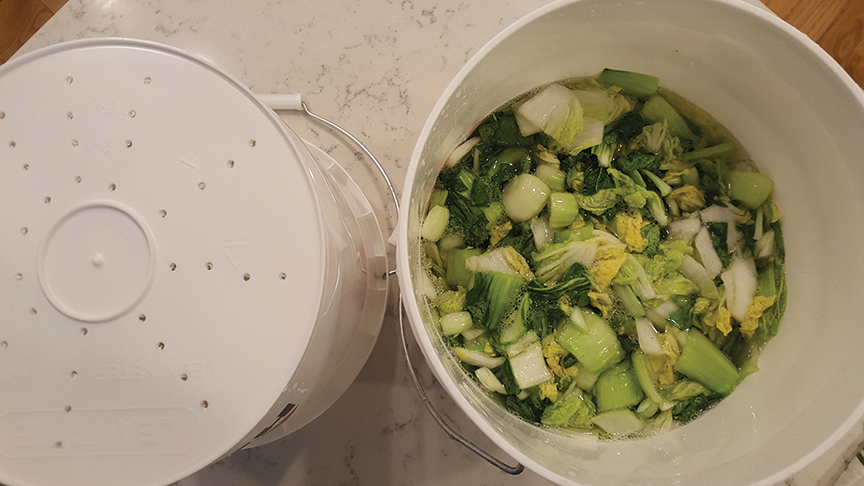
Rinse the Brined Cabbage
Unless you have a very large colander, a bit of ingenuity makes cabbage rinsing easy and manageable. I have two 2-gallon (8-L) buckets that I use for brining and a third 2-gallon (8-L) bucket with a bunch of holes drilled in the bottom that is my kimchi colander (this bucket-colander is shown beside the bucket of soaking cabbage in the image on the bottom left of page 40). The cabbage volume is approximately halved during the 2-hour brining process, so even if you are starting out with 4 kg (8.8 lbs.) of cabbage, you can use one 2-gallon (8-L) bucket without holes and the one 2-gallon (8-L) bucket-colander for the rinsing step.
Transfer all salted cabbage into the bucket-colander (with the colander placed in a sink), rinse out the brining bucket(s), and insert the bucket-colander into a bucket without holes. Fill with cold tap water, stir, and allow to rest for about two minutes. To drain, simply lift the bucket-colander out of the solid bucket and put in sink to drain. Empty the rinse water in preparation for the next rinse cycle.
A minimum of four rinses is recommended to prevent kimchi from being too salty. I like to taste pieces of cabbage after the fourth rinse to check the saltiness. If the cabbage seems too salty for your preference, rinse more. Remember, kimchi is a preserved food and the salt does play into that equation, so don’t rinse the cabbage too much. Gently press after the last drain step to remove free water.
Bringing the Parts Together
Fermenter full of fermenting kimchi.
Transfer about 1⁄4 of the cabbage to one of your kimchi buckets, add about 1⁄4 of the kimchi paste, then gently mix until uniform. Repeat this process three more times until all cabbage and kimchi paste is in bucket.
Transfer the fresh kimchi to your fermenter and pack the mixture so there are no air bubbles. This is fairly simple with mak kimchi. I have made the best batches of kimchi in my E-Jen fermenter and know this container results in a different product compared to a glass bowl with a water lock covering the top. In the past I have used wide-mouth canning jars and never made great kimchi. Whatever you choose as your fermenter, the next couple of days are very important.
One thing to note here is that no starter culture is needed because there are plenty of lactic acid bacteria from the cabbage and other vegetables. There are also plenty of nutrients for these bacteria to consume during fermentation. This is why kimchi is considered a wild fermentation.
Leave your fermenter(s) at room-temperature (~68 ˚F/20 ˚C) for 2–3 days. If you are using glass bowls or jars, it’s best to place these on plates or a sheet pan because some liquid may be pushed out during fermentation. Kimchi fermentation is nothing like fermenting wine and you will not see foam forming at the top. You may, however, see gas bubbles and changes in the appearance of the kimchi paste. The first couple of days of fermentation builds the bacterial population and sets the stage for continued fermentation in the refrigerator. After 2–3 days, move your fermenters to a 39 ˚F (4 ˚C) refrigerator and allow to continue fermenting for about five days.
Although some commercial kimchi producers reportedly only use cold fermentation, I have had very poor results with this method. Although the kimchi texture and appearance are very nice and acid is produced, the flavor is one-dimensional and lacks the breadth of warm-started kimchi fermentations, in my opinion.
Enjoying Kimchi
You can eat your kimchi any time after the brined cabbage is rinsed and mixed with the paste. Some folks really like fresh, unfermented kimchi (this type is sometimes hit with a dash of soy sauce and topped with sesame seeds), others like kimchi a couple of days into fermentation, and most folks who eat kimchi on a regular basis like it best somewhere between weeks 1–3. The way I perceive the range of flavors is that young kimchi has not come into its own, the peak flavor and texture is between weeks 1 and 3, and beyond that time frame, as the cabbage tissue becomes very soft and the acidity becomes pretty intense, kimchi is best used for Korean soups, stews, and stir fries.
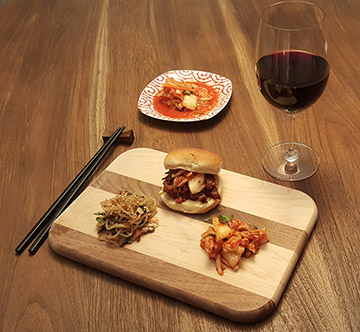
Koreans eat some sort of kimchi as an accompaniment to almost every meal, and you will always find kimchi served with any dish you eat in a Korean restaurant. So, serving with Korean food is a pretty obvious choice. A bowl of good rice served with a little dried squid or grilled meat and a healthy portion of kimchi makes for a great simple lunch or snack. Thinly sliced kimchi also adds a dimension to hamburgers, fish tacos, omelets, pizza, smoked pork butt sandwiches (as pictured on the opening of this story) or whatever else suits your fancy.
When it comes to choosing a wine to pair with your kimchi dishes, the choices are wide and may be influenced by the rest of the dish. White wines and rosés with some astringency and a light sweetness are a good option — think Riesling or Pinot Grigio. Sauvignon Blancs and wines with solid acidity and tang work well. As do red wines, generally those lighter in tannins like a Pinot Noir. You’ve got some flexibility here.