Maceration Considerations
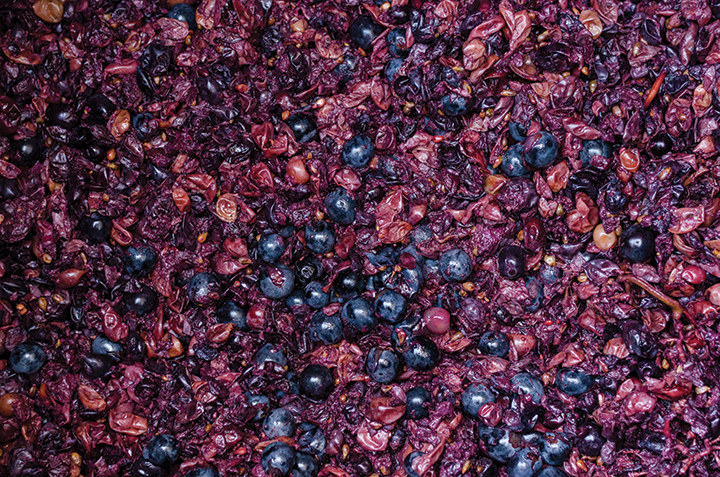
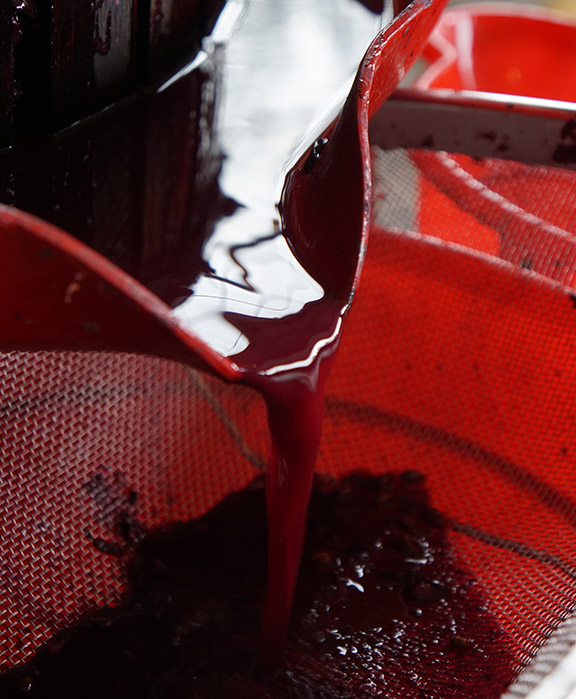
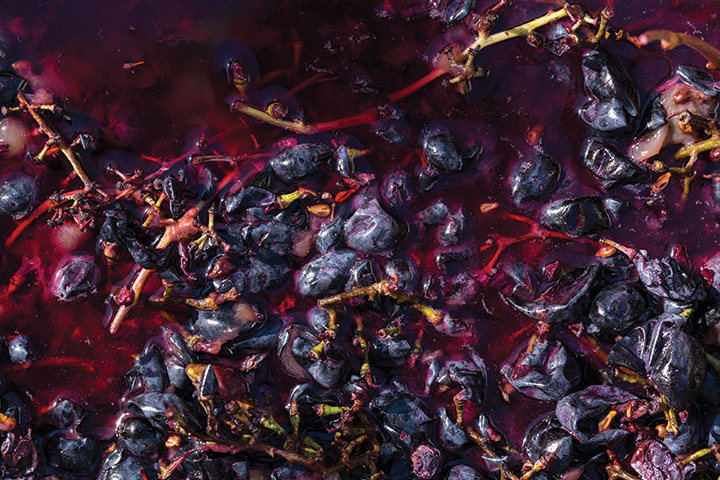
Maceration is the process of extracting chemical compounds from the solid parts of the grape berry into the juice. Maceration doesn’t play a big role in white wine production, with the exception of some aromatic whites and orange wines, but is a critical component of red winemaking. Maceration time and temperature, as well as processing options, impact the color and tannic astringency of the resulting wine. Both color and tannin components are phenolic molecules. The location and the molecular size of the phenolic compound have a big impact on when and how much of a particular type of phenolic compound is extracted into wine. Anthocyanins, the phenolic compounds that contribute color to wines, are found predominantly in the skins in most grape varieties. Tannin compounds, a wide class of compounds that have similar base structure but differ in size and type, are found in the skins, seeds, and pulp of grapes.
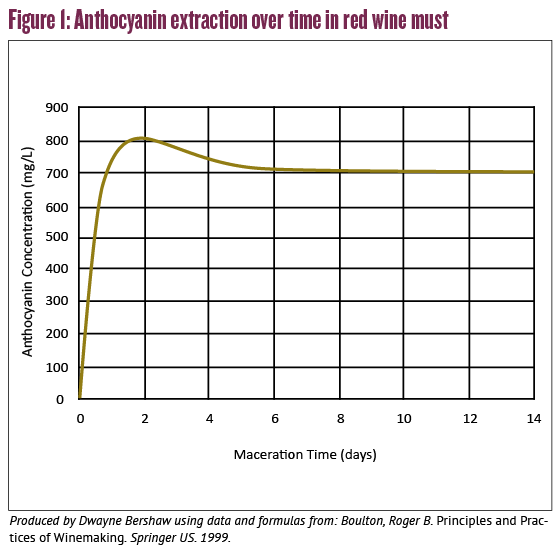
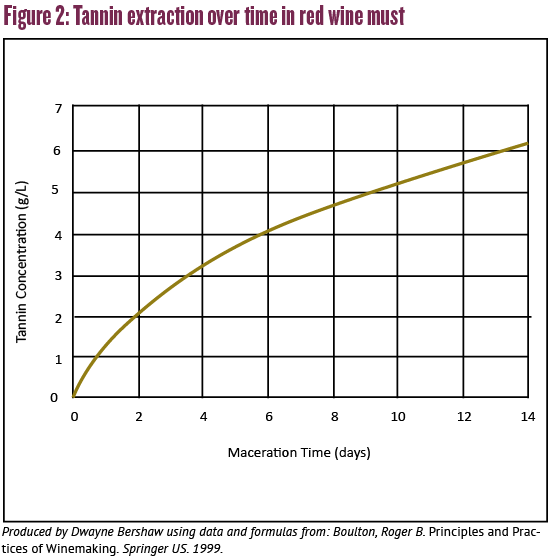
The rate of extraction of color and tannin molecules from the solid matrix of the skin tissue into the liquid matrix of the juice is mostly determined by the size of the molecule. Anthocyanin molecules are relatively small in size and thus are extracted into juice quickly. Most tannin molecules are polymers, and their larger molecular size means they are extracted more slowly into the juice. Grape seeds contain large quantities of tannin that are extracted the most slowly unless the seed is damaged, so winemakers go to great lengths to ensure seeds are treated gently and never crushed in rollers that are too tight, or ground in pump internals or other processing equipment. Examples of the extraction dynamics for color and tannin are shown in Figure 1 and Figure 2, below. These figures show that most of the color is extracted in the first day or two of maceration, while tannin extraction is more gradual and continues as long as the skins and seeds are in contact with the juice.
Maceration Dynamics
Punchdowns and pumpovers are the two most common methods of maceration. In commercial production most winemakers believe punchdowns, despite the name, are gentler and less oxidative than pumpovers. When I worked harvest jobs in California and Oregon the Pinot Noir producers favored punchdowns, while the Cabernet producers favored pumpovers. However, the research I’ve seen regarding the impact of punchdowns versus pumpovers doesn’t show a lot of difference between the two methods in terms of color and tannin extraction. Still, there are so many variables in how these two maceration methods are performed, and the sensory impacts may be so subtle, that it is possible research has yet to catch up with winemaker intuition. The other big split between punchdowns and pumpovers is based on tank size. Very small lots are more convenient to punchdown than pumpover, and the opposite is true of very large tanks. For this reason most home wine producers favor punchdowns, which puts them in good company with many commercial producers.
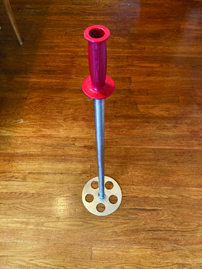
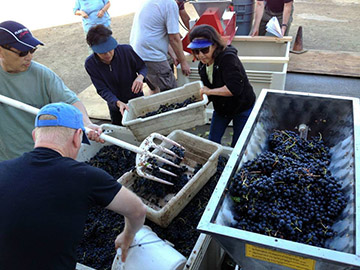
Foot treading, like Lucille Ball in her famous grape stomp scene in I Love Lucy, is a time-honored method of maceration still practiced by some traditionalists. Most modern winemakers prefer to keep their shoes on and manually punchdown the cap using their arms. A sturdy and easy-to-clean punchdown tool is a good investment; you can find them at home winemaking shops and online, or you can make your own out of wood or stainless steel. You can see a homemade punchdown tool my dad fabricated for me when I first began home winemaking in the picture on the right.

Pumpovers require a pump, of course, but also some method of keeping skins and seeds out of the pump internals. Commercial producers often use screens inside the tank that prevent solids from getting stuck in the tank valve, as well as a sump below the tank outlet with another screen to collect skins and seeds prior to the pump inlet.
Home winemakers and small lot producers often ferment in tanks, macro bins, or food-grade garbage cans, which don’t have a screened bottom valve. In this case, using a perforated suction tube, with the inlet hose to the pump inside it, is a workable method for pumping over. Pump-overs can have the added benefit of adding a bit of oxygen to fermenting must if the fermenting juice is sprayed back over the cap. Oxygen during active fermentation helps with both color stabilization and tannin integration. Oxygen can also be important for yeast health, preventing yeast from producing reductive, or stinky aromas, late in fermentation. To incorporate more oxygen into the fermenting must a Venturi tube or sparging stone and oxygen tank are required.
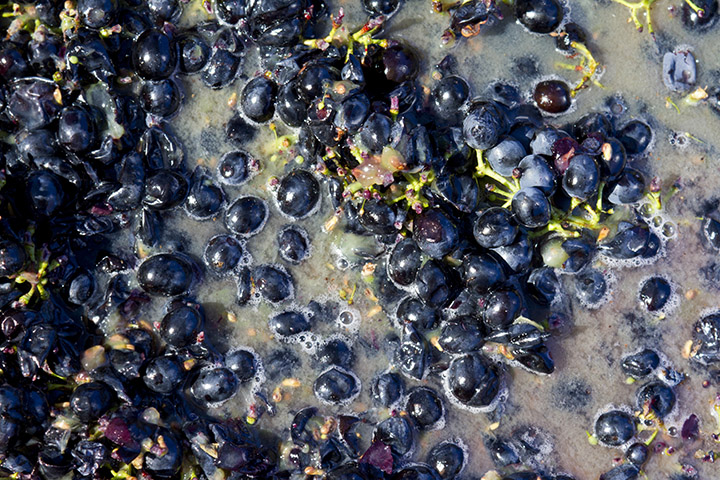
Getting back to maceration techniques, one important consideration for either punchdowns or pumpovers is that some method of breaking up the cap should be employed at least once a day during active fermentation. Once fermentation is underway and the cap has formed the juice beneath it contains an inhibitory level of alcohol and is saturated with carbon dioxide, thus limiting microbial growth. Getting the cap wet and keeping it in contact with the fermenting liquid beneath it helps with tannin extraction, but more importantly it also limits microbial growth in and on the cap. Both acetic acid bacteria and spoilage molds and fungi will grow in the cap if it is not periodically wetted with the fermenting juice.
Winemakers often punchdown or pumpover two or three times per day during active fermentation. Again, there’s not a lot of research on this topic and the research I’ve seen does not show big differences between wines made with different numbers of maceration activities per day, so as a home winemaker with other stuff happening in your life, it’s probably fine to perform a punchdown or pumpover once per day. Doing this maceration step at least once per day also gives you as the winemaker the opportunity to assess the fermentation by taking a sample and measuring the Brix level. This daily sample should also be sniffed to check for off-aromas and tasted to determine if tannin extraction is progressing according to the winemaker’s goal for the style and type of wine being produced.
Temperature is also an important aspect of color and tannin extraction, with increasing temperature during maceration increasing the extraction. Some winemakers use this to their advantage in hot pressing, where the must is heated to 150–180 °F (66–82 °C) for a short period of time prior to pressing, instead of waiting the 24–48 hours it usually takes, in order to extract color. Color is released quickly in this method, but tannin and some aromatics are not. Thus hybrid winemakers may employ this method for extracting color in highly aromatic hybrid red wines.

In vinifera red wine fermentations many commercial winemakers like to see maximum fermentation temperatures in the 85–95 °F (29–35 °C) range if high levels of tannin extraction are desired for the grape variety and style. These high temperatures may be difficult for home winemakers to achieve. Using insulated fermentation vessels will help retain the heat generated during fermentation, and tank electric heaters or use of heat exchange coils circulating hot water might also be options to explore.
I always tell my students that there are a million different ways to make wine. This maxim holds true for maceration options as well. Besides the options mentioned earlier: Punchdowns vs. pumpovers and maceration frequency and temperature, some winemakers employ techniques such as cold soaking, extended maceration, and carbonic or “semi-carbonic” maceration. We’ll cover each of these options in more detail next, with the help of some commercial winemakers. I contacted Kirsty Harmon, Winemaker at Blenheim Vineyards in Virginia; Elizabeth Clark, Winemaker at Airlie Winery in Oregon; and Peter Bell, Winemaker at Fox Run Vineyards in New York to ask their opinion and use of these techniques. We’ll cover a brief overview of each technique, followed by opinions and commentary from our commercial winemaking team.
Cold Soak
Cold soak is a technique utilized after destemming and crushing, but before primary fermentation begins. The skins and seeds are “soaked” in contact with the juice, but the temperature of the must is kept low, 40–50 °F (4–10 °C), so that alcoholic fermentation does not advance. When cold soaking it is also often recommended to add sulfur dioxide during crushing and to utilize dry ice and a cover on top of the must to prevent oxidation.
I looked up this technique in the Oxford Companion to Wine and besides the basic definition there isn’t much to say about cold soaking other than it is popular in Pinot Noir production. One could imagine that in an era before commercial yeast was readily available, cold soaking was simply part of the process in Burgundy, where the fall harvest temperatures could be quite cool. It would certainly take some time for native Saccharomyces yeast to grow enough cells to develop a cap in an unheated wine cellar. Emulating Burgundian winemaking methods is perhaps why Pinot Noir producers have continued to utilize this technique.
Cold soak duration is generally overnight to several days, but usually not more than a week. Even though the temperature is low enough that alcoholic fermentation is inhibited, other microbial species may be capable of metabolism in this temperature range. Thus it is still recommended to macerate during cold soaking either with punchdowns or pumpovers to ensure unwanted microbes are inhibited. Practically speaking this can be somewhat arduous because grape must without a cap is much more difficult to punchdown!
Winemaking textbooks recommend rapid heating to standard fermentation temperatures and inoculation with a commercial yeast strain once the cold soak duration is complete. The danger is that a prolonged period of moderate temperatures could slow Saccharomyces metabolism and allow other microbes to metabolize sugar in the must. This brings to mind a couple of practical problems with many cold soaks, particularly for the home winemaker: The ability to maintain a low temperature and the ability to rapidly heat the must to fermentation temperature. Especially in warmer climates, it can be difficult to keep a cold soak cold. Thus, what may occur in practice is a “lukewarm” soak, which could end up promoting the metabolism of non-Saccharomyces strains that produce unwanted aroma volatiles like ethyl acetate (nail polish remover or solvent aroma). Similarly, even if cold temperatures can be maintained, a long warming period prior to fermentation also leaves the must susceptible to unwanted microbial metabolism.
There is conflicting research data on whether conducting a cold soak is beneficial in terms of color extraction, but most research seems to show little difference in color, or even a slight color loss, between cold soak and standard maceration schedules. Similar research has shown a slight decrease in tannin extraction when cold soak is utilized, but this technique remains popular in some regions and with certain grape varieties. We mentioned Burgundy and Pinot Noir earlier, and the idea of cold soaking appears to have initially spread to Pinot producers in Oregon and California as well. In addition, the technique has now expanded to Cabernet Sauvignon and Syrah producers in the U.S. and, according to the Australian Wine Research Institute (AWRI), is also popular with Australian producers of many different grape varieties. Tim Patterson wrote an excellent article on cold soaking several years ago in Wines and Vines covering much the same ground, and he also mentions at several points that research into cold soak is inconclusive. So it begs the question if more research may be needed on this technique.
Besides the possible impact on color, some winemakers also like cold soaking because they believe the added time before active Saccharomyces fermentation may give other beneficial microbes a chance to increase the aroma complexity of the wine (similar to non-inoculated, or “native” fermentations). There is some research evidence for the benefit of multi-microbe fermentation, so much so that several commercial yeast suppliers now also offer non-Saccharomyces strains for pre-fermentation or early fermentation use. Still, for home winemakers this technique may present more risk than reward.
Elizabeth Clark cold soaks both red varieties she produces, Pinot Noir and Marechal Foch. Elizabeth says, “While I don’t think it’s particularly necessary for either tannin extraction or color extraction with these two red varietals, I do think there is increased aromatic complexity. As it is difficult for us to do a true cold soak, we get more of a ‘cool soak.’ I have been experimenting with some of the non-Saccharomyces yeasts like Gaïa™ (Metschnikowia fructicola from Scott Labs) to provide some microbial protection while increasing aromatics.”
Kirsty Harmon does not use a cold soak in her winemaking protocol, except for rosé production. Rosé wines need to spend some time on the skins to extract color, of course, and performing this skin contact at cooler temperatures can help limit tannin extraction and prevent fermentation before cold settling is complete. Kirsty’s view is that, “I know that it is a popular technique, but I don’t like the risk that you take by keeping fruit cold for an extended period of time.”
Peter Bell also does not utilize a cold soak phase in his winemaking, stating that research has shown no benefit in color or tannin extraction, and “unless you go crazy with oxygen exclusion during the cold soak, you’ll probably see an increase in ethyl acetate in the must. Then there’s the issue of having to warm the must up before inoculation.”
In summary, cold soaking doesn’t really impact color but might be an interesting method to try if you’re adventurous and interested in trying to expand the aroma complexity of your wine. The safest way to experiment with this method is to utilize some of the non-Saccharomyces yeasts that are currently sold for this purpose, and to limit oxidation as much as possible.
Extended Maceration
Extended maceration is a technique where the skins and seeds remain in contact with the newly fermented must well past the end of primary fermentation, often anywhere from a week to 30 days post-fermentation, and for some adventurous winemakers even longer. The Oxford Companion has even less information on extended maceration than cold soaking, but an AWRI article on the topic mentions it is a traditional technique used in the Burgundy, Bordeaux, and Rhône Valley regions of France, as well as in the Piedmont region of Italy. An AWRI survey in 2009 found it was quite common with Australian producers and most commonly used on Cabernet Sauvignon, Syrah, Merlot, and Pinot Noir. I’ve seen it used in California on both Pinot Noir and Cabernet.
Allowing the newly fermented wine to remain in contact with skins and seeds using extended maceration has been shown to increase the percentage of seed tannin and the overall tannin level. Anecdotally, winemakers also describe a change in tannin perception at the end of extended maceration where the aggressive tannin of a well-extracted red wine mellows and becomes softer and smoother.
Extended maceration is a bit of a gamble if you’ve never tried it before. It should only be performed with grapes that have ripe seeds, because unripe seeds can extract too much and very harsh tannins (the fully developed seed coat is thought to slow tannin extraction). Care needs to be taken to limit oxidation and the potential for spoilage, since fermentation is no longer creating carbon dioxide. Thus extended maceration should be performed in a closed tank, and preferably one that is either full or periodically purged with an inert gas. As a result, I’ve only seen extended maceration performed in closed top tanks or tanks with variable capacity lids. Without this equipment it would be difficult for home winemakers to utilize extended maceration without oxidation concerns, however there are many different sizes of variable capacity tanks available to home winemakers. When I make red wine at home I use food-grade trashcans for fermentation, which would definitely leave the must susceptible to oxidation if I tried this technique. Besides limiting oxidation, extended maceration must also be monitored by tasting the wine every few days to determine the optimum time to press the wine off the skins.
Kirsty doesn’t normally use extended maceration in her winemaking because of the stylistic choices she makes with her red wines. “I am hoping to make fruit-forward wines that have some tannin, but I don’t want overly astringent or tannic wines, so I press as soon as Brix are reading negative numbers. All of the wines that we make here are in barrels less than a year and bottled before the following harvest. I think if I were hoping to make more structured wines with more aging potential, that extended maceration might be a tool that I would consider.”
Peter is also not a fan of extended maceration because he produces cool-climate reds where, like Kirsty’s wines, maximum tannin extraction is not a focus. Peter states that, “The aim is to continue to extract phenolic compounds from the must, and perhaps initiate a cascade of polymerization reactions in the wine. Research indicates that for this to work at all, maceration has to be for weeks or even months rather than a few days. During that time, you are asking a lot of different microbes to the party.”
Elizabeth also does not use extended maceration, perhaps due to the limited number of red varieties she produces. “The few Pinot Noirs I have tried where it was done have not tasted good to me. I find them overly tannic and bitter and less fresh tasting. My understanding is that thicker-skinned varietals such as a Cabernet Sauvignon do quite well with extended maceration and that it’s necessary to start the process of actually smoothing out the tannins.”
So, extended maceration might best be suited to winemakers making high-tannin reds, and who have the patience and storage capacity to perform this technique without damaging the young wine.
Carbonic Maceration
Carbonic maceration is a relatively recent addition to the winemaking toolbox, with experiments by French researcher Michel Flanzy documenting the technique in a production capacity in 1936. Carbonic maceration is a technique where whole clusters of fruit are placed in a sealed tank that has been purged with carbon dioxide gas. Enzymes in the grape berry will naturally break down the skin of the berry and convert some sugar into ethanol. The tank is also kept quite warm, perhaps around 90 °F (32 °C), which helps with the enzymatic breakdown of pulp and skin tissue. After about one week of time, depending on the maximum temperature achieved, the tank is emptied to press and a traditional fermentation is continued following pressing. This technique produces very fruity wines (some call it fake fruit or “Jolly Rancher” aromas). However, the wines usually have only a moderate amount of color and low tannin.
I haven’t seen many producers practicing full-on carbonic maceration outside of Beaujolais, the French region that made this technique famous with their Beaujolais nouveau style. The Oxford Companion states that while Beaujolais is the most prominent region for carbonic maceration and Gamay the most popular grape variety utilized, the technique is also practiced in southern France on grape varieties like Carignan. Still, I have met winemakers, especially in Oregon, who talk about utilizing some percentage of whole-cluster fruit in the bottom of a fermentation vat as a “semi-carbonic” process. I’ve also heard some winemakers describe destemming berries, but not crushing them, as giving a bit of carbonic fruit lift to their fermentations.
Research has shown there are definitely organoleptic impacts on wines treated with the full carbonic maceration protocol. The effects are so dramatic that one need only compare a Beaujolais nouveau to a common Beaujolais Village wine to see, smell, and taste the differences. There’s also some research showing differences in wines that were destemmed vs. whole cluster fermentations, with whole cluster fermentations showing less color but higher total phenolics. When evaluating the impact of whole cluster fermentation vs. carbonic maceration or standard maceration, it’s a bit difficult to separate differences in any impacts that might be coming from carbonic maceration in the berries versus the extraction of aroma and flavor coming from the included stems. Limited amounts of research regarding whole berry fermentations versus crushed fruit show subtle differences in color and phenolics (flavor differences were not categorized).
Our commercial winemakers had a lot more to say regarding carbonic maceration, whole berry, and whole cluster (also called stem inclusion) fermentation techniques.
We will start with Peter’s take on carbonic maceration:
“In its classic iteration, carbonic maceration does not seem to work well at all outside of Beaujolais — the wines are thin and disjointed. I have experimented with adding some destemmed, whole berries to fermentations. The main effect seems to be drawing the fermentation out for a few more days, which may favor the production of certain yeast metabolites. I am skeptical that the berries themselves are actually undergoing enough of a true enzymatic fermentation to influence wine flavor. Even if this is happening, who really wants cinnamaldehyde and isoamyl acetate [cinnamon and banana aromas]?”
Elizabeth has also experimented with carbonic and partial carbonic techniques and considers whole berry destemming an important parameter:
“I have done true full-on carbonic maceration in the past and it was very difficult with floating lid tanks to keep them sealed and full of CO2. I suspect a fixed capacity tank would be easier but I have no idea how one would load it with whole clusters. It does provide a distinctive flavor/aroma profile and in my experience of working with Gamay Noir and Pinot Noir generally masked the varietal. I don’t generally add whole clusters to my red ferments but we have a very gentle destemmer, which leaves lots of whole berries and as our punchdown/pumpover regime is quite delicate we get a certain percentage of berries that go through a form of carbonic maceration. Certainly when we changed destemmers (to the more gentle destemmer) there was a great increase of fruitiness and black pepper aromas and a touch of confectionery. The wines are rounder and softer as well, but I think that is more due to the fact that the seeds tend to stay in the berries longer so I have less seed tannins in the finished wine.”
Kirsty has experimented with full carbonic and semi-carbonic maceration and has included a link to some of her own research on this topic.
“I really like using whole clusters and whole berries in fermentations and have experimented quite a bit with carbonic maceration. I started trying to utilize as full-on carbonic maceration as I can get a few years ago. I have a small tank that I can load 0.75 ton (680 kg) of whole clusters in and then gas continually. I don’t have the ability to control the temperature of this tank, but after 7–10 days outside with gas on constantly, I’m able to get pretty fizzy intact clusters out of it that I then destem and ferment (two punchdowns a day) as normal. As part of the Winemaker’s Research Exchange, we’ve been able to do some sensory analysis each year to confirm that the wines are statistically different. The group has done several carbonic/carbonic-type experiments over the years.
“I do think that even semi-carbonic maceration is important in the winemaking here and do think that it leads to fruitier wines. I originally tried experimenting with more carbonic maceration as a way to try to increase complexity as well as mid-palate structure, and have really liked the outcomes. I generally do not crush any fruit, just destem.”
So, from a home winemaking perspective trying to experiment with destemmed-only whole berries might be an interesting first step into the world of carbonic maceration. Newer commercial destemmers, and mechanical harvesters for that matter, have come a long way with gentle handling of clusters and are capable of destemming with a surprisingly large percentage of whole berries. At the top end of the home winemaking price range are some “gentler” destemmer-only models (one example goes for $2,500, for instance, vs. about $1,500 for stainless home crusher/desemmers). Traditional small-scale destemmer/crushers will crush the fruit first, so if you, or your winemaking club, doesn’t want to splurge for one of these destemmer-only models it might be necessary to ask a larger local producer, or your local winemaking shop, to destem the fruit for you.
Another option for home producers might be to attempt carbonic maceration with whole cluster fruit in a tank that can be sealed, like Kirsty’s method. Poly tanks with large access lids might work, or a food-grade 55-gallon (208-L) drum with a removable lid, but as Elizabeth mentions getting the whole clusters back out of the tank could be difficult without a way to tip the tank. Once a suitable tank and emptying method is found you would also need a way to purge the tank, at least daily, with carbon dioxide during the carbonic maceration period. WineMaker Technical Editor Bob Peak shared that he’s found a technique that worked for him: “I had some success with my one experiment in a 26-gallon (100-L) variable capacity tank. I ran a CO2 line from the bottom of the tank prior to loading in whole clusters, then brought the tube out through the fermentation lock hole in the lid and over to the CO2 tank. I burned a votive candle on the lid before charging with gas, so when the candle went out, the tank was flushed.”
Part of the fascination and excitement of being a winemaker is trying to figure out the logic puzzle of how your best fruit expression may be achieved with the fruit quality, equipment, and techniques available to you. As my father used to say to me when we ran into difficulty refurbishing hot rods together, there is more than one way to skin a cat. Good luck in finding your own best practices for making exciting and flavorful wines this harvest!