Q. I’m working on a batch of homemade Chardonnay and added oak chips during aging. I went a little heavy-handed, because now it smells and tastes like licking the inside of a barrel. Is there anything I can do to fix the flavor at this point, or am I stuck with a wine that’s more lumber than lemon?
Shelly Porter
Boise, Idaho
A. You’re not the first winemaker to tumble into the oak pit. The short answer is: No, you can’t take the oak out — but you can try to balance things with a smart blend.
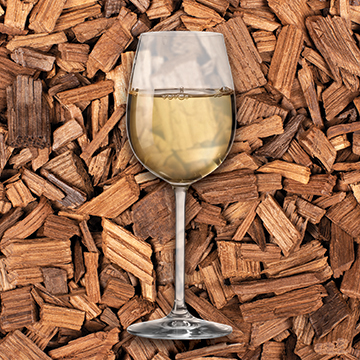
Oak additives like chips, cubes, or staves bring a lot of personality to the party, and they don’t wait around to be noticed. Especially with chips (which have a high surface area and tend to extract quickly), it’s easy to go from “nicely structured” to “tongue full of toothpicks” before you realize it.
At this point, the most practical solution is to blend your over-oaked Chardonnay with a similar wine that hasn’t seen any oak. Even a relatively small percentage of unoaked wine can freshen the aromatics, soften the wood tannins, and bring back some of that fruit expression you’re probably missing and wishing you still had.

Here are a few blending tips:
Start small with a bench-blend in 50 mL aliquots: Try bench trials with 5% to 25% of the unoaked wine to see what works.
Let the blend meld overnight, in a topped-up small bottle, if possible: Oak character can integrate a bit better over time, so give your trials a day or two before making a final call.
Evaluate the results. Do side-by-side tastings of each trial to really understand the results. Taste with food also — sometimes oaky wines behave differently alongside salty or fatty dishes (this can help you imagine real-world drinkability).
For next time, oak additions are best approached as a slow build. Think of them like salt in a soup: Easy to add, impossible to take out.
As a rough guide:
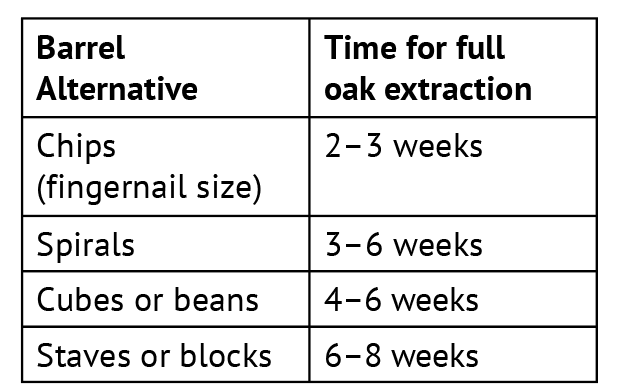
The smaller the oak additive, the faster it gives up its goodies. My advice? Start with half the rate suggested on the packaging or on the supplier’s website and taste every week. A couple of weeks in and you’ll often get a clear picture of where the wine is headed. Wait another week or so and taste your batch again. If you like the direction, you can always add more. Patience pays off here.
And don’t forget — oak is just one of many tools in your winemaking belt. When in doubt, less is more. Good luck on the blending trials and outcome. Your lumberyard wine might just turn into a beautiful porch sipper yet.
Q. I’ve been making wine at home for a few years now, but I still get overwhelmed when it comes to choosing yeast strains. There are so many different options out there — some with descriptions I don’t really understand. How do I pick the right one for my wine style, and what happens if I just use the same one for every batch?
Mallory Greene
Asheville, North Carolina
A. Yeast selection is one of those underappreciated levers in winemaking that can really shape your finished wine. Flavor, aroma, mouthfeel, fermentation kinetics, and even clarity are all on the table. And you’re right, there are a lot of choices. Luckily, each strain generally falls into a few broad functional categories, which can help simplify your decision-making process. Let’s go over a few yeast “personality types” you’ll often run into:
1. Workhorses (High Alcohol Tolerance & Fermentation Reliability)
These yeasts are great if you’re working with a must that’s high in sugar or likely to be nutrient-deficient. They’re less likely to stall out and tend to finish dry. These strains are especially helpful if you’re fermenting late-harvest grapes, fruit wines, or anything where sugar levels climb into the 25+ °Brix range. Some popular examples:
EC-1118 (Lalvin) — Often used in sparkling wine, cider, and mead production. Neutral aromas and good SO2 tolerance. A true all-around yeast.
QA23 (Lalvin) — A nice aromatic choice, used for whites and rosés with good alcohol tolerance (up to 16%).
2. Aroma-Enhancers (Unlocking Precursor Compounds)
Certain yeast strains are known for their ability to cleave aroma precursors (like thiols and terpenes) through enzymes such as beta-glucosidase or beta-lyase. These strains are especially helpful with aromatic varieties like Sauvignon Blanc, Riesling, or Muscat, where unlocking floral and citrus notes is the name of the game.
Look for strains that mention “aromatic release,” “terpene release,” or “thiol expression” in their descriptors. These are often your secret weapon for lifting the nose on an otherwise quiet wine. K1-V1116 (Lalvin) is an example, as is QA23, mentioned above.
3. Hybrids & Non-Saccharomyces (Complexity Builders)
More recently, winemakers have been experimenting with mixed fermentations or “hybrid” strains that include both Saccharomyces cerevisiae and other yeast species (like Torulaspora delbrueckii or Lachancea thermotolerans). These bring added complexity, texture, or even acidity shifts to the final wine. These strains often come with more specific instructions (like requiring co-inoculation or temperature control), but they can be a great tool if you’re ready to branch out. It is still difficult to find these strains available in small-scale quantities, but they are becoming more popular so hopefully they become available in sachets soon.
To address the second part of your question: Can you just use the same yeast for everything?
Technically, yes, but you might be limiting yourself. If I had to choose one “desert island” yeast I would definitely go with EC-1118, AKA “Prise de Mousse.” In fact, most wine kits come with this yeast, no matter the varietal or style, simply because it will get the job done and is neutral in character. However, I like to think of yeast like paintbrushes: Sure, you can use a basic round brush for everything, but once you learn what a fan brush or palette knife can do, your creative options really open up.
If you’re new to choosing strains visit yeast company websites, which allow you to compare yeast types. You’ll also find tech sheets that explain things like alcohol tolerance, temperature range, nitrogen needs, fermentation speed, and aroma contributions.
If you’re not ready to experiment mid-vintage, do some side-by-side trials next year. Split a 5-gallon (19-L) batch into two or three smaller carboys and pitch different yeasts. It’s one of the best ways to learn how dramatically one ingredient can change a wine.
Thanks for a great question — and happy fermenting. Yeast may be microscopic, but their impact on your wine is anything but small.
Q. I live in an area with very hard tap water. Sometimes I need to rehydrate yeast, and I’ve also read about people diluting musts to adjust sugar. Does it really matter what kind of water I use, or is any clean water good enough?
Raymond Delgado
El Paso, Texas
A. Great question — and you’re right to pause before filling up your winemaking bucket straight from the tap. While clean municipal water might be fine for drinking or dishwashing, it can introduce a few headaches when it comes to fermentation and long-term stability.
Let’s start with what “hard water” really means. Most of the time, hard water contains elevated levels of dissolved calcium, magnesium, and sometimes other trace minerals. While these aren’t dangerous in themselves, they can influence your wine chemistry in ways you might not expect.
One of the biggest concerns is pH. Water high in mineral content can buffer or elevate the pH of your must or wine, especially if you’re adding more than just a splash. Why does that matter? Because pH plays a major role in how wine behaves during fermentation and aging. Higher pH wines (anything creeping above 3.8 or so) are more prone to microbial instability. That means wild yeast, spoilage bacteria, or even film yeasts may find it easier to get a foothold, and your sulfite additions might not be as effective as you’d like.
Another factor that often gets overlooked is chlorine. Many municipal water supplies contain free chlorine or chloramines as disinfectants. While they’re great for keeping drinking water safe, they can spell disaster in your cellar. TCA, the dreaded “corked” wine defect aroma, is the result of certain fungi (like those naturally present in corks or barrels, for instance) interacting with residual chlorophenols in the winemaking environment. That musty, wet card-board smell can ruin a batch, and once it’s there, there’s no way to remove it. Even very small amounts of chlorine exposure can set the stage for TCA, and it doesn’t take much for your careful winemaking to end up smelling like a damp basement.
Commercial wineries are very careful about this. Most avoid chlorinated cleaning agents entirely and rely instead on sanitizers like peracetic acid, ozone, or hot water. For home winemakers, the risk often comes when topping up with tap water or using it to rinse carboys, spoons, or siphon hoses without a final rinse of clean, chlorine-free water.
It’s important to know if your water source is chlorinated or not. If so, you can buy hose or faucet attachments online which remove it. I recommend this for all home winemakers and small-scale wineries. Don’t forget to completely ban any chlorine-containing cleaning solutions and powders from your cellar environment.
Scale is another issue. Over time, that white crusty buildup you see on faucets or kettles can also form inside stainless steel fittings, tubing, or plastic siphon parts. Not only is it unsightly, but it can interfere with cleaning and even harbor bacteria if not removed properly. Many commercial wineries using hard water will periodically run citric acid rinses through their cellar gear to help dissolve mineral deposits. At home, I’ve had good luck using plain white vinegar, followed by a thorough rinse with filtered water.
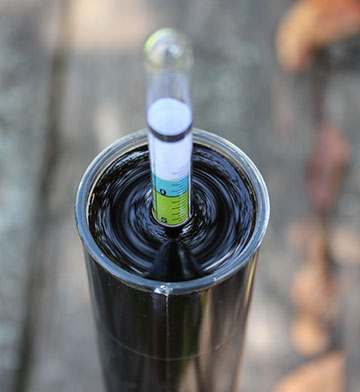
Hard water can also wreak havoc on your lab tools. For instance, if you use it to clean or calibrate a pH meter, the mineral content may leave residues that throw off readings. Same goes for hydrometers and refractometers — if there’s mineral buildup on the measuring surface, you won’t get accurate numbers.
So what’s a home winemaker to do? Here are a few quick guidelines:
For cleaning or calibrating lab equipment: Stick to distilled or de-ionized water. These are stripped of minerals and won’t leave deposits or mess with sensitive probes.
For rehydrating yeast or adjusting musts: Use clean, low-mineral water such as spring water, filtered water, or bottled water labeled as low TDS (total dissolved solids).
Avoid softened water from home water softening systems, which often replace calcium with sodium. Sodium is not great for wine, and too much of it can affect fermentation health.
Steer clear of chlorinated tap water for any application unless it has been properly filtered. An activated charcoal filter can help remove chlorine, or you can buy chlorine-free bottled water for peace of mind.
In short: Yes, water matters, and chlorine in particular matters especially. It might not be the first thing that comes to mind when you’re thinking about yeast nutrients, titratable acidity, or oak additions — but it’s the silent partner in many of your cellar tasks.
A little extra care in your water choices now can save you down the road from dirty buildup on equipment or the heartbreak of a corked aroma in a batch you worked hard to create.
Q. I’m making a Syrah from Washington state grapes, and things were going well at first — the ferment smelled great and was bubbling along fine. But now it’s stuck at 5 °Brix and hasn’t dropped in almost a week. I’ve warmed it up, punched it down, and even added a little yeast nutrient, but nothing seems to help. What’s going on, and what can I do to fix it?
Jon Melecki
Walla Walla, Washington
A. Ah yes, the mid-ferment stall . . . so common, yet always a bit of a heart-stopper. When fermentation slows or stops around 5 °Brix, it’s usually a sign your yeast are running out of steam. Stress accumulates as alcohol rises, temperatures fluctuate, nutrients deplete, or the pH creeps outside the comfort zone. The yeast may have started out strong but are now fatigued and struggling to finish the job.
Red wines like Syrah are especially prone to this because they often ferment hot and fast early on, then cool as the sugars drop and fermentation slows. It’s easy for a must to quietly drift from 80 °F (27 °C) to 65 °F (18 °C) without noticing, and this change is enough to cause some strains to stall — especially if they’re already under pressure from high alcohol or low nutrients. This is one reason many winemakers keep an eye not just on sugar and temperature, but also on the nitrogen content of the must before fermentation starts.
Nutrient depletion is a major cause of sluggish ferments. If your grapes were low in yeast assimilable nitrogen (YAN), and you didn’t supplement early on with a complete nutrient blend, the yeast may have simply run out of fuel. It’s especially important when using strains known for high fermentation vigor as these can have high nutrient demands. Rehydration nutrients can help yeast build healthy cell walls right out of the gate. Later, staged additions of Fermaid K or Nutriferm Advance (Enartis) during fermentation can prevent crash-outs by feeding the yeast exactly when they need it most.
There’s also alcohol toxicity to consider. Many Syrah musts start around 25–26 °Brix, which puts your final alcohol near 15% if it ferments to dryness. Not all yeast strains are built for that. Some will stall naturally around 14% unless you’ve selected one with high alcohol tolerance. For future ferments, you might explore robust strains like Uvaferm 43 (Lallemand), Fermol Premier Cru (AEB), or EC-1118 (Lalvin/Scott Labs), all of which are known for strong performance under challenging conditions.
Your pH could also be playing a role. If the must pH is too high — say, above 3.8 — yeast can behave sluggishly, and spoilage microbes may become more competitive. If you haven’t already, check your pH and consider a tartaric acid addition to bring it down closer to 3.6–3.7, giving the yeast a more favorable environment and improving microbial stability.
Since your fermentation has been stalled at 5 °Brix for several days, and warming and nutrient additions haven’t restarted it, you may need to consider building a yeast starter to re-inoculate. This isn’t something to do hastily. You’ll want to use a strong, alcohol-tolerant strain like the ones mentioned earlier, hydrate it carefully with Go-Ferm, then gradually acclimate it to your wine’s alcohol by adding small portions of the stuck wine over time. Once the culture is bubbling and fully adapted, you can add it back into the full batch.
Rather than outline every detail here, I recommend reading the previous WineMaker article “Restart Stuck Fermentations” by Bob Peak. It offers excellent step-by-step guidance, including how to build and scale a starter culture properly.
Looking ahead to your next vintage, prevention is key. Before inoculating, consider testing your must’s YAN and pH. Choose a yeast strain appropriate to your Brix and desired wine style. Always rehydrate dry yeast with nutrients to support healthy cell development and stagger your nutrient additions to give the yeast what they need when they need it. Daily Brix readings (two or even three times a day during the peak of fermentation) and temperature tracking will help you catch slowdowns before they become full-blown stalls.
Stuck fermentations are frustrating, but they’re also one of those winemaking moments where you gain a lot of practical knowledge fast. With the right tools and a bit of patience, I hope your Syrah finds its way to dryness — and that you gain confidence for whatever challenges next year’s harvest brings.

A fermentation is “stuck” when it fails to reach the desired conversion level of sugar, usually coming to a halt somewhere below 10 °Brix. It does not refer to a failure to start, which is a different issue. I used to have a lot of stuck fermentations at home but really haven’t had a problem for the last decade or more as my techniques improved: Hydration nutrient, two-step nutrient addition and the like.…
No matter how much attention we give a wine, sometimes it will disappoint when tasted for the first time during aging. It may not be faulted, just lacking a desired characteristic. That’s when it is time to intervene. Qualities like flavor, aroma, body, color, or even tannins can all be improved with a little help.

