Q My question is on the use of argon/CO2 to make-up for headspace in a carboy or tank. How does one know when you have placed enough to displace the oxygen? is there a method to color the CO2, for instance? I know some people cannot stand the smell of CO2, but it is very seldom I get a whiff. Also, when I place my stainless steel sparger instrument into the carboy all the way to the bottom, hit the valve for two seconds, and then rack into the carboy with wine, what sort of time frame is the wine still protected in, one month, two perhaps?
Ricker Olson
Billings, Montana
A Excluding oxygen by gassing headspaces and purging containers is one of the most important winemaking jobs we have. Oxygen exposure during aging can create all sorts of problems from premature oxidation and loss of aroma to spoilage microbe growth. The tough part is just what you mention — how do we know, with our own unique bottles, carboys, kegs, and barrels (not to mention the PSI and size of our gassing setup) that a barrel or carboy is “gassed” enough for the job? Sadly, there is no easy answer because as I’ve intimated there are so many unique factors involved. I can, however, provide a solid set of guidelines to help you make the best decisions for any situation you may encounter while racking.
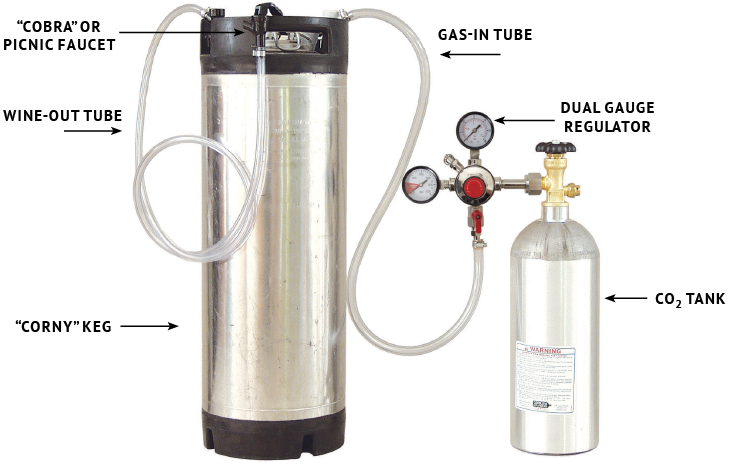
We “gas the headspace” using inert gases heavier than air, typically argon and carbon dioxide gas. Nitrogen is sometimes used in the commercial winemaking process to push hose lines, etc., but since nitrogen has about the same gas density as air (nitrogen has 1.25 g/L to air’s 1.29 g/L) it’s not terribly practical for blanketing headspace. Carbon dioxide is indeed heavier than air (1.98 g/L) while argon clocks in at 1.78 g/L, making them both great candidates for this kind of work. Carbon dioxide, especially under cold conditions, however, will readily dissolve into wine so argon is the best gas to use as a wine approaches bottling (unless you want a little extra fizz).
Like I said, there’s no way to fully exclude oxygen from headspace as there will always be a little mixing. Think of it as if you’d be pouring heavy cream into coffee or making one of those fancy layered cocktails with different colors. Your aim is to layer the heavier gas on top of the wine’s surface with as little turbulence as possible, in order to avoid mixing the argon or carbon dioxide in with the lighter air above.

Here are some blanketing tips:
- Introduce gas very slowly. Start regulator at 0 psi and just crack open to a very low pressure setting.
- You want the gas to be exiting at a low rate so as not to cause a big mixture of your gas and the air in the headspace.
- Meter in the gas parallel to the wine surface, not directly down onto it. If you blow your gas directly down onto the surface of the wine, it’ll just rebound up, creating a jet-wash effect. You can avoid this by fitting a “T” onto the end of your hose or pipe, so that the gas is blown (gently . . .) parallel to the surface of the wine, which will again help avoid that turbulence.
- Use the largest-sized hose possible.
- Many wineries use a “bell” type device that fits over the end of the hose or a type of cone fitting that allows the gas to exit in a controlled, non-turbulent manner rather than a small hissing stream, which would just get mixed in with the air.
- Use the “flame test” to test for the presence of a gas blanket: Using a long-stemmed lighter or BBQ match, lower the flame down into your carboy, keg, or barrel until it’s snuffed out. That’ll allow you to see where the oxygen starts to be excluded. It’s imperfect but, absent an oxygen meter, is a pretty good way to approximate it.
If you’re gassing a 750 mL bottle, then a two-second slow pulse is probably enough. The bigger the containers get, as you might imagine, the more gas you need to introduce to create an effective layer on the surface of the wine. Sadly, the blankets don’t last that long. I gas headspaces at least twice a month in my winemaking.
There are always some safety concerns to take into account when using inert gases. Never use them in confined spaces. The very things that make it great for winemaking (odorless, tasteless, non-coloring) make it a potential hazard. Always have a high degree of ventilation in your work area and when in doubt, get out.
If you are going to “purge” a container (i.e., fill it up with gas before filling with wine) always make sure you’ve got a vent — you don’t want to blow up a container in the name of preventing wine spoilage!
Also be aware that using gas for blanketing is never as effective as a completely full carboy, tank, or barrel; there will always be some level of mixing between inert gases and air because while yes, they’re heavier, they’re not going to create a 100% “seal.” Keeping your vessels fully topped-up is really the only way to make sure the wine isn’t getting unnecessarily oxidized or that air-loving spoilage microbes won’t get in and gain a foothold.

Q In this great article about Syrah: https://winemakermag.com/article/648-super-syrah, I found the following: “Syrah needs a warm fermentation, at least a day or two with a temperature in between 80–90 °F (27–32 °C).”
That got me thinking, how should one measure the temperature of the fermentation? In the cap before punching down (that’s not an average temperature but a local maximum), or on top of the cap after punchdowns, or someplace else?
I tried to search for the measuring process but have not found one yet. Could you please point me to an article that describes it, if there is one?
Zoltán Németi
Budapest, Hungary
A That is a great question and I’m really glad you asked. Sometimes when those of us who have been making wines for quite some time write about some technique, process, or concept that we may think of as “simple,” we need to rethink for a moment that how we describe something might not be so obvious to everyone. I think your instincts are pointing you in the right direction. During an active fermentation the cap (the grape skins that float to the top of the vessel) can get very hot and so the cap’s temperature is definitely not indicative of the temperature of the entire must/fermentation.
I’m not aware of any specific article that points to “how to measure the temperature of a fermentation” but I’ll pass on to you what I know from how I was trained over many harvests and how I still conduct temperature measurements today. Like you say, the cap is always a local temperature and during the peak of fermentation, when we want to make sure we’re getting a red fermentation warm enough to extract “the good stuff” (anthocyanins, tannins, etc.) but we don’t want it so hot that the yeast start to be inhibited (no one wants cranky yeast), the cap will always be hotter than the juice below. This is why I will only “take the temperature” of the overall fermentation after a really good punchdown or pumpover, after the tank is well mixed.
Let’s say you’ve got your fermentation going in a one-ton (910-kg) macro bin and it’s been ripping along at about three °Brix drop per day and is now at about 10 °Brix. This is just about at peak fermentation time. I’d wager the cap would be super-hot and the wine would be slightly cooler below. Give your macro a big punchdown, going over the surface at least twice, very vigorously. Then, sink your cylinder or sample-collecting device underneath the cap about 2⁄3 of the way down (covered with your hand), let it fill, and bring it back up. That’ll give you a good idea of the overall, mixed temperature of that fermentation. That’s the 80–90 °F (27–32 °C) range you want to try to hit. In a stainless steel tank, you’d do a decently long pumpover to mix the tank well and then would take a sample from the sample valve, which is usually about 1⁄3 of the way up from the bottom of the tank. Winemakers may have their own specific definitions or techniques, but I’m pretty sure most of us mean a “well-mixed, just-punched-down” temperature when we talk about starting, finished, or peak fermentation temperatures.
Q I have a question regarding the article, “Volatile Sulfur Compounds and Hydrogen Sulfide in Wine,” written by Daniel Pambianchi in the April-May 2017 issue. I have used copper tubing, along with racking and aeration, with success to remove H₂S odors. When H₂S odors are detected, I rack/aerate and place a copper tube in the carboy until the odor has dissipated. There was no mention of this technique in the article. My question is, if there is a strict limit of using CuSO₄, is there also a limit to using copper (e.g., how much copper tubing to use for a period of time)? Also, does the copper dissolve into the wine or does it simply chemically react to the wine?
Greg Meyer
Brush Prairie, Washington
A Ah yes, the classic “I sunk a bunch of pennies in my carboy” tale. Forgetting for a moment that modern pennies contain very little copper, there’s a reason that most winemakers I know don’t use brass fittings or copper equipment anymore. It’s because it is indeed impossible to really know how much elemental copper you’re releasing into your wine.
In high doses, copper is indeed poisonous and there’s a very good reason that those gorgeous old Victorian cooking pots you see in antique stores are lined with shiny tin. It’s because Mrs. Crumbie the Cook wouldn’t want to inadvertently give the Master and Mistress of the house copper poisoning with a poorly lined saucepan (on second thought, who’s to say, maybe she would). Regardless, I don’t want you poisoning yourselves or your loved ones so it’s always best to carefully measure copper sulfate (CuSO₄) into your wine rather than rely on copper-containing objects or equipment.
The TTB (Alcohol and Tobacco Tax and Trade Bureau) website states that as of 2020, “The quantity of copper sulfate (calculated as copper) must not exceed 6 parts copper per million parts of wine (6.0 mg/L). The residual level of copper in the finished wine must not exceed 1 part per million (1 mg/L).” Copper from brass fittings or copper equipment does indeed react with wine and certainly can contribute to residual dissolved copper in finished wines. How much copper gets into your wine is dependent on a multitude of factors. One, as you mention, is contact time. The others include, but are not limited to, temperature, copper content of the metal item in question, surface area of the metal, the pH of your wine, the alcohol content of your wine, etc. As you can see, it’s quite unpredictable.
Now, do I think there’s anything terribly wrong with, while doing a pumpover, using a copper screen in the tub for a minute or two or racking a young wine by passing it through a hose with a copper fitting? Not really. I do think that leaving copper-containing objects in containers for any length of time over a few minutes is risky and don’t recommend it, especially if a wine is approaching bottling. Fermenting, young wines have their entire lives in carboy, keg, or barrel to precipitate and “drop out” copper-containing solids over time and are much less likely to end up with an unhealthy amount of residual copper in a finished bottle. Wine that is ready to bottle doesn’t have the luxury of time and so is quite sensitive to potentially big doses. Do you really want to chance it? If you can pick up some diluted copper sulfate solution (I usually buy a 1.00% solution) and have some small-gauge pipettes (1 mL or smaller), you’ll be able to do bench trials and measure in small amounts of copper like a pro, without any fear of having any toxic residues in your wine.
Q What is the proper psi for carbonating dessert wine? Residual sugar is about 8 degrees Brix. Thank you for your time.
Jessica Laminack
Fruithurst, Alabama
A If you’ve got a carbonation setup at home that you use for your homebrew, cider, mead, or kombucha, you certainly can fizzy up some wine products for yourself. I like your idea of using a dessert wine, because the sugar in sweet wines can balance out the sensory “sharpness” of bubbles, possibly leading to a very harmonious outcome.
I think you should experiment a bit with the level of carbonation; starting low and turning up the pressure gradually can be a good way to come to the perfect balance point. The first thing to do is to think about your serving temperature. The laws of physics tell us that a colder product will hold onto dissolved gas more readily than a room temperature one. Especially if your dessert wine is a white or a rosé, I’d guess you’d plan to serve it at least slightly chilled (54–56 °F/12–13 °C) if not all the way down to refrigerator temperature (37 °F/3 °C). Why not really “chilled,” like 50–52 °F (10–11 °C)? Try a range to find what best suits your wine, but I like to never serve dessert wines too cold, even whites. This is because if you chill it too much, delicate aromas are repressed and all you experience is a big whack of sugar on the palate with none of the retro-nasal nuance that should come with a well-made dessert wine.
If you’ve got a carbonation setup at home that you use for your homebrew, cider, mead, or kombucha, you certainly can fizzy up some wine products for yourself.
Assuming you’ll be serving it somewhere between 52–56 °F (11–13 °C), try 7–10 PSI, which, if you think in beer terms, is about the fizz level of where a stout or a porter would be. I would start there first before going higher, which you certainly can. Carbonation works best when you give the gas some time to dissolve into the liquid. Ideally, you’d have a temperature-controlled place where this can happen. At my house, we’ve converted an older “garage fridge” into the “beer fridge” where we keep our kegs and sparkling water. In fact, while I was pregnant with my two sons, my husband made me my own kegs of ginger-apple sparkling water, which was essentially well-diluted apple juice flavored with fresh ginger. We found that if we chilled it to 45 °F (7 °C) then carbonated it and waited a few days, the gas would integrate a lot better and the bubbles would stay nicely in the glass. I’m not sure of your particular situation but having a fizz-friendly setup like that certainly makes it easy to dial in your temperatures and carbon dioxide levels.
Can you make a sparkling sweet wine with naturally fermented carbon dioxide? For the other readers out there who might be wanting to experiment, sweet sparkling wine is made by a) backsweetening during the “dosage” process in the méthode champenoise or charmat traditional sparkling process, b) capturing residual carbon dioxide gas during an arrested fermentation, or c) injected into an existing sweet wine, as seems to be the case here. Doing naturally sparkling wine right can take quite a bit of specialized equipment and know-how, but it certainly can be achievable on a small scale. But it is a challenge none-the-less for many hobby winemakers. If you’re interested in making naturally sparkling wine, be sure to check out the article starting on page 24 on making sparkling wines via the pét-nat method.

Get some pointers and considerations a winemaker needs to keep in mind when topping off your aging wine vessels. The Wizard also answers questions on fining agents and malolactic fermentation after cold stabilizing a wine.
The Wine Wizard fields questions on eliminating (and avoiding) browning in red wines, malolactic fermentation test strips, and techniques for making wine from maple sap.

