Storing and Enjoying Your Kit Wine
Once you’ve mastered the art and craft of making kit wines, what do you do with them? Drink them, of course! We don’t need to teach you how to drink and appreciate wine, but there are some finer points to cellaring, decanting and pairing wine with food that you may findhelpful. Building a wine collection full of your favorite styles of wine, and with varied types that pair well with all kinds of food, will help you enjoy your home winemaking hobby more fully. It will also be available for the times you are entertaining guests — even in unplanned circumstances. Knowing when decanting your wine is worthwhile will come in handy when you have a lot of young wines on hand. (It will also give you an opportunity to use that decanter you got as wedding gift that, until now, has been sitting and gathering dust.) Finally, wine is the perfect complement to food. Picking the right wine for your meal should be a joy, but too many people worry that they are breaking some unknown rule or making a wine faux pax. We’ll remove the mystery — and hopefully any trepidation — over pairing food with your handmade wine.
If you’ve been making your own wine for a while, you’ve almost certainly experienced the Vandergrift Principle of Home Winemaking: consumption rises to meet all available sources of wine. The two most common things I hear from people trying a kit for the first time (in order) are, “I’ll never be able to drink thirty bottles of wine!” followed a month or two later by, “I have to make another kit — I’m all out of wine!”
The first complaint often turns into the second very rapidly because, while few people drink thirty bottles of wine by themselves in a single month, you’d be amazed at how many friends you suddenly have when you have wonderful wine that you made yourself and just how friendly they can be when you show up with a case of wine under your arm!
The solution is to build up a cellar of properly aged wines that you can count on when you need them. This involves a bit of cellar planning — which we’ll get into later — and some extra winemaking, but when you’re done not only will you never run out of wine again, you’ll always have the right wine available for any occasion, ready to drink, at your fingertips.
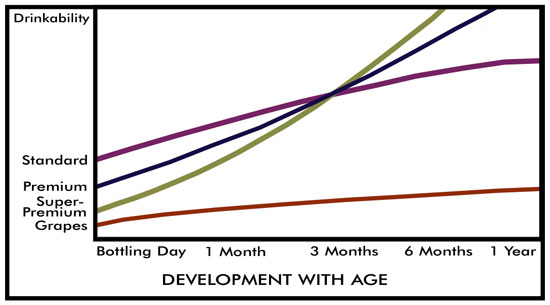 Standard kits, with a moderate amount of total solids are usually ready to bottle in a month or so. They taste a little less rough on bottling day and improve pretty well for at least a year. They level off sometime after that, but hold for a significant time before going into any kind of decline. These kits may trade a bit of long-term development for early drinkability, but that’s not necessarily a bad thing — especially if the cellar is bare!
Premium kits are much larger and have more single-strength (unconcentrated) juice and more solids. They usually require six weeks or more before they can be bottled. While premium kits aren’t as ready to drink immediately, they improve steadily for more than a year, and can really benefit from long-term aging.
Super-premium kits are usually the largest volume, are sometimes region or vineyard-designated and are typically the most expensive kits. They don’t show very well on bottling day, but they really pick up steam after a year. Most super premiums only really show their best after at least a couple of years or more.
Grape wines, with the highest levels of solid material are like teenaged boys: sullen and uncommunicative until one day, after an interminable-seeming wait, they open up and surprise you. Of course, your Cabernet Sauvignon isn’t going to eat you out of house and home or borrow the car and return it with the gas tank empty. Unless you use a terrifically aggressive fining and filtering regimen, the majority of grape wines are going to be pretty unlovable for the first few years. This is especially true for reds.
Three things about the chart: first, it’s not an accurate predictor of precisely how your kit wine will age. It’s actually here as a visual illustration of the tradeoffs between aging and early drinkability, so don’t quote me about one year versus two. Cellaring conditions vary so much that there’s no way to predict exactly how everyone’s wine is going to age.
Second, one chart can’t cover the aging potential for every company’s wine kit products. Some manufacturers place a high value on smooth, early drinking, and some favor a house style that tends towards longer aging, which rules out a dinner party on bottling day.
Third, you’ll notice a confluence of all of the wines at about three months. This is because the standard kits will have developed quite a bit of their final flavors in that time, and the premium and super-premium will have dropped quite a bit of their initial rough, green character. If you positively have to drink your wine early, try to wait at least three months before passing any kind of judgment.
Standard kits, with a moderate amount of total solids are usually ready to bottle in a month or so. They taste a little less rough on bottling day and improve pretty well for at least a year. They level off sometime after that, but hold for a significant time before going into any kind of decline. These kits may trade a bit of long-term development for early drinkability, but that’s not necessarily a bad thing — especially if the cellar is bare!
Premium kits are much larger and have more single-strength (unconcentrated) juice and more solids. They usually require six weeks or more before they can be bottled. While premium kits aren’t as ready to drink immediately, they improve steadily for more than a year, and can really benefit from long-term aging.
Super-premium kits are usually the largest volume, are sometimes region or vineyard-designated and are typically the most expensive kits. They don’t show very well on bottling day, but they really pick up steam after a year. Most super premiums only really show their best after at least a couple of years or more.
Grape wines, with the highest levels of solid material are like teenaged boys: sullen and uncommunicative until one day, after an interminable-seeming wait, they open up and surprise you. Of course, your Cabernet Sauvignon isn’t going to eat you out of house and home or borrow the car and return it with the gas tank empty. Unless you use a terrifically aggressive fining and filtering regimen, the majority of grape wines are going to be pretty unlovable for the first few years. This is especially true for reds.
Three things about the chart: first, it’s not an accurate predictor of precisely how your kit wine will age. It’s actually here as a visual illustration of the tradeoffs between aging and early drinkability, so don’t quote me about one year versus two. Cellaring conditions vary so much that there’s no way to predict exactly how everyone’s wine is going to age.
Second, one chart can’t cover the aging potential for every company’s wine kit products. Some manufacturers place a high value on smooth, early drinking, and some favor a house style that tends towards longer aging, which rules out a dinner party on bottling day.
Third, you’ll notice a confluence of all of the wines at about three months. This is because the standard kits will have developed quite a bit of their final flavors in that time, and the premium and super-premium will have dropped quite a bit of their initial rough, green character. If you positively have to drink your wine early, try to wait at least three months before passing any kind of judgment.
Nearly everyone has seen a decanter before, either the never-used crystal wedding gift on Mom’s China hutch, or in a stuffy British television show where the characters pass around a glass-stoppered vessel of deep ruby port while harrumphing to each other. But what’s the deal with decanters and decanting? Is it just for show amongst the pinkie-extending set, or does it have a place in improving the flavor and aroma of wine? Certainly the concept of “letting it breathe” is pervasive among wine drinkers, but what if I told you that one of the most revered and famous winemakers on the planet (Professor Émile Peynaud) thought that decanting was the worst possible thing you could do, and recommended against it? Okay, now what would you think if I told you I thought he was full of hooey — at least as far as kit wines are concerned? Who are you gonna trust, some French guy, or good old Tim? What’s a winemaker to do in the face of such controversy? As usual, my advice is to read on.
Food and wine pairing is something that first-time winemakers never seem to be comfortable with. Home winemaking books are curiously silent on the subject, which I think marginalizes winemakers. On the other hand, many of those glossy coffee-table books are full of dogma and high-falutin’ bushwah. Don’t despair, however; pairing food and wine is not complicated, and the few rules really aren’t rules — they’re just guidelines to help you get the most from your meal and your wine.
Matching your cellar to your wine-drinking needs is a topic whose importance is not always immediately recognized by many new winemakers. Building up a cellar of properly-aged wines is important if you wish to have wine on hand to pair with foods — along with all the other occasions when wine is called for. Specifically, it’s good to have a variety of ready-to-drink wines on hand for different meals, in different seasons.
In summer, most people want lighter fare on their table and the heat makes us crave cool, refreshing beverages. In the winter, hearty meals chase off the chill, as do robust wines. In the dog days of August, it would be nice to have a light, refreshment-type wine (like a fruit wine) and a good Port is a definite must for snowy winter firesides. For every season, there is a cuisine. For every cuisine, there is a wine. And, for every wine, there is — or at least should be! — a winemaker.
Keep in mind that, although I’ll give tips on picking the “right” wine, my intent is only to help you get the most out of your wine-drinking. If anyone tries to intimidate you about your wine choices, or insists that there is only one wine for any given occasion or food pairing, ignore them. According to “Vandergrift’s Rule of Conservation of Liver Capacity,” you can only safely drink a certain amount of wine. Wasting any of this allotment on wine you don’t enjoy is a tragedy. The best wine is always the one that you like, not the one that some snob intimidated you into drinking.
 Aging Gracefully
If you’ve been making your own wine for a while, you’ve almost certainly experienced the Vandergrift Principle of Home Winemaking: consumption rises to meet all available sources of wine. The two most common things I hear from people trying a kit for the first time (in order) are, “I’ll never be able to drink thirty bottles of wine!” followed a month or two later by, “I have to make another kit — I’m all out of wine!”
The first complaint often turns into the second very rapidly because, while few people drink thirty bottles of wine by themselves in a single month, you’d be amazed at how many friends you suddenly have when you have wonderful wine that you made yourself and just how friendly they can be when you show up with a case of wine under your arm!
The solution is to build up a cellar of properly aged wines that you can count on when you need them. This involves a bit of cellar planning — which we’ll get into later — and some extra winemaking, but when you’re done not only will you never run out of wine again, you’ll always have the right wine available for any occasion, ready to drink, at your fingertips.
It’s a mystery
It’s a little surprising to find out that although it’s been extensively studied, the process wine undergoes as it ages isn’t perfectly understood, although Erik Matthews did a great job of explaining what is known in the Winter 2001 issue of WineMaker. Don’t worry though, just because the process can’t be perfectly explained, it doesn’t mean you can’t observe the typical course of aging in your wine. You can use those observations to predict when your wine will peak, and when you’ll need to make more batches. The best course of observation is to make enough volume of wine that you can taste bottles from the same batch every couple of months over the course of several years, recording your impressions every time. Now aren’t you glad you made thirty bottles? Armed with some observations and a few hints from this article, you’ll be able to plan both for the coming drinking season, and the long-term. If you don’t have a couple of years to sort out some cellar notes, don’t panic. By judicious choice of the types of wines you make, you can get started early and even fudge a little when you run short or happen upon a wine-related emergency. The world, my winemaking friend, is your bivalve mollusk, so make some Sauvignon Blanc and get the hot sauce.How long to age?
Before we talk about cellar planning, I need to correct a funny impression that a lot of winemakers have: that when a wine is ready to bottle it’s also ready to drink. A quick trip through the local wine shop will correct this impression, because even the least expensive bottles are at least a year old, and anything with upscale notions is two, three or more years of age. This is because most commercial wines are intended for consumption within hours of being sold. If you’re like most winemakers — including me, sigh — you’re so eager to try out your new batch that you’re sneaking a “taster” bottle right away. Sadly, one-month-old wine is barely settled down into the bottle, much less had time to shed its youthful roughness, esters and general stinkiness. Luckily, most kit wines have an edge for aging time. This is because as a general rule, the lower the level of dissolved solid material in a wine, the faster it will age. Most kits are made from juice that’s been well clarified, and after fermenting they get a fairly aggressive fining regimen. This ensures that there aren’t a lot of solids to settle out and calm down before the aroma and bouquet of the wine can develop. Lower solids can, in some cases, limit the ultimate potential of the kit to achieve true greatness, so there is an element of trade-off there, but it’s a pretty fine point, unless you plan to hand wine down to your grandchildren. Astute readers, however, will notice how I said “most.” That’s because kits vary in size, price, processing times and levels of dissolved solids. As a very general rule of thumb, the bigger and more expensive a wine kit is, the longer it takes to make, the greater the amount of solids it has, the longer the aging time will be and the greater potential it will have to achieve high levels of flavor and aroma. Hopefully, the chart on the top of this page might shed some light on this.
Standard kits, with a moderate amount of total solids are usually ready to bottle in a month or so. They taste a little less rough on bottling day and improve pretty well for at least a year. They level off sometime after that, but hold for a significant time before going into any kind of decline. These kits may trade a bit of long-term development for early drinkability, but that’s not necessarily a bad thing — especially if the cellar is bare!
Premium kits are much larger and have more single-strength (unconcentrated) juice and more solids. They usually require six weeks or more before they can be bottled. While premium kits aren’t as ready to drink immediately, they improve steadily for more than a year, and can really benefit from long-term aging.
Super-premium kits are usually the largest volume, are sometimes region or vineyard-designated and are typically the most expensive kits. They don’t show very well on bottling day, but they really pick up steam after a year. Most super premiums only really show their best after at least a couple of years or more.
Grape wines, with the highest levels of solid material are like teenaged boys: sullen and uncommunicative until one day, after an interminable-seeming wait, they open up and surprise you. Of course, your Cabernet Sauvignon isn’t going to eat you out of house and home or borrow the car and return it with the gas tank empty. Unless you use a terrifically aggressive fining and filtering regimen, the majority of grape wines are going to be pretty unlovable for the first few years. This is especially true for reds.
Three things about the chart: first, it’s not an accurate predictor of precisely how your kit wine will age. It’s actually here as a visual illustration of the tradeoffs between aging and early drinkability, so don’t quote me about one year versus two. Cellaring conditions vary so much that there’s no way to predict exactly how everyone’s wine is going to age.
Second, one chart can’t cover the aging potential for every company’s wine kit products. Some manufacturers place a high value on smooth, early drinking, and some favor a house style that tends towards longer aging, which rules out a dinner party on bottling day.
Third, you’ll notice a confluence of all of the wines at about three months. This is because the standard kits will have developed quite a bit of their final flavors in that time, and the premium and super-premium will have dropped quite a bit of their initial rough, green character. If you positively have to drink your wine early, try to wait at least three months before passing any kind of judgment.
Which wines to make?
Of course the answer is to make the wines you like to drink. But one of the great things about kitting out a cellar is having an array of different wines for different purposes. If you’re a foodie, you need to have enough wines to cover a number of different menu choices. In a final article in this special issue, I discuss wine and food matching and map out some rules and recommendations about having a selection of light, medium and heavy whites and reds plus a bit of blush wines, Port, Sherry and sparkling to fill out your cellar. Keep in mind, however, the everyday needs of your table when you plan your cellar. For example, if you’re a vegetarian you may need less heavy, tannic red wines for food matching. If you’re a big meat-eater, concentrate on the big reds.But how do I get properly aged wine?
Aging is the key to adding more aroma, flavor, character and especially quality to your wines. A lot of home winemakers wind up drinking the last bottle of a batch just as it’s perfectly aged and most enjoyable. There are two ways to get ahead of the curve and build up some nicely-aged wines. The first involves a little math, discipline, and investment. I know, I know, it doesn’t sound like any fun, but if you can bite the bullet and do it, it’ll pay off. Use the cellar planning advice on page 72 to calculate your bottle needs based on your consumption patterns. The second way of pumping up your cellar is a little easier to swing: get a second carboy and double up your batches every time you make wine. Bottle one for your use, and put the other in the cellar. Staying on a regular schedule will maximize your use of equipment: idle carboys are nobody’s playground. Over the course of a year you should be able to get at least an extra six batches salted away for aging, making a good start on your cellar.Cellar Conditions
If you’re planning on cellaring your wine, you may wonder about the required conditions. Your biggest concern should be the temperature. Ideally, you should store wine around 50 °F (10 °C). However, you have plenty of wiggle room. If you can keep the wine at a steady temperature, temperatures within 10 °F (~5 °C) of this ideal should be satisfactory. The longer you plan on storing your wine, the more temperature matters. You may have heard that wine cellars should have a certain level of humidity. Many sources list 55–80% as an ideal range. For long-term storage of wine bottles sealed with natural cork, this is a good recommendation. Wine kits, howewer, come with synthetic cork, so humidity isn’t as critical — especially for wines that are not going to be cellared for years. Light will negatively affect wine over time. You don’t have to keep your kit wines cloaked in absolute darkness, but you should keep them somewhere relatively dark and certainly don’t store them where they receive direct sunlight. A final consideraton is vibration. If you don’t live over a subway line, you probably don’t need to worry, but think twice about storing your wines right next to large refrigerators or freezers. The vibration caused by a compressor starting and stopping may shake your bottles.
Enjoying your aged wine
If you’ve been paying attention, you’ve gotten to the end of this story and realized that you’ve walked into a trap. Remember the Vandergrift Principle of Home Winemaking? Consumption always rises to match available wine sources. But don’t worry — you can always make more!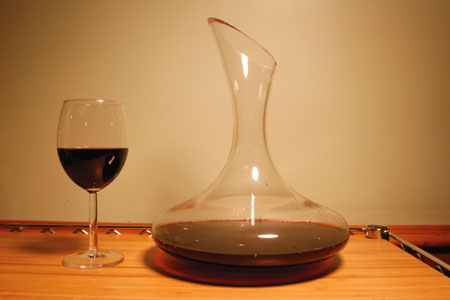 Decanting 101
Nearly everyone has seen a decanter before, either the never-used crystal wedding gift on Mom’s China hutch, or in a stuffy British television show where the characters pass around a glass-stoppered vessel of deep ruby port while harrumphing to each other. But what’s the deal with decanters and decanting? Is it just for show amongst the pinkie-extending set, or does it have a place in improving the flavor and aroma of wine? Certainly the concept of “letting it breathe” is pervasive among wine drinkers, but what if I told you that one of the most revered and famous winemakers on the planet (Professor Émile Peynaud) thought that decanting was the worst possible thing you could do, and recommended against it? Okay, now what would you think if I told you I thought he was full of hooey — at least as far as kit wines are concerned? Who are you gonna trust, some French guy, or good old Tim? What’s a winemaker to do in the face of such controversy? As usual, my advice is to read on.
Decanting in history
In the past, there was always some sort of decanter in any wine-drinking household. At first this was because wine was typically stored in large vessels, either giant clay jars, amphorae or barrels, and some sort of carrying vessel was needed to get the wine from the cellar to the drinker’s glass. Until the 17th century, wine was never stored, aged or transported in glass bottles — although the ancient Romans did use blown glass decanters to serve their wine. You can tell that the early 17th Century bottles were intended for serving wine rather than storing it, because they were often shaped like “onions,” with a globular body, flattened bottom and a very short neck — a shape that would never lie on its side in a cellar, even if there were a cork to fit it! In the 16th Century, the Venetians rediscovered glass-making technology and their wares spread across — and were widely copied by — the rest of Europe. Because corks were an exciting and newly emerging technology at the time, nobody had thought of using them to seal wine bottles, so blown or ground glass stoppers were included with some bottles to seal them up, at least temporarily. With a custom-made glass stopper for each bottle, it was imperative that the two not be separated — stoppers weren’t interchangeable. To that end, stoppers were wired or tied to each bottle. In order to facilitate this, a ring of glass was applied just below the top of the neck where the string was anchored. You can still see the vestiges of this system on the neck of almost every modern bottle in the form of a tiny rim around the top. In the early 1700s, people rediscovered something important: Vintages mattered and, if you could keep some of your best wines well-cellared, they improved dramatically. The best way to store the wine turned out to be in a glass bottle, sealed with that exotic new cutting-edge material, “cork.” While cellar aging was great for improving wine, it also lead to another condition — layers of “goo” in the bottle. Fining, stabilizing and filtration technology was not as advanced then as it is now and many wines would throw sediment, tartrate crystals (“wine diamonds”) or a haze during storage. The answer, of course, was decanting the wine into a clean serving vessel for the table, leaving the detritus behind. Another benefit of this was the ability of the host or hostess to decant all of the wines being served at a dinner party well before the guests arrived. They could then be displayed on the sideboard or table, ready for each course in turn. This custom is where the practice of using decanter labels (the Victorian name for these is “bottle ticket”) derived. These labels are small metal nameplates hung around the necks of the bottles — it would be a terrible crisis for the party hostess to confuse the Madeira with the Canary before the toast course!Modern decanters
While any clean food-safe vessel of sufficient capacity can be used as a decanter, modern folks are usually intent on either separating their wine from sediment or giving it an airing. To this end, most decanters are made of clear glass and are approximately 30–50% larger in volume than a standard bottle of wine. With an eye to the airing goal, the design usually allows for one bottle of wine (25.6 ounces, 750 mL) to fill them exactly to their widest point. These decanters ensure that wines open a maximum surface to air so that they are allowed to pick up the most oxygen. There are also cut-glass decanters, more for serving fancy spirits, and some specialty decanters that hold two bottles of wine (for magnums). Some very pretty models are shaped like Greek pitchers, with handles and pouring spouts while other decanters have perfectly rounded bottoms — so they can’t be put down on a table without a stand . . . some use this as an excuse to pass the decanter around until it is emptied!Decanting theory and practice one: Sediment
Virtually all modern table wine is intended for more-or-less immediate consumption and will never have the chance to throw any sort of haze or sediment. Vintage Port, however, almost always throws a “crust” in the bottle. This is because it is bottled very early in its evolution. Many vintage Ports need 10 or even 20 years before they’re ready to drink and in this duration will continue to evolve in flavor, aroma and appearance — dropping a thick layer of tartrate crystals, color compounds and polymerized phenolics (tannins, mostly). If you just poured the Port directly from the bottle, you’d wind up with a pretty hefty layer of aforementioned goo in the last three or four glasses. In this case, decanting helps present a wine in its best light. Decanting to separate the wine from sediment is done very carefully. First, the bottle is brought up from the cellar and stood upright for 24 hours, to allow all the sediment to settle. Next, a scrupulously clean decanter is readied, and the port is very slowly and gently poured into it. This can take as long as three or four minutes. The goal is to disturb as little sediment as possible. Towards the end of the bottle, the sediment will begin to flow down towards the neck. However, Port bottles have a strong drop-shoulder and, by keeping watch, you can stop pouring as soon as the sediment begins to flow towards the neck. There are some gadgets that are designed to help with the process. The traditional method is to hold a candle behind the neck of the bottle to help illuminate the flow of sediment — this has since been replaced by strong flashlights. Another tool, namely decanting cradles, are still around. This gadget, looking like a cross between a dismembered music-box and a hand-driven apple-corer, uses a mechanism to tilt the bottle with glacial slowness, to prevent any sudden tipping that could disturb the sediment. They’re not cheap, and most of the ones you’ll find are now antiques. Should you decant your Port before serving? If you’re the kind of person who collects vintage Port, you already have your own opinion on that. If you’re like most of us, making and enjoying ruby and tawny-style Ports from kits or home fruit, it’s probably not going to be necessary — but it does look fancy and won’t hurt a strongly-flavored, high-alcohol Port in the least.Decanting theory and practice two: Breathing
The most widespread reason for decanting is aeration, giving the wine a chance to soak up some oxygen, to open up and express its aromas. On the surface, this sounds pretty good: The wine has been cooped up in the bottle, so letting it out to stretch its legs would make sense, right? Well, according to some oenologists, this presumption is wrong. According to these experts, post-fermentation oxygen exposure is virtually always detrimental and the greater the exposure the more damaged it becomes, driving off delicate aromatics and numbing the wine’s delicate bouquet. Only heavily sedimented wines should be decanted, they say, and then only at the very last minute before they’re served. Indeed, for very old wines this is true. I was at a wine tasting in the early 90s where a very rare bottle of Argentinean Cabernet Sauvignon from the 1950s was poured. It was amazing at first, a rare and delicate wine with cedar, hints of blackcurrant, dusty cigar box, even rose petals lurking around. As I sniffed and swirled it over the course of four or five minutes the aromas got lighter and thinner until suddenly — poof! It smelled of nothing except lightly vinegared water. It was almost like seeing a vampire getting trapped in the sunlight — it decayed away to nothing so rapidly. Decanting this wine would have doomed it to losing its character before the drinkers ever saw it. Keep in mind, however, that most oenologists have never made a kit wine (hey, it’s their loss — I’m here when they want to try). If there’s one thing I’ve learned in the last 15 years of working in the kit industry, it’s that people tend to drink their kit wines just slightly before they’re actually ready to drink. Not that this is such a terrible thing — some wines taste just fine while they’re fresh and snappy with youth, and others, like the “mist-type” fruit and wine beverages are meant to be drunk the day of bottling. However, the bigger, oak-aged whites and many of the reds really benefit from a year of age in the bottle, resting quietly and gaining strength for their unveiling.Is decanting for you?
So which kits should be decanted? Pretty much only the Chardonnay-based kits that have been oaked and the darker, heavier reds. Decanting a delicate Sauvignon Blanc or a Beaujolais-style won’t accomplish much but a big California Cabernet Sauvignon, a rich Australian Chardonnay or an Italian Amarone-style will open up and show itself much better with just a little airing out. If you’re still not sure about decanting, there’s an easy test for you. Buy or borrow an inexpensive decanter. About half an hour before you want to serve your kit wine, decant one bottle and leave it out. Right at service, open a second bottle from the same batch. Quickly make sure that neither bottle is corked or otherwise “off,” and then have your guests sample both wines. (For the best results, tell them only that both wines are from the same batch; don’t divulge which was decanted.) You might be surprised at just how much of a difference this will make to your wines, and how easily you and your friends will be able to perceive it. For young kit wines, a little airing not only doesn’t detract from them, it also accomplishes the following: •Separates it from any sediment. This can definitely be a problem in young kit wine — but if you decant it, no one will ever know! •If the wine has a small amount of trapped carbon dioxide (CO2) and is slightly “fizzy,” decanting can drive this off, making the wine smoother. Dissolved CO2 in solution forms carbonic acid, giving the wine a sharp “bite.” •If the wine has an appreciable aroma of sulfite, decanting can oxidize it and drive it off. Most kit wines have a carefully measured amount included, but if you think you can detect it, decanting will disperse the “burnt match” character. •Wines that are heavily oaked will lose some of the “Chateau plywood” character and show more of their fruit quality. •Highly tannic red wines will lose some of their harsher bite, and present a fruitier, more approachable flavor and aroma. Indeed, with kit wines, the improvement made by decanting the young ones can be quite dramatic. They go from closed, low aroma wines with a subdued character to fully open, approachable wines with a pleasant aroma. If you don’t believe me, try the simple test outlined above and judge for yourself if decanting may be worthwhile for you.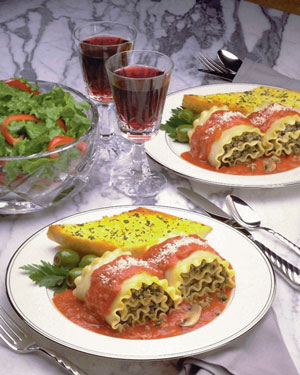 Wine And Food
Food and wine pairing is something that first-time winemakers never seem to be comfortable with. Home winemaking books are curiously silent on the subject, which I think marginalizes winemakers. On the other hand, many of those glossy coffee-table books are full of dogma and high-falutin’ bushwah. Don’t despair, however; pairing food and wine is not complicated, and the few rules really aren’t rules — they’re just guidelines to help you get the most from your meal and your wine.
Matching your cellar to your wine-drinking needs is a topic whose importance is not always immediately recognized by many new winemakers. Building up a cellar of properly-aged wines is important if you wish to have wine on hand to pair with foods — along with all the other occasions when wine is called for. Specifically, it’s good to have a variety of ready-to-drink wines on hand for different meals, in different seasons.
In summer, most people want lighter fare on their table and the heat makes us crave cool, refreshing beverages. In the winter, hearty meals chase off the chill, as do robust wines. In the dog days of August, it would be nice to have a light, refreshment-type wine (like a fruit wine) and a good Port is a definite must for snowy winter firesides. For every season, there is a cuisine. For every cuisine, there is a wine. And, for every wine, there is — or at least should be! — a winemaker.
Keep in mind that, although I’ll give tips on picking the “right” wine, my intent is only to help you get the most out of your wine-drinking. If anyone tries to intimidate you about your wine choices, or insists that there is only one wine for any given occasion or food pairing, ignore them. According to “Vandergrift’s Rule of Conservation of Liver Capacity,” you can only safely drink a certain amount of wine. Wasting any of this allotment on wine you don’t enjoy is a tragedy. The best wine is always the one that you like, not the one that some snob intimidated you into drinking.
Food and Wine Pairing
The whole idea behind matching a particular wine to a certain food is to try to achieve synergy from the interaction of flavors. My dictionary defines synergy as “increased effectiveness, achievement, etc. produced by combined action.” You can think of wine as a super-condiment. When you slather mustard on your hot dog or squeeze lime on your ceviche, it’s because the two taste great together. Not many people eat mustard by itself, or suck on plain limes, but these flavors produce a nice synergy when they are combined with other foods. Wine does this as well, but with the added bonus that . . . it is wine!Intensity of Flavor
When matching food and wine, the idea is to get the most out of each part of the meal. You probably don’t want to serve an old-vines Zinfandel with mac ‘n’ cheese any more than you would serve a delicate Riesling with Carolina barbecue. In the first case, the Zin would completely overwhelm the relatively innocuous flavor of the pasta and cheddar. In the second, the intensely smoky, unctuous barbecue would show up the Riesling, making it taste weak and thin. The idea is to match the intensity of the food with the power of your wine. At the big-boy end of the block for white wine reside Chardonnay (in its many guises) and Sauvignon Blanc. For red wines it’s the big Italians (Barolo and Amarone styles), the Cabernet and Bordeaux variants, Châteauneuf-du-Pape styles, Zinfandel and Shiraz (or Syrah). These will usually stand up to the most flavorful and intense foods, such as barbecued ribs, wild game and strong cheeses. In the middle ground of medium-intense wines, white styles include: Gewürztraminer, Chardonnay blends and some Sauvignon Blancs (including so-called Fumé Blancs). Medium reds include: Rhône styles, Chianti, Graves styles, Rioja, Merlot and Valpolicella. Light whites include: Pinot Gris (also called Pinot Grigio), dry Riesling, Muscadet, Soave, Verdicchio and California Chablis-style wines. Light reds go from blush wines, to Beaujolais, to Pinot Noir and California Burgundy. A good rule of thumb is that light food is best served with a light, often white, wine. For example, a poached, skinless chicken breast and steamed carrots would probably go well with a nice Italian Soave. That way, the delicate flavor of the food won’t get pushed around. Heavy food (say, a huge bowl of beef stew, or big slab of prime rib with garlic mashed potatoes and mushrooms) won’t overpower a big, flavorful Cabernet or Zinfandel. So pick full, red wines to pair with heartier foods. You’ll have to decide yourself where your cut-off for light or heavy is, but keeping it in mind will help you pick an appropriate wine for the dish.Acid and Sweetness
The word “acid” has a negative connotation in daily life, as does “sour.” This is too bad. While there’s nothing wrong with sweet, sour is really underrated. It heightens flavors, and “lengthens” their effect on the palate. (This isn’t just a perception. The ions that the acid unleashes on the palate open up the tastebuds and turn up the flavor intensity dial). That’s why apple pie needs a bit of lemon juice, and you can’t have oysters without a squeeze of zesty lemon, either. Acid in wine has a couple of effects. It can either highlight or cut through sweetness and it can help cleanse the palate of strongly-flavored dishes, readying you for another sip. Acid also helps the wine stand up to acidic flavors. A really flinty-dry Sauvignon Blanc will taste wonderful with a seafood dish laced with fresh limejuice, while a soft off-dry Riesling would taste flabby and weak. This also works backwards. If you’re serving a fresh, juicy peach with a flinty-dry Sauvignon Blanc, the wine will probably taste about the same as licking a battery terminal on your car. (And, before you ask, I did it on a bet in high school. It did taste pretty sour and I still have a lightning-bolt-shaped mark on my tongue.) On the other hand, a delicate, off-dry Riesling — such as a Piesporter style — will highlight the sweetness of the fruit and seem perfectly balanced.Fruit and Structure
Red wines are usually dry, that is, free of residual sugar. Any perception of sweetness that they carry comes from the fruit character of the grape or wine style. Shiraz is usually bursting with jammy fruit character, while French Cabernet or Bordeaux blends are less fruity, more austere and structured. For the purposes of food matching, think of structure in a wine like the structure of a song. Is it light, airy and gently melodic? Is it heavy and dark, and intensely moving? Or does it lodge in your head and make you want to bash your noggin with a hammer? Wines described as having structured flavor tend to have less fruit and more alcohol, tannin and acid. Less fruity, more structured, wines tend to work better with simpler dishes, such as pan-fried steak or pork chops. Intensely fruity reds work well with sweeter and more intensely-flavored sauces, such as barbecue sauce or cherry demi-glace. Extremely fruity wines also tend to hold their own against salt. This is why overwhelmingly fruity wines such as Sauternes or Icewine taste great with Roquefort cheese or barbecued almonds, while an austere Alsatian Pinot Blanc (very dry indeed!) would be less satisfactory. A quick word on wine and cheese is warranted; while the phrase seems to be lodged in the collective consciousness of wine consumers, the two don’t actually go well together in many cases, especially with dry white wines and most reds. Cheese is an earthy-flavored, savory, high-fat, calorie-dense food. Finding a wine that enhances it is a challenge. Still, your taste may vary from mine, and cheese and wine might be your favorite.A Thumbnail List
All of the above information may be correct, but to be useful we need a quick way of determining which wine will go with the foods we’ve chosen, and vice-versa. The best way to develop a guideline is based on flavor intensity. Although this will work in most cases, your mileage will vary: Remember, what you like drinking is the ultimate arbiter! See the chart below entitled “Pairing Guide” for wine-food pairings by flavor intensity. This list isn’t complete, nor does it take into account the often-confusing differences between wine style names among various kit manufacturers. To help relate it to wines you may have already been exposed to from commercial bottles, the list includes the real names for the wine. For the names used on the kit boxes, and an explanation of why they are different, see the first section of this Guide.Pairing guide
Light White Wine Pairings Any of these wines: Pinot Gris/Grigio Dry Riesling Muscadet Soave Verdicchio California Chablis
Any of these foods: Delicate fish, sole, cod, oysters Simply prepared chicken dishes Medium White Wine Pairings Any of these wines: Gewürztraminer Fumé Blanc Lighter Chardonnay Any of these foods: Medium white fish, snapper, scallops More flavorful (herbed) chicken dishes Veal or pork chops Heavy White Wine Pairings Any of these wines: Chardonnay Intense Sauv. Blanc Intense Gewürz. Any of these foods: Heavy or oily fish, salmon, tuna Lobster, Chinese food Other spicy cuisine Light Red Wine Pairings Any of these wines: Blush Wines Beaujolais Pinot Noir California Burgundy-style Any of these foods: Salmon, duck, roast chicken Medium Red Wine Pairings Any of these wines: Rhône-styles Chianti Graves Rioja Merlot Valpolicella Any of these foods: Game birds Grilled veal, pork roast, burgers Heavy Red Wine Pairings Any of these wines: Cabernet Sauvignon Barolo Amarone Zinfandel Shiraz/Syrah Any of these foods: Lamb Steak Venison Rich sauces The first thing you’ll notice about the food and wine pairing list is that it doesn’t list every type of food and wine, yet some wines and foods are repeated more than once. If you made only one 6-gallon (23-L) batch of wine for each of these, you’d have an 800-bottle cellar. But don’t worry; you’ve got a lot of leeway for matching your foods and wines. Think of the matching challenge as a playground, not a prison, and have fun with it. Second, there is a lot of overlap between different wines and different palates. I happen to think that really crisp, dry Sauvignon Blanc is a terrific match with Szechwan cooking, while my wife favors off-dry, spicy Gewürztraminer. There’s always another wine that might work equally well with different foods. Third, you don’t need a thousand bottles in your cellar just to have something to drink with dinner. Start by making the wines that you like to drink just for themselves, and to fill out your dinner-table needs, pick a few food-friendly wines. The following wines work with a broad range of food choices and cuisines, and won’t overload your cellar. White wines that go well with many foods include: rosé or blush (any off-dry to medium will do), Pinot Gris, Verdicchio, Soave, Sauvignon Blanc (or Fumé Blanc), Chardonnay, Riesling or Gewürztraminer. Red wines that pair well with many foods include: Beaujolais, Pinot Noir, Chianti, Valpolicella, Barolo, Zinfandel, Cabernet, Merlot, Zinfandel or Shiraz. I’ll conclude with a word on sparkling wine — it’s the ultimate food-matching wine. (I could have saved lots of space by telling you this at the beginning of the chapter!) Sparkling wine goes with everything from Thai food to foie gras to pizza. And it can be drunk from appetizer to dessert without seriously clashing with any dish. The main reason sparkling wine goes with so many foods, as you might suspect, is the bubbles. These will cleanse the palate after every sip and the crisp acidity will lengthen the flavor of the food and wine on your tongue. This is by no means a complete course on food and wine matching. For more information, try the wine and food section of your local bookseller. Read everything you can, taking all the information with a grain of salt (perhaps followed by a swig of fruity Viognier), then make your own decision.Cellar Planning
One thing that books and courses on winemaking never seem to teach is how to build up a good cellar of homemade wine. If you’re like most home winemakers, you always seem to be drinking the last bottle of your batch just as it’s really perfectly aged. Usually, it’s also the last bottle in the house. How do you stay ahead of the curve and build up some nicely aged bottles to show off to friends, family and (perhaps) contest judges? It can be done, but it involves a little math, a little discipline, and a little investment. If anyone is still reading after that list, here’s how to go about it:- Determine how much wine you use in a year. This includes your daily glass with dinner, dinner parties, friends dropping by, birthdays, anniversaries, the holiday weekend, house-warming presents and your thirsty brother-in-law. Let’s say that comes to about three bottles per week. Split it up according to your preference for red and white. Don’t forget to include pink, dessert and Champagne on your list.
- Multiply your weekly consumption by 52. In this case, that totals 156. Add 15–20% for unexpected wine emergencies — because you know there will be some. In this case that’s 25 or 30 bottles. We’ll round that to 180 bottles.
- That works out to six 23-liter (6-gallon) batches per year. Now comes the painful part. Make double your yearly consumption in as short a period as possible, ideally within one or two months. This is 12 batches, all in one fell swoop. Put half of the wine away in your cellar and forget about it and drink the other half as you need it. At the end of one year, start opening those fully aged bottles and enjoy the tremendous improvement that only good cellaring can bring to wine.
- On the anniversary date of your big batch, make another six batches — all at once — and put them to the back of the cellar. Again, this is a lot of work, but in a year you’ll nearly dislocate your shoulder from patting yourself on the back.
- The problem with this plan is, while it is very rewarding, you need both the space and the cash to make twelve batches of wine all at once. Ouch!
- If you can’t quite swing that, another good strategy is to make double batches every time you make wine. Bottle one for your use and put the other in the cellar (away from the prying corkscrew of your thirsty brother-in-law). Try to stay on a regular schedule to maximize your use of equipment: Idle carboys are nobody’s playground. Over the course of a year you should be able to get at least three or four batches salted away for aging, making a good start on your cellar.
BACK: Troubleshooting and Tips NEXT: Kit Wine Glossary