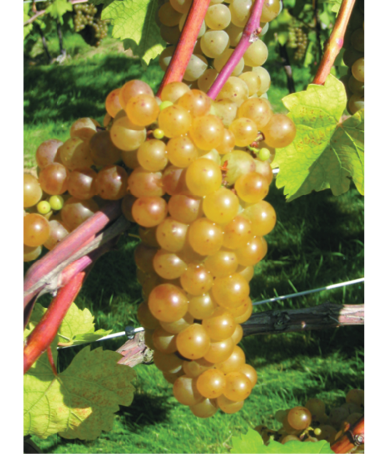
Vidal Blanc
Coming off the cold winter of 2013-2014 it’s hard to imagine that we’re already off to our current winter season with the hopes that it couldn’t get any worse than it did last year. After all, the bud kill in the Midwest and Northeast from last winter is going to affect this year’s crop as well, so we don’t need to add any insult to injury with another hard winter. But winter is winter and at least for now, before the global warming thing really makes us all wear shorts, flip-flops and t-shirts all year, we have to accept that if we want to grow grapes in every state of the union, we have to keep up with the strategies that allow us to do that.
While interest in growing more vinifera grapes in all the states is increasing, the winter kill inflicted on vinifera at some point makes it not worth the hassle and expense. I have always been intrigued with the grape breeders of the modern wine world. After all, now that phylloxera has been conquered, what else is there to breed for? But in the end they all seem to come up with something that helps. Specific to this column, one relatively cold-hardy variety that is well known in the Midwest and Northeast that has been developed is Vidal Blanc.
As with most interspecific hybrids, Vidal Blanc’s parentage can be easily traced, but their genetic lineage can be difficult to follow. In other words, the varieties that are also present in its generational “family tree” can be determined only through extensive review of the breeder’s records. With respect to parentage, on one side, is the Vitis vinifera variety Ugni Blanc (aka Trebbiano). On the other side, is Rayon d’Or, the common name for Seibel variety 4986.
The first question is, what is a Seibel? Well, Seibel is a classification of grapes originating from French viticulturist Albert Seibel (1844– 1936), who was known for his work in developing phylloxera-resistant varieties. Seibel produced over 16,000 hybrids, of which about 500 were developed into commercial varieties. Interestingly, Seibel 4986 is also one of the parents of Seyval Blanc, which we covered in the October-November 2011 “Varietal Focus” column. Buried in Vidal Blanc’s lineage are native American varieties like Vitis Rupestris and Vitis aestivalis.

The original intent of Jean-Louis Vidal (1880–1976) was to develop a variety that could be used in Cognac production in the cold maritime regions of western France, specifically, Charente-Maritime, in the 1930s. However, at the same time, the hybrids were falling out of favor in France. Despite the attempt for hybrids to be a possible solution to the earlier devastation caused by phylloxera, they just were not producing the same wines consumers were used to. French viticulturists and winemakers were moving away from the hybrids in favor of vinifera varieties grafted to phylloxera-resistant rootstock. Across the Atlantic in North America though, Vidal Blanc did hold promise for those pioneers in grape growing in the colder regions of the United States and Canada.
It was first brought to Canada in the late 1940s and early work investigated its usefulness in the cold and to make sweet or icewine styles. Once its cold-hardiness was confirmed, it started to spread west and south. In Canada, Vidal Blanc is primarily grown in the Niagara area but you will also find it all the way to the west in British Columbia, and as far east as Nova Scotia as well.
In the United States, it is widely planted from the Finger Lakes in New York, south to Virginia and North Carolina, and then stretching west to Arkansas, Missouri, and Illinois. Eighteen states list the variety with various acreages reported. For example Virginia listed 176 bearing acres in 2012, up from 160 acres the previous year. The farthest west I saw it was in New Mexico. Not surprisingly, no acreage was reported in California. But I was quite surprised that I did not see any acreage listed for Washington State.
Vidal Blanc is technically defined as a variety that has “moderate cold hardiness” with the reference variety in this case is Vitis vinifera. Cold hardiness has to do with how well the dormant buds resist the cold temperatures. In this case, Vidal Blanc does just fine in the normal winters where it is grown. However, the exception will be a winter like the last where even the hardiest of the cold-tolerant vines experienced winter kill. One report I read last winter indicated more than a 50 percent primary bud kill in the upper Midwest and the east, including the most cold-tolerant vines. Sometimes, Old Man Winter does get its way, despite all the efforts of the breeders. In Ontario, Canada, a website (http://www.vineinnovations.com/) has been set up to evaluate almost real-time cold hardiness based on variety and location as the vines susceptibility varies through any given season based on fluctuating ambient temperatures.

One other aspect to the success of this variety is the late bud break it is known for. This permits it to avoid most of the spring frosts. In the event that the primary buds are damaged or killed by the spring frosts, the fruitfulness of the secondary buds is another positive attribute. In general, production from a vigorous variety must be managed through careful dormant season pruning and proper cluster adjustment through to growing season.
This vigorous nature, and the fact that the grape is often left on the vine well past “normal” commercial maturity to be used for icewine production led to concerns by producers on the long-term effect of these growing conditions. It has long been known that vines that over crop in one year will tend to under crop the following. This phenomenon is best explained by the fact that there is only so much energy to go around. Growers in the Midwest had some concerns centered on the tendency to over crop having an adverse effect on the cold hardiness of the buds. These concerns were presented to their local university extension and an extensive study was undertaken at Ohio State University. In the end, no adverse impact was found on bud cold-hardiness when “balanced pruning was applied in tandem with cluster thinning to avoid over cropping.” What this means in reality is that if you are not sure, work with your local university extension advisors.
Increased planting of this variety in recent years is largely due to its benefits of a thick skin and Botrytis-resistance for making icewines. However, this white grape produces wines that are known for their crisp acidity and bright fruit flavors — specifically grapefruit and pineapple. The crisp acidity can be used to balance varying sugar levels. Some liken the wine styles that do best for this grape to those of the Riesling wines of Germany. In seasons where less acid is needed, malolactic fermentation will help balance the acidity. The extent of the malolactic fermentation is determined by tasting the wine as it progresses through the process. In some cases complete malolactic fermentation is in order, whereas in other wines the process needs to be stopped short. When the acidity is right, stopping the malolactic fermentation via the addition of sulfur dioxide is done along with chilling the wine.
Across the range of wine styles, winemakers are faced with challenges balancing the previously mentioned acidity. With respect to residual sugars, they range from dry, semi-dry and the icewine styles. The dry or semi-dry styles take advantage of Vidal Blanc’s ability to sugar up despite its late bud break and potentially early harvest. These follow typical traditional winemaking styles of crushing and pressing, or for those with specialized equipment, taking advantage of the whole cluster press. The icewine versions are a specialized grape growing and winemaking process undertaken when conditions are just right. Producers risk crop loss due to rot, but Vidal Blanc’s thicker berry skin helps reduce this risk by being less affected by Botrytis.
In her article, “Making Icewine Easier, At Least for Yeast,” Debra Inglis of the Cool Climate Oenology and Viti-culture Institute at Brock University in St. Catharines, Ontario refers to making icewine as a process that will push winemakers to their “wits end,” even taking on a form of “extreme winemaking.” The sheer challenges of holding the fruit on the vine until the proper low temperatures are attained, keeping them from birds, rot, and molds are the first challenge. Then working with high sugar juices presents different challenges in the winery, from osmotic stresses on the yeast due to the nearly double sugar concentrations, and then processing sweet wines to the bottle.
Local production of Vidal Blanc is good but it’s future as a major grape for widespread distribution is limited because of the general preference for vinifera wines. As well, export is not possible because of legislation in Europe that has not permitted the use or importation of wines made from hybrid grapes. The rise of the noble grapes grown on rootstocks that resist disease came out ahead in the long run due to the ease of grafting. Alas, the modern day market for hybrids is generally local.
Now look outside . . . white or green, if its white, it’s likely not the complete onset of global warming, but the trends in temperature data over the last 20 years are indicating change. If you are inclined to take on the icewine challenge, then now’s the time. It’s hard to say what we will do in the future, but the versatility of Vidal Blanc, dry, semi-dry or downright sweet has been proven sound over the last 50 years.
Vidal Blanc Icewine Recipe (5 gallons/19 L)
Ingredients
• 6 gallons (23 L) commercially available icewine juice (36-40 °Brix)
• Distilled water
• 10% potassium metabisulfite (KMBS) solution. Weigh 10 grams of KMBS, dissolve into about 75 milliliters (mL) of distilled water. When completely dissolved, make up to 100 mL total with distilled water.
• 5 grams Di-ammonium Phosphate (DAP)
• 10 grams Lallemand EC-1118 yeast (13 grams of Premier Cuvée can be used as a substitute)
• 17 grams Go-Ferm
• 5 grams Fermaid K (or equivalent yeast nutrient)
Other equipment or needs
• 5-gallon (19-L) carboy
• 6-gallon (23-L) carboy
• 6-gallon (23-L) plastic bucket
• 1-gallon (4-L) plastic jug
• Airlock/stopper
• Racking hoses
• High-Brix hydrometer
• Equipment cleaning and sanitizing agents (Bio-Clean, Bio-San)
• Inert gas (nitrogen, argon or carbon dioxide)
• Refrigerator (~45 °F/7 °C) to cold settle the juice. (Remove the shelves so that the bucket will fit.)
• Ability to maintain a fermentation temperature of 55 °F (13 °C). TIP: If you do not have other means, use a 33-gallon (125-L) plastic can as a water bath. Place ice blocks in the water to maintain a relatively constant temperature. This will be your refrigeration system for peak fermentation. Alternatively, you may have a need to keep it warm, in this case wrapping the bucket/carboy with an electric carboy wrap works well.
• Thermometer capable of measuring between 40–110 °F (4–43 °C) in one degree increments
• Pipettes with the ability to add in increments of 1 mL
Step by step
1. Let the juice settle at a cool temperature in your 6-gallon (23-L) plastic bucket overnight. Layer the headspace with inert gas and keep covered.
2. Measure the Brix using a high-Brix hydrometer. Record your result.
3. When sufficiently settled, rack the juice off of the solids into the 6-gallon (23-L) carboy.
4. Prepare yeast. Heat about 250 mL distilled water to 110 °F (43 °C). Mix in the Go-Ferm. Measure the temperature. Pitch the yeast when the water/ Go-Ferm suspension is 104 °F (40 °C). Sprinkle the yeast on the surface and gently mix so that no clumps exist. Let sit for 15 minutes undisturbed. During this time, take a half-quart (half-L) of the juice and, at room temperature, add about 250 mL of this juice to the yeast/Go-Ferm mixture. Let sit one hour with one gentle mix at 30 minutes. At one hour, add another equal volume of the juice, then wait two hours, again mixing gently every 30 minutes. During this time, pre-warm the juice to ferment to 68 °F (20 °C). When the yeast is ready, add it to
the fermenter.
5. Add Fermaid K or equivalent yeast nutrient.
6. Initiate the fermentation at room temperature 68 °F (20 °C) and once fermentation is noticed (~24 hours), move to a location where the temperature can be maintained at 63 °F (17 °C).
7. Two days after fermentation starts, dissolve the DAP in as little distilled water required to completely go into solution (usually ~20 mL). Add directly to the carboy.
8. Normally you would monitor the progress of the fermentation by measuring Brix. One of the biggest problems with making white wine at home is maintaining a clean fermentation. Entering the carboy to measure the sugar is a prime way to infect the fermentation with undesirable microbes. So at this point, the presence of noticeable fermentation is good enough. If your airlock becomes dirty by foaming over, remove, clean, and replace it as quickly and cleanly as possible. Sanitize anything that will come in contact with the juice.
9. Leave alone until bubbles in the airlock are about one bubble per minute. This usually is about 2–3 weeks, then measure the Brix every 2–3 days.
10. Fermentation is stopped when there is no noticeable sign of fermentation and the Brix reads the same for three consecutive readings. Because of the high sugar, the fermentation is designed to self-arrest between 9–11% ethanol. Chill the wine to 43 °F (6 °C). Add 3 mL of fresh KMBS (10%) solution per gallon of wine. This is the equivalent to ~40 ppm addition.
11. After two weeks, test for pH and SO2 and adjust as necessary to attain 0.8 ppm molecular SO2. (There is a simple SO2 calculator at www.winemakermag.com/guide/sulfite). Check the SO2 in another two weeks, prior to the next racking and adjust while racking. HINT: Rack to another sanitized 5-gallon (19-L) carboy, or your bucket. In the case of the latter, clean the original carboy and transfer the wine back to it. This is done at about 4–6 weeks after the first SO2 addition. Once the free SO2 is adjusted, maintain at the target level by monitoring every 3–4 weeks.
12. Taste the wine and consider alcohol, sweetness and acid balance. It may be necessary to add tartaric acid.
13. At about three months, make one final sorbate addition and bottle. Maintain sanitary conditions while bottling. Once bottled, you’ll need to periodically check your work by opening a bottle to enjoy with friends.
Notes: The recipe calls for specific additions of sulfur dioxide at specified intervals. Once these scripted additions are made, you must maintain the level at the target concentration; adjusting as necessary using the potassium metabisulfite solution or by methods of your own choosing. Testing can be done at a qualified laboratory, or in your home cellar using various commercially available kits.