In the Wine Lab
Sooner or later, if you make wine at home, you are going to do some chemical analysis. To establish (or expand) your wine testing capability, what will it take? There are some tests that are absolutely essential to any complete winemaking program, others that are informative but optional, and some that are mostly curiosities. Among all the tests, some of the equipment is required, some of it can be done without, and some of it goes on the birthday wish list for someone else to buy for you. Read on for one home winemaker’s take on the equipment you really need, what the equipment does, and how much it costs.
Not All Testing is the Same
While there are color-development “dip sticks” for various tests, they don’t really qualify as a home laboratory. Usually no better than semi-quantitative, the sticks are quick and easy, but not very accurate. It is fine to use them if you don’t have the space, time or interest to do real laboratory testing, but recognize their limitations. For genuine laboratory testing, you need some designated space, adequate utilities, some analytical equipment and supplies for individual tests of interest.
My work experience includes time as an analytical chemist, a laboratory manager and a home-fermentation store owner. Over the years, I have come to recognize certain wine tests that need to be done just about every vintage.

Brix
Formally represented as “°B,” it means “percent sugar by weight” (% w/w). The home winemaker will measure Brix with a refractometer or a hydrometer. Neither of these instruments actually measures “percent sugar by weight.”

A refractometer (pictured) is an optical instrument. Simple analog units cost around $100, with digital versions going for two or three times as much. Most modern units feature “automatic temperature compensation” or ATC to minimize the effects of having the sample at a different temperature than the original calibration temperature of the instrument. To take a reading, put a few drops of grape juice on the prism (analog) or window (digital). To use the digital meter, simply look at the numbers displayed on its screen. For the manual unit, look through the eyepiece at a bright sky and note the division between the blue field and the clear field. That edge is a shadow caused by bending of the light passing through the sample (and the prism). The location of the edge, as displayed on a numerical scale along the side, defines the °B reading, usually on a scale from 1 to about 35. While reported as Brix, the bending of the light, or change in refractive index, is affected by any dissolved material in the solution. Grape juice contains mostly sugar, but dissolved acids and other extract materials also affect the reading. More significantly, if fermentation begins, alcohol in the solution also affects the reading. The refractometer is used for estimating sugar in grape samples, juice or must. Once alcohol manifests itself, it is time to switch to a hydrometer.

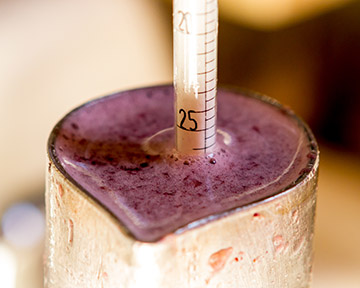
The hydrometer (pictured) estimates sugar content by relative density. As more sugar is dissolved in water, its density or specific gravity goes up. The hydrometer is a sealed hollow tube with a precisely weighted end and a long stem with graduations. The graduations can reference several standard scales, but °B is most popular with winemakers. Modern full-range glass hydrometers typically measure from about -3 °B to +35 °B and cost $10 to $12. Narrow range hydrometers, such as -5 to +5 °B, allow for reading the graduations with more accuracy, as the marks are further apart on the stem. These more accurate hydrometers may cost $20 to $40 or more. Hydrometers are also available with a thermometer sealed inside for providing a temperature correction to the reading. These will usually cost about $20. For any hydrometer, floating it in a tall narrow plastic or glass tube — a graduated cylinder or hydrometer test jar — allows use of a small sample and provides for easier reading. A plastic jar will cost as little as $5, with a glass cylinder costing $15 to $25.
When the hydrometer is floated in a sample of juice or wine, the top level of the liquid (the meniscus) is noted along the graduated scale. While it may say °B, the flotation level is actually reflective of “total dissolved materials” in the water matrix. In juice, that means other dissolved solids like acids or extract compounds add a positive component to the actual sugar. In wine, alcohol (which is less dense than water) contributes a negative influence. A sample temperature lower than the temperature specified on the hydrometer will result in a high bias and a higher temperature will cause a low reading. There are density tables available that allow for a temperature correction factor. (Keep in mind that you will also need to degas your sample as CO2 will affect the measurement.)
If you have a vineyard or source fresh grapes, a refractometer is very efficient because the required sample size is small. In the vineyard, you may squeeze the juice of an individual grape onto the prism, take a reading and move on to measure another grape. The simplicity, portability and small sample size help justify the higher cost of the refractometer as compared with the hydrometer. However, once you begin fermentation, you will need a hydrometer anyway to monitor your progress. That being the case, if you do not need vineyard sugar readings, you can skip the refractometer, crush a larger sample of grapes and measure the juice in a hydrometer jar or graduated cylinder with your hydrometer.
A full-range hydrometer will meet most needs. Near the end of fermentation, you may want higher precision in the final reading. In the near absence of sugar and presence of significant levels of alcohol, finished wine will have a negative Brix reading. Using a +5/-5 precision hydrometer will allow you to read smaller differences from day to day (or vintage to vintage) than you can get from the full-range instrument.

pH
Knowing the pH of your juice and wine is essential for planning sulfite additions and monitoring stability. This is perhaps the most popular test for applying “dip stick” technology, but most such colorimetric strips are not accurate enough to provide maximum utility. Instead, you will need to use a pH meter. An electronic meter is the heart of pH measurement, while the electrode does the dirty work. A thin glass membrane is formed into a bulb on the end of this probe. The glass is always thin because it must permit an electrical voltage to be measured through the otherwise non-conducting glass. A standard solution inside the bulb reflects a difference in voltage when contrasted with the sample solution outside the bulb. A reference electrode, filled with a potassium salt solution (or a gel version of the same thing) completes the circuit. The meter itself, then, is a high-impedance millivoltmeter that measures the potential created by the hydrogen ion concentration — the pH — of the sample solution. Because the measurement is relative, a pH meter must first be calibrated with solutions of known pH — buffers — before it will provide reliable results.
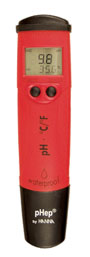
Battery-powered portable pH meters (pictured) read with a resolution of either 0.1 pH units or 0.01 pH units. The latter, 10 times as sensitive in resolution, are highly preferred for measuring pH in wine. Portable pH meters range in price from about $60 to about $125. Intended to provide rugged use in a field environment, portable meters are equipped with somewhat thicker glass-membrane electrodes than typical laboratory grade bench-top meters. The thicker glass does not negatively affect accuracy, but it does slow down response time. Portable pH meter electrodes will usually provide reliable service for about one to five years. When they stop working, the electrode must be replaced, usually at a cost of $65 or so. The cheapest meters do not have replaceable electrodes and when the electrode fails the entire meter must be replaced.

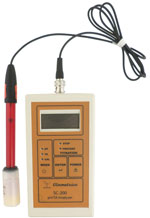
Bench-top pH meters (pictured) almost always read to 0.01 pH units. At a cost of $275 to $1,000, such a meter may be more of a “wish list” item than an essential component of your wine laboratory. A bench meter does have several advantages, though. It offers the opportunity to use interchangeable electrodes for different specific purposes. The use of thinner glass on the pH probe bulb also allows a faster response time, making these meters better for titrations. As long as the meter works, which is usually many years, the electrodes can be replaced indefinitely. The electrodes themselves, like their portable counterparts, usually last one to five years but cost about $75 to $150 to replace.
Titratable Acidity (TA)
While TA is related to pH — both offer a measure of acidity — the two numbers are not interchangeable in winemaking. The content and balance of the major wine acids — tartaric, malic, and lactic — make a wine more or less pleasant to the palate (along with many other flavor and aroma components, of course). High acid wines — usually exhibiting low pH — have bright, crisp, refreshing character. Low acid wines, at higher pH’s, can be softer, rounder, and fruitier — possibly to the point of tasting flat or flaccid. Measuring the pH will give a hint to the TA, but you really need to measure the acid directly.
Other than dip stick methods, TA is always determined by titration. Indeed, that is its very definition: “Titratable acidity” is the sum of all acids that can be titrated by a dilute solution of strong base to a pH endpoint of 8.2. “Titration” is the quantitative addition of a reactant to a solution to achieve some endpoint — in this case, a pH endpoint.
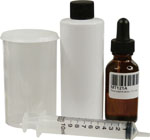
The least expensive titration kit uses a clear plastic cup to hold the sample and a plastic syringe to dispense sodium hydroxide solution (pictured). Phenolphthalein indicator, with a clear-to-pink endpoint change at pH 8.2, is included. Kits like that, typified by the Country Wines kit, cost about $10. They are reasonably accurate, particularly for white wine or juice. In measuring TA for red wine production, it is helpful to take a juice sample right after crushing, to minimize color pickup and make the endpoint easier to detect.
Another popular kit is the Precision Acidometer from Vinoferm. In this titration, a fixed amount of wine sample is first poured into a special graduated cylinder that is part of the kit. Blue indicator solution is added dropwise, at first turning the solution green, then blue. Just before it turns blue, the volume indicated on the side of the cylinder in milliliters is the TA in grams per liter. The color endpoint is easier to discern than the phenolphthalein endpoint, but still not simple. A kit costing about $20 will usually include a pack of litmus paper to help confirm the endpoint. When a drop of titrated solution is placed on the paper, a lack of color change indicates that the correct point has been reached.
The most sophisticated titration for TA is with a pH meter (pictured right). Using the same sodium hydroxide solution and phenolphthalein indicator as a basic kit, it relies on a calibrated pH meter to show the pH 8.2 endpoint. Although a syringe or graduated pipet can be used for titration, maximum accuracy is achieved with a laboratory buret held in a buret clamp on a support stand. If you already have a pH meter, those supplies may add about $100 to your equipment costs. Starting out directly with a bench-top pH meter TA kit (which also gives you pH measurement capability) will cost about $350 to $450.
Malic Acid
Our next essential determination is the completion of malolactic fermentation. The home test for this procedure is a paper chromatography kit (pictured) used to visualize the disappearance of malic acid as it is converted to lactic acid in the wine. A basic kit costs about $40 and includes several sheets of chromatography paper, some orange-colored solvent, capillary tubes, acid standards, and a 1-gallon (3.8-L) jar to serve as the development chamber. Based on actual laboratory systems for paper chromatography, the simplified home kit is very effective. Individual components may be replaced for just a few dollars each as they are used up.
Free Sulfur Dioxide
The last of my essential tests is free sulfur dioxide, or FSO2. While there are a number of kits and procedures available for this determination, they essentially come down to two different chemistries: Ripper titration (pictured above) or Aeration/Oxidation (A/O) with acid/base titration (pictured below). Tests based on Ripper use a direct iodometric titration of a wine sample with iodine solution or iodine/iodate reagent. The endpoint is blue starch iodine indicator, sometimes enhanced with use of a platinum electrode. A/O methods on the other hand depend upon removing sulfite from an acidified wine sample by sparging it with a stream of air. The stream of air, sulfite entrained, then passes through a trapping solution containing hydrogen peroxide. The peroxide changes the sulfite to sulfate, releasing sulfuric acid into the solution. The acid produced is titrated with standard base, much as in a TA test.
The Ripper methods are often faster, easier, and cheaper than A/O. Unfortunately, they are undermined by limitations of the chemistry involved. Any substance that reacts with iodine — including some tannins — will be measured as sulfite. Further, the acidification of the sample for the titration tends to release some sulfite bound to anthocyanins (color compounds) in red wine, making it appear “free” when it is not. Due to these limitations, Zoecklein et al (Wine Analysis and Production, Chapman and Hall, 1995) say, Ripper “data for free SO2 in red wines may be expected to be erroneously high.” In contrast, A/O is essentially the definition of free sulfur dioxide. It is that fraction of SO2 that can be removed from an acidified wine sample by bubbling air through it. If the sulfite is not free, it remains behind in the wine sample.
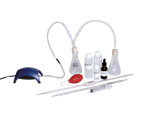
Because of its simplicity, many winemakers rely on Ripper anyway. The simplest and cheapest Ripper test is the little Titrets kit, about $20 for ten tests. The iodine/iodate reagent is in a sealed glass ampoule under vacuum. To use it, you attach a flexible tube to the ampoule’s tip, break the neck, and draw wine into the solution with the vacuum. At first, the excess of iodine reveals the blue starch endpoint. As more wine is added, sulfite reacts with the iodine. When no excess iodine remains, the color returns to something like the original wine color (or colorless in the case of white wine). The ampoule is stood on end and sulfite read from graduations on the side. Since the volume of titrant is fixed, it is a reverse titration in which the sample size gets measured. Higher sulfite levels mean less wine is needed to exhaust the iodine present, while lower levels mean more wine must be drawn up to reach the endpoint. The graduations are marked accordingly. While simple in design, the Titret is difficult in practice. Reasonably useful for white wine, the various interferences and difficulty detecting the color make it problematic for red wine. It almost always reads high in comparison with A/O. For that reason, kits are now packaged with labels that state “for white wines only.”
A basic Ripper titration setup with visual starch endpoint includes a reaction flask, a buret with support stand, and a volumetric pipet for the sample. Reagents include iodine or iodine/iodate reagent, starch indicator, and sulfuric acid. All together, these supplies would cost about $150 to $200. Because a platinum electrode improves the accuracy of the Ripper endpoint detection, most home users would opt instead to buy a kit with a meter such as the Vinmetrica SC100 for about $250. The kit includes a meter and attached platinum electrode, along with needed reagents and supplies. While endpoint accuracy is improved, the other limitations of the Ripper method remain.
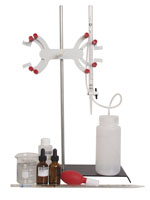
For Aeration/Oxidation, required equipment includes a sample flask, a glass tip to introduce air, an aspirator or pump to move the air, transfer tubing, and a trapping flask. For the titration step, a buret, pipet, or syringe may be used. Reagents required are 25% phosphoric acid, hydrogen peroxide, SO2 indicator, and standardized sodium hydroxide titrant, usually 0.01 N. An all-borosilicate glass laboratory grade apparatus is available for about $500. Simplified systems for home use employing flexible tubing and stoppered flasks can be purchased for about $120 to $250. While this method eliminates the Ripper interferences, it requires more attention to detail and occupies more space on the home laboratory bench.
Optional Tests
Residual Sugar
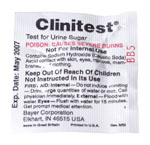
Measurement for Brix does not provide an accurate low-level sugar reading in finished wine because natural extract levels vary. A simple kit using Clinitest tablets intended for measuring sugar in urine for diabetic patients can be used to measure residual sugar (RS) below 1% in wine (pictured above). The kit has modified instructions and a color chart to adapt it to wine and usually includes a test tube and pipet. The kit costs about $20 to $30 and the process is simple. A Clinitest tablet is dropped into a measured amount of wine and the resulting color is compared with a standard chart.
Alcohol
A small glass device called a Vinometer assesses alcohol concentration in dry wine by displaying the viscosity of the solution.
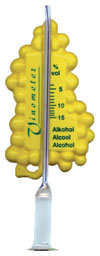
It is a little glass tube that is filled with wine, inverted, and left to stand. The wine level drops according to its viscosity and you read alcohol percentage from a scale on the side. Unfortunately, it is thrown off by any sugar or a significant level of other extract in the wine, so is unreliable in most real-world situations. Its strong advantage is a cost of only about $8.00. The only alternative for home use is to buy an instrument called an ebulliometer. This apparatus measures alcohol by the change in boiling point relative to pure water. Simple units that use an alcohol burner to supply heat for boiling the wine are about $800 and electric/electronic ebulliometers may top $1800.
Lab Space
In addition to the specialized equipment for each test, you need some space to work. The minimum is about two feet (~5 m) of counter space, but about six feet (~2 m) would allow you to leave some of your apparatus set up between tests. You need a sink, or you will have to carry everything to the kitchen for cleaning. Distilled water will do fine for your pure water source. For greater convenience, you could install a reverse osmosis system. Of course, you also need good lighting and a source of electricity to plug in your various devices. For general-purpose equipment, you will need a scale that reads down to 0.1 g (or 0.01 oz) or better. These cost from $40 to $100. You will also want a wash bottle for your distilled water that will cost $5 to $15. Various beakers, flasks, and pipets will run another $50 or so.