Yeast Trials With Wine Kits
People making their wine from fresh juice or grapes will go to great lengths to ensure their raw materials come from good growing areas and from vineyards that use good practices, and they will choose varietals that suit them, test for pH, acidity and Brix — all commendable activities. Yet, it’s rare for them to choose a specific strain of yeast for their grapes. That’s not surprising, given that yeast represents a step from the purely agricultural and chemical aspects of winemaking, and into the arcana of biochemical knowledge.
The curve is even steeper for kit winemakers: Kit manufacturers have always relied on specific strains of dried yeast to yield consistent, repeatable results. They’re so focused on ensuring quality control that they strongly caution against using any strain but the dried packet that comes with their kits and either don’t provide information on strain changes, or even fail to acknowledge that using different strains is possible.
I blame myself. No, I’m serious: As the dominant technical guy for wine kits for over 20 years, I had to ensure that we maximized the chance of success for the majority of the consumers of the million-plus kits sold every year. While that’s actually a sensible piece of customer service, the fact that you’re reading WineMaker magazine means that you’re not the majority of consumers. You’re adventurous, stalwart and keen (good looking too — have you lost weight?). Just maximizing the success of your kit, as measured by it fermenting and clearing on time isn’t enough for enterprising folks like you.
So for the first time, I’ll let you in on a secret: Anything good that a specific strain of yeast can do for a wine made from grapes or freshly pressed juice, it can do for a kit — and more. Some strains produce more esters, giving fruity aromas like pear, citrus, apple, and berries, while others have abundant phenolics, giving spicy notes like clove and black pepper. In fact, many of the aroma descriptions we use when talking about wine are a result of yeast action, both directly and through chemical reactions with other components in the must.

Yeast beast released
But which yeast should you choose? And should you choose one? After all, some wines are made in separate lots, fermented with different yeast and blended together post-fermentation to achieve complexity and layered flavors. How will you decide?
By doing yeast trials, of course! But before we dive into bench-top samples, strains and potential outcomes, it’s important to understand what the original wine yeast that came with your kit was supposed to accomplish.
First, it had to be a quick fermenter: Kits are usually clear, stable and ready for bottling in 4 to 8 weeks. Second, it had to be strongly attenuative, eating all of the sugar in the must. This helps with extended stability, preventing re-fermentation in the bottle. Third, it had to flocculate (settle out after fermentation) really well. Kits usually have one dose of fining agents and manufacturers are loath to have the bottling days delayed to allow for slow clearing — un-bottled wine is un-drank wine! Finally, it had to be low foaming. Some yeast develops a great foamy head, which can overwhelm primary fermenters. Messiness is not considered consumer-friendly.
These characteristics are present in the majority of yeast strains available, and as an adventurous winemaker, you can cope with slightly slow fermentation or clearing, and a bit of foam is easy to manage. The potential attenuation isn’t that big a problem either, unless you choose to use a yeast strain that has low alcohol tolerance for a high-alcohol wine. Most strains will successfully ferment up to 13% alcohol with ease.
There is one more consideration that manufacturers have held onto tightly. All kit wines have to go through pasteurization — that is, they get heated to around 160 °F (70 °C) for a minute or so, and then are cooled very rapidly and packaged. This kills spoilage organisms and keeps the kits shelf-stable. During the heating process it was thought that sugars could bond to other compounds in the juice, making it difficult for some yeast to ferment them — thus the strict adherence to the strain included in the kit.

This turns out to be a very slight consideration: The actual change in the sugars by pasteurization is minor, and any perceived flaws in a substitute strain in your kit are more likely to be due to your personal taste rather than an artifact of pasteurizing — it was more a factor in the old days of kit processing, when temperatures were higher, for longer durations. Modern techniques free us to use a wider variety of yeast!
Choosing a new yeast
There are four major yeast companies that cater to home winemakers: Lallemand (Lalvin) and Red Star, which make dried yeasts, and White Labs and Wyeast, which produce liquid yeasts. While you can browse the companies’ websites or brochures for guidance on which yeast to try, WineMaker has compiled an excellent and easy-to-compare chart of all the major strains that includes suggested styles, temperature ranges, alcohol tolerance and flocculation potential. If you see a strain that particularly interests you, go from there to the manufacturer’s site, where you’ll find more information about the origin of the yeast and the specific characters that it will bring to your kit.
I can’t stress enough that you should do your homework before you start swapping yeast. Half an hour of browsing and making notes will give you all the information you need to choose a new strain — or strains.
You should note that there are attributes that must be considered to give your yeast a fighting chance: Brix, nutrient requirements, and alcohol tolerance to name a few. It’s wise to compare attributes of the kit manufacturer’s chosen strain against potential strains you are considering to ensure fermentation carries through with minimal risk of a complete failure.
Going to trial
Strain or strains? Indeed. While you could just swap out your existing yeast with the kit and go through the process to find out whether you improved your 6-gallon (23-L) batch or not, it’s a good idea to hedge your bet by trying the new yeast against at least a control sample by splitting your kit into two 3-gallon (11-L) batches. Ferment one with the original kit yeast, and the other with your substitute. It will take a bit of fiddling, divvying up finings and stabilizers between the two, but if your experimental batch is drinkable-but-not-vastly-improved you can blend the two together and still have a drinkable wine. If it’s a complete failure, you’ve still got half a batch to console yourself with, and best of all, if it’s fantastic you can bottle it separately to show off, or use it to drive a special blend with the original.
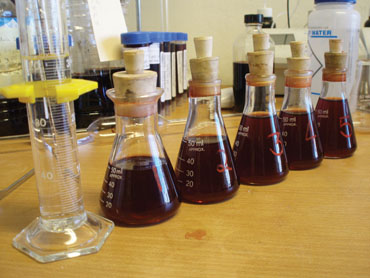
If you’re eager to try more than one strain of yeast at a time (and willing to pay for the extra yeast necessary) it’s great fun to run a set of bench trials. You’ll need six 1-gallon jugs (five of them if you’re Canadian, due to the difference between Imperial and US gallons) the same number of bungs and airlocks, and enough different yeast strains to inoculate them all. Rehydrate your must, take temperature and specific gravity (SG) readings, split it up amongst your jugs and you’re on your way.
It might seem like a pain to manage all of the finings and stabilizers for such small amounts, but there’s an easy way. First, get a good measuring cup and a syringe from your local supply shop. Dilute your sulfite and sorbate in water in some multiple of the number of jugs you have (i.e., 60 mL) and then use the syringe to accurately dose each jug. You can do the same with the fining agents, and as they’re in liquid form you won’t need to dilute first.
Follow all of the rest of the manufacturer’s instructions to the letter! The only variable in these trials should be the yeast itself, if you want the best results.
Rendering a verdict
When the wine is clear, stable and ready to bottle, do a comparative tasting. You will need a description of the control wine from the manufacturer—brochures or websites are useful. If you’ve made an entire 6-gallon (23-L) batch with a different yeast strain, it’s pretty straightforward to decide if you’ve gotten a decent result, but you won’t have a definitive answer to which is better. You’ll learn a lot more if, as suggested, you split it into two smaller batches and have a control — especially if you enlist the help of some other tasters to check your work.
If you’ve run a trial on more strains, then you’ve really got a lot of fun on your hands. Again, groundwork is helpful: Assemble descriptions of each of the yeast strains you used. Make up a tasting sheet for each of the wines and score them objectively for flavor and aroma. Sort them out to see which ones made the best showing and then see how you did against the control. There may or may not be a definitive winner, which is where other tasters can help to break ties or give notes.
The great thing about running a number of yeast trials is doing a blending session afterwards. Your 1-gallon jugs will let you layer flavors, increase complexity, and make a much more rounded and interesting wine. Start off by doing the standard bench trial trick of getting a known volume (like 100 mL — it’s much, much easier to work in metric for this) of your favorite wine and choose a second one that seems to either counterpoint or complement the first. Blend in 5-10% at a time and see how the wine changes. When you hit a sweet spot, choose a third wine, and repeat.
Eventually you’ll hit a point where you’ve gotten the best out of the blend (or your palate will have dropped dead of fatigue!) and from there you can assemble your best blend. If that means that not all of the gallon jugs get completely used up, you’re in good company: You can assemble a second wine, as many wineries do, for early drinking, or depending on the quality, foisting off on relatives.
After that, bottle and age your blends and monitor how they evolve at six-month periods. You’ll find that some strains that showed strong variation at first can become much more sedate with time, while others that may not have impressed initially can open up and wow you.
Further thoughts
It would have been pretty outré to recommend trials like this 20 years ago, but today’s kit winemaker is the smartest and most advanced in history, eager to try new things and see what works.