Troubleshooting Visual Defects in Wine Kits
The old truism of the commercial wine industry is that people drink with their eyes first. This is natural since you’ll see your glass as it’s coming to your lips. No matter how a wine tastes, if it’s hazy, cloudy or (even worse!) lumpy, it’s not going to please the drinker.
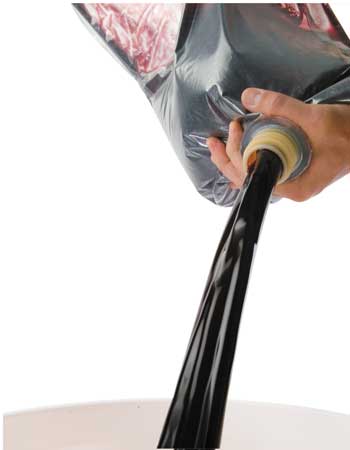
Wines made from kits go through the entire winemaking process, from yeast pitching to bottling, in a condensed timeframe, almost always less than two months, which requires a strict regimen of degassing, finings and rackings, a regimen that has to be followed closely to be successful.

Even though the winemakers at the kit companies devote numerous experimental trials to ensure the best fining/clarification possible, it doesn’t always work out, either due to environmental factors, product issues, or user input (aka, goof-ups). When your wine won’t clear on time, here are the things to look for so you can bottle delicious, diamond-bright wine.
What not to do, ever
First, don’t bottle cloudy wine. It won’t clear in the bottle, and any extra treatment to clear it up will require you to dump out all the bottles, process it and re-bottle.

Second, don’t filter the wine to clear it. Filtering is only good for polishing wines that are already almost completely clear. An analogy for the difference between fining and filters can be seen on your car. While a freshly washed car looks clean and bright, you can instantly tell it from a freshly waxed car — it’s clearer, luminous, and very appealing. But you can’t wax a car unless you wash it first.
If you try to filter a cloudy wine, any fining agents still in suspension will sail straight into your filter pads, blocking them up quickly, and the ones that actually manage to make it through will show up as sediment in your bottles later on — a disappointing return on your investment in filters and time!
Where to start
First, check the specific gravity. If the wine had not finished fermenting before you added the finings, you’re just going to have to wait until it does. Nothing you do will influence the clarity until the yeast is good and satisfied that there isn’t any more sugar to ferment.
Next, go back to the instructions and carefully review them to make sure you followed the fining procedures exactly. Some kits want you to add bentonite on the first day, and some want it on the 20th. Some kits must be racked prior to fining, some must not be racked off of their sediment or the finings won’t work at all.
Also, the instructions regarding fining all contain the same curious phrase: “Stir the wine vigorously,” which actually means, really, really, really vigorously. In order for the finings to have the proper effect on the wine it needs to be free of carbon dioxide. If it’s not, the bubbles of CO2 will churn about in the wine, floating the fining particles back into suspension, over and over again, and nothing will settle out.

The stirring process will be helped if you warm the wine to the upper end of the specified temperature range for your kit (remember CO2 is soluble in a liquid solution in inverse proportion to the temperature). When the wine is warm it will be much easier to de-gas.
Double-check the instructions regarding temperature. While some fining agents work very well under cool temperatures (bentonite, Kieselsol, etc.) others (chitosan, isinglass) stop working below specified temperatures. Many grape winemaking textbooks advise lowering temperature to help the finings work: this normally doesn’t apply to kit winemaking.
If the specific gravity is correct, you’ve stirred the wine sufficiently, and you’ve got it at the right temperature, the best intervention is to simply wait an extra week and see if it clears up on its own. The principle of least intervention applies to fining: Try to get the most effect with the least amount of added finings and effort.
If a weeks’ patience doesn’t pan out, you can probably add an extra dose of finings. Usually a manufacturer will recommend the same fining agent used in the kit, at a rate of 50% of the original dose. If that turns out not to be an option, the fining agent Sparkalloid is an excellent choice. It’s a little complicated to use, but the combination of seaweed protein and diatomaceous earth makes it a very effective cleanup fining. Only use it sparingly because its power as a fining agent is directly related to how much flavor and aroma it can strip from a wine. Be sure to follow the package directions precisely.
If you do add extra fining agents to the kit, make sure you increase the sulfite levels to match the extra processing and handling. As a rule of thumb, you can add an extra one-quarter teaspoon of metabisulfite per 6 gallons/23 L (about 25 parts per million) to offset any oxidation from the handling. If you’re not sure about the extra addition, you may wish to consult your manufacturer, or get a sulfite testing kit to make sure you stay in the right range.
Wine was clear, goes cloudy in the bottle
If your wine seemed clear in the carboy, but after bottling showed a haze or sediment, look for one of three problems. First, your fermentation may not have been completely finished.
Sample the cloudy wine and check both the specific gravity and the level of CO2 in solution. If the specific gravity is higher than that recommended in your instruction for bottling, and it has a significant amount of CO2, you will need to transfer it back into a carboy to finish fermenting.
Next, if the specific gravity is at or below the levels recommended in your instructions but the wine is fizzy with CO2 and hazy, you may have a microbial infection. There are thousands of potential culprits, from lactic acid bacteria to acetobacter (vinegar) to air-breathing mutant yeast (candida vini). Many organisms have the ability to ferment your wine after it has achieved what should be your terminal specific gravity. In this case you will need to un-bottle it all, re-stabilize it with more sulfite, and allow it to clear before filtering it (to reduce the number of remaining organism) and then re-bottling it.
One final scenario is a protein haze. Sometimes a fining agent will fail to clear all of the big proteins in a wine or traces of a protein-based fining agent (gelatin, isinglass, etc.) will stay in solution rather than binding to haze in the wine. When the temperature of the wine changes (such as during chilling) these proteins become visible as a haze. As it warms up again, the haze usually disappears. For people familiar with beer making, this is the same phenomenon as chill-haze. If you’re confused about why previously clear stuff goes opaque with a temperature change, think of egg whites. They hit the pan clear, but as the temperature heats up, they become opaque.
Proteins are usually taken care of with the bentonite included in most kits, but if you do have a protein haze, a small addition of bentonite should take care of it. Try adding 15 grams per 6 gallons/23 L (about three teaspoons). Follow the bentonite instructions for rehydration and stirring when you and add it to the wine. Wait two weeks and check again for cold stability by putting a sample of the wine in the freezer for 20-30 minutes. If it remains clear, you’re ready to go.
If not, you could try cold filtering. If the wine is mostly clear at room temperature, but clouds when cold, you can chill the entire batch and while it is still cold, filter the haze out. Note that this will not work if the wine contains significant amounts of solid material or sediment, and you will need to use the finest grade of filter pads your retailer sells. Still, with a good filter and careful handling you can proudly serve “cold-filtered” wine.
Floaties and lumpies, oh my
During the early stages of fermentation yeast can sometimes clump together and float on top of the must like a little island of happy sugar-eaters. Occasionally mold can form on top of the wine, showing up as small, papery-looking dots or circles. To discern between yeast and mold, take a sample of the floating material and rub it between your fingers. Yeast smears like yogurt or sour cream. Mold will roll up like rubbery paper, and won’t smear at all, remaining discrete in your grip.
If it’s yeast, ignore it. Yeast is as yeast does, and floating around the top of the must constitutes unremarkable behavior. On the other hand, if it’s mold, you need to carefully assess the wine. If the mold came out of the bag when you made the kit, you should carefully document the kit serial number, grab a sample of the mold and must in a sanitized container and return to your retailer with your receipt in hand, and ask for help. While it’s exceedingly rare, kits can develop mold in the bags before fermentation.
Because of the way the wine is packaged, through a sterile-fill pasteurizing head, it theoretically goes into the bags free of organisms. But certain environmental molds are actually thermophillic, meaning they don’t bloom until after they’ve been heated beyond a certain point (you see this in Ponderosa Pine trees that won’t release seeds from their cones until after a forest fire has cleared the underbrush and roasted the cones to fruition, yet another scene in nature’s grand pageant). These organisms can survive the pasteurizing process and show up in the wine a few weeks after packaging.
Don’t panic though: The failure rate for this sort of mold is very low indeed, and kit companies track this like hawks — that’s why you need to record the production code of every kit you make.
There’s another occasion when you might find something floating on top of your wine, and it can be very dramatic. If you add the fining agents to a wine that is still highly saturated with carbon dioxide, the finings can trap the tiny bubbles, forming a floating island that is almost exactly like a meringue. “Almost exactly,” because a meringue is a bunch of small bubbles encased in proteins that forms a light, fluffy mass. When this happens in wine it’s pretty dramatic looking.
The best solution to this is prevention: Follow your kit instructions and degas thoroughly before adding the finings (and stir to degas more afterwards). If it’s already too late, you can either carefully rack the wine out from under the mass into a clean, sanitized carboy, or you can go in with a drill-mounted stirring whip and break it up. If you can do that effectively, it will settle out over the course of a few days.
Film school
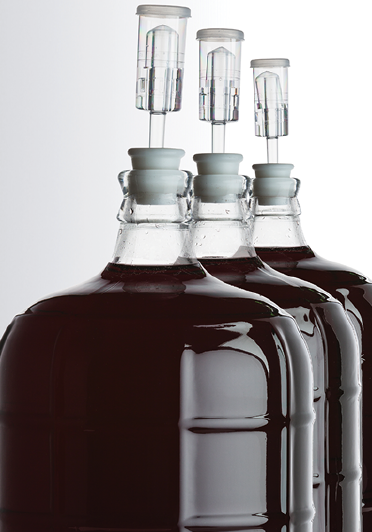
If you observe a thin, whitish film all over the top of your wine, you have serious problem, one that you may not be able to rectify. Sometimes called “flowers of wine,” it is a species of yeast, Candida Vini. It’s an aerobic organism, meaning that it requires oxygen to flourish. If it shows up in your carboy, it’s a sign that the sulfite in the wine is no longer protecting it from oxidation, and beyond that, the wine has already absorbed significant amounts of oxygen. As in so many troubleshooting cases the best cure is prevention. Always add the recommended sulfite, and for any period of storage or holding outside of the manufacturer’s instructions, top your carboy all the way up, to just below the level of the bung. This will reduce the surface area of wine exposed to oxygen transfer and make the sulfite’s protective effect last longer.
If you detect film yeast very early, when it’s a few spots or the faintest layer of film, you can sometimes treat the wine with a measured dose of sulfite. An addition of 50 PPM in 6 gallons/23 L (about 3 grams, or a level half-teaspoon of metabisulfite powder) followed by racking to get it away from any mycoderma film. Top up the carboy, switch to a solid bung, and taste the wine after a week to see if you caught it in time. You may wish to re-test the wine for sulfite level and filter it to increase its stability.
After that, go through all of your equipment and sterilize it by soaking it in a cleaning solution and scrubbing with plenty of elbow grease. Check all of your other wines, being careful to sanitize your wine thief and sample jars between wines. While it’s slow growing and only flourishes in the presence of oxygen, mycoderma easily spreads to other wines and can be difficult to get rid of.
Sometimes winemakers see a film and think that they have a sherry or “Flor” yeast. This is a type of yeast that behaves as strangely as its cousin mycoderma, utilizing oxygen and leaving a film (or Flor) on top of the wine. As it works it can drive the alcohol content of the wine to 20% or higher, and leaves it with a nutty, delicate flavor described as “rancio.” But Flor grows under such an incredibly narrow range of conditions (temperatures in excess of 100 °F/38 °C, lots of dissolved oxygen, no sulfite and a huge culture of the proper yeast strain) that you will never see it unless you devote your life to growing it.
Goo and swirls
If your wine has a floating swirl, a haze that’s suspended and seems like it sticks to itself, it could be the signature of an acetobacter infection. Acetobacteria are trouble on the hoof because they are what make vinegar. Sadly, the kind of vinegar that wild acetobacter makes tastes more like carburetor cleaner than salad dressing.
Acetobacter is really the jerky brother-in-law of spoilage organisms: It consumes your alcohol and leaves you with a sour taste in your mouth — literally. It breaks alcohol down into acetic acid and associated ketones, esters and aldehydes, giving wine that distinctive vinegar odor and back-of-the-throat tang, dropping its alcohol content and utterly ruining it forever.
The cure for acetobacter contamination is a sewer drain. The wine can’t be saved. Sanitize all of your equipment like a demon, all at once, with strong detergents. Top up all carboys of finished wine, make sure airlocks and bungs are secure, use the recommended level of sulfite in your kit and control fruit-flies in your winemaking area. The common fruit fly, melanogaster drosophila, is a rotten little carrier of the bacteria. Even in the tiniest amounts of acetobacter can change the character of your wine, so wipe up any spilled wine, keep fruit or other potential attractants away from your winemaking room, and if things get bad, set up a fruit fly trap (see sidebar at the end of this article).
Another entirely wacky phenomenon in wine appearance is “rope,” or “graisse.” This happens when yeast exudes a mucous-like polysaccharide compound and thickens the wine like, well . . . 6 gallons/23 L of mucous. In extreme cases you can actually use your finger to scoop out a thick ribbon of wine (which looks like rope, I guess). This condition, while fascinating, is rare even in the worst winemaking conditions. That’s lucky because there is no cure for this condition, and the wine can only be discarded.
In living color
Wine kit manufacturers are in an odd position: They make a packaged food out of a variable agricultural product. They can ameliorate color differences from harvest to harvest by blending grape material from different areas to achieve consistency. However when all of the grapes in a kit come from a specific area, it may not be possible to completely blend away differences. Commercial wineries acknowledge this, and celebrate the different harvests as vintages. Kits are going to vary a bit from year to year, but unless the color change is marked by some other effect, a bit of inconsistency is not necessarily a flaw that can be corrected.
Into darkness
There are coloring products on the market, such as Grapeskin Extract, Mega Purple, Exberry, etc. that can be used to darken a red wine. Some consumers associate deeply colored reds with rich or powerful wine, but dark color is not necessarily a sign of high quality. Pinot Noir can be a delicate garnet/ruby color and still deliver wonderful flavor and aroma. Philosophically, I am opposed to darkening kit wines with coloring agents. High-quality kits will have an appropriate color that won’t require fiddling. They are as dark as or darker than good commercial examples of the wine.
It hardly ever happens that a kit is darker than expected, but if it is, double check with your retailer to make sure you got what you were asking for. If it is the correct style, but still seems too dark, you may wish to blend it with a lighter wine.
Pink is the new orange
Blush wines are actually quite difficult to produce, and commercial wineries have spent literally millions of dollars trying to figure out how to keep consistent color in their blush. The kinds of color compounds that give a lovely pink color are very unstable. They lose their purple-pink hue over time and go to a reddish-orange pink. The French call this color “l’oeil de Perdrix” (eye of the partridge) and it almost looks like the color of salmon flesh. This change is not a sign that the wine is oxidizing or spoiling, merely that the colors are going through their natural evolution. Red wines do the same thing, but they do it much slower and have much higher levels of color to start with. Unless your partridge-eye color is accompanied by off aromas and flavors, it isn’t a sign of low quality.
White is brown, red is bricky
While well-aged examples of white table wine can be deep golden, with icewine gorgeous amber, and Sherry is a lovely tawny-toast color, brown wine is more often a sign of advanced oxidation, and is usually accompanied by a Sherry-like (nuts/hazelnuts) smell due to acetaldehyde production. When terminally advanced this Sherry smell goes from acetaldehyde to acetic acid to ethyl acetate, the vinegar and nail polish remover aromas.
As with other oxidation events, the best treatment is prevention, so follow your kit instructions for racking, topping and sulfite use. Severe oxidation is always preventable.
In early stages of oxidation you can treat the wine. First with a strong dose of sulfite (50 PPM, one-half teaspoon per 6 gallons/23 L) and then with a compound that removes oxidized color compounds. The best treatment is Polyclar VT, a food-grade Polyvinylpolypyrrolidone, which is a type of powdered nylon plastic.
Use it according to the package instructions, usually in 1 to 2 grams per liter (one to two ounces of powder per 6 gallons/23 L). This amount may seem high to people who have used Polyclar for grape or fresh juice wines, but experience with kit wines has shown they take significantly more treatment to remove the oxidized compounds. It requires repeated stirring over a period of hours, because it is only effective when in contact with the wine and it rapidly settles out. After stirring and settling, filter the wine, test, and adjust your sulfite to 50 PPM again.
Polyclar can diminish aroma compounds (sometimes it is used for this very purpose, to remove an undesirable aroma) and can completely de-aromatize a wine, so you may wish to do a trial on a small sample of your oxidized wine to determine if it’s actually an improvement.
Polyclar also indiscriminately removes polyphenolic compounds (tannins) and desirable color. For this reason it is much more damaging to red wines, and too strong a dose can strip a bricky-red wine to salmon pink, and remove enough of the tannins to leave it flabby and soft. Proceed cautiously and do a small trial to see if it can help the wine without stripping it too much.
Fruit Fly Trap Sidebar:
Fruit flies are a winemaker’s natural enemy. Even a few of them contacting your wine can alter the flavor. In addition to sticking with very strict sanitation and cleaning regimens, there is something you can do to keep them at bay. You can set a trap.
Buy a wasp trap from your local hardware store or feedlot/tack shop. Assemble it per instructions, but fill the reservoir with apple cider vinegar and a squirt of liquid dish detergent. The flies will be almost unbearably attracted to the smell of the vinegar and the detergent will reduce the surface tension of the liquid so that as soon as they hit it, they go under and drown. You’ll need to clean it out periodically, but it will keep working 24 hours a day to keep them from spoiling your wine.