7 Great Wine Kit Tips
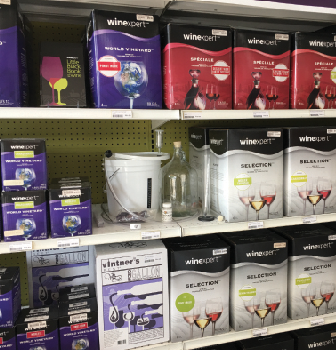
Ah, the wine kit — is there any invention of mankind that has contributed more happiness and pleasure than the simple box of delicious juice, clarifiers, stabilizers and thoughtful, well-written instructions? Well, okay, maybe sanitation, medicine, crop rotation, fire, the domestication of animals, the plow and nearly everything else. However, in the grand scheme of things, kits offer you the opportunity to make wine from a wide range of styles — over 100 at last count — from around the world. And you can make them with a good chance of success, even on your first try.
Wine kit manufacturers all warranty their kits against defects in manufacture and workmanship. Most of them also guarantee that the wine will turn out every time. The catch is, they only honor this guarantee if you follow the instructions precisely, omitting no detail, however slight.
If you’re anything like me, you usually regard manufacturer’s instructions much like the admonitions of a nanny. They are gratuitously conservative, overbearing and easily ignored. However, if you change your ways and take the time to read the instruction manual that comes with your purchases, you can be vastly surprised and informed. (I can program my VCR! My car stereo works! It’s like magic!)
However, most of you are probably unlike me in that you didn’t write the instruction sets for two of the big manufacturers in the industry. One bit of inside knowledge I can let you in on is this: All of the instructions are based on empirical trials. “Empirical trials” means that we tried them to see if they worked. We make kits not once, or even twice, but up to thousands of times every year! Kit manufacturers make up hundreds (and even thousands) of their own kits on a yearly basis, using their instruction sets precisely. The day they don’t turn out as specified is the day the instructions get revised. In addition to proactive trials, manufacturers keep a customer service database. When reports of fermentation or clearing difficulties come in, the quality control and technical types (like me) swing into action. We test the kits and making necessary changes.

Now, where the confusion normally lies is with people who have some knowledge of grape winemaking techniques. Many of the instructions in kits contradict good grape winemaking methods. Logically, if you were making wine, you’d want to use the steps that commercial winemakers use, right?
This reminds me of the days when I worked for an automotive store. I once sold a gentleman a can of carburetor cleaner. He was back in an hour, fuming, complaining that the spray hadn’t worked. When I went out to his car and popped the hood, I had to point out that his car wasn’t equipped with a carburetor; it had fuel injection.
He had good intentions and the right idea, but he was applying it to the wrong technology. The same goes for applying grape winemaking techniques to wine kits. Good ideas, the best of intentions, but there aren’t any fresh grapes in kits to apply them to.
If you want your kit wine to turn out great every time, and avoid a few of the pitfalls that I’ve seen crop up time and again, here are the seven highly fermentative habits you need to follow.

Habit 1: Read the instructions
I’ve lost count of the number of times someone has told me “I did procedure ‘X,’ just like it says in the directions,” and it turns out the instructions haven’t included that procedure for three years.
Manufacturers don’t randomly change the process of winemaking for their kits. However, when faced with a changed technology — such as new fining agents, different strains of yeast or a different level of solids in the raw materials — they have to alter the procedures to ensure the wine turns out correctly. Even if you’re an experienced winemaker, and you made the very same kit a short time ago, always read the instructions again — they may have changed without your notice. This is especially important in regards to racking, stirring and fining procedures, which are the aspects most likely to change.
Also, reading the instructions may head off confusion. Some kit manufacturers package only one or two sizes of additive package. Instead of making another size for a kit that requires a different dose, they double up on the regular size.
You see this sometimes with oak powder. There might be one, one-ounce (28 g) package for a Sauvignon Blanc, and suddenly there are four of the same packages in an Australian Chardonnay! Are the extra packages included by mistake? Are you supposed to throw in a pillowcase full of oak? Consult the instructions, and I guarantee they’ll say, “This kit may contain more than one package of each ingredient. Please add all packages when directed.” A final note here: Different wine kits use very different instructions. Why aren’t they all the same? Mainly because of those empirical trials mentioned above. A set of instructions that works for one kit isn’t necessarily going to give success with another. Always read the instructions and use the specified techniques.
Habit 2: Keep it clean
Wine is food. When you’re preparing food at home, you use a clean cutting board, wipe the counter, wash your hands and use clean plates and cutlery. Now imagine your dinner had to sit a month, or even six weeks, before it was ready to eat. Unless your clean-up and preparation was intensely sanitary, your food would be spoiled long before you could eat. The same goes for wine. Unless your winemaking equipment is spotless and sanitized, you’re giving environmental bacteria up to a month and a half to chow down on your wine!
Remember, cleaning and sanitation are two different things. Cleaning is removing visible dirt and residue from your equipment. Sanitizing is treating that equipment with a chemical that will prevent the growth of spoilage organisms. Everything that comes in contact with your wine must be clean, and properly sanitized, from the thermometer to the carboy, from the siphon hose to the bung and airlock.
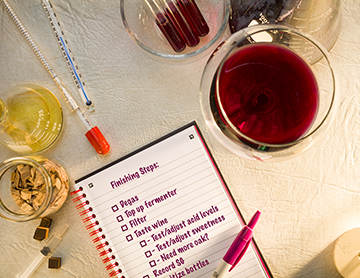
Habit 3: Write it down
Winemaking is like any other hobby — you’ll be better able to duplicate your successes and avoid your failures by keeping records of both. You can either jot these in the spaces provided right on the instruction sheets, or get a notebook that you can keep in your winemaking area.
Ideally, you should record:
• The date and time you started your fermentation and the type of kit
• Your measurements (specific gravity, temperature)
• The temperature of your fermentation area
• Anything else that might potentially affect the fermentation
However, keeping good records of your fermentation goes one step further. Wine kits generally have a production date code somewhere on the box, either right on top, or along a seam or other open spot. Manufacturers use these codes to identify each kit individually.
If you have a problem, the code number is very important. It allows your retailer, through the manufacturer, to find out if there was any kind of change in the product recently and whether the manufacturer has any advisories on the particular kit. It can also confirm that the kit was packaged correctly. By consulting the product code, all things can be made clear.
In addition, if the kit doesn’t turn out, the manufacturer won’t be able to help you without the code number. So write it down! (Note: Some people save their wine kit boxes, which allows them access to the code. Or, it does until your seven-year-old discovers your cache of boxes and realizes that with a glue-gun and some imagination she’s got the makings of a great fairy castle. Oy!)
Habit 4: Be full of it
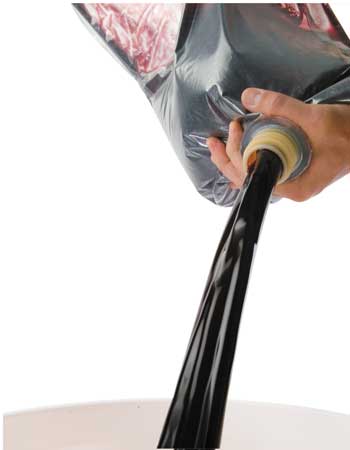
One thing that is crucial to the success of a wine kit is starting it out at the correct volume. Virtually all dry table wine kits start off at six gallons (23 L). Dessert wines are usually three (11.5 L). After all, who can drink six gallons of Port? (Besides me, I mean.) On day one, you need to add the correct amount of water to make that full, six-gallon (23-L) volume. The consequences of over-diluting are weak-tasting, low-alcohol wine that may not keep well. The potential consequences of under-diluting are subtler and potentially more harmful.
First, unless corrected, under-dilution will make a harsh, unbalanced wine. It will have a high alcohol content, but no finesse. Certainly the wine will not taste the way it is described in the manufacturer’s literature.
The wine will also take longer to ferment and may not clear well. Some high-gravity kits (those that start with a gravity in excess of 1.100) may never finish fermenting at all. The yeast could die before all the sugar was converted to alcohol. With this extended or incomplete fermentation, the fining agents may not work correctly. During ongoing fermentation, bubbles of carbon dioxide in suspension (a by-product of the yeast converting sugar to alcohol) will “churn” the fining agents into suspension, over and over again, preventing them from doing their job. Residual sugar from incomplete fermentation may also hinder the finings’ effectiveness.
Starting off at the correct volume requires the use of a primary fermenter of at least 8 gallons (30 L) capacity. This is to allow room for foaming, which in a wine kit can be astonishingly vigorous. If you use a six-gallon pail, you’ll stain the carpet. (If it’s on concrete, keep in mind that raw winemaking grape juice can etch through uncoated concrete; it loves the calcium in the concrete mix.)
Habit 5: Stir the pot
Wine kits generally contain the admonition “stir vigorously” somewhere in the text of the instructions. This is a little ambiguous. What it really means is “Stir until you feel like you’re going to fall over! Stir ’til you have to brush your teeth left-handed for a week! Stir like it’s the only thing between you and eternal damnation!”
Vigorous stirring is needed on day one. This is because the juice and concentrate are very viscous and don’t mix easily with water. Even if it seems that dumping the contents of the bag into the primary with the water has done the job, it hasn’t. The juice lies on the bottom of the pail with a layer of water on top. This not only throws off any gravity readings, it also overworks the yeast. It may get through the diluted top layer all right, but underneath it can’t ferment the high-sugar, unmixed juices. It might quit early, leaving underfermented wine.
Vigorous stirring is also needed when it comes time to stabilize and fine the wine. The stirring has to drive off all of the CO2 the wine accumulated during fermentation. This is because the dissolved gas will attach to the fining agents, preventing them from settling out. You need to stir hard enough to make the wine foam and keep stirring until it will no longer foam. Only then will the fining agents work. It’s not possible to predict how long this will take, because it varies with the vigor of the stirring. You just have to watch to see if it’s stopped foaming.
Once again we come to the obvious question from a grape winemaker —what’s with all that stirring? It isn’t necessary in grape wines! Grape wines are generally made over a one to two year period. This gives them all the time in the world to release their suspended carbon dioxide. Kit wines are generally ready for fining in less than three weeks. This means that the yeast fermentation has more or less just finished and the wine will still be saturated with bubbles.
Habit 6: Temperature control
One thing that frequently messes up wine kits is the wrong temperature, or varying temperature ranges during fermentation or fining. Kit instructions tell you to ferment your wine within a specific temperature range, typically 68–78 °F (18–24 °C). Kit yeast likes this temperature range as it provides a good compromise between optimum growth and ester (flavor compound) production. Yeast certainly does not like temperature fluctuations.
This is another situation where kit instructions are different from grape winemaking techniques. In commercial wineries, some white wines are fermented cooler than this, sometimes below 55 °F (12 °C). Again, commercial wineries have the luxury of taking a year or so before they bottle their wines. For the home winemaker, though, if the fermentation area is too cool, the wine will ferment very slowly and you’ll be stuck with fizzy, unfineable wine. Worse, the kind of fining agents included in kits may not work well at temperatures outside of the specified range.
Temperature range is one thing, but temperature fluctuations are another kettle of oysters. Winemaking yeast is actually a fussy little milquetoast of a fungus. Too many cycles of hot and cold and it’s going to take its bat and ball and go home. Well, not exactly, but if the yeast senses too many temperature changes, it will decide that the environment is too hostile and it will go dormant. This will extend your fermentation and may stop it altogether.
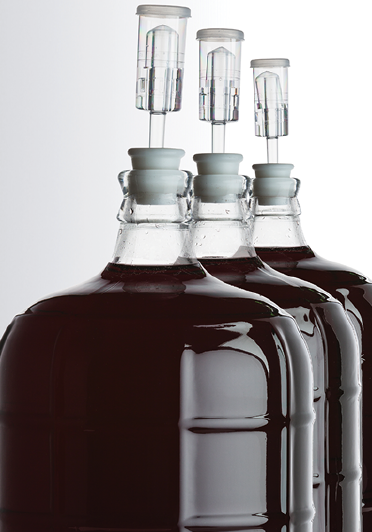
In climates with extremes of temperature, many winemakers keep their batch in their living space where there is central heating or air conditioning and assume this will keep the temperature stable. What they miss is that during the day while they’re off at work, they turn off the thermostat. The wine may go through several heating and cooling cycles, and the yeast gets fussy and chucks it all for a nap. So, if you live in a climate of fluctuating temperatures, you need to ensure that your fermenting area stays in the specified temperature range in the instructions. In cold climates that may mean tucking the carboy in a cupboard with a small thermostatically controlled heater. (Please don’t burn down the house for a batch of wine. Follow the instructions for your heater unit.) Or you may wrap the fermenter in an electric blanket. In cool climates you may need to resort to a passive cooling system. Simply standing your carboy in a pan of water, draping a wet T-shirt over it and directing the breeze from a fan over it can lower the temperature of your carboy by as much as 10 °F (5 °C). In the hottest of climates, you will either need a root cellar, or a permanently air-conditioned area.
Habit 7: Magic ingredient
Ever wondered if there was a magic ingredient you could add to your wine? The truth is, there is . . . time. You see, wine kits are ready to bottle in 28 or 45 days — they’re not ready to drink! For most whites, and virtually all reds, at least six months is needed to smooth out the wine and allow it to express mature character. Heavy reds will continue to improve for at least a year, rewarding your patience with delicious bouquet. So add the magic ingredient; let time do its work!