Are you ready to move up from small batches of wine? In this article we are going to discuss the specifics of making “big” batches of wine — that is, 10 gallons (38 L) or more.
This is a great follow-up to my recent article on setting up your home winery (in the February-March 2014 issue of WineMaker), but this is also a “BIG” topic to cover! As I have only been a winemaker for about five years I don’t consider myself a winemaking expert, but I did know early on that for winemaking, going big was the best approach for me. And it just may be for you too!
Should You Go Big?
The first topic to address is whether bigger is better for you. Like lots of hobby winemakers, I started out by making wine kits; a Gewürztraminer was my first. This was an unintimidating way to cut my teeth on the process, and if it didn’t turn out, well, I wouldn’t be out a whole lot of money. Plus I already had most of the necessary equipment from my beer-making hobby. The wine turned out quite well, particularly given my non-discriminating palate at the time. Unfortunately being a wine and beer maker garners a LOT of new friends who are eager to share the fruits of your hobby. Wine also makes great gifts when visiting friends and family. Within a couple months my stash of what seemed like a large supply of 30 bottles was eviscerated.
The immediate solution to this problem was to either make individual kits more frequently, or increase my batch size considerably. The question at hand was not if I was going to increase my annual volume, but which path I would take. The pros and cons are highly dependent on your individual needs. To begin, you’ll want to determine how much wine you consume in a year and how many varietals you like to have on hand during that period. Don’t forget to include wine you give as gifts to friends and family. I really enjoy the sharing aspect of this hobby, so sharing constitutes about a third of my annual production. And don’t forget to add in wine that you want to lay up for long-term aging.
The other big factor to consider when scaling up your production is time. Having lots of varietals in inventory is great, but managing that many different batches is very time consuming. With an active family of teenagers, time is a precious commodity for me. But keeping enough wine on hand to unwind after a day of dealing with aforementioned active teenagers is also vital — doubly so for my wife who has to add me in the mix of challenging people to deal with.
Another crucial decision is how artisanal and personal you want your handcrafted wines to be. You can certainly pour multiple kits into a large vat for processing, but the majority of the handcrafting has already been done for you by the kit manufacturer. Kit wines have certainly come a long way in quality over the years, particularly red wine kits, and competitions validate that they can compete with whole fruit wines. But I prefer to make wine with fresh grapes and I love the freshness and finesse I get from real, fresh, whole fruit. This is why I love the hobby — the pride of handcrafting, and the drive to learn and improve every season. While you could make a small batch of whole fruit wine, managing the fruit buy, crushing, pressing etc. can be a lot of work for a small batch. It isn’t much more work to increase your batch size significantly and amortize your effort over a much larger quantity of wine.
A great benefit I found when making large batches is the camaraderie associated with it. I always can find friends that are interested in the process and are always excited to help. Hauling that much fruit, crushing it, fermenting it, pressing it, and bottling it are unmanageable without help. I always get the job of hauling the crushed fruit from my front yard, through the house, and into my basement. All protected by plastic tarps on the carpet — a lesson learned the hard way from a major carpet stain during my first batch. Wife — still not happy about that. But I do find that handing her a glass of Chilean Malbec tends to quiet her up about it. If you offer free wine during the process (except the person running the crusher), and a promise in a share of the yield, the winemaking experience becomes a fantastic social event. Bottling day is another key social event. But don’t forget to add this wine consumption into your annual quantity. It is also a super way to get more people into the hobby. Still another great locale, and probably the best for large batch winemaking, is to work with your local winemaking club. Not only can more people learn and share, it is a great opportunity to pool resources, reduce net shipping costs of fruit, and share equipment. In a nutshell, big batch winemaking offers the potential for higher quality wine, less time per bottle, a great social and artisanal experience, and a very reasonable cost per bottle.
It will also challenge you to grow your winemaking knowledge and improve your wines more than you would have imagined.
The Equipment
The next step after you’ve decided to go big is determining what equipment you’ll need to get there. Might I add that if you’re thinking about going big you are probably already serious about the hobby and plan to do this for a long time. Look not at this equipment as an expense, rather as an investment. While most of us have a budget, don’t be tempted to go cheap on equipment. You’ve got a lot of money tied up in fruit, yeast, additives and time. Having the proper equipment is a necessary investment. I have always said that the most expensive tool in my toolbox is a cheap one. If it doesn’t work properly when needed, it is worthless. I’m not recommending to be lavish, but do plan to make a significant investment in your hobby. Also realize that some of the larger equipment can be rented from your local winemaking retailer for a reasonable fee. My local retailer will crush any fruit you buy though them, which is a very convenient service. Group buys — such as with a club — of equipment can also spread out the investment.
Testing Equipment
I put this as the first category for a reason. With large batches in particular, it is vitally important to measure, monitor, and correct any deficiencies in your wine as early in the process as possible. Not that it isn’t important for small batches — you just have a lot more at risk with large batch quantities. At a minimum you should have a reasonably accurate instrument to measure additives, specific gravity, SO2, pH, TA levels, and malic acid in your wine.
A dissolved oxygen meter is nice, but optional. There are a ton of scales to measure by the gram in the market today and are readily available at your home winemaking retailer. Choose one with 0.1 g precision. Using measuring spoons is impractical and too inaccurate for large-scale winemaking.
For specific gravity, refractometers are very inexpensive and work great for crush day. But a plain old hydrometer works well too. And note that once fermentation begins a refractometer does not read accurately so use it just for crush day. When using a hydrometer, try to make sure the sample is largely pomace-free for more accurate results.
Another simple to use and reasonably priced tool is a pH meter. Beware of low-price imported models as they often don’t read consistently and electrode life isn’t always the best. While pH test strips are low in price, they are really too inaccurate for winemaking.
The next big investments are SO2 and TA measuring tools. For SO2, some simple Titrets® are available for a very low price, and in white wines they provide reasonable accuracy. But in reds, Titrets® are not an appropriate measuring tool since the transition color is hard to detect from the dark wine and the interference from tannins skew the measurement. Again, you’ve got a lot of money tied up in fruit so skimping on this vital measurement is not advisable. If you’re a bit of a chemistry geek, kits are available for a very reasonable price. Or you can go with an automated machine for significantly more. Same with TA measuring equipment. I will say that doing it the old fashioned way with flasks and reagents will teach you what these measurements are actually doing and aren’t all that difficult to use after a little practice. Malic acid test kits (paper chromatography) look a little confusing to use but are quite simple in actuality. Knowing your wine is through malolactic fermentation is much better than 300 bottles of fizzy wine. I’m man enough to admit that it takes a long time to drain, degas and rebottle that much wine. In lieu of buying instrumentation, several sources exist for mailing your wine in for measurements for all the above parameters for as little as $120. That said, unless you can get this done locally you’ll be waiting for few days for your results. Except for on crush day this isn’t usually a big deal. If you can group buy the TA and SO2 equipment, or utilize your local winemaking store, that is a nice option. Tip for winemaking store owners: This is a great service to offer and a great way to stay in touch with your customers. Accurate measurements make for measuredly better wine.
Crusher/Destemmer
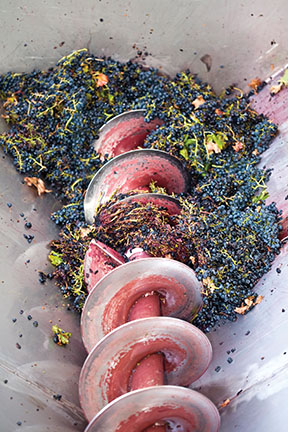
A quality crush is important to a quality fermentation. Too loose a crush and un-split berries may not fully ferment and are more difficult to press. Too tight and you risk cracking seeds and imparting harsh tannins to your wine. There are also crushers, crusher destemmers, and destemmer crushers in order of expense and quality. If you use a simple manual crusher plan to either manually destem prior to crush (very laborious) or pick thoroughly through the must to remove stems before adding to the primary alcoholic fermenting vat; also very laborious. A crusher destemmer (crushes then extracts stems) works quite well, although you’ll still get some carryover of stems into your must — but not enough that it will affect your wine. Ideal, but most expensive, is a commercial-type destemmer crusher where whole clusters are destemmed and the whole berries fall through to the crusher. With these models very little stem material makes it into the must but they are insanely expensive. In practicality, the “mid-grade” crusher destemmer is most common and does a great job for the amateur winemaker. Since this is a sizeable investment for a tool that will be used a few days a year, consider utilizing your local home wine supplier or renting. Better yet, consider a group buy with your winemaking club.
Vat
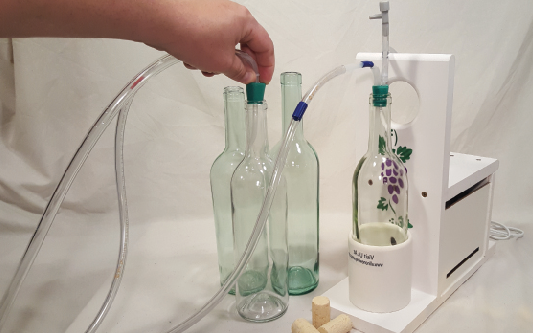
During primary fermentation CO2 evolution and the relatively short duration opens this step to lower cost food-grade plastic vessels, but these vessels are not acceptable for long-term maturation due to inadequate sealing systems and oxygen permeability. They do, however, make great temporary storage vessels for performing racking operations discussed later. Carboys and demijohns are great for cleaning and oxygen ingress prevention, but their limited size makes them challenging for large batch production since so many are needed.
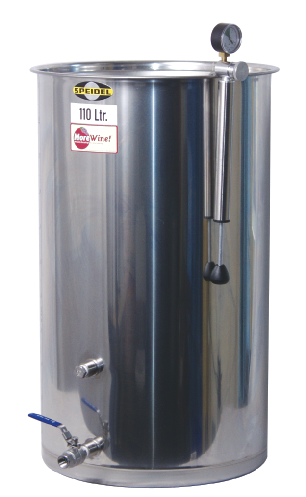
Stainless variable capacity tanks (VCTs) are commonplace these days and reasonably priced. Their “floating” lid designs virtually eliminate headspace that can lead to contaminations. For large batch winemaking, VCTs are frequently the vessel of choice for big batch home winemakers. For sizing, expect to fill a primary fermentation vat about 75% full to allow for the cap to rise. Other vessels can pretty much be filled to full capacity.
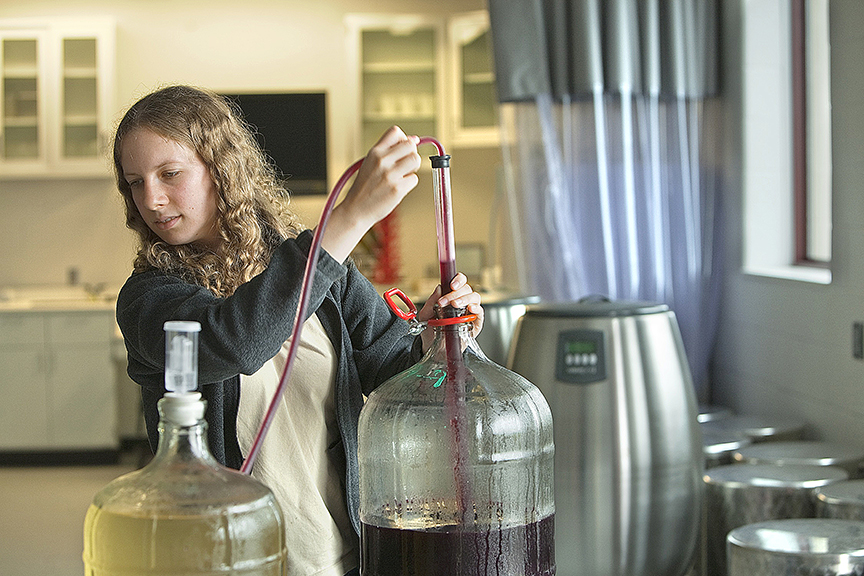
Growing in popularity are stainless conical fermenters, which are great for bulk aging, but not ideal for primary fermentation on skins. They offer complete elimination of racking by allowing quick dumping of lees through a valve at the bottom of the cone, which takes just a couple minutes. But because they are fixed in volume, the headspace must be regularly purged with nitrogen, argon, or beer gas (75% nitrogen, 25% CO2) or topped up with wine to keep spoilage and oxidation at bay. To combat the headspace issues, a great solution is to apply a constant low positive pressure (a few inches is enough) of inert gas to the vat. This blanket of inert gas protects your wine automatically even during sampling and lees removal. You’ll also need to rack several times during maturation, so you’ll need some sort of containers to temporarily rack into. A common method is to temporarily rack into your primary fermentation vat (plastic or other), then clean the sediment out of the aging vat (VCT or other) and rack back into the aging tank from the temporary storage tank. Of course, be mindful of sanitation and oxidation. Another option is The WineEasy™, developed by my company, Blichmann Engineering. The WineEasy™ system is available in different models ranging from capacities of 20 gallons (76 L) up to 55 gallons (208 L), and provides the ability to perform primary alcoholic fermentation, pressing, and bulk aging as a variable capacity tank (VCT) all utilizing a single main vat. The pressing is accomplished using a vacuum pressing system. The vat also makes a useful blending/bottling tank on bottling day. An added plus is that the double wiper seal of the WineEasy™ floating lid doesn’t require an air pump for the “tire” as do traditional VCTs.
Cooperage
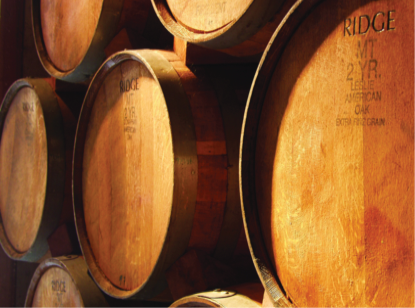
Admittedly, oak barrels are really cool to show off and really give the winemaker that artisanal feeling. But unfortunately, they are expensive and a challenge to manage and maintain for home winemakers. While I’ve included common pricing for these, my personal recommendation is aging in bulk using stainless tanks and utilizing oak barrel substitutes such as chips, planks, cubes and spirals. What I really enjoy is the ability to mix and match species of oak and the ability to control intensity level by removing them after that intensity is reached. It is also eco-friendly as it uses much less oak per barrel of wine to achieve the desired level. The only drawback is the inherent lack of micro-oxygenation that barrel aging provides while simultaneously imparting oak tannin character. However, for home winemakers the multiple rackings through the aging process usually achieves adequate micro-oxygenation for proper aging but you’ll definitely want to use those oak barrel substitutes during aging.
Presses
After primary alcoholic fermentation you’ll pump your free run into a vat and be left with some damp sloppy pomace to press. Cue the stain on my carpet. I bought a traditional wood slat ratchet press, and while it worked fine it did take forever to press, and I never really knew how hard I was pressing and was concerned about extracting harsh tannins. Bladder presses, on the other hand, are a bit more expensive, but easy to limit the pressing force and are much faster to operate. Of course they both come in several sizes. As I mentioned earlier, the WineEasyTM is a product that utilizes a vacuum pump to provide the pressing force. Since this is limited to atmospheric pressure, the pressing force is self-limiting and keeps you out of hard-press conditions. It also eliminates the transfer to a press so it is very mess- and contamination-free.
Pump
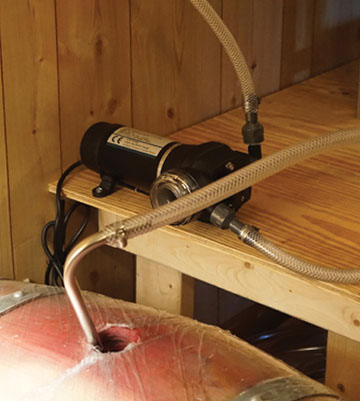
This is a tool that is often overlooked, and irrationally feared. Simple and immediate cleaning and sanitizing after and before each use should shed any fears of contamination and the convenience of pumping vs. gravity siphoning for racking is amazing. While gravity is highly reliable and quite cost-effective, getting elevation for siphoning large vessels isn’t practical. Diaphragm pumps will easily move 3–5 gallons (119–19 L) per minute (gpm), and best yet, they’re self-priming so elevation is a non-issue. Some models are also variable speed so flow control is great.
Filter
While filtration is a somewhat debated necessity, large batch winemaking, in my opinion, really necessitates this. If you inadvertently carry over some lees in a large batch of whites you may end up with a lot of cloudy wine. To me, presentation of a white, or even a red, is important. Cloudy portrays sloppy winemaking and turns off some wine drinkers. While finings do a good job of clarification, wine filters work impeccably. And I use them in tandem. In short, if you’ve come this far with a large batch of wine, the filtration is the “polishing touch.” There are a number of filters on the market, but a good product I’ve used for years is the Buon Vino Super Jet. The pads are reasonable and if your wine has gravity-settled for several months you’ll be able to filter well over 30 gallons (114 L) on one set of pads. Speaking of pads: There are coarse, polishing, and sterile pads to choose from. I personally use the polishing pads and have brilliant whites. Sterile pads plug more rapidly if you inadvertently draw some sediment into the filter. To be honest, I can’t tell any difference in clarity so have just stuck with the polishing pads. Another feature I like is the integral pump, which makes draining the aging vat and filling the bottling vat a snap. I do like to blend all of my individual tanks into one bottling vat for consistency bottle to bottle, particularly if I am blending different varietals.
Bottle Filler
Don’t even think of using a bottling wand if you make a large batch of wine — unless you’re using this hobby solely to kill time and stay away from people; or you really want to know what carpel tunnel feels like. There are some decent single-head fillers out there for a fair price like the EnolMatic and the Buon Vino Fill Jet. They’re fairly fast and provide a reasonably consistent fill level. But more than about 25 gallons/95 L (125 bottles) and you’ll wish you had another one, as it can become the bottleneck in your process. That said, a 3-head filler is awesome for larger batches and about all one person can keep moving.
Corker
I tossed my hand bottler after the first use with a few choice words accompanying it to the dumpster. I will say that they are an excellent way to launch a bottle onto the carpet. Really, I need to stay a good 50 feet (15 m) from carpet when I’m doing anything related to winemaking. So I moved to a quality floor corker immediately. Wow — what a difference. Consistent cork insertion depth, speed, and the bottle stays secure. They aren’t all that expensive so buy a good quality model — you’ll love it.
Labeler
Again, unless you’re trying to kill time and learn about carpel tunnel, a label applicator is a necessity for large batch winemaking. They apply the label quickly and accurately. There are a number of label manufacturers and most will provide them on rolls to accommodate most dispensers. Labelers aren’t cheap so this is another great item to group buy.
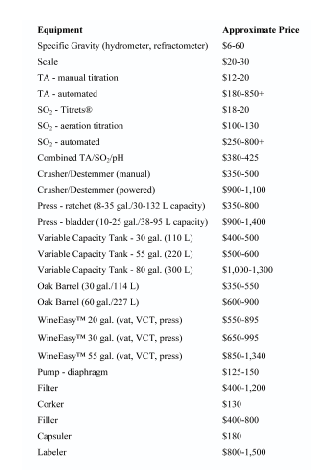
Big Batch Equipment Costs
Time to Make a Big Batch
Hopefully this article has given you some serious food for thought about going big in your home winery. While making big batches isn’t for everyone, they are not as daunting an undertaking as it may seem. Review what your personal winemaking needs and desires are and see if they align with the benefits of large batch winemaking. I can promise that the knowledge you will gain from this process will grow exponentially and the handcrafting of big batch wines will be very rewarding. The final step is to review my previous article in the February-March 2014 issue about setting up your ultimate home winery and, of course, PLAN! Remember that you don’t need to buy all the winemaking equipment at once, and don’t forget to look to group buys and renting some equipment in lieu of purchasing. Lastly, you’re a winemaker — with great knowledge comes great responsibility. Share the hobby, the wine, and pass on the knowledge!