Build a Carboy Cleaner
I learned quickly during my early days of cleaning up after myself in the winery that a carboy brush is designed to spackle the walls, surrounding cabinets and the user with undesirable crustiness from within the carboy interior. Sure, a brush does a good job of cleaning the major gunk out, and it’s cheap, but after a few messy cleanups I was sure that there must be a better way to clean a carboy. I scrounged DIYs on various Internet forums in search of that better way and found that soaking the carboy with OxiClean overnight seemed to be the default method for most folks. So for my next few batches, I did just that — I waited. I’d fill a carboy up halfway with some sort of detergent then carefully flip it over and balance it in a bucket to let the suds do the work. Most of the time the place I picked to let the carboy sit and clean itself was in my way (or worse, in the way of my wife, but I didn’t dare move the soaking carboy before it was ready to drain out of fear of spilling the water all over the counters and the floor, not to mention dropping a glass carboy could be catastrophic — which is easy to do when it’s wet. I needed a better way; a way to speed up the cleaning process because leaving carboys soaking in the kitchen for an extended time wasn’t an option in my world anymore.
Driving through the automatic car wash one day, as I watched the giant spinning cloths, I wondered, ‘why not try to make a small one of these to clean the innards of my carboys?’ The only thing I had on hand was a Shammy cloth in my stash of car washing supplies, so before heading to the local hardware store I drew up a quick sketch of how to attach the cloth to the end of a rod. I realized I could attach the other end of the rod to my power drill. With a design in mind, I spent about 10 minutes at the hardware store and gathered $16 worth of supplies, including an aluminum rod. When I was about to leave, I realized the aluminum rod was long enough to cut in half and that I had enough Shammy material to make an extra cleaner, so I bought two additional nuts, flat washers and lock washers to make an second one for a buddy of mine. The thread protector already came in a two-pack, so for a grand total of $18 (add $6–$8 more if you have to buy a Shammy) and an hour of my time, I had a tool for me and a gift for a friend — and if you follow the directions I have given in this story you can, too!
Tools:
Tube cutter (or simple scoring tool)
Scissors
Vice grips
Small slip-joint pliers
Thread cutters (die, ¼-inch, fine
or coarse)
Sand paper
Drill
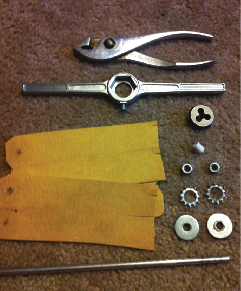
Materials:
(1) 18-inch (46-cm) aluminum rod, ¼-inch diameter
(2) nuts, ¼-inch (use same thread pattern as the die you used)
(2) flat washers, ¼-inch I.D., ¾-inch O.D.
(2) external tooth lock washers, ½-inch I.D.
(1) thread protector, ¼-inch
(1) Shammy cloth

Step-by-Step
1. Cut the aluminum rod
Gather all of the tools required for this build. Using the tube cutter, cut your aluminum rod to the desired length. I made mine about 18 inches (46 cm) long, which is long enough to reach the bottom of a glass carboy without being too long. You just need to score the rod enough to bend it with your hands. Clean up the new end with sandpaper to remove any sharp edges.
2. Thread one end of the aluminum rod
While holding the rod with your vice grips, cut threads on one end. You’ll need to thread about 1–1¼-inch (2.5–3.2 cm) of one end of the rod. The aluminum cuts very easily so you should be able to do it without cutting oil or lube for this small task.
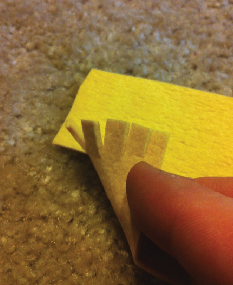
3. Cut slits at end of cloth
Cut and shape the Shammy. You will not use the whole Shammy, just cut at least four strips, roughly 4 inches by 7 inches (10 cm by 18 cm). Once you’ve got your strips of Shammy cloth cut, fold each in half lengthwise and feather one end by cutting several ½-inch to ¾-inch (1-cm to 2-cm) slits with your scissors.
4. Cut hole at the other end to slide cloth onto rod
Round off the other end of the folded over Shammy by cutting the corners and then poke a small hole, approximately ½-inch (1 cm) from the rounded edge, so you can slide it over the rod. Repeat this step for all four strips and set them aside for use in a moment.
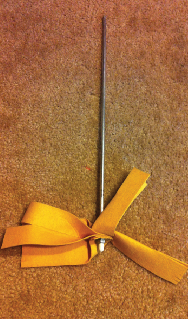
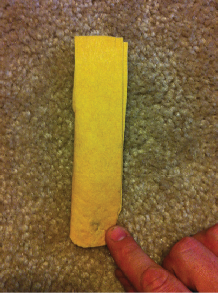
5. Assemble your carboy cleaner
Assembly time! Start by threading on one nut, then the flat washer, and then the lock washer. Add all of the Shammy pieces in some sort of a symmetrical pattern to aid in balance. I had four pieces of Shammy, so a cross pattern suited my application just fine. Place the other lock washer on top and finish the stack with the flat washer and nut. The very last thing to put on is a thread protector. This isn’t just for aesthetics; it will prevent the sharp aluminum threads from contacting and etching the glass on your carboy. The picture to the right shows the order of assembly.

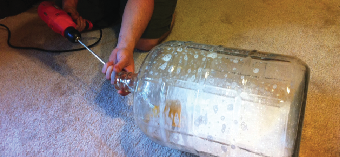
6. Put it to use
Make sure the Shammy is damp. Add one gallon (3.8 L) of warm water and OxiClean (or your cleanser of choice) and gently lay your carboy on its side. Put your new carboy cleaner in the carboy and attach the other end to your drill. Run your drill on its lowest setting to prevent the Shammy from just wrapping around the aluminum rod. Periodically roll the carboy to ensure
the entire sediment ring is exposed to
the cleaner.