Design your Home Winery
We have had many customers at Blichmann Engineering ask about using our fermenters for winemaking, which is why I decided that I needed to learn more about making wine. My first batch of whole fruit red wine was a classic disaster resulting in a large stain on the carpet in my basement. I was woefully under prepared for how messy red winemaking can be! (Wife: not happy.)
Fortunately, the wine did turn out reasonably palatable. And I did re-carpet and tile the basement, which I argued needed it anyway. (Wife: less unhappy.) But the most important outcome that came about from ruining the carpet in my basement is that it really kindled my newfound passion for making wine. And thus taking on yet another hobby filled with gadgets, large stainless tanks and a new process to master. But most importantly, I discovered a new realm of flavors to experience and share with newfound winemaking friends.
Let’s get back to that “fortunate mess” from my first attempts at winemaking, however. While I do have a nice, well-organized homebrewery, that space didn’t immediately lend itself to winemaking. I had to make some changes in order to make the winemaking process faster and more convenient so that I could focus on the finer points of winemaking.
Whether you’re an engineer like me, or a chemist, an artist or anything in-between, there are few things more rewarding than designing your ultimate home winery. Since a winery is part factory, part kitchen and part art canvas, designing a winery requires facets of all of these professions. And taking the time to really think about the design of the space you will dedicate to your winery will make a big difference in how useful the space will be when you are actually working in it. In this article, I’ll share my experience about laying out an effective, reasonably-sized home winery.

As a mechanical engineer, my passion has always been product design and manufacturing. My goals were clear when I designed my winery: I needed an efficient layout with all my supplies and tools in easy reach so that I could focus on the details of winemaking instead of searching for misplaced items, running around in a panic to manage a spill or spending an inordinate amount of time getting ready for the arrival of the fruit.
Dreaming and Planning
Just like a factory, every winery — commercial or hobby — needs efficient, uncluttered work areas, convenient work tool locations, effective movement and useful storage for less frequently used items and material. The basics for any organization are quite simply, “a place for everything and everything in its place.” Another rule I try to follow with all things is that less is more. And that is never more critical than in work areas.
Equally important to organization is process flow and planning. Don’t just jump into organizing and rearranging; plan. You can’t design a factory to produce a product without knowing the process to produce it. Start with a process flow map of everything you do in your winemaking process throughout the year such as crushing fruit, cleaning fermenters and hoses, measuring sulfites, adding chemicals, wine storage, etc. Then alongside the process flow boxes list the tools and equipment needed in those boxes from wrenches, to sinks and ingredients. Next, sort those boxes by function, grouping them into work cells, and storage areas. All cleaning processes, all must/juice making processes, additive prep processes, etc. should be grouped together.
I grouped my processes by category that I perform throughout the year on the different stages of winemaking. Here is the list I used for designing my own home winery:
1. Must preparation, alcoholic fermentation and pressing
2. Monitoring, measuring and racking
3. Filtering and bottling
4. Storage and aging

Next, I made sure I had all the needed equipment and supplies handy to quickly perform the task at hand. I find if getting a project such as a winemaking day set up is a big ordeal, I tend to find justification to put it off until “next week” until it may be too late. I learned this the hard way with a beautiful batch of Lake Erie Noiret that ended with an Acetobacter and Brettanomyces infection from delaying sulfite monitoring, racking, and topping up. I did mention that winemaking is a learning process, right? Lesson learned. I also learned that setting a calendar appointment on my cell phone is a great way to keep up with wine maintenance!

Draw Up Your Plans
After defining your main processes, and where they’ll be performed, make a scale drawing of your available winemaking space so that you can determine how your equipment will fit within the allotted space. Whether your winery is a stall in your garage, back patio, basement, or a combination like mine, sketch out all the hard walls and infrastructure that is difficult to move like water, power, furnaces, doors etc. Pencil and graph paper works just as well as CAD software and it allows you to use cut to scale post-it note mockups of your equipment for experimenting with different scenarios. In my home winery, I have cleaning, measuring, additives, bottling and temperature control work areas as shown in the layout drawing. I do the bulk of my winemaking in my basement and share space with my furnace and water heater, etc. I do my crushing/de-stemming in my garage as I don’t have the physical space to do that in my basement, which also keeps that messy process out of the house. I use sealed buckets and self-adhesive clear protective stretch-wrap on the carpet just in case. (Reference ‘wife not happy’ section earlier.) My storage area is shared with my homebrewing equipment, which is actually convenient because there is a lot of crossover equipment. As you can see in the layout drawing I convert work areas depending on the season and process I’m doing.
During harvest season I have my WineEasy™ in place for primary alcoholic fermentation and pressing. But come bottling time I move the primary fermenter and pressing equipment to the storage area and replace it with my floor corker — this is something you can adapt to depending on your personal choice of equipment. The bottling work cell is a small triangle and I can efficiently bottle with little movement. I also use the top of my chest freezer as a work space for labeling and shrinking bottle foils.
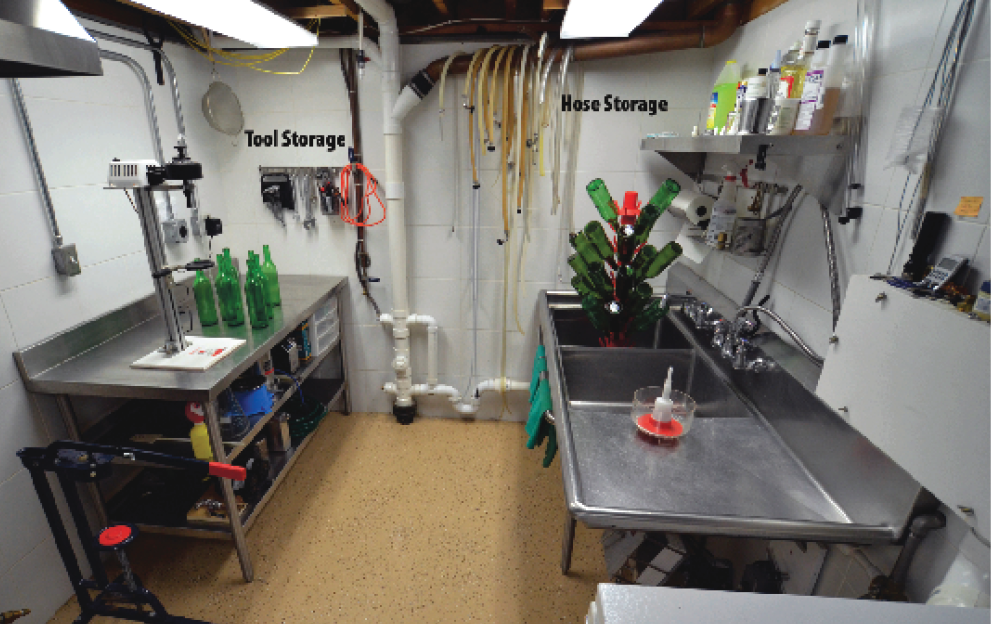
Always try to minimize all movement when you locate your cells and for all work being done within the work cells. You’ll also want everything you need for that process located within arm’s reach and always in the same spot. Again, think factory. If you always use a certain wrench or screwdriver for a certain process, buy a spare and make that part of the winery its permanent home so you don’t have to search the garage looking for it. As you can see in my layout , I located the bottle filling and corking area across from my commercial sink, and located all the cleaning and sanitizing supplies on a shelf above it.
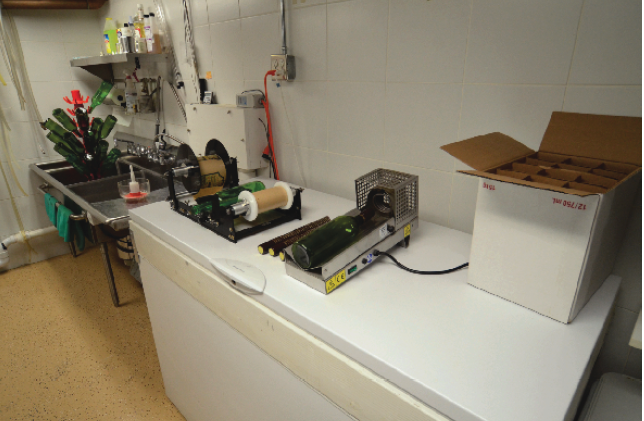
The chest freezer is between the cleaning cell and supply storage area (this is where I store my beer kegs) because it becomes my work table for measuring sulfites, preparing yeast for pitching, taking notes on my laptop and drying equipment parts after cleaning. You’ll see a couple of upright freezers in my drawing that I installed temperature controllers in for lagering beer, but they also work beautifully for cold stabilizing wines!
Bear in mind that like a kitchen, too small of a space and you’re tripping over everything. Too big and you’re wasting time walking around. Draw a triangle between the three main pieces of equipment you use the most. This may be your sink, bottling area, and labeling area; or it could be your sink, measuring area and your wine storage area.
Make sure the perimeter of that triangle is less than 23 feet (7 m) total. As shown in my layout drawing earlier, walkways should be no less than 40 inches (~100 cm) for one person making wine, ideally 48 inches (~120 cm) for ease of maneuverability for more than one person in the winery area. Much more than 60 inches (~150 cm) is really wasted space and will slow you down.
Factor In Cleanliness
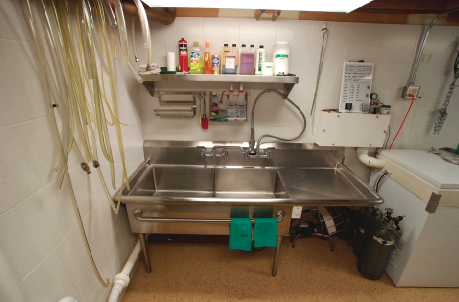
We all know that winemaking is about 80% janitorial work, but this seems to be the most overlooked and inconvenient aspect in most home wineries. Get lax on keeping things squeaky clean and the fruit flies and bacteria will invade. That said, my two favorite pieces of equipment in my winery are not my stainless conicals and WineEasy™ fermenters, they are my stainless commercial sink with a large sideboard for drying equipment and large basins and my industrial mop. Both make cleaning a breeze. A dinky little sink and mop are frustrating to use. Although a nice sink is a bit expensive, my motto is “buy once, cry once.” Used restaurant supply stores are a great resource for sinks as well as many other winery equipment needs like tables and shelves. You can buy used items for about half the price of new, and the used equipment is often made better than some of the new stuff. And if you have a local used restaurant equipment store you can save a pile of money on shipping by showing up in person and transporting the equipment yourself. Industrial mops can be purchased at any home improvement store for a very reasonable price. If your budget and/or available space do not accommodate a large stainless sink, do not fret — plastic laundry sinks are big and economical. Don’t forget to make sure hot and cold water are readily and conveniently available. I have a quick-connect garden hose adapter for my faucet and have a hose handy at all times. Speaking of hoses, keeping hoses clean and dry is important to keep things sanitary. I utilize a drainpipe conveniently located above my sink to dry hoses so I always have them dry and handy.
Flooring
Another thing I love about my home winery is the epoxy “garage floor” coating on the floor. It is impervious to about everything; StarSan, SaniClean, Iodophor, wine, acids, strong alkaline cleaners, cat hairballs . . . you name it. And it is an absolute breeze to mop up. If you decide to seal your floor this way, my advice is to skip the cheap water-based stuff — the real two-part solvent-based stuff is incredibly hard and durable, but you will want to ensure you have great ventilation when laying it down as it is quite strong smelling. A clear coat afterward is well worth it. I find that the more warnings on the label, the better the product is likely to work. Most paint stores and home improvement centers carry this type of floor coating. If using chemical coating isn’t your preference, however, other flooring I’ve seen used successfully in home wineries include vinyl, enamel and ceramic tile. Whatever you choose, just make sure it is non-slip, stain resistant and can handle being subjected to occasional contact with the chemicals used in winemaking. I have no logical explanation as to how I end up with wine and fruit on the walls in my winery, but it does happen. I love the ceramic tile walls I’ve installed, but fiberglass shower wall sheeting, or durable enamel paint, are both appropriate for other areas subject to occasional splashing. White wall tile is commonly available for about $1/sq. ft. and is pretty easy to install. Looking for a product to remove red wine residue and stains? Powdered Brewery Wash (PBW) is an environmentally friendly (and useful all-purpose) alkali cleaner from Five Star Chemicals (makers of SaniClean) that removes stains like these instantly from stainless, glass, floors, walls — you name it.
Separate Spaces
As I mentioned, I do my crushing in the garage. But depending on your climate and needs, you may want to do more processes there — everybody will have different needs depending on where they live. Unfortunately I’m also an avid tool collector, woodworker, shade tree mechanic and just added a project car to my hobby list (yes — very patient wife) so work space is at a premium at my house, but if you’re in the same boat don’t let that keep you from being effectively organized. And it doesn’t keep you from implementing many of the suggestions I’ve discussed already. Just remember to keep things mobile and easy to setup. And if possible, try to make things dual purpose. Tim Runnette, a friend of mine, made a cool and simple mobile bench that doubles as equipment storage and work surface. It is made out of stock kitchen cabinets and a Formica top all mounted to a double sheet of plywood. Casters were installed for mobility. Another neat idea to provide a simple cleaning station in a garage was built by my friend Matt Raby. Both the sink and the worktable fold up and out of the way on the perimeter of the garage. The sink drain is simply a hose routed to the floor drain, or outside, or could easily be a 5-gallon (19-L) bucket. Storage shelves above complete the ensemble. So don’t think for a minute that a garage can’t be an awesome and convenient place to convert to a winery. Just be creative and look for elevated storage locations and locate places to minimize movement.
Equipment Storage
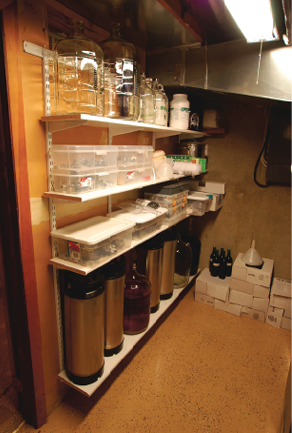
Storage of winemaking equipment, supplies and ingredients are just like everything: it expands to fit the space you allot for it. Remember to keep the items you use infrequently out of the main workspace. Adjustable storage shelves are an excellent way to store carboys, test equipment, hardware, and about every conceivable item. I really try to store small equipment, bags of additives and bits of hardware in clear totes so that the content is easily visible when lined up on a shelf. The smaller containers can be found at the hardware store or any big box department-type store.
Properly designed and equipped work areas are also safe work areas. Minimizing traffic, reducing clutter and using pumps instead of lifting are all common sense tactics and lead to fun and safe winemaking. Glass carboys are particularly hazardous so always use a proper lifting device like the Brew Hauler to move them and take great care not to bump them on any hard surface.
Wine Storage
Now I do have to admit that the biggest fan of my wine is my wife, but I had no idea how much wine I needed to make to keep her happy. Since she has always been supportive of my plethora of hobbies, I knew I needed to make sure my wine inventory never hit a critically low level. But when I did have that carpet mishap, I do seem to recall the word “idiot” coming out of her mouth. Really, how was I supposed to know there was a hole in the tarp? In any case, wine storage is another area I needed to accommodate. Being a woodworker I made some built-in cabinets in my basement to take advantage of the even year-round temperature of 68–70 °F (20–21 °C). I also built a smaller cabinet for our upstairs wet bar for convenience (see the photo on the top left of this page). If you don’t have a basement you can do what my good friend Steve Harding did — make a walk in wine room! There are also a myriad of wine coolers from big to small available to purchase. The key is to utilize space where the temperature fluctuation and humidity changes are moderate. Racks can be as elaborate as a custom built-in rack, or as simple as milk crates laid on their side and stacked on top of each other.
Make It Happen
Hopefully my design ideas have inspired you to tweak your current winery, revamp it or set the creative energy in motion to build that dream winery you’ve always wanted. Either way, remember that less is more, plan before building, visualize this as a winemaking factory, and design for safety and comfort. And last but certainly not least, when you make that award-winning wine in that new winery don’t forget to send me a bottle!