Build a Ladder-Style Wine Rack
There are lots of different styles of racking you can use in your cellar, so it’s worth considering the advantages and disadvantages of each as you work out the details of your design. They include flat shelves, display shelves, ladder racking, waterfall racking, diamond bins, radiused ladders, curved end shelves, end caps, and others. You’ve laid out the locations of the racking in your plans. Now you need to decide what type of racking would be best for your cellar. One great option is the ladder rack design.
Ladder Racks
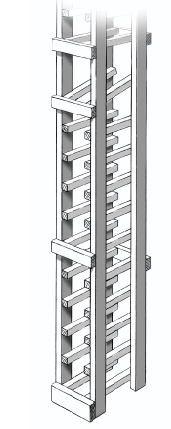
Ladder racks are made from a pair of floor-to-ceiling uprights with small crosspieces nailed to them. When the two racks with crosspieces are stood next to each other and tied together, they support a column of bottles. The bottles are individually supported, meaning each one is independent of the others and can be removed without moving any other bottles. The crosspieces, or ladder “rungs,” can be installed on opposite faces of the uprights, so that the racks can be lined up side by side to create a row of bottle stacks. At each end of the row, the paired uprights will have crosspieces installed on only one side.
Any number of materials will work for ladder racks, from walnut to oak, redwood, cedar, or pine. The cost of each varies widely, so some research and budget consideration should take place before you decide on any one species. I was very fortunate to find a cedar mill that was closing out its inventory of rough-sawn materials, which I was able to mill into finished pieces. The cedar smells great! (I would, however, avoid aromatic or “Tennessee” cedar, which can have an overwhelming aroma.)
Depending on your cellar configuration, you might have use for a variety of ladder racking styles, including straight racks, curved corner racks, and waterfall racks. All of these use the same basic ladder construction. If you’d like to build more than a few stacks of racks, it’s well worth your time to create a simple jig that makes the assembly fast and accurate. The jig described on the next page works for one- and two-sided ladder racks, corner racks, and waterfall racks.

This ladder design assumes a ceiling height of at least 97” for your cellar. If your ceiling height is lower, adjust the top of your jig and material lengths accordingly. The total height of the racks should be at least 1” less than the finished ceiling height to allow you to assemble the racks on the floor and then clear the ceiling as you stand them up for installation.
Materials
One 16” x 96” piece 3⁄4” CDX plywood
Three 8-foot lengths 2×4 lumber, each ripped into 2”-wide strips
21⁄2” wood screws
One 16” length 1×4 lumber
Build It!
1. Install the guides
Lay the sheet of plywood across a pair of sawhorses or a bench. Lay one of the 8-foot-long, 2”-wide strips ripped from a 2×4 along one edge of the plywood, with its 2” side set vertical. Screw the strip to the plywood, keeping it as straight as possible. Screw the 1×4 into the edge of the plywood on one short side, forming a stop for the bottom of the uprights. In the finished jig, the 2” piece ripped from the 2×4 is the front edge guide, and the 1×4 is the bottom guide.
2. Mark the rung layout
Lay out the locations of the rungs by measuring up from the 1×4 bottom guide and marking the plywood at the following points:
• 3 1⁄2”• 38 1⁄4”• 74”
• 7 3⁄4”• 42 1⁄2”• 79”
• 12”• 47 1⁄2”• 83 1⁄4”
• 16 1⁄4”• 49 7⁄8”• 87 1⁄2”
• 20 1⁄2”• 57” • 91 3⁄4”
• 25 1⁄2”• 61 1⁄4”
• 29 3⁄4”• 65 1⁄2”
• 34”• 69 3⁄4”
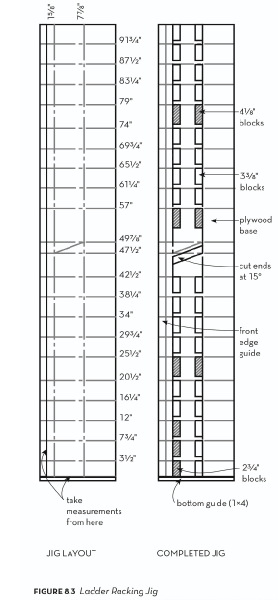
Using a square, mark a line across the plywood at each of these marks, square to the front edge guide. Measuring from the inside edge of the front edge guide, make a mark at 15⁄8” at the top and bottom of the plywood, and draw a straight line or snap a chalk line lengthwise between the marks.

Make another line 7 7⁄8” from the front edge guide in the same manner.
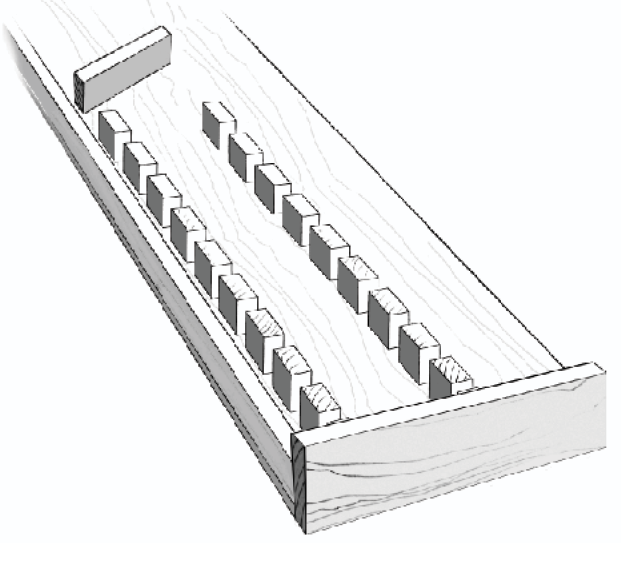
3. Install the blocks
Cut the other strips ripped from 2x4s into 32 blocks at 3 3⁄8” and 8 blocks at 4 1⁄8”. With the 1 1⁄2” dimension of these blocks against the plywood, you’ll screw the blocks through predrilled holes to the plywood, aligning them on the inside corners of the short horizontal lines and the long vertical lines (see figure 8.3 above). Be sure to predrill the blocks to keep them from splitting. The blocks will form a negative skeleton of the racking. Beginning at the 3 1⁄2” mark and working up, install five pairs of 3 3⁄8” blocks, then one pair of 41⁄8” blocks, and then four pairs of 3 3⁄8” blocks.
Next, lay out the display shelf guide by marking a diagonal line between the long vertical lines, from the 47 1⁄2” mark on the 1 5⁄8” line to the 49 7⁄8” mark on the 7 7⁄8” line (see figure 8.3 above). Cut the ends of two pieces of ripped 2×4 at 15°, cutting across the 1 1⁄2” dimension; screw these 3⁄4” below the display shelf line.
Starting at the 57” mark, install one pair of 41⁄8” blocks, then four more pairs of 33⁄8” blocks, then one pair of 4 1⁄8” blocks, and finally four pairs of 3 3⁄8” blocks.
Materials
See step 1 below for calculating lumber quantities.
8-foot lengths 1×2 lumber (for uprights, cross ties, and nailing strips)
101⁄2” lengths 1×1 lumber (for ladder rungs)
8-foot lengths 1×4 lumber (for baseboard and ceiling trim)
11⁄4” brads
2” brads
21⁄2” wood screws
Build It!
1. Calculate quantities
For each ladder, you’ll need two 8-foot lengths of 1×2. For rungs, the ladders use 10 1⁄2” lengths of 1×1; each single-sided (end) ladder needs 20 rungs, and each double-sided ladder requires 40 rungs.
To calculate the total number of ladders you’ll need, measure the total length of racking in inches and divide by 4.25 (the on-center spacing of the ladders). Multiply this number by 2 (the number of uprights per ladder) and add 2 (the uprights for the end racking) to get the total number of uprights you’ll need. For the rungs, count the total number of ladders, subtract 1, then multiply that number by 40.
For the horizontal 1×2 cross ties and nailing strips, you’ll need seven pieces to span the length of the racking. Four will be cross ties, and three will be nailing strips.
Similarly, the 1×4 baseboard will span the length of the racking, as will the ceiling trim, if you want it.
2. Construct the ladders
Keep in mind that you’ll have a left end ladder and a right end ladder. For the left one, place a straight 8-foot 1×2 upright into the jig, tight against the front edge guide and the bottom guide. Place another 1×2 upright opposite, tightly against the blocking and the bottom guide. Lay 1×1 rungs in the slots between the blocks, tight against the front edge guide. Nail the rungs and uprights together with a single 11⁄4” brad at each intersection. Carefully remove the finished ladder.
For the right end ladder, lay down the rungs first, followed by the uprights. Nail the pieces together, and remove the completed ladder from the jig.
For each double-sided ladder, lay in a course of 1x1s, then the uprights, then another course of rungs. Nail these together with 2” brads.
3. Cut the ties, nailing strips, and trim
Count the number of ladders you will be standing up. Multiply this number by 4.25 and add 3⁄4”. This will be the length of your four 1×2 cross ties, three 1×2 nailing strips, and 1×4 baseboard and ceiling trim. Cut the pieces and set them aside.
4. Mark the supporting wall
Mark the locations of the studs and/or backing you will screw the nailing strips to. You’ll install screws at about every other stud (approximately 32” apart) and at 91” and 20” above the finished floor. Note that these are the screw locations; make your marks slightly above or below these points so you can see them when you stand up the racks, and the nailing strips won’t cover them up.
5. Assemble the ladders
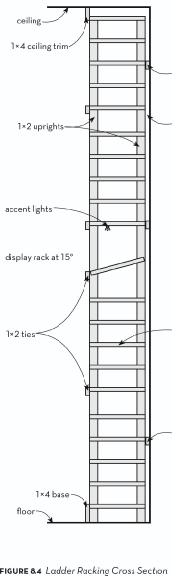
Lay the ladders facedown on the cellar floor, with their bottom ends against the supporting wall. Stack them all tightly together in the order they’ll be assembled. Then position the end ladder approximately where it will be stood up. Install the bottom nailing strip as shown in figure 8.4, flush with the outside of the upright, nailing it into the upright with a 2” brad. Install the other two nailing strips in the same manner.
Position the first double-sided ladder next to the end ladder, spacing it 31⁄2” from the end ladder’s upright. (You can use a 2×4 block to set this spacing, but every fifth upright or so, measure the overall dimension to make sure you’re maintaining the 41⁄4” on-center spacing, to prevent compounded errors.) Nail the three nailing strips into it at the nailing strip locations. Repeat to install the remaining ladders.
6. Mount the racking
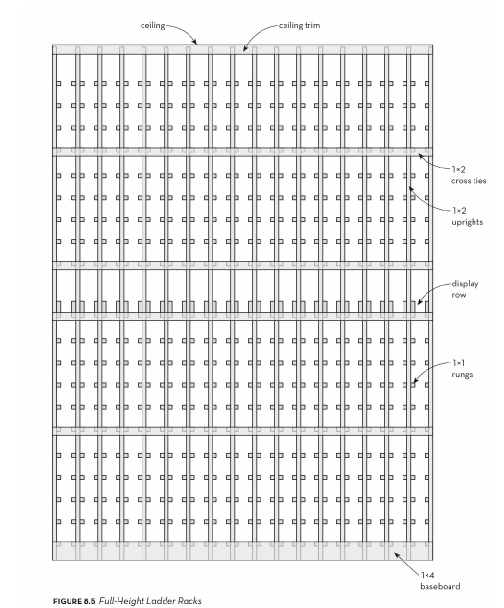
Once you have assembled all the ladders into a single rack, stand the racking up against the wall. Use a level to make sure the uprights are plumb in both directions, then screw the top and bottom nailing strips to the wall. (It’s easier to do this before installing the front cross ties, as the fronts of the ladders will spread apart to allow you to get your drill and hand between them.) Install the front ties, baseboard, and ceiling trim as shown in figure 8.5.
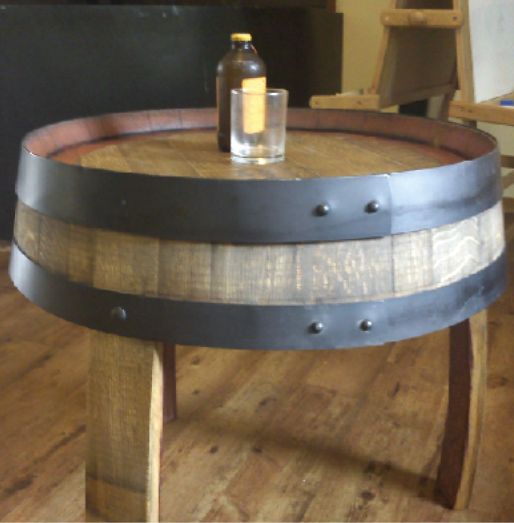
A ladder rack is much like it sounds — a pair of “ladders” that face each other, with each opposing set of “rungs” supporting one bottle. The rungs are positioned to allow a bit of space between bottles. These racks are versatile in that they allow you to access any bottle in the racking at any time, unlike other stacking types of racks. This project shows you how to build straight ladder racking using the jig described earlier.
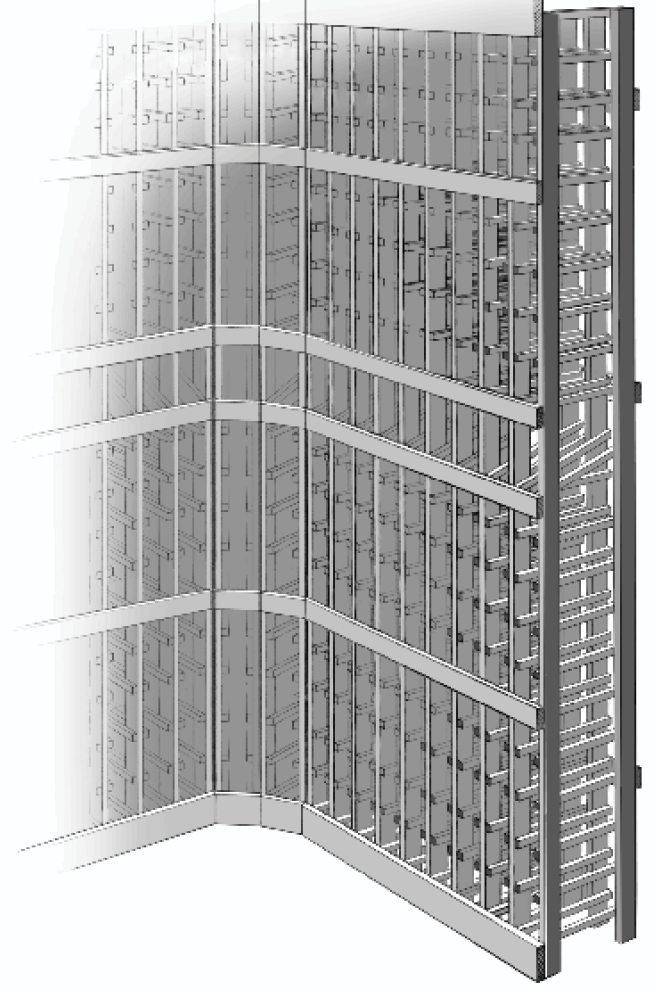
Curved corner racking
Inside corners can be a big waste of space for a racking system. Filling the corners with these curved ladders allows for maximum use of the space while creating a really elegant look.
Materials
Four 51⁄8” lengths 1x2s (for front cross ties)
Two 51⁄8” lengths 1×4 (baseboard ties)
Two right end ladder racks (as described in ladder racking project)
Two left end ladder racks (as described in ladder racking project)
2” brads
Six 5” lengths 1×2 lumber (for back nailing strips)
Scrap 1×4
Build It!
1. Build the corner unit
Cut each end of the 51⁄8” front cross ties at a 15° angle so the angles are opposed (not parallel to each other). Nail a cross tie to the front of a pair of left and right ladders at the same height as each of the horizontal crosspieces on the regular ladder racks. Flip the ladders over and install the back nailing strips so you have two sets of ladder racks.
Create a few 30° triangle guides from some 1×4 scraps by cutting two sides at opposing 15° angles meeting at the top of the triangle. Use these guides as spacers between the uprights of the ladders to position each set together at the proper angle. Align the front crosspieces, and nail the two ladder racks together.
2. Install the corner unit
It’s a good practice to set any corner units in place prior to mounting the straight runs of racking. To do this, mark a line on the floor 113⁄4” out from each wall that forms the corner. Stand the corner unit up on the floor so the bottom front corners of its outer uprights sit on these lines. Use a square on the floor to transfer these locations to the supporting wall of the straight racking, to mark where the ends of the straight racking will terminate. Draw a plumb line up the wall at the termination point to guide the straight racking installation. Once the corner and straight sections are in place, nail the two units together.
This article was excerpted from the newly released The Homebuilt Winery ©Steve Hughes.
Illustrations by ©Michael Gellatly.