Making Your First Wine
So, you want to make wine. You’ve consumed wine, it pleases your taste buds, you like the feeling it gives. You are obviously interested in some aspects of enology, otherwise you would not be reading this magazine. You may be part of a wine-centric group like the American Wine Society® and enjoy the learning and camaraderie. The next logical step is to try your own hand at producing some. After all, how hard can it be? Well, in reality, it is really not that hard . . . that is, if you adhere to some basic rules. On the other hand, if you are not aware of, or you choose to ignore some of those rules, you may find making a quality wine a very challenging effort indeed. I like to think a quality wine is one that you and others would enjoy drinking on multiple occasions. Not only should your product be of good sensory quality, but the whole process should be a fun endeavor rather than a task. Like any other hobby, it should be addressed eagerly with anticipation of enjoyment.
I’m a firm believer in educating yourself in winemaking before getting in too deeply. Poor habits are difficult to shake; a winemaking class or online instruction will go a long way towards a quality wine product. Advice from “little ole winemakers” should be approached with much skepticism. Not that they don’t know about good practices, it’s just better to get a firm knowledge base established on science rather than family traditions.
Plan on making 5 or 6 gallons (19 or 23 L) for your first batch; grow in 5- to 6-gallon (19- to 23-L) increments after that. In my experience, I have had less success with smaller quantities.
Making wine fulfills all the requirements of a good hobby: It can provide relaxation, its product is rewarding, and the opportunity for social networking with like-minded people is amazing. The rewards will be satisfying; it is an investment in your wellbeing!

Before You Begin
Kit winemaking will require no prior winemaking knowledge, just a few hours to start the process with periodic monitoring and racking until bottling. Total time can be measured in hours for a 6-gallon (23-L) batch. For fresh fruit wines, a good knowledge base is a plus as the activity is hands-on during the crush, fermentation, and press, measured hours at a time for each activity. Once the initial tasks are completed, monitoring and racking is similar to that of kit wines.
Well before you start making your first wine you will need to make some decisions. Do you want to make fruit (other than grape) wines? What kind? If grapes, should it be white or red? What variety would you prefer? Should the white be dry, off dry, or sweet? Perhaps a dessert wine. Should the red be light or heavy in body? Should it be fruity, oaky, tannic? Establish a target for yourself and plan several sequential small batches of the same wine as you perfect your capabilities (5-gallon/19-L batches are easy. Keep diligent notes and write results down for future reference. Refer to the notes often. Build a firm basic understanding of the process and then expand your mix to other varieties/styles. Once you understand the implications of each step you can easily add to and change your process.
Your First Wine
One of the first decisions you need to make is which starting product to choose: A winemaking kit, juice, or fresh fruit. Each has its distinct advantages and disadvantages. The tradeoffs are usually your time commitment, equipment investment costs, the sensory attributes of the product, and very importantly, your winemaking knowledge. Often novices jump in well over their heads with visions of making way too much wine on their first attempt, too often with predictably painful results. Winemaking should be approached as a lifelong, fun, and rewarding activity. It is never a race. Among the necessary rules is having a good dose of patience. I recommend you start off small, learn the why’s and how’s of the process. For a first-time winemaking experience I find it hard to beat working with a kit wine. If you can follow simple instructions, you can make a good wine. After several small batches and with good winemaking knowledge firmly under your belt, it is easy to move on to fresh juices and/or fruit, and to scale your production to whatever volume desired, within legal limitations, of course.
Wine can now be made throughout the year to fit your schedule, depending on what source material you decide to work with. By that I’m suggesting making a kit wine any day of the year with a minimal amount of time required on your part and minimal winemaking knowledge. On the other end of the spectrum, you may choose to work with fresh fruit, available only during the fruit-ripening season. For grapes, that would be in the fall, or late spring for southern hemisphere fruit. With fresh fruit there is a requirement for a maximum amount of your time and good winemaking skills. Between those two extremes there is a whole host of possibilities to fit almost any time schedule and knowledge base. So, to help make the right decisions for you, let’s visit some topics regarding your choice for your first wine.
White vs Red
The procedure for whites vs. reds should not be measured in terms of difficulty, rather, they are just different for a simple reason: Color extraction. I see no advantage starting with either for simplicity sake. You might even consider making one 5-gallon (19-L) batch of each. For kit or juice wines there is no difference in procedures.

Kit Wines
Wine kits are available year-round. All kits will make wine which can be proudly served and consumed provided instructions are followed carefully. Some are packaged in cartons containing all necessary materials including the juice or juice concentrate while other kits are packaged in 6-gallon (23-L) food-grade plastic pails. Besides the juice, contents usually include yeast, sulfites, fining agents, oak chips, nutrients, acids, etc. Most kits will produce 5–6 gallons (19–23 L) of finished wine. Detailed instructions will lead you through the entire process, fermentation to clarifying the wine. Kits are a great way to start the hobby.
Typically the less costly kits tend to be the ones with the most concentrated juices. You will need to add more water to reconstitute the juice to appropriate concentration, thereby mimicking the natural juice. Bottled water is frequently utilized to minimize water off flavors. From a sensory level, wines produced with such kits will be less true to varietal characteristics as compared to pure juice kits as a result of the water used. The advantage to such a kit is its lower cost, hence easier entry to the hobby.
Kits containing non-concentrates (i.e., all juice) tend to produce wines that more closely reflect true varietal characteristics. Their cost will be accordingly higher due primarily to shipping and handling costs. The winemaking process will be basically the same for all kits. If you don’t own any winemaking equipment you can purchase starter equipment kits, which will contain the bare essentials necessary for your first (and hopefully subsequent) batches.
Fresh Juices and Musts
Another option for a new winemaker is to start with fresh or stabilized juice which is available through much of the year. Fresh juice, available primarily after harvest, is just that, juice from the fruit shipped in 6-gallon (23-L) pails with some sulfites added to stabilize the product for a short period of time. These juices must be stored in coolers, usually at 34–36 °F (1–2 °C). Stabilized juices are also available most of the year and do not need to be refrigerated. These fresh juices should not be confused with kits — they are juice only. The buyer will be responsible for procuring yeasts, nutrients, sulfites, etc. The pails will contain 5.5 gallons (21 L) of juice with the air space intended for foam if the winemaker ferments directly in the pail. These juice pails are intended to produce 5 gallons (19 L) of finished wine. Included instructions are minimal at best. More winemaking time and knowledge is expected when of the purchaser as compared to a pure kit.
Frozen Juices and Musts
Frozen juice and must are also available usually year round. Frozen juices are, again just that, a juice pail frozen shortly after packaging and maintained in a frozen state. It is intended to produce 5 gallons (19 L) of finished wine. Other than the task of thawing it out to room temperature, there is no difference to the winemaking procedure as compared to fresh juices.
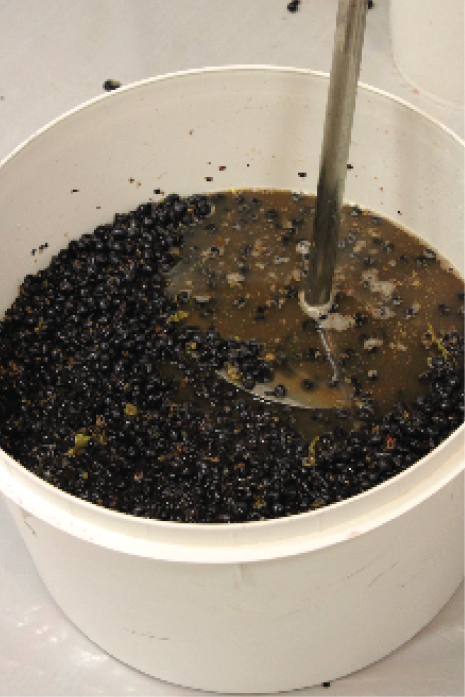
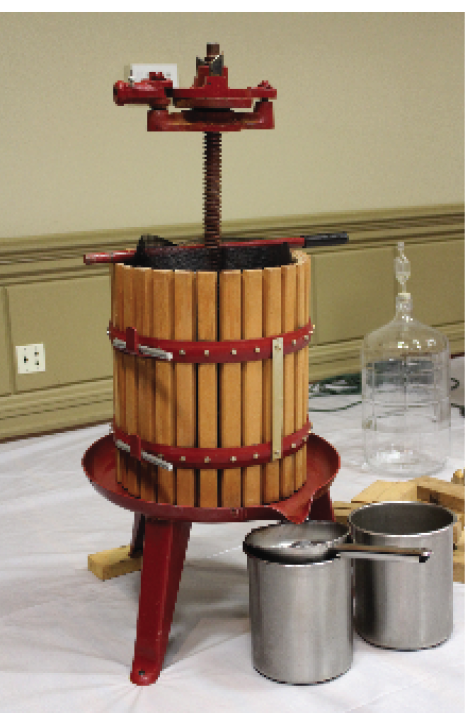
Frozen must is a bit different in its makeup. It is the product which comes from the crushing/desteming process, i.e., it contains crushed berries, including pulp, skins, seeds, and some stems. The producer has eliminated the need for you to buy or rent crushing/desteming equipment, thus saving you its cost and the labor for doing such. Please do not discount the saved labor and drudgery of equipment preparation, sanitizing, and cleanup. These 6-gallon (23-L) pails will contain enough to produce 3 to 3.5 gallons (11 to 13 L) of juice. A wine press will be required to separate the solids from the wine.
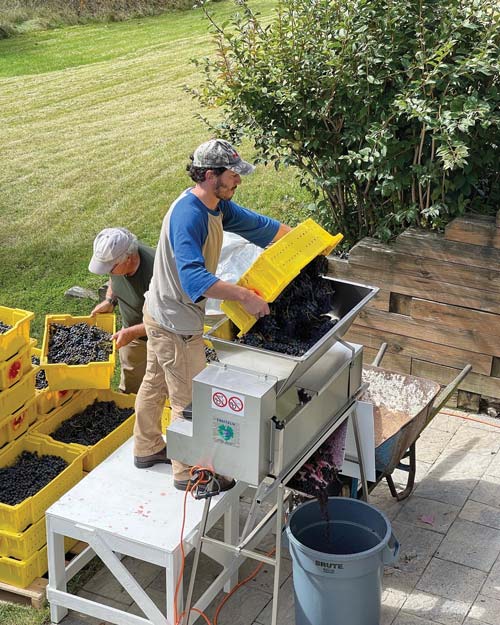
Fresh Fruit
The next option for the new winemaker is to start with fresh fruit in season. Visit your purveyors or local grape growers when the grapes start to come into season. Get to know the source vineyards. There is a lot of variation between vineyard locations and the resulting wines from each region. Prices paid for the grapes will be based largely on their source. Growing conditions (terroir) and historic wine characteristics set the prices. Typically warmer/hot areas will be least costly and will yield wines with less interesting attributes. The old adage of wine being made in the vineyard holds very true. The better the quality of the starting grape, the more interesting and complex the wine will be at the end. However I would not suggest purchasing the top-of-the-line fruit for your first batch. Please remember it is possible to make a delicious wine from a moderately low cost kit, and also possible to make absolute swill from premium high cost grapes!
Yeast
Kit wines will have a pre-selected dry yeast strain packaged in the kit, eliminating the decision for the novice. For other wines you will need to purchase the yeast separately. You might want to rely on the advice of the juice/grape supplier or on WineMaker magazine’s online yeast chart. In either event the yeasts you are working with are the same as for commercial wineries in most cases. They have been isolated in all the great winemaking regions of the world. You can make your wine using those same strains.
First Steps: Winemaking Metrics
Fresh juices are natural products just as the actual grape berries are. As a result, you can expect considerable variation in the three key metrics of sugar content, acidity, and pH, from container to container. Understand the importance and value of taking measurements (the metrics) of your juice/must. On the side of each pail the producer usually identifies those key metrics for the winemakers’ reference. These numbers reflect the batch or harvest parameters, not necessarily those of your individual pail. There can be significant variation within the same harvest. You must exercise due diligence by performing those three measurements for yourself and go with those. Learn to measure the sugar, acidity, and the pH of your juice/must. Become familiar, and therefore comfortable, with making any necessary adjustments. Recognize the incremental changes possible for the winemaker as you target the wine to suit your palate. Most importantly, understand why these three metrics are so important in being able to repeatedly make good wines.
Also note in the case of fresh juices, despite being properly sulfited at the producer upon packaging, and subsequent storage at cold temperatures, there will be some natural fermentation taking place. The amount will be dependent on total storage time. When you measure remaining sugars in the juice you may find the number well below what is expected due to this natural fermentation. When this happens do not add sugar to bring the Brix up to where you would expect. Rather, understand the storage dynamics and assume the starting °Brix was 24 for red and 22 for whites if not stated differently on the label.
Clarification and Aging
As mentioned before, when it comes to winemaking, patience is truly a virtue. Although some wine kits advertise drinking your wine in some amazingly short time, for other than kit wines, I would suggest you allow your wine to age and mature properly. I would look to bottle and drinking a white after six months, and a red after ten to twelve months. Wines just taste better after aging in bulk; all the flavors seem to find their place, the harshness tends to soften and the mouthfeel gets rounder, etc. Be diligent during the aging process by making sure you maintain the sulfites at their appropriate levels based on the pH of the wine.
Bottling
Finally, at some point, you will be ready to bottle your wines. For each 5 gallons (19 L) of wine you produce you will need about 25 to 27 clean, sanitized bottles. You can start your own collection of used bottles or you can purchase them new. Bottles should be 750 mL in size, clear or green, Bordeaux (high shoulder) or Burgundy (soft flowing shoulders). Tradition dictates bottle style primarily based on wine variety. Red wines are typically stored in dark bottles to minimize fading. If you use screw tops you can eliminate the purchase of a corker. As a cautionary note, do not attempt to put a cork into a screw top bottle, and if you use screw-top bottles always use new screw tops; they should not be recycled as they will not provide a proper seal.
Equipment
You will need some equipment to start out. Perhaps you already have some from family or friends; that’s great. If you are working with used items please be very careful to both clean and sanitize (those two steps are not the same) all that may contact the juice and/or wine. Used wine presses can harbor mean microbiological critters but can be easily updated with new wooden basket slats and a fresh coat of food-grade epoxy paint on metal surfaces. You do not want to start the winemaking process with contamination.
At a minimum, for a boxed kit wine you will need a 6-gallon carboy (23-L), airlock with bung, and a siphon. A second carboy would be very convenient to ease the racking process. Various cleaning brushes, cleaning agents, sanitizing materials, etc. will round out the list. I suspect your total cost will be $50 to $100, and many home winemaking suppliers have pre-selected “starter” kits with all you need to make a batch of wine from a kit. If you choose to start with fresh /frozen juice the cost will go to perhaps $100 to $125, covering the additional cost of a hydrometer, acid titration and pH testing capability. Starting with fresh fruit will require the purchase of a press, new or used at market prices. You may avoid the cost of a crusher since many sellers of fresh fruit will crush/destem your grapes for a fee. All equipment items will be reusable year after year. If you live in a wine-growing region, crusher/stemmers and presses may be available for rent through local home winemaking shops. You will note I did not include a barrel in that list, and this is for good reason. There will be time for exploring barrels as you gain experience. As a novice you will have enough to concern yourself as is.
Assuming you have the experience and confidence to produce greater quantities of wine, you will need to also expand your equipment capabilities. If you make more than 10 to 15 gallons (38 to 57 L) of wine it will be to your advantage to maintain your own crushing/desteming capability. Although manual models are available, an electric model will make short work out of hundreds of pounds of grapes in a short amount of time. The dollars you can save within a few years by not paying per-box crushing fees will pay for the machine.
A larger wine press may be helpful by pressing a greater amount of grapes at one time. Clean up is not significantly different between small and larger presses. You might also consider a bladder vs a ratchet/screw press further simplifying the task and producing a higher quality juice. I always suggest sizing the wine press to easily handle the largest amount of one variety of grape you plan on working with over your winemaking career. By doing so you will only buy one press, ever. So frequently I see home winemakers upgrading in size incrementally. That method will cost you considerably more in the long run as opposed to buying the larger size up front.
Consider purchasing stainless steel variable capacity tanks for fermenting, racking, and long term storage of finished wine. They are very versatile for any amount of wine.
Establish a budget for yourself. You do not need to buy every piece of equipment for the first attempt, or even the first few years. Start small and grow if you enjoy the hobby. Remember to purchase your equipment for the long run and amortize the cost of equipment over your lifetime of winemaking.
Barrels
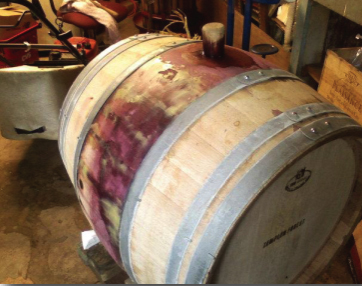
We spoke earlier about barrels and I have just a few thoughts regarding them. Wines stored properly in oak barrels will exhibit truly great characteristics; I encourage their use. However there is a price to be paid for that benefit in the form of frequent monitoring of wines to maintain their health and that of the barrel. It is for that reason I suggest delaying the purchase of barrels until your winemaking skills allow you to devote additional time for barrel maintenance.
Wine will oxidize quickly in the presence of air. Wines aged in barrels will evaporate a significant amount (known as the “angel’s share”) during the life of that storage resulting in an air space at the top of the barrel. Therefore, barrels must be topped off every couple of weeks to prevent oxidizing the wine; it is a task you must make time for regularly. You must plan for this additional quantity of wine when initially purchasing grapes or make other provisions for the topping off wine. For a year of aging, for example, you can easily need 10 to 15 percent of the total barrel capacity as additional wine for this replacement purpose.
It is best to always have the barrel full of wine; you should coincide the emptying of a barrel of one wine with the refilling of the same barrel with a new batch of wine. Empty used wine barrels bring an additional host of maintenance tasks in an effort to keep the barrel healthy for the next batch at some future date. Read more about new and used barrel care.
Wine should be clarified well before being stored in a barrel to minimize solid deposits accumulating inside. However be aware that your wine will continue to settle during barrel aging and deposit some solids. Also, during the time of wine aging you must maintain the appropriate
sulfite level in the wine to assure a stabilized product.
Relative to barrel sizes, I find it much more convenient to work with multiple smaller barrels, 30 gallons (114 L) or less in size, as opposed to the 60-gallon (228-L) size, very common to commercial wineries. Besides being easier to handle physically, it is more likely you will be able to sequence smaller batches of wine throughout the year and keep the barrel full at all times. This will go a long way towards maintaining a healthy barrel. Be aware that a smaller barrel has a higher surface-to-volume ratio than a large barrel and will “oak” the wine faster.
Summing It All Up
With the preliminary stuff out of the way, let’s briefly summarize new to winemaking considerations. If your first wine will be a:
Kit wine – Straightforward process. Purchase and/or clean and sanitize all equipment. Read and follow instructions; no prior winemaking knowledge is necessary. This is the simplest way to get into winemaking. Least amount of commitment, financially.
Fresh/frozen juice wine – All the above plus some basic testing and possible adjustments of the starting metrics. A bit more hands-on involved from kit winemaking. Testing material and equipment needs to be purchased or borrowed. Some knowledge of metrics’ importance is necessary.
Fresh/frozen must wine – All the above plus the need for a wine press to separate the solids in the must from the liquid wine. Incrementally more winemaking knowledge is required.
Fresh fruit wine – All of the above plus the need for crushing/desteming. This is total hands-on winemaking; a very good winemaking knowledge base is required. The winemaker has total control of the process. A larger dollar commitment is needed.
Fresh fruit with barrel aging wine – All of the above with the addition of barrels for longer-term aging. A very good knowledge base along with experience in good winemaking practices is required. Significant time and process dedication is required.
Disclaimer: Another old adage; nothing is certain but death and taxes. Despite following all the rules, stuff happens and wines are sometimes less than good.
In the end we are only managing Nature, at best; no one can ever guarantee a perfect wine. What we can promise is having a good time with family and friends during the winemaking and consuming process. Now, go make some wine!