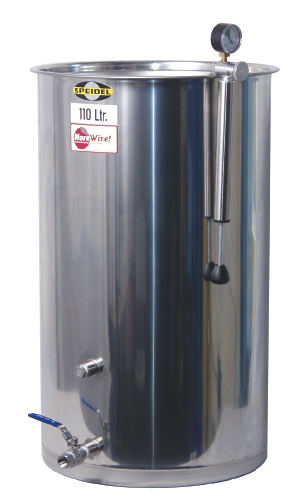
Using Variable Volume Wine Tanks
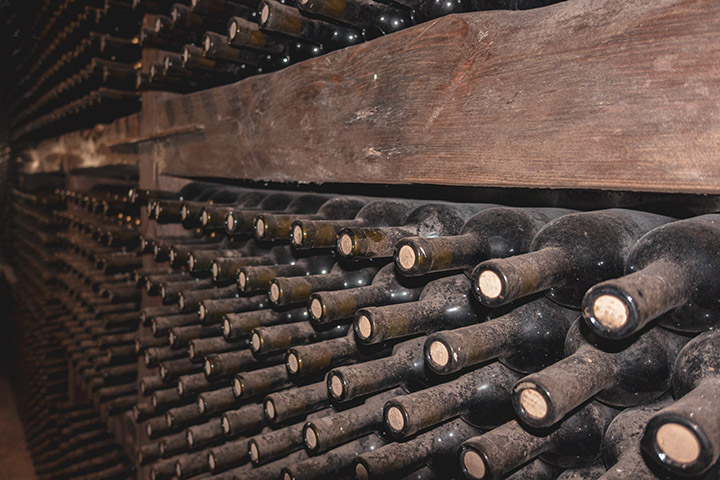
Over the past few years I have made larger and larger batches of wine, and as a result the number of carboys I use has really added up. Each year I try to make improvements to my home winery, and being a total wine equipment nerd variable capacity stainless steel tanks were an obvious upgrade for me. What better way to make the next step than to have a big, shiny tank or two in my wine cellar?
I set out to research the tanks and soon realized while there are benefits, there are certainly just as many drawbacks. However, with some effective modifications, and the purchase of a few pieces of equipment, you can increase the usefulness of the tanks. I have invested time learning how the tanks work, and what modifications others have used to improve on the successful use of the tanks. This article will hopefully help improve your experience with stainless steel variable capacity tanks.
Tank Modifications
There is much debate on whether or not to perform long-term aging in these tanks due to the possibility of lid failure or oxygen exposure through various parts of the tank. However, I am confident that with the following alterations, you can do more with your tank than just fermentation, malolactic fermentation or a short stay before the barrel.
Lid Bladder/Gasket
When your new tank arrives, the lid gasket/bladder it comes with will most likely be one made of a thin, clear vinyl material. Though these gaskets are fine during primary fermentation when the CO2 is protecting the wine from O2, they cannot be trusted for any post fermentation storage because they form a poor seal around the lid when inflated. Another vulnerable part of the gasket is the seam where the two ends meet to form the seal. These areas will potentially allow harmful oxygen exposure to interact with your wine. A way to remedy this is to replace the lid gasket with a new and improved one. These well-constructed lid gaskets are made from thick, heavy-duty food-grade rubber; they are a major upgrade over the stock gaskets. Another great thing about them is that they do not have a ridged seam, and they come equipped with a metal nozzle. This metal nozzle allows you really tighten the pipe clamp to ensure an airtight seal (take care not to slice the tubing and cause a leak). The major problem with the seam in the stock gasket can be seen in a simple water test. All you need to do is put a gallon (~3.5 L) of water in your tank and put the lid in the tank near the top and inflate the gasket up to about 0.6 bars. Then put the tank on its side and angle it allowing the water to hit the lid while gently rolling the tank back and forth, and watch for any leaks. Most likely water will come leaking out where the seam is, which means an airtight and uniform seal has not been achieved. These leaks will show you where O2 can get into your wine. I would also recommend performing this test when you get the upgraded gasket to ensure a good seal.

There are two different lid gaskets: White and black. I personally use the black ones because they fit my particular tank. As for the white ones, I have heard nothing but good things. I would suggest you pick the one that fits your tank the best.
When you decide to get a new gasket, measure the diameter of you tank and allow your retailer to assist you in getting a gasket that is a perfect fit. You can find the gaskets at most retailers that sell variable volume tanks.
The Stock Airlock
The waterless airlock that comes with most tanks uses a marble over the vent hole to allow gas to escape and is supposed to re-seat in the hole to prevent oxygen from getting back in. This is another potential entry point for oxygen and should not be relied upon to protect your wine.
A couple things you can do to improve this are:
• You can take the existing marble airlock and cut it in half just below the vent. This gives you a place to put a bung and an airlock, or a breathable bung. Or you can simply remove the whole thing and just go with the bung.
• Consult a welder to have a stainless steel tri-clamp ferrule installed in the lid (see photo, below left). This allows you to use an airlock, breathable bung, or tank vent

• Tri-clamp ferrules can also give you the ability to use hoses or caps when the ferrule is not in use, and more than one can be installed on your tank.
Isolating the Pump
The pump used to inflate the gasket is another potential source of problems due to the fact that air can leak out of the threaded valve on the side of the pump, around the gauge and out of the thin tubing which can be cut from the pipe clamp. One solution is to get thicker tubing that a tightened pipe clamp can’t cut through. As for the leaky pump, an inline pressure gauge and a shutoff valve between the pump and the lid gasket can be installed. By doing this you remove the pump completely, your lid gasket stays inflated and the gauge allows you to monitor the inflation level of the gasket so you know when to pump it up again. When the gasket needs to be inflated hook the pump up to the shut off valve, turn it to the on position and pump it to the desired level. Then turn the valve to the off position prior to unhooking the pump.
If you have several tanks you can install a sealing quick disconnect. Rather than buying a pressure gauge for each tank, you can quickly connect the pump to the lid gasket via the quick disconnect and use the pump gauge to check the pressure on each tank. This works by hooking one side of the quick disconnect to the gasket’s metal valve with a piece of suitable tubing and pipe clamps to ensure a tight fit. Next, connect the other side of the quick disconnect to the tubing of the pump in the same fashion. After the quick disconnects are installed, connect them and inflate the gasket to a suitable level (I like about 0.6 bars, MoreWine! recommends 1 bar for rubber, 0.7 bar for vinyl), unhook the pump and store it until the next time you need to perform a check.
Temperature Fluctuations and Using an Inert Gas Bleeder
Being that we make our wine in passive cellars, garages or our kitchens, maintaining and managing a consistent temperature can be difficult. Temperatures can fluctuate throughout the time the wine is in storage. These temperature vacillations are apparent in the varying wine levels in the neck of a carboy. When using a stainless steel tank, temperature swings can cause the wine in the tank to expand and contract; or the lid could be sucked in by a vacuum from a contracting tank causing the lid to fail and exposing your wine to excessive oxygen. To help with this you could use an inert gas bleeder system. I use one from MoreWine! and included in this purchase is the tank lid connection and the diaphragm bleeder regulator. You will need to supply the inert gas tank, tubing and gas tank regulator.
How this mechanism works is if the temperature increases and the wine expands; the excess pressure will be released out of the diaphragm bleeder. While at the same time the bleeder is allowing inert gas to be pulled into the tank on demand, without putting pressure on the tank. Being able to perform long-term storage in these tanks is like a dream come true. For the home winemaker on a budget, this particular upgrade may seem like an unnecessary luxury. But this is an important upgrade if you plan to use your variable capacity tank for long-term storage of wine. By only using your tank for fermentation, malolactic fermentation, and some other short term uses, you are limiting the tank’s overall usefulness and not really getting the value for your money. My goal for my home winery is to replace most of my carboys with tanks, which will make it easier to utilize my time more efficiently. It also allows me to use my limited space more effectively.
The Drain Valve
If your plan for using the tank in your winery is to quickly move your wine via the drain valve on the bottom of the tank, you may wish to replace the standard valve that comes on some of the tanks. Your two options for doing this are: A full port ball valve, or a tri-clover ferrule and clamp with a butterfly valve. These upgrades are necessary if you want to move larger volumes of wine faster, or through a larger pump. For transfers in and out of the tank I personally use ½-inch tubing, which is lowered into the tank, and I transfer out with a pump that moves 3 gallons (11 L) per minute (more on this later). But if you want to use larger tubing and a larger pump, these upgraded valves may be a good idea for you. As I mentioned earlier you will need to recruit the help of an experienced welder to help you in installing the T.C. ferrules, etc. Be very wary of weld quality when affixing something to your tank wall. All welds should be back-gassed and then ground and polished to prevent pockets which can harbor bacteria. Tip: If you use the drain valve that comes with the tank, apply Teflon tape around the threads to keep it from leaking. NPT fittings must be taped, and should be from a reputable supplier. Straight thread (BSPP) fittings seal with a gasket.
Additional Upgrades You May Consider
Lid Handles: Often there is not much to hold on to when lowering the lid of the tank onto the wine preventing you from splashing grapey goodness all over the place. A good idea would be to have your now new friend the welder install two handles onto the lid.
Dust cover: A dust cover is a smart solution to the problem of dust and dirt settling on to the lid and on the exposed sides of the tank. The dust cover will also help with controlling fruit flies. This could be anything from a bouffant cap from a hospital, a bed sheet or a plastic cover with an elastic edge.
Tank Stand: Any place you can buy your wine tank from will have stands available to put your tank on. All the stand is doing is getting the tank up off the floor, and for less than half the price you can build your own stand using 2 x 4-inch boards and ¾-inch plywood. You can build it just high enough so it is off the floor, or if you prefer to gravity rack, you can customize your stand to suit those needs. These tanks can be very heavy when they are full of wine so please be sure of the stability of your newly-made stand before using it full time. You can also make a wheeled cart for moving the tank around the winery. Just do whatever fits your needs best. If you decide to make a wheeled cart, be sure to check the weight rating of the casters before building.
Equipment Needed to Use the Tank
In order to use these tanks, you need to get some additional equipment to do various operations such as transfer the wine in and out of the tank, and clean it. Some of these things are necessary, and some are just nice to have.
Pump: I use a self-priming diaphragm pump that can move 3 gallons (11 L) per minute. It has a self-regulating motor which is designed to temporarily shut down, and then turn back on when restriction pressure exceeds pump capacity. This pump does not have a switch, so in order to control the pump, I wired a common light switch into a heavy duty extension cord, which I can carry around as I am managing pump operations. This allows me to control the pump without having to run to the outlet to unplug it at the right time. This is plugged into a GFCI outlet for safety.
Tubing: I use ½-inch tubing with the Buon Vino pre-filter on the inflow side of the pump, which will protect the pump from debris, along with a racking cane on the end to prevent curling of the tubing in the donor vessel. Your tubing needs to be thick walled or reinforced if using a self-priming pump to keep the tubing from collapsing, at least on the feed side. On the outflow side of the pump is a ball valve to control the flow of the wine. This flow control is helpful if racking in or out
of carboys.
Stirring the Pot: As your tanks get bigger and deeper, you may find the long handled spoon you have is not adequate. A good substitute is a cordless drill mounted mixing paddle, which you can find at several winemaking stores. Winery-equipment.com is the only place I know of that will make them at different lengths for you upon request.
Keeping your tank and its parts clean is a priority. To make the job easier use a hose with a multi-sprayer to assist removing any debris that has built up in the tank. Working near a floor drain is also helpful because you can just tip the tank over to drain rinse water out, rather than trying to manage a tank over a sink.
Tank Troubleshooting
As you gain experience with using variable capacity tanks they will become just as easy as using a carboy. There are a few things to remember when using these tanks, however:
• Variable tanks are not just “set it and forget it:” They need to be monitored at least once a week at the very least to check on the inflation level of the lid gasket and the integrity of the lid in general (I tend to check in on them every few days).
• Regular SO2 monitoring is an absolute must: Even after most of your modifications have been made, like any other winemaking vessel some O2 may slowly find its way into the tank. This means that when you are considering buying a tank you’ll also need to buy a free sulfite testing kit — and use it!
Pulling Samples for Testing and Tasting
When using the drain valve to pull samples for tasting or testing, the lid must be reseated (i.e. the gasket must be deflated then inflated again). These tanks don’t act as wine kegs where you can keep a volume of wine in the tank and just drink from it as you wish. If you would do this the air space in the wine would get larger, causing oxidation of your wine. If you plan to make a sulfite addition after a testing session, or any other additive for that matter, just reseat the lid after your testing session has ended and you’ve made your additions.
Cleaning and Sanitizing Chemicals
Anything that includes chlorine should not be used with these tanks (bleach, Comet, etc.) as they can cause pitting in the stainless steel, which will weaken the tank. Sulfite is ok to use as a sanitizer but limit the length of exposure to the tank. Also, steer clear of abrasive cleaners and detergents. A good cleaning protocol to follow is: A hot water rinse, followed by your favorite cleaner such as Powdered Brewery Wash (PBW) or One Step Cleaner (follow manufacturer’s instructions). Follow with a no rinse sanitizer or a citric acid rinse solution of (50 g/4 liters) and then a final warm water rinse. You may sanitize the lid components, bungs and airlock at this time also, using the same method as above.
Take Control of your Tank
Once the bugs are worked out, variable stainless steel tanks are very nice to have in your cellar or home winery. They take up less room, they are easy to clean, and you make additions to one vessel rather than several carboys. They are also very flexible if you vint different volumes of wine each year. I hope this article will help you with your tank, or help you feel better about taking the plunge and getting one for yourself.