Site Planning and Prep: Designing a modern backyard vineyard
Researching, planning, planting, and caring for a vineyard is serious business and should not be considered landscaping to admire from your kitchen window. Horticulture takes us back to the very beginnings of human culture and was serious business for those that took part in its practice. Tending to grape vines has been an important part of humanity for at least 10,000 years, when a domestication event happened in and around the forests and mountains between the Black and Caspian Seas. We cannot separate viticulture from post-neolithic culture. But for those looking to commit to starting their own vineyard, commitment is the buzzword here. Before visiting some vital planning information for your vineyard, let’s make a short list of what is necessary for successful vineyard establishment and management:
“Hair on fire”: Successful vineyards are planted and tended by fanatics. When I consult on new vineyards my first task is to go to lunch with the property owner and do everything I can to dissuade them. If they can get through my pestering questions and are still committed, I believe they are a good candidate for the vineyard.
Hours of planning: Do your homework! Oh, you need the assignments? Just keep reading, we’re going deep into this.
Labor source: Vines need love and attention (a.k.a. canopy management and a fungicide program) every single week. A minute per vine per week is a decent starting point for determining labor and spraying, but add or subtract from that depending on how young/strong your labor is as well as the quality of your equipment and spray rig.

Quality vineyard equipment: From your bypass pruners to your spray rig, the closer you can get to professional quality, the more enjoyable and efficient your farming will be.
Expendable income: The cost of planning, planting, and managing a vineyard that produces quality wine on a small basis will ALWAYS be more expensive than just buying great $30 wines for your cellar. If this is about saving money, the home vineyard is not for you. This is a way for you to SPEND money, but on the bright side you will learn more about wine and wine growing intuitively and osmotically than just about any other path of wine education.
Time and a winery: For a small backyard vineyard, a few hours a weekend will likely be all the time you need. For more than a few hundred vines, or an acre or two, you will likely want to have some supplemental laborers that have been carefully trained to grow quality wine. Chances are you’re going to make the wine from your vineyard, so do consider looking back at your WineMaker magazines for checklists and ads for great equipment from our suppliers and advertisers. A basic starting point includes destemmer, a press, some hoses, a pump, barrels, yeast, lab tools for measuring Brix and pH, lots of cleaning supplies. But winemaking is an endless rabbit hole, and winemaking shops ALWAYS have a few extra tools/toys or upgrades that you will want. Which brings us back to the previous discussion on expendable income.
So what does it take to be a successful vineyard “parent?” You have to be dedicated. You have to learn some new things and ask advice from people who have done it before. You have to have some extra money. You have to know where to shop. You have to be willing to give up some of your leisure time.
Without getting discouraged, realize that even a small vineyard will require weekly maintenance during the growing season and pruning in the winter. The fruit you grow will reflect your effort and your success or failure as a viticulturist will dictate the potential quality of your homegrown wine. The decision to start a vineyard is a serious one. It requires study, planning, financial resources, dedication, and a willingness to get muddy, sulfur-soaked, and parting ways with a decent amount of your money.

In planning your vineyard, there are lots of considerations. You will need to select your site and exposure, prepare the soil, decide if you plan to irrigate, plan a trellising system, and then choose a row and vine spacing scheme that works for you. I cannot get through all of those topics in one article so our focus today will be on the first topics: Site selection and preparation. We can talk modern trellising and spacing in a subsequent article. The purpose of this article is to introduce these development issues to you, teach you some basic vocabulary and concepts, and then turn you loose to do your own research.
Before we jump into it, I want to reiterate that it’s vital you network with other grape growers in your area to benefit from their mistakes and successes. Local wine growers can point you toward vineyard hardware suppliers, good nursery materials, can help you choose your vineyard plot, your grape varieties and root stock, and might even help with the labor if you bring them enough wine. Start a wine grape growing club or join an existing one. Help each other farm, harvest, and crush. Asking for help is absolutely vital to the success of your future vineyard. Most viticulturists I’ve interviewed have been very forthcoming about their first planting experiences — they admit that they would have planned and planted differently if they would have taken more time to read, network, and plan. Once the vines are in the ground, there’s little you can do to change the basic layout of the field. I like to say every hour of planning will save 1,000 hours of labor in the vineyard. That might be hyperbole . . . or maybe not. With that understood, let’s start planning your vineyard.
Site Selection
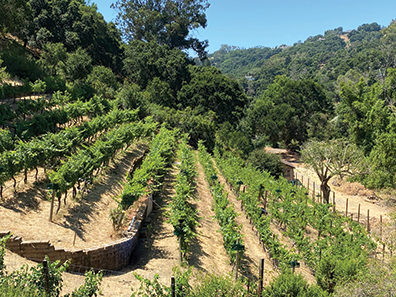
Hillside vs. Flat
Hillsides, especially southwest facing hillsides in the Northern Hemisphere, have always been the preferred location for growing quality winegrapes. It has been suggested by many wine writers that this was originally done out of necessity — that infertile hillsides were planted to grapes because other agricultural crops failed to grow there. Rocky, infertile soil produced small vines with less vigor than vines grown on deep, alluvial soil. Smaller vines meant smaller clusters and crop load, and the wines showed unusual concentration and intensity.
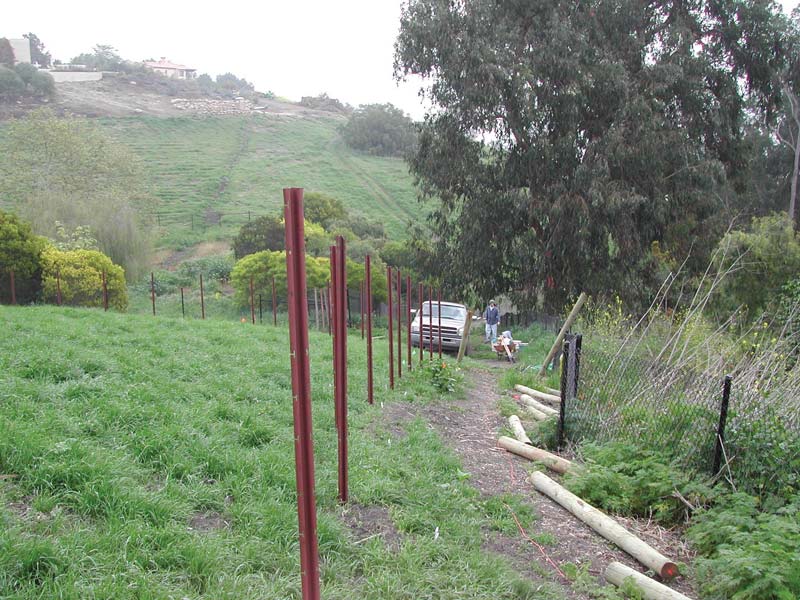
Hillside sites are generally well drained and have less frost issues in spring as long as the cold air has space to flow down, away from the hill. Consider the difficulties in farming on a hillside, though. Tractors and equipment take a beating and so can human beings. Check out pictures from the Mosel region of Germany for some extreme examples of this. With a hillside vineyard, one has limited choices concerning row direction and row spacing — the slope, exposure, and the topography will dictate where you can fit the vineyard. Terracing might be necessary, which can add thousands of dollars per acre to the establishment cost.
It’s vital you network with other grape growers in your area to benefit from their mistakes and successes.
Our family vineyard is mostly hillside and I deal with erosion and equipment difficulties constantly. We have one small section of vineyard that is relatively flat and I have to admit I love working in it. The spraying is easy, picking is easy, pruning is easy. I suggest that putting a vineyard on a slope will nearly double the effort required to maintain the vineyard and will significantly increase the investment needed to establish it. But . . . there are few sights as inspiring to the wine lover as a hillside vineyard. Quality fruit can be grown on flat ground, it just tends to be a little more vigorous and might require some more vine hedging to keep the vines from getting too wild and wooly. If I didn’t have to farm it, though, I would take hillside fruit every time.
Exposure
It is imperative to know what sections of your property get the most sunshine, wind, and shade throughout the growing season — roughly March to October. Sun exposure on the fruit is key to getting good flavor out of your grapes, so planting a vineyard among shade trees or in the shadow of a canyon is not advisable. An open, sunny, southwest-facing slope is perfect. Finding the spot on your property that gets early morning sunlight and keeps that exposure until late into the afternoon will ensure that the vines get all the sun they need to grow, stay healthy, and make sugar in the grapes. Some wind will protect the grapes against mold and mildew. Too much wind will shut the stomata on the leaves and cause the vine to shut down (stop respiring) temporarily. Again, the key is moderation. The fruit needs sun exposure, but not so much that it is burned. The canopy should have air flow, but not so much that the vines are constantly being beat up and shut down.
With rising global temperatures and many areas of the U.S. sunny enough to easily ripen grapes, exposure (especially in sunny places like California) is not as important as in cooler regions high in latitude. In fact, in sunny, arid regions of California exposure can be purposefully chosen for afternoon shade to protect the fruit and to keep it from ripening too quickly. On the other side of the coin, the reason those extremely steep hillsides were chosen in the Mosel was because of the exposure they provided. While climate change is effecting these decisions of where and what to plant, the basic concept does not change.
Checklist for tasks and research before breaking ground/planting:
- See a mental health professional and admit you want to plant a vineyard.
- Cleared from a DSM V diagnosis, or if you just don’t care, let’s get to planning!
- Identify the area(s) where the vineyard will be installed. Consider sun, shade, existing vegetation, previous land use, ease of moving in equipment, where equipment will be stored, etc.
- Map the vineyard out on paper, determining row orientation (think of the equipment!) and spacing between rows and vines (use anticipated vine vigor, more on this in the next article). This will help you determine the number of vines you will need to order.
- Take soil samples from the center of this area and any other spots you see changes in vegetation. Details for soil sampling, evaluation, and soil amendments later.
- Determine if your locale will need supplemental water/irrigation in the vineyard. Irrigation in dry climates will be the lion’s share of the vineyard’s development costs, so if you can “dry farm,” your install will be a lot less burdensome comparatively.
- Get climate records from as close to your site as possible or buy a weather station (refer back to the expendable income section). Determine your “Growing Degree Days,” a number usually between 2,000–4,000, which will dictate which grape varieties will work well.
- If you are lucky and have a successful vineyard(s) in close proximity to your site (by close proximity I mean the climate and soils are very similar), you may want to ride on their coattails and plant what makes the best wine for them.
- Prepare the soil.
- Install the irrigation system. This is always done before planting the vines so you know it’s functional and vines will have water.
- Install trellising (stakes, clips, wires, irrigation tubing) appropriate for anticipated vine vigor.
- Throw a vine planting party! Trust me, you’ll want as much free labor as you can get and keep them coming back to help for years to come.
- Now the real work begins: Training, spraying, watering, observation, notes . . . reading back issues of my column in WineMaker for more information on these subjects.
Site Preparation
Prepping the soil
There are basically four steps to preparing the soil for a vineyard: Evaluation, amending, ripping/discing, and finally planting a cover crop. Let’s take a spin through each.
Start with an evaluation of the soil through test pits, soil samples, and laboratory soil analysis. Get a USGS (U.S. Geological Survey) soil map and learn what “soil series” you will be planting on, and learn how that soil series impacts agriculture. While I will do a very brief primer on this here, I’m going to refer you to my June-July 2020 issue column “Dirt Don’t Lie” to get a more in-depth understanding of its importance (https://winemakermag.com/technique/dirt-dont-lie-the-impact-of-soil-on-vineyards-and-wine) because this is not a topic to take lightly and you need to dig a DEEP hole (backhoe is useful for this) in the center of your vineyard site. Not only will you find great information from the results of these tests, you may also want to find out if there are nematodes or phylloxera in your soil. These are vine pests that can cause havoc if you don’t plant a vine rootstock that can resist them. Most soil labs can test a soil for these pests. Ask them about the best way to take a sample.
After 22 years managing the same vineyard in the Santa Rita Hills, I was always surprised how often I would pull out the original pre-plant soil reports for varying parts of the vineyard; checking nutrient status baselines, soil series, micro nutrient availability or to show prospective fruit clients who asked. Getting soil samples is absolutely vital to understanding your site’s potential, and thereby the quality of future wines. Keep those soil samples in a safe place — they will be used again and again.
Next up you need to amend the soil with lime, nitrogen, compost, etc. to make it pH balanced and to add necessary nutrients as needed. Teach yourself a thing or two about what nutrients a vine needs, and then check your soil samples to see what needs to be added/amended. Take your soil samples to a respected company that sells amendments and they will help you determine how many pounds or tons per acre of any given amendment your vineyard may need.
Many soils, if not most, do not need to be amended for winegrapes to grow and thrive. Focus on the suggested range for any given nutrient or measurement and only amend the red flags. If there are too many red flags (high sodium, boron, chlorine, etc.), a vineyard might not be feasible on your land.
If you can afford it and can get the equipment into your property, rip the soil to a three-foot (1-m) depth to help the vines establish strong, deep root systems (local farmers and/or agriculture experts can help you determine if your soil needs ripping). Do this after you have spread your amendments so they will be spread through the soil evenly. After ripping, disk the soil so it is uniform and relatively smooth. In most areas there are folks with tractor equipment that can rip/disk for a daily or per-acre rate.
But the reality is that getting a Caterpillar D8 in your backyard can be a bit problematic — this would only apply to a property in the country with no fences or very big gates. Having an ATV with a soil disk attachment would be a great way to keep the rows tidy and break up the soil pre-plant, but it’s certainly not necessary unless in extreme examples (once again, we circle back to expendable income). If the soil is rock hard, it will take extra effort to make the holes for planting, and it may be helpful to plant after a late spring rain that softens the soil and gives the young vines water right as they are planted.
Irrigation
Ask local winegrowers whether or not they use irrigation or if the rainfall in your area is adequate to bring in a healthy crop year-in and year-out. Irrigation can be the most costly aspect of vineyard development. If you don’t need it; save your money for other tools/toys. If it turns out you do need supplemental irrigation for your new vineyard, be sure to install it after ripping/disking, and before planting cover crop. And make a system that will take elevation change, gravity, and water pressure into account.
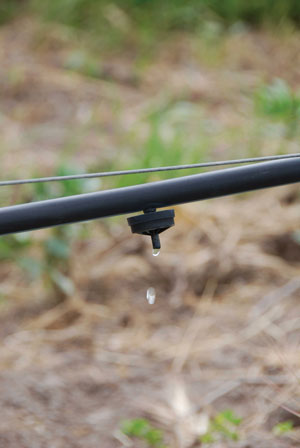
Most backyard vineyards are on flat ground. In this situation, and if the vineyard is less than 100 vines, you can hand water the vines with a hose, giving them enough water to grow every week or so. If you want a more elaborate drip system, this is yet another opportunity to bring a local winegrower a few bottles of wine. Ask how many gallons of water they apply per week in an average growing season, and how they apply it. You may need to set up a sub-soil PVC system to get the water to the site. You may need to invest in a pump to keep pressure adequate and if you are on a hillside you will need “pressure compensating drip emitters” (I love the Netafim brand), around 0.5 to 1 gallon per hour (2–4 L/hr).
Without pressure compensating drippers the vines at the bottom of the hill will get lots of water while the vines at the top will get none due to increased gravity and pressure at the bottom of the system. Go check out some vineyards in your area, take notes on the measurements of the irrigation system (both in the ground, out of the ground, and on the trellising), ask who installed it, how it was installed, and where they got the materials.
The ancestral home of the winegrape Vitis vinifera is in an area between the Black and Caspian Seas known as Transcaucasia. This area averages about 30 in. (76 cm) of rain annually, so I use 25 in. (64 cm) annually as my cutoff for dry farming. Can you do it successfully with 10–15 in. (25–38 cm) of annual rainfall? The best answer I can provide is maybe. After all this time, energy, and resources, do you really want to risk it?
Protect Your Vineyard Investment with a Cover Crop
Now that the soil is ready and irrigation is in place (if needed) you should call a local farm supplier and let them know you need to grow some cover crop to keep your new ripped, disked vineyard site from eroding. A good cover crop (grasses, vetch, clover, or whatever is appropriate for your soil and locale) will help slow erosion, will add nutrients to the soil, will attract beneficial insects, and, if timed right, may even choke out potential weed growth. In areas with hard winters growing a winter cover crop might not make sense if it’s just going to be covered with snow.
If you like to keep populations of beneficial insects in the vineyard, mow every other row of the cover crop after it flowers. This allows the “beneficials” to hop over to the adjacent row and not be left unprotected to predators. Once the vines go through budbreak, though, mow all cover crop and native growth/weeds to a clean vineyard floor to reduce frost damage (frost damage is higher in vineyards with any growth on the vineyard floor).
In my subsequent column, we’ll look at the remaining topics found in my checklist from earlier: Mainly the importance of selecting trellising and row spacing. And until then, be sure to schedule that mental health appointment.