Testing for Malolactic: Don’t be in doubt
Starting with this column, we will use the next few issues of WineMaker magazine’s “Techniques” to get into one of my favorite activities in winemaking: Lab testing. Years ago I earned a chemistry degree and then spent much of my working career in analytical laboratories, with the last assignment being General Manager of a wine testing lab in Sonoma County, California (after that job I became co-owner of a homebrew and home winemaking store, but that is another story). I have always enjoyed the combination of intellectual challenge and hands-on activity represented by the chemical analysis process. Now I would like to share some of that fun with you, the WineMaker readers.
There are signs to watch for that may help you determine that MLF is underway and when it is finished.
In each segment, I will cover a single wine parameter that can be analyzed at home. We will consider why we want to know, via measurements, how much of it is in our wine, when to test for it, and the principles of methods to be used. I will also cover any safety issues — always important in the lab. Today, we are looking at malolactic testing. What we really want to know is, “has my malolactic fermentation (MLF) gone to completion?” We don’t monitor the fermentation per se, but rather we test for the depletion of malic acid in the wine to signal that MLF is done. In looking for the disappearance of malic acid, we do not necessarily expect a result of zero. Instead, we look at some threshold value of residual malic acid that is low enough that we believe the wine is microbially stable and will not spontaneously start fermenting again in the bottle later. Commercial winemakers like to see a malic acid level below 30 mg/L (ppm) to declare the wine stable. For home use, a value as high as 100 ppm is probably safe enough. After all, even under favorable conditions, it can sometimes be difficult to get MLF to go. Once the malic acid level is low, the wine is properly sulfited, and it is stored under good cellar conditions, a spontaneous refermentation becomes very unlikely.
In grapes, malic acid is the second largest contributor to the total acidity (or titratable acidity, TA) after tartaric acid. If a grape’s malic acid level is found to be around 1.5 g/L, this translates to a ppm level of 1,500. That is the number that we are counting on ML bacteria to consume down to the 30 to 100 ppm level for our endpoint. Malic acid, named after apples (where it is the most prominent acid) has a sharp, bright flavor. Chemically, it has two protons that can become free hydrogen ions as part of the wine’s acidity. When Oenococcus oeni (or other lactic bacteria) consume malic acid, they excrete lactic acid and CO2 gas. Lactic acid, named after milk, has a softer and rounder taste profile than malic acid and each molecule has just one active proton instead of two. Accordingly, even though converted molecule-for-molecule from malic acid, it will contribute only half as much TA. In consequence, MLF mellows and “rounds out” most red wines and some whites, such as Chardonnay. While some winemakers count on indigenous bacteria (or used barrels) to initiate MLF, it is more reliable to inoculate with a selected strain of commercially produced Oenococcus oeni. We want MLF to complete promptly so we can add sulfites and cool the wine for aging. While keeping it warm without sulfites to support MLF, it is subject to spoilage by other organisms.

When will we test for completion of MLF? While it can vary widely, MLF will generally complete in about two to six weeks. There are signs to watch for that may help you determine that MLF is underway and when it is finished. If your wine is in carboys, you may see tiny bubbles of carbon dioxide rise along the walls during MLF. Another sign is to put your ear against the carboy or barrel. If you hear a crackling sound, that indicates bubble formation and active fermentation, although much less vigorous than yeast fermentation. Some winemakers report a “rubber boot” smell from the wine during MLF, but I have never detected that. Even if you do not see any of the telltale signs, you will need to start testing. About two or three weeks after inoculating would be a good time to run your first test. If MLF is not done, wait another week and test again.
In laboratories, there are enzymatic and instrumental tests for low levels of malic acid. At home, we use a classic wet-chemistry method: Paper chromatography. Have you ever looked closely at a stain left by a coffee cup on a paper napkin? If you have, you may notice bands of different shades of tan and brown left behind as the spilled coffee spread through the paper. That is the principle of paper chromatography. Different chemical components have different affinities for sticking to the paper fibers. As a liquid moves through the paper, materials that stick strongly stay where they are, while those that attach more weakly will move along at a faster pace. In MLF paper chromatography, a combination of paper type, solvent (called the mobile phase), and color indicator have been chosen to provide a semi-quantitative answer.
With careful spotting to keep the spot compact and intense, ‘absence’ indicates a level below about 100 ppm, the approximate detection limit for this test.
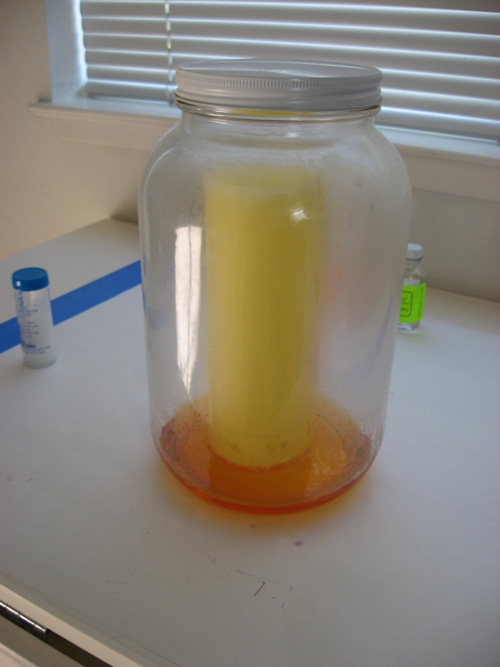
Laboratory versions of paper chromatography use a rectangular glass tank with devices to hang a piece of chromatography paper in the tank, with the bottom edge trailing in the solvent. For home use, we use a one-gallon (4 L) pickle jar, form the paper into a cylindrical shape, and stand it in the solvent. Here’s the process:
About one inch (2.5 cm) from the bottom edge of a piece of chromatography paper, draw a pencil line all the way from left to right. Use pencil because ink would move with the solvent and will interfere with the test. Mark a small “x” for each of three acid standards plus as many samples (up to about five) as you are testing, evenly spaced along the line. Using a fresh glass capillary tube independently for each, dip into standard solutions for malic, lactic, and tartaric acid. Release the contents of the capillary tube on each of the first three x’s. Mark them M, L, and T to indicate which acid standard you are applying to that x. Allow the spot to dry, then put another drop of the same acid on the appropriate x. Repeat about four times, drying in between. Meanwhile, label your other x’s (in pencil!) with your wine sample identifications. Again using a unique capillary tube for each, spot and dry those x’s about four times.

The chromatography solvent is butanol—butyl alcohol. That is the mobile phase that moves up the paper during the test. To visualize it, for this test it contains the indicator bromocresol green which is yellow-orange in an acid pH environment and blue-green in a basic environment. The MLF solvent also contains formic acid. That assures that it is in an acid condition and explains why the solvent is orange in the bottle. Pour your solvent into the large jar, form your spotted paper into a cylinder with the line at the bottom (secure it with staples or paper clips), and stand it in the jar, resting in the solvent. Put the lid on (the solvent is smelly) and go away for a few hours. During that time, the yellowish solvent will rise through the paper by surface tension. As it does so, it will carry malic, lactic, and tartaric acid with it. With different affinities for the solvent and the paper, the three acids travel different distances as the solvent travels to the top of the paper. The key to the test is that a particular acid travels the same distance from all x’s. Tartaric acid remains lowest on the page, malic acid is somewhere in the middle, and lactic acid travels nearest the top.
The next key to the test is seeing where the spots ended up. Remove the paper from the jar and hang it from paper clips to dry. Formic acid is volatile and will be leaving the paper as it dries, while at the same time, any ambient ammonia vapor in the air (which is common in buildings) will be neutralizing remaining formic acid. As the formic acid clears, over a period of a few hours, the neutralized paper will turn bluish—except in those spots where target acids remain. The malic, lactic, and tartaric acid spots remain yellow and become clearly visible on a bluish background. The standard solutions are commonly either 0.1% (1,000 ppm) or 0.3% (3,000 ppm) each. The spots are clearly visible and are in the range of tartaric and malic acid in wine before MLF and lactic acid after MLF.
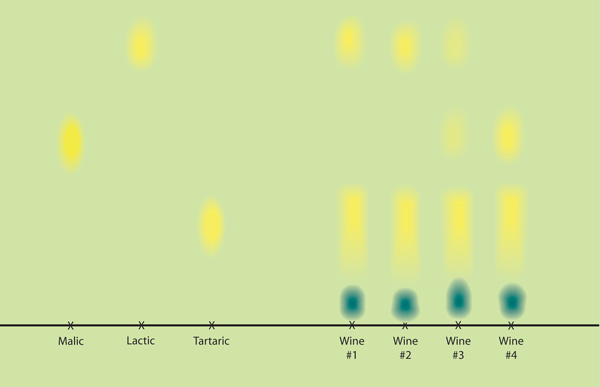
For any wine sample, you will always see a tartaric acid spot. If you also see a malic acid spot, MLF is not complete since malic acid is still present. If you see a lactic acid spot, it indicates conversion from malic to lactic acid is happening. When the malic acid spot is absent, you may conclude that MLF is complete. With careful spotting to keep the spot compact and intense, “absence” indicates a level below about 100 ppm, the approximate detection limit for this test. Over time, the entire sheet will turn blue as the acids in the spots become neutralized. If your test sheet is not turning blue after a few hours of drying, you can hurry it along by opening a bottle of household ammonia (like Parsons ammonia cleaner) nearby. The ammonia vapors from the open bottle will neutralize the formic acid and turn the sheet blue. If you use this step, check frequently as the entire sheet may turn blue and the chromatogram will be lost if it experiences too much exposure to ammonia vapors.
To run paper chromatography tests for MLF at home, you will need to buy a kit. That is easier and more economical than sourcing all the equipment and supplies individually. For about $80 (USD), you will get the large jar, a bottle of solvent, a package of 100 capillary tubes, several sheets of chromatography paper, the three acid standards, and maybe a funnel to help you put the solvent back in the bottle after the test. Detailed instructions will also be included, but having read this column, you already have a good idea of what you will do.
Butanol is a toxic alcohol, but not strongly poisonous — it is even used in perfumes. It is flammable and has a pungent, alcoholic aroma. Formic acid is an irritant and has an even more pungent aroma. The solvent stinks and you should avoid breathing the vapors. Wear safety glasses to protect your eyes against splashes. After the test, pour the solvent from the jar back into its original bottle and cap it tightly. You can keep using the same solvent again until you run low. It’s a good thing you can reuse it, because if you still see a malic spot this time, wait a week and test again!