Your First Wine Barrel
After 15 years of making wine, I am finally embarking upon the use of barrels and it is very exciting. Just having the barrels in my homewinery creates an ambiance that is softer, more aromatic and a bit primitive.
I’m feeling that my homewinery is now more in sync with the Old World milieu of my backyard vineyard. I’m looking forward to the next time that I entertain and bring my guests inside after a walk through the vineyard. Now I can have them settle in the cozy winery for a glass of wine or two, surrounded by these stately new barrels. It definitely is a huge upgrade. Oh yeah, I’m hoping that the barrels add wonderful new attributes to my wines as well. I’d like to share with you the recent journey I took including selecting the barrels, prepping the barrels and putting them into service.

What’s So Good About the Wood?
For those just getting into winemaking, here’s a brief introduction to the benefits of aging wine in oak and how that is accomplished in the winery.
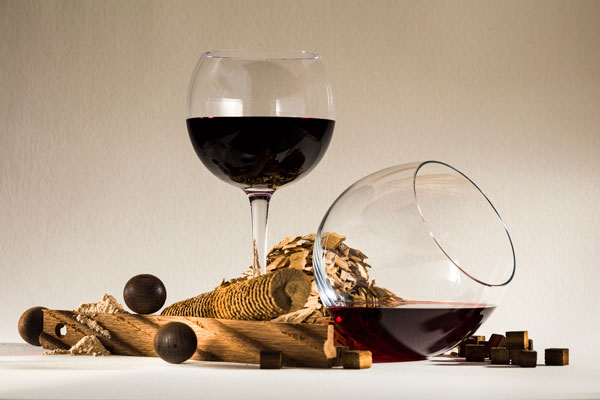
Wine from most red grape varieties benefit from some contact with wood during aging. The red varieties that are most popular — Cabernet Sauvignon, Merlot, Pinot Noir, Syrah and blends that are dominated by these grapes — all typically spend some time in oak barrels. A few white varieties — most notably Chardonnay — are also frequently oaked. There are two basic benefits to aging wine in an oak barrel. First, oak flavors are imparted to the wine. One of the most important flavors from the oak is the vanilla notes from the compound vanillin. The toasting the barrel receives shapes the character of the oak. Secondly, although barrels are water-tight, they are not completely air-tight. A tiny amount of air enters the barrel through the porous wood over time, and some winemakers describe this as the barrel “breathing.” This slow but steady ingress of oxygen microoxidizes the wine, and this has many positive effects. Small amounts of air, containing water vapor and alcohol fumes, also escape from the barrel, concentrating the wine slightly.

White wines can be fermented in barrels, or fermented in a neutral vessels then transferred to the barrel for maturation. Neutral vessels are those that do not impart any flavor to the wine, such as stainless steel fermenters, glass carboys or plastic fermentation buckets. Fermenting the wine in the barrel is said to add an extra layer of complexity.
Red wines are transferred for barrel aging after they have been fermented and pressed off their skins.
The amount of oak flavor imparted to the wine decreases each time you use a barrel. Once the barrel no longer imparts any appreciable level of oak flavors, it is called a neutral barrel. Many commercial wineries will use their barrels three times, then dispose of them.
You can continue to use a barrel after it becomes neutral and still receive the benefits of microoxidation of your wine. However, you will need to get the oak flavor from another source, possibly staves, spirals or cubes.
The porous nature of the wood will harbor any microbial contaminants in your wine. As such, transferring wine that is contaminated by Brettanomyces or Acetobacter will virtually ensure that any subsequent wine aged in that barrel will be contaminated with these organisms. The most common microbial problem in barrels is Penicillium mold.

Selecting The Barrels
I considered French, Hungarian, and American oak barrels. I chose American oak barrels because they are more affordable, I like the traditional barrel shape, and I want to use American oak with the wines I make from my Cornell University developed hybrid grapes. I do plan to try French oak spirals in the American oak barrels once they become neutral. I chose 30-gallon (110-L) barrels because I make about 33 gallons (120 L) of wine every year from each of my three hybrid cultivars: Traminette, Corot Noir and Noiret. I am really looking forward to managing the wines in over 30 gallon (110 L) batches, instead of the numerous 5 gallon (19 L) carboys that I use in the initial stages of winemaking. I plan to eventually bottle (with filtering) directly from the barrels. That will be about 130 bottles from each barrel, which is a good work effort. I will also plan on filling the barrels back up the same day that I empty them for bottling. I can see that I better get a larger bottling party lined up.
I also went with the 30-gallon (110-L) size barrels because the larger barrel size has slower oak extraction than the smaller barrels, such as a 15-gallon (57-L) size. The slower extraction rate in a
larger barrel is due to the ratio of the wine volume to the barrel surface area. A full-sized, 58-gallon (220-L) barrel will have an even slower extraction rate. I know that American oak imparts more oak flavor faster than Hungarian or French barrels, so I will be monitoring the “oakiness” of the wines every six weeks. At that same six week interval, I will be testing each barrel’s contents for free SO2 (FSO2) and adjusting as necessary. I use the aeration oxidation (AO) method of testing FSO2. Before the barrels are closed up for the next six week interval, I will top them up to the brim. My estimation is that I will leave the 2011 vintages in the new barrels for about 6 months, and then I will replace that wine with 2012 vintage wines of the same variety. I am hoping to get into an annual barrel refill schedule after the second vintage goes into the barrels.

The Barrels Arrive
I had the barrels delivered to a local business, to ensure that someone would be there to receive them when they arrived. Even though all three barrels and the three barrel cradles were ordered at the same time, one of the barrels was delivered a day later than the others. This turned out to be a good thing, since I could only fit two barrels at a time into my Prius with the back seats folded down. I didn’t realize how large a 30-gallon (110-L) barrel was, and how heavy they are. I couldn’t get my arms all the way around the barrels, so I put on some leather gloves and used a rope twisted around the palms of my hands. The rope extension made it a lot easier to carry the barrels with a “bear hug”, and get the large barrels down the stairs to my winery.
The barrels were marked as 75 pounds (34 kg) on the shipping label. I haven’t weighed them when full, but I can calculate an approximate weight. I’ll assume the barrels weigh about 70 pounds (32 kg) empty, and that the packing material weighed about 5 pounds (2 kg). The specific gravity of dry wine is very close to the specific gravity of water, which weighs 8.35 pounds per gallon (1.00 kg/L). The barrels have a capacity of about 32 gallons (120 L) each. I calculated the full barrel weight as follows: (32 x 8.35) +70 = 337 pounds for each barrel (153 kg/barrel). I had to be sure that I had shelves that could handle that much weight. After a rough calculation, I decided that the same shelves that I use for carboy bulk storage will be strong enough for barrel bulk storage.

The barrels were packed very well for shipping, and there wasn’t any apparent damage caused by the shipper. The barrels are not perfect, and I am happy to say that any imperfections are due to the hand craftsmanship of the barrels. I like the fact that the barrels are made with a lot of human skill, and hence creativity. They truly are pieces of art to me.

Inspecting The Barrels
After unpacking the barrels, and inspecting them for any apparent damage, I attempted to pull out the wooden bungs that the barrels were shipped with. I had to use a rubber mallet to break them free, but it wasn’t too difficult. I used a piece of cardboard against the barrel and the bung so I didn’t leave any black rubber marks from the mallet on the nice new oak wood. Once the bung was removed, I did a sniff test on each barrel. What a wonderful smell. They each had a sweet smell that was a blend of fresh sawn oak and a bit of the charred smell from the medium toast interior of the barrels. Very pleasant!

Preparing For Use
I then went through the barrel testing procedure to see if there were any leaks. I bought barrel cradles along with the barrels, so the barrels were easy to set up and fill with cold water. Before adding the tap water to the barrels, I added one teaspoon of potassium metabisulfite. After about an hour, I did see that one of the barrels had a very small leak between two of the staves. The leak was so small that it never dripped; it just made a damp spot in the area of the leak. I let the full barrels sit overnight. When I checked on the barrels about 12 hours after I filled them, they were all watertight. The small leak stopped and the wood in the area of that leak dried right up.

I didn’t leave the water in the barrels any longer than the 12 hours because I didn’t want to unnecessarily leach out the oak and toast flavors. When I emptied the barrels with my wine pump, I put the water from each barrel into a 32-gallon (120-L) Brute container so I could measure the volume with a dipstick that I use for volume measurements during fermentations.

The capacity of the barrels is also something that is not exactly the same for each barrel. The actual capacity of one of my three “30-gallon (110-L) barrels” is 32.5 gallons (123 L); the other two barrels have a capacity of 31.5 gallons (119 L). I also tasted the water that I pumped out of the barrels and it had a nice subtle flavor of oak and smoke to it. If I made wine from kits, I would be tempted to save this barrel testing water and use it with the kits.

Now that I was convinced that the barrels didn’t leak, and that I wouldn’t have to send any of them back to the manufacturer, I applied a mildewcide coating. The label on the mildewcide coating can states: “This is a special product formulated for the wine industry that permits the wood to breathe — it does not seal up the pores and acts as an assistant to the wood tanks in the proper aging and storage of wines.” Two or more coats are recommended, with a day or more in between applications. After some trial and error, I found that the easiest way to apply the mildewcide coating was to stand the barrels on end on top of a small dolly. That allows a coat to be applied to the entire barrel except to the head that was facing down. I also applied two coats to the barrel cradles. The mildewcide coating has slightly darkened the color of the barrels, as well as put a protective coating on the outside. The barrels look great, and I understand that the inevitable staining of the barrels around the bung hole while transferring wine will be easier to clean up. I didn’t spill much wine on the barrels while using my vacuum transfer system, but the few drops of wine that did hit the barrel wood was easily wiped up, thanks to the mildewcide coating.

The bung holes were cauterized (charred) by the manufacturer to prevent leakage. I used the wooden bungs that came with the barrels when I applied the mildewcide coating, so I didn’t get any mildewcide inside the bung holes. That is about the only thing I would recommend using these wooden bungs for. They are very shallow, and hard to install and remove. I also wonder how well they seal, unless you pounded them in very hard. A good alternative is to use solid silicone bungs. Order your silicone bungs when you order the barrels, so you have them on hand when the barrels will be ready to be filled with wine. Make sure you ask the barrel manufacturer what the diameter is of the bung hole on your barrels before you get them, and order the correct silicone bung size.

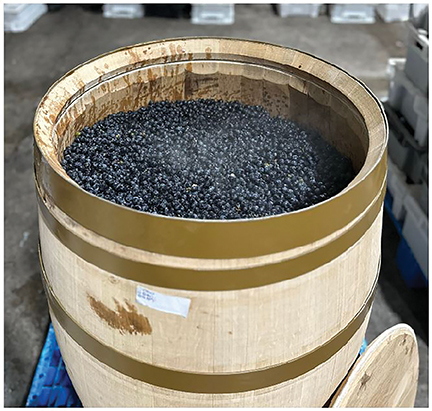
First Use of the Barrels
Finally the time arrived to fill my new barrels with wine. I used a vacuum to pull the wine from the carboys into the barrels. I saved enough of the 2011 vintage of my three varietals, so that I could fill the barrels and have topping wine left over. All of the wine that I put in the barrels is over a year old, and has been cold stabilized and racked several times. The wine that I put in the barrels was clear enough that I would be fine with bottling it as is. I didn’t want to have the wine clear in the barrels and drop a lot of sediment, even though that’s how it is usually done. I also have enough 2012 vintage wines to fill the barrels again. The timing of buying your barrels, putting in the first wine, and preferably attempting to keep the barrels full of wine at all times, is important. The best way to store a barrel is to keep it filled with wine. If you are going to store the barrel empty for an extended period of time, you should burn a sulfur stick or sulfur disk in the barrel every six weeks or so, and keep the barrel bunged up with the sulfur fumes still in the barrel.
Once I filled the barrels, I let them sit overnight, and then I tested the free SO2 (FSO2) levels of each wine. In the past, I have been using “rules of thumb” to determine my potassium metabisulfite additions. By using the aeration oxidation (AO) method of measuring the FSO2, you can determine how much FSO2 is in the wine. The higher the pH of the wine, the more FSO2 is required. There are several charts available online that show the different levels of FSO2 required for different pH levels. After measuring the FSO2 with the AO method, I determined that all three barrels needed to have potassium metabisulfite added.

Once you go through the AO procedure a few times, it’s easy, but a bit time consuming. It takes about 15 minutes to aerate, 5 minutes to perform a titration on the results, and another 10 minutes to clean the lab glass. There are other methods and tools that can be used to measure FSO2, but I personally like the simplicity of the AO method.

In addition to purchasing the barrels, the barrel cradles, and the mildewcide coating, I purchased some accessories and supplies that I won’t need right away, but that I wanted to have on hand. I bought sulfur sticks and a stainless steel wire to use when I burn them. This was a less expensive method than buying the sulfur disks and the special holder that the disks need to be burned in.
I also purchased a rotating spray head mounted on a stainless steel wand that I will use for rinsing the barrels after use. This wand does a good job of reaching all areas of the barrel interior, although it doesn’t have a “power washer” force that would knock the tartaric crystals off the interior of the barrel. I also bought some caustic barrel cleaner that I wouldn’t use unless I had to, but I want to have it on hand. I already have potassium metabisulfite and citric acid on hand.
After two years of working on it with a couple of close friends, the new home winery was completed earlier this year. Well, I guess a homewinery is never really completed, is it?