As I researched and considered this article, an interesting thought came to mind. If you planted your vineyard back in 2000 when I started writing for WineMaker magazine about planning and planting a small-scale vineyard, you might have “old vines” in your backyard by now. And that’s the focus here: Mature vineyards in the fall and winter.
As always, my focus in these articles is on measurable results and practicality. It’s been eight years since we last discussed shutting down a vineyard after harvest, and we’ve never discussed shutting down the mature vineyard for harvest, so let’s review and learn some new things while we’re at it.
As viticulturists we adjust our farming to the climate and the vintage. Any given day we might be pruning, hoeing, watering, fertilizing, positioning shoots, pulling leaves, applying fungicide, or harvesting. For many home vineyardists, even finding time to work in the vineyard can be a challenge.
Growing grapes tends to be a reactive process. We see how our vines are responding to the soil, climate, and human interaction, and we react. Every decision we make impacts the vintage and the quality of our wines. While it’s easy to make a plan for a year’s farming in the vineyard, it’s almost impossible to stick with it. Weather fluctuates, rain comes and goes, frost pops up when we least expect it. We may have to deal with heat waves, cold streaks, pests of all shapes and sizes, labor issues, mildew, equipment failure — and of course we need to juggle our busy schedules just to find a few hours each week to get into the vineyard.

When all of the vines have reached maturity the vineyard management gets a little easier, for numerous reasons:
• Vines are better adapted to heat, cold, and even pests.
• Vines have deep root systems and manage their water and stress better.
• Vines have better stores of nutrients at budbreak.
• You have the benefit of a decade-plus of management history to better understand our vines’ environmental, watering, and nutritional needs.

• You’re less likely to make ill-informed snap decisions in the moment.
• You have a sense of what you need to spray, the dilution, and cadence, and the equipment.
• You know how to prune now, after 10+ years of pruning your own vines.
• You have a sense that you’d like to plant and tend your whole vineyard anew — using all the skills you have developed in the last decade or two.
So here are my mature vineyard management basics:
• Using your long history of small vineyard management, make a plan and stick to it. Be flexible enough to adapt, but not so hasty that you abandon standard cultural practice on a whim or because of strange weather.
• Observe the mature vineyard (with a focus on issues you’ve seen before) as often as you can for patterns. Never make decisions based on a single vine. Take the average of all vines in a field when making decisions on how to farm the whole vineyard. Or even better, farm every individual vine to its best advantage. Spot fertilize the struggling vines, replace a vine that shows virus, pull different amount of leaves from the canopy depending on vigor.
• Stay informed on management techniques for a mature vineyard in your locale. There are tons of great websites, YouTube channels, books, and magazines that can keep you up to date on winegrowing, science, and new grape growing strategies. Besides reading each and every issue of WineMaker, I recommend the following publications for those that can’t get enough info: Practical Winery and Vineyard, and for those that are considering a run at a commercial production, Wine Business Monthly. If you don’t own a copy of Dr. Smart’s Sunlight Into Wine you are missing out on the book that revolutionized canopy management and heralded the modern viticultural age (and informed much of this article and my own winegrowing success). Gather the information, see what works in your home vineyard, and reject any info that fails. Repeat and cherish the info that helps you grow better wine by taking/reviewing notes so you don’t forget what you did last year!
• The greatest wines are made from vineyards with admirable consistency from mature vine to mature vine. Try to keep all vines manicured with similar vigor and crop load. Consistency provides uniform ripeness from berry-to-berry, cluster-to-cluster, vine-to-vine, row-to-row. Try to avoid Brix gaps (from vine-to-vine as well as cluster-to-cluster) greater than 2–3 °Brix. It’s hard to make great wine from a vineyard where some primary clusters measure 20 °Brix and others measure 28. You’ll get the green, herbaceous flavors from the underripe fruit and the jammy overripe notes from the too-ripe fruit. Just because the blend in the fermenter is 23.8 °Brix doesn’t mean there will be consistency of flavor.
• You will always have a few vines in the vineyard that are ugly and consistently under perform. The soil may be shallow, there may be a bit too much boron (or too little), or some kid may have dumped motor oil on the dirt five years ago. Don’t stress to understand it or spend hundreds of dollars on tests. Spend your precious vineyard time fine-tuning the healthy parts of the vineyard. If the “sick” part of the vineyard spreads, then worry about it. But if it stays isolated (usually at the margins of the vineyard), don’t sweat it too much. You can try to replant a few vines, but expect them to have the same problem as the originals. If you pull them out, though, you may be adding a deeper margin to the vineyard and the vines a few rows in might suffer.
• Keep a notebook on the practices you complete in the mature vineyard. It can be as simple as an entry like, “May 3, 2024: Finished first leafing pass on east side. Took about 30% of leaves and all laterals out. Left less than one leaf layer between the sun and clusters.” In this way you will be able to correlate your work with the success or failure of any vintage. If the wine is a hit you can replicate your success, and if it lacks something you can try to identify the problem and try different timing if you identify the faults as vineyard-based.
Improving Mature Vineyard Management
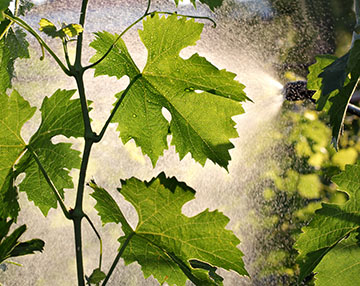
• Assess the vineyard mildew/rot pressure through harvest. Mildew and rot will begin affecting wine quality at less than 5% affected berries — so it’s vital they do not get into the fermenter or press. Mildew and rot are encouraged by humidity and heat and are much more likely to grow in crowded, shaded canopies. Mildew pressure is drastically reduced in open canopies with less than one leaf layer between the fruit and the sun and wind. Humid, warm temperatures between 75–85 °F (24–29 °C) are a perfect incubator for mildew and rot — so pay special attention to the weather and increase your spray frequency to the pressure. Both mildew and rot can perforate the skin of the grape and begin degrading freshness and flavor. During harvest you can address mildew and rot issues by cutting out parts of the affected clusters so the clean fruit goes in the bucket and the mildewed/rotted sections are cut onto the ground. The key to getting good mildew/rot control is choosing the right varietal (low rot/mildew potential in high-pressure areas), using spray equipment that has the pressure and coverage that will get the fungicide into the canopy and onto the fruit, timing your spray applications according to label directions, and sticking to a very regimented schedule. Be wary of using overhead sprinklers/irrigation, as sprinkling the whole vineyard will inevitably cause problems with increased pressure for mildew and rot due to heightened humidity and increases spreading of spores. I find new growers have the most problems with rot and mildew. Once you get the rhythm of sprays firmly working a few seasons in a row, you should be educated and experienced enough to get a feel for what the vines need in your corner of the world.
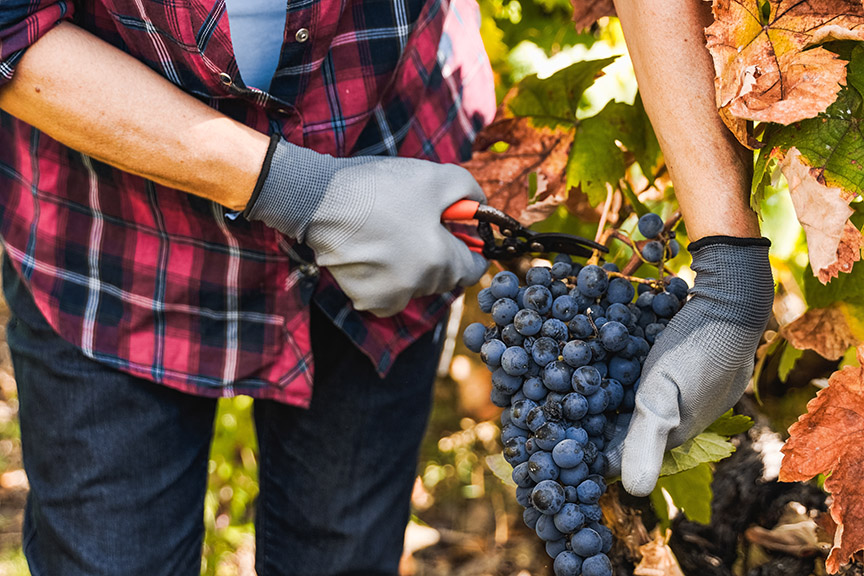
• Harvest the grapes at your desired levels of sugar and acidity.Weekly Brix testing at the end of the season and careful observation can enable a “perfect pick.” We only have one chance to harvest per year, and even though the mature vine might not be so unpredictable as young vines with ripening, we want to get the moment of harvest right.
Massively simplified, grape sugar is converted into alcohol and carbon dioxide by primary fermentation. Wine yeasts, in my experience, convert sugar to alcohol at a rate of about 0.55–0.6% alcohol per °Brix of sugar in the fruit. That means 20 °Brix = ~12% alcohol at dryness, while 25 °Brix will be closer to 15% alcohol in a dry wine. So, for those who like their wines at about 14% alcohol, plan to pick around 23 °Brix. Remember that red ferments tend to creep up after crush — sometimes as much as a +2 °Brix soak up in the fermenter, especially if the fruit is dimpled or has raisins. As Brix climbs in summer and early fall, acid is respiring. The magic moment is when the sugar is high enough to make a rich wine, and the acid is strong enough to provide ample backbone. White wines above 3.4 pH usually taste a bit too soft for me, and red wines above 3.7 pH often strike me as “flabby.” Red wines with excellent tannins can make up for a lack of acidity by the structure and mouthfeel the tannins provide.
• Measure Brix (sugar levels) in your vineyard a month or two out from harvest. Keep the results in a separate notebook and consider plotting your “ripening curves” to see what to expect in subsequent vintages. Brix can be measured easily with or without a lab in your house. Using a refractometer in the field is an easy way to teach your palate how to measure sugar. Walk a little while, choose a berry, squeeze some juice on the refractometer and taste the rest of the juice. What would you guess the Brix content is? Make your guess and then check your instrument. Repeat every year, and within a decade your mouth will be able to judge Brix within one or two points consistently. For a more accurate average of field ripeness, you need to take a sample of at least a few pounds (1+ kg) of fruit. I fill about 1⁄3 of a 5-gallon (19-L) bucket for a field sample. I crush the fruit by “punching” the clusters down with my fist against the bottom of the bucket until I’ve made a juicy mess that doesn’t squinch and pop under my fist after a few minutes. I pour the white juice right off the skins into a pitcher or bowl, while I put a wet towel over the red samples, put them in a cool spot indoors, and allow them to soak for about 24 hours before measuring. Getting an accurate sample of field ripeness before picking is a vital part of making harvest a success. Pour the juice sample into a large graduated cylinder and float a hydrometer in the juice. Do not allow foam to form on the top of the juice, blow it off if you have to, and read the Brix just below the meniscus.
• At a minimum, it is important to measure pH in ripening grapes. Titratable acidity is also useful but may end up causing more confusion than it’s worth. Acidity is usually described in juice and wine as either pH or TA (which I’ve seen described as both total acidity and titratable acidity, of which I prefer the latter for accuracy). The pH of juice or wine is a measure of the activity of hydrogen ions, while TA measures the actual weight of how much acid is in the liquid. Make sure to calibrate your pH meter every week or so in the testing period, and if it starts losing accuracy it may be time to replace the probe. Simple kits to test TA with sodium hydroxide titration are available from most lab companies. For most winegrowers, pH is a good single measure of acidity to plan a pick. Keep track of the pH of your harvested grapes and final wine, and consider what pH makes the best wine from your mature vines.
• Pick your vineyard on the day when the fruit is perfect. I have made enough noise about this subject in previous articles. You’ve spent an entire year farming the fruit, and you really should pick it on the vines’ schedule of perfection, not when you get a day off. Call in sick, play hooky, whatever’s necessary. This is your wine we’re talking about!
• Taste other local homemade (and commercial) wines and discuss harvest chemistry with the grower/winemaker. The importance of getting involved in the local wine culture cannot be overstated. Why reinvent the wheel when there are growers and winemakers in your county or state that can show you the way? Seek out the local experts and help them first in their vineyards and take note of their tips and tricks. Bring your own wines and if your new friends seem reluctant, ask them for their honest appraisal of your wines. A good way to ask them for tips is asking something like: “If this was your wine, how could you improve it?”
• Pick your grapes at night or early in the morning and crush them while cool.Picking grapes in the heat of the day puts you at a disadvantage. Hot grapes will be more likely to leak juice and begin feral ferments. If you have no choice but to pick in hot weather, find a good source of food-safe dry ice and chill the grapes or the must. Be careful adding dry ice to juice, as it has a tendency to foam and spit out of barrels or containers, and can burn unprotected skin/hands.
• Keep the critters away. Most vineyard owners have seen firsthand what birds and other pests can do to an unprotected vineyard. Bird netting is a great way to keep the winged types out, and if you roll up the extra netting and tie the bottoms up with tomato twine or twist-ties it also may exclude squirrels, raccoons, and other critters that climb into the canopy for a snack. A few dogs in the backyard may help as well. Try to keep gophers under control with trapping or gas bombs, and deal with bees/wasps/yellowjackets early in the season to keep them from breaking the skins of those precious berries.
Shutting the Vineyard Down Post-Harvest
After the fruit has been picked and crushed, there are a few more details that need to be attended to in the vineyard:
• Make sure all fruit, even ugly fruit and bird-pecked clusters/stems, have been totally removed from the vines. Fruit/stems that are allowed to stay on the vine will increase rot and mildew pressure the following year because the spores will overwinter on the vine and produce lots of new spores to start the cycle again in the spring. Removing the fruit completely from the vineyard is preferable, but you won’t be adding much extra pressure by allowing the trash fruit to compost in the center of the vine rows.
• Do a vineyard walk-through after your day of winemaking to confirm all fruit has been harvested, a row has not been missed, equipment has been gathered, buckets/picking shears collected, and pickers aren’t passed out between rows. Nets should be rolled up and stored. There are moments when the pressures of harvest make us put off some final vineyard tasks. I find that those last tasks rarely get done if they are not completed immediately following harvest day. You’ll feel much more comfortable after a day of harvest and winemaking knowing that the vineyard is clean and the winery is orderly and sanitary. These are the details that help to make good wine great.
• Give the mature vines a deep irrigation if rainfall hasn’t already saturated the ground. After being freed from their burden of fruit, the vines go into a stage of strong root growth, which will be easier for the vine if the soil is saturated. Ten or more gallons (38+ L) per vine is not unreasonable if the soil is still dry. Turn the drippers on all night and let the vines soak up a nice long drink. They’ve worked as hard as you all year and deserve to wet their feet and relax for the winter.
Conclusion
Managing a mature vineyard is almost always preferable than managing a young one. Use your experience, notes, and gut to make the decisions you were hesitant to make when the vineyard was young. Mature vineyards can take a little bit more stress. Take notes each year, read them before the growing season starts, correlate weather patterns and ripening curves, and you will have tools (and potential wine quality) beyond anything you could have imagined when you first plotted the vineyard on the back of a bar napkin.

So you have decided to elevate your hobby to the point of growing your own fruit for winemaking? This is a huge step that should not be taken lightly. Once you plant that first vine you have entered the world of farming. Farming is by no means something for the faint of heart. There are so many variables that can take the best of plans off course in your wine growing for…

With harvest behind us and our wines safely fermenting or in bulk storage, it’s time to reflect on the past year’s struggles and triumphs in the vineyard — and to take notes on what can be improved for next year.

