About once every other year I answer questions I receive from the WineMaker magazine readership. I always love interacting with all of you, so please feel free to send questions directly to my inbox ([email protected]) and I’ll try to answer them when time permits, and they may be printed and answered in the magazine as well! So here is the latest from readers:
Q: Can you give me some ideas on controlling black rot in my grape vineyard? We are in central West Virginia.
Thomas Cain
West Virginia
Black rot is a fungus that can impact wine grapes, mostly in hot, humid conditions. It is often poorly understood because it rarely is discussed in West Coast-based growing literature, but impacts the Midwest and East Coast of the United States in significant ways. If an infection is untreated in a vineyard, an entire crop can be lost and the fungi will overwinter under bud-shields and will increase disease pressure in subsequent vintages. The specific fungus involved is Guignardia bidwellii. Let’s have a spirited discussion about how to keep black rot out of our vineyards, and how to quickly assess and make a plan on how to spot a new infection, and how to save the unaffected (clean) fruit in your backyard vines.
Best practices for diagnosing and treating a black rot infection:

- Keeping your vineyard clean with regular fungicide sprays is the key for not having to deal with a black rot infection. (Read later for fungicides that can control black rot and other fungal diseases such as powdery and downy mildew, and Botrytis).
- Opening up your canopy after fruit set (being careful to keep sun flecking on the fruit balanced without burning your fruit), will allow more wind and air to circulate in the fruit zone and reduce mildew and rot pressure. There should never be more than one leaf between the sun and your fruit, but the fruit should be protected from the hottest days/sun to prevent burn and skin cracking.
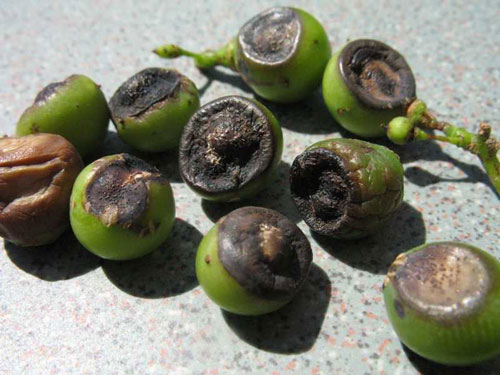
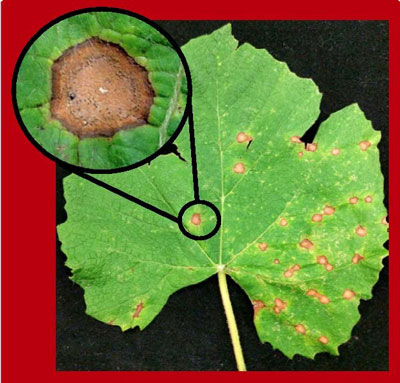
- If you see characteristic leaf symptoms (see photo on page 57) and/or the dark lesions and raisin-like berries (see photo on page 56), it can be confirmed that you have a black rot infection. And if you can see the lesions and spots, chances are the infection is much worse than you would guess, as most fungus in the vineyard is invisible and has yet to cause lesions and spots.
- Using a very sharp, sterile pocket-knife, (dip in rubbing alcohol or light bleach solution between vines), cut off the infected (black rot) tissue of the grapevines: Leaves can be plucked, stem and all, but if an entire shoot is impacted, trim it back with your knife to where the tissue is clean. Pluck or cut all spotted leaves, and cut off any clusters with lesions/raisins, “mummy-clusters,” or tissue damage. Take a second pass through both sides of each vine and double check all infected tissue, grapes, and leaves have been cut/removed. Place infected tissues (leaves, clusters, shoots) you remove into a plastic garbage bag and throw away in green waste away from the vineyard.
- In a very small vineyard, control may be increased by placing an electric fan or fans in the vineyard to increase air circulation, aimed either down the vine row (between the rows), or blowing right at the fruit zone of a vine that has been leaf-thinned to open up the canopy without threat of burning the clusters. Cool climate areas can pluck more leaves, hotter regions need to keep some protective leaves to keep the fruit from burning. Experiment each year in your locale by determining how much leaf thinning in the fruit zone can be executed without burning your precious grapes.
- Raindrops and sprinkler irrigation can spread fungal spores, so drying out the vineyard as soon as possible after a rain or overhead irrigation (which I do not recommend) is key.
- Organic gardeners like to apply a paste of cooking oil and cinnamon to the cuts you make on the vine to remove black rot, as that will help seal and dry the wound and keep fungal spores from spreading to clean tissue.
- Fungicide applications could have kept your black rot from causing visible symptoms, which is the management goal here. Fungicides that contain myclobutanil or captan are your best choices. Spray according to label recommendations, never at a higher rate than is suggested, and consider a few protective sprays in spring, at 6-in. (15-cm) shoot growth, and at full canopy after fruit set and leaf-plucking, to increase spray penetration and keep the black rot from growing at all!
- For an existing infection, the same myclobutanil or captan sprays should be applied every two weeks until symptoms disappear, and continue to cut out infected tissue and pluck infected leaves in between sprays, and after the label says it’s safe to re-enter your vineyard. My best luck has been Rally brand fungicide (but it requires a permit in many states) but other brands are readily available with a captan label.
I hope this gives you a lot of cultural practices that will heal your vineyard and keep it clean in future vintages!
Q: We are looking forward to coming to the WineMaker Conference in San Luis Obispo, California next May, taking your boot camp to help us with our small Merlot vineyard in Washington, and visiting some local wineries and attractions. Because you make wine on the Central Coast, will you make some suggestions on a few day trips for May 2020?
P. Rogers
Walla Walla, Washington
We are so excited here on the Central Coast of California to welcome WineMaker magazine readers back to our homes, businesses, restaurants, and vineyards! I absolutely love the wines coming out of eastern Washington, so please bring a few to share or trade.
Here are my personal favorite places to visit, eat, and drink locally and in surrounding cities:
Beer/Taproom (takes a lot to make wine!): Firestone Walker Brewery, just south of Paso Robles, right on Highway 101. You can’t miss it! Great casual dining too.Figueroa Mountain Taproom in Arroyo Grande, cool if Paso is hot. Great beer and food.
Fine dining: Thomas Hill Organics Bistro and Wine Bar.
Oceanfront dining, oysters and bubbles: Lido at Dolphin Bay, Pismo Beach.
Quick bites: Byblos (Middle eastern, great shawarma), found in Atascadero off of Traffic Way. Sylvester’s Burgers, also in Atascadero, also is amazing! Taco Roco (Mexican) in Paso Robles (get the #18, fried shrimp tacos with rice and beans . . . and thank me later).
Deli for a beach picnic: DePalo and Sons, Shell Beach, 30 minutes south of Paso Robles.
Wine tasting: Tablas Creek for incredible white/red Rhônes, Barr Estate for small production Cabs and red blends, Justin or Daou for Cabernet and their big tasting room. Booker for big reds, Peachy Canyon and/or Turley for big, ripe Zinfandels.
Amazing hike: Bob Jones Trail, 30 minutes south of Paso from San Luis Obispo to Avila Beach Pier, about 5 miles round trip, bikes or walking, through trees, river, beach.
San Simeon: 30 minute drive north to see elephant seals and the Hearst Castle.
Big Sur: Why not stay an extra few days in the magical land of Big Sur! This may be the most beautiful place on the entire planet! Deetjen’s rustic lodging and incredible breakfast and dinner, Post Ranch for fancy digs and eats, Nepenthe for lunch, bubbles, and dinner ($45 glasses of Cristal/Krug!).
Pro wine shop: Don’t miss the Vintner’s Vault in Paso Robles. Huge selection of pro winemaking equipment and chemicals, great selection, and support. Go big and then go home!
Santa Barbara: J. Wilkes Tasting Room, reserve at bouchon for amazing dinner, or Super Rica for a taqueria.
If you need any more recommendations, or have special needs for your trip, feel free to reach out to me directly: [email protected] Looking forward to having you here!
Q: I have read in your articles that sunlight penetration into the grapevine canopy positively impacts the flavor of grapes and wine, but I live in an area that is increasingly hot in the summer and I’ve had some sunburn on the skins of my grapes on the most exposed clusters. Am I doing something wrong, and how does sunburn impact wine?
Cathy Swan
Rocky Knob, Virginia
About 25 years ago Dr. Richard Smart published his industry-changing book, Sunlight Into Wine. I recommend this (expensive) workbook for anyone who grows grapes, it is well worth the money.
The main thrust of Smart’s seminal work is that getting sun flecks and sun exposure on wine grapes, at a level that does NOT burn them, is key for developing flavor and balance. Wine grapes grown in shade have high levels of methoxypyrazine, which smells like green bell pepper when isolated. To destroy/remove the pyrazine compounds requires sun exposure/flecking on the grape clusters. UC-Davis tested how much sun is needed and agreed with Dr. Smart: A minimum of 10% of the ambient sunlight is required to penetrate the leaf canopy to remove the pyrazines. Smart also likes to focus on “leaf layers” that measures how many vine leaves are between the sun and your clusters. There should never be more than one leaf layer between the sun and the berries, and the cooler your area’s weather, the more leaves you can pull to expose the fruit to even more sun. The key is to practice various levels of leafing in different parts of the vineyard and then be sure to record the results. When you see sunburn appear after a heat spell, you’ve gone too far!
Sunburn is a serious problem for winemaking and wine quality for the following reasons:
- Skins can split and expose the juice to oxygen, making volatile acidity and sourness.
- Split skins will attract bees, hornets, wasps, and fruit flies, and will hasten the process of turning the juice to vinegar.
- Split berries will not ripen properly.
- Burned skins do not develop healthy color and flavor.
To review: Make test sites in your vines with various levels of leaf pulling and see how many leaves you can pluck without having the fruit burn during heat spells. Also, in hot summers, make sure the clusters have a leaf retained above the cluster to shelter it like a hat in the hottest part of the day (10 a.m.–2 p.m.). Remove all leaves from the interior of the canopy that don’t protect the clusters from the sun. This will allow more spray penetration and will reduce clutter and humidity — try for as much air movement and dryness in the fruit zone as possible to reduce mildew/rot pressure. Take notes, experiment, and open up that canopy for flavor and healthy clusters.
Q: Some wine growers I talk to on my Facebook group say that I should hedge my vines when the canes get so long that they are flopping on the ground or bending over to shade the grape clusters. Others say I should hedge the vines and keep the vineyard tidy and neat and limit the height and “sprawl” of my high-energy, high-vigor Crimson Cabernet on the border of Missouri and Kansas. What are your thoughts, Wes?
Michael Donahue
Fort Scott, Kansas
This is a great question and will help a lot of people understand the difference between a tidy, manicured vineyard for visual appreciation, and what actually matters to making great wine.
I always appreciate a highly manicured vineyard with perfect canopy management. It’s like shopping in a perfectly clean store. It makes the experience of shopping better, and it may even keep the stock in better shape, and it shows the commitment of the proprietor to be professional.
On the specific subject of hedging a vineyard, it’s very easy to quantify what will help the fruit quality and how to time/measure how much to cut off and the best timing.
- Grapevines have two growth stages: Vegetative (carbohydrate production for growing shoots, leaves, tendrils) and ripening (producing sugar in the grapes to attract animals to disperse the seeds). A grapevine usually stays in vegetative stage until early summer and then changes, stopping its growth, shedding its growing tip and tendrils, and then focuses on ripening.
- Don’t hedge short, stunted shoots. When a vine has 12 leaves per cluster, regardless of varietal or region, it has enough leaf area to achieve ripe wine grapes. So your first criteria for hedging is to maintain at least 12 leaves on a shoot with 1 grape cluster, and 24 leaves on a shoot that has two grape clusters. (Yes, I make the interns count leaf:cluster ratios in various parts of the vineyard before and after leaf plucking, hedging, etc.) Keeping the leaf:cluster ratio consistent from vine to vine will mean your fruit will ripen consistently throughout the vineyard, which leads to amazing quality in the wine. A home grower’s goal should be to attempt to keep all clusters within 2-3 °Brix of all other clusters of the same varietal in the same vineyard. It’s a tough task, but worth the effort.
- If the shoots are 12+ leaves per cluster and they are bending back/sprawling to shade the fruit, that may be an excellent chance to hedge or “top” the vine. Just use clippers or loppers to cut the top of the vine at a consistent height. That height should be exactly the distance between your vine rows. If your rows are 10 ft. (3 m) apart, your vines can be 10 ft. (3 m) high without shading the next row. So keep a 1:1 ratio of canopy height and vine row spacing. A long wood dowel is a great tool for easy measuring.
- Expect an explosion of lateral shoots when you hedge a vineyard. When a vineyard loses the tops of its shoots, it freaks out a little bit. It has extra energy for growth and will often push secondary, or lateral, shoots in the canopy that will need to be removed. Lateral shoots shade fruit, congest the canopy, raise humidity, and bear no fruit, so about a week after hedging, get in the vineyard and snap off all of those laterals!
- What if there are small “second crop” clusters on the tops of the shoots I’m hedging? Second crop (smaller) clusters, never ripen at the same time as primary crop in the fruiting zone, so hedging vines that have small clusters will help during harvest so you aren’t tempted to throw underripe fruit in your buckets.
That’s it! I hope these answers help. I strive to include questions from all over the country and from diverse situations that will help the most backyard grape warriors. Stay in touch and remember: Home vineyards are the advance guard for commercial wine growing. You may become the Robert Mondavi or David Lett of your hometown!

Fall is the most critical time in the vineyard. Preparing for and executing harvest are paramount. So is the cleanup and vineyard care afterwards. Wes Hagen lays out his advice for fall and winter care in a mature vineyard.

Wes Hagen lays out last-minute advice to maximize this make-or-break day as home viticulturists gear up for harvest.

