Project One: Rolling Cart for Fermenters

Hauling a fermenter is hard labor. So let’s put the weight onto a platform made for the task. Our rolling cart will have a solid base, sides to prevent tip-overs, fixed and movable wheels for accurate movement, and a handle.
Tools: screwdrivers, drill and bits, table saw (or buy precut wood).
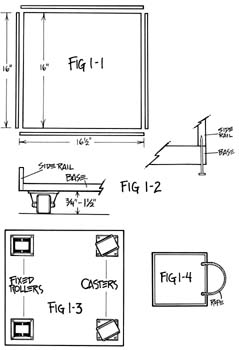
Construction: Measure the diameter of your largest fermenter. This will determine the size of your base; make it at least 1” larger than your fermenter. My fermenters are 14”, so we’ll pick a 16”x16” size. For a sturdy platform, we’ll use 3/4” plywood. Cut the required number of 16” squares (see Fig 1-1). For sides you’ll need strips of 1/4” Luan plywood. Cut two 2”x 48” strips for each frame. Then cut these strips again, creating one 16” length and one 16-1/2” length.
Attach the 16” lengths with glue and wire brads to opposite sides of the base. The longer strips fit the other two sides (see Fig 1-1). Once the glue is dry, attach two fixed rollers and two movable casters. Be certain that these are the same height (see Fig 1-2). Attach the rollers with 3/4” #6 round-head wood screws; predrill all holes with a 1/16” or 3/32” drill to a depth of 1/2”. Place the wheels as close to the corners as possible. This prevents tip-overs when the weight of the carboy isn’t centered on the platform (see Fig. 1-3).
A rope handle makes the cart easy to pull. All that requires is some soft clothesline and two holes in your base. Secure the rope with a figure-8 knot (see Fig. 1-4).
Project Two: Custom Racking Cane

Our deluxe racking cane is made of stainless steel, which can be difficult to find (try www.onlinemetals.com). It includes a stainless ChoreBoy “scrubby” to filter debris, and the tip is turned up to avoid sediment at the bottom of the fermenter. We’ll pick a length of 24–30” to fit most fermenters (measured from the bottom of the tip to the inside of the upper curve).
Tools: tubing bender (under $50, or borrow from a friend), hacksaw or tubing cutter, stainless tube ($15 for 10’).
Construction: Buy 48” of 316 stainless-steel tube with an outer diameter of 0.375” (wall thickness of 0.028” and inner diameter of 0.319”).
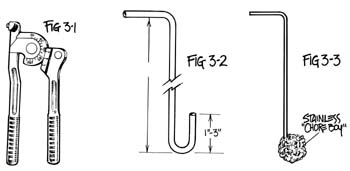
Make a mark approximately 6” up from one end of the tube. Slip the tube into the bender and align your mark with the 0° mark (see Fig 3-1). Bend the tube 180° to form the bottom “J.” If you have more tube left atop the J than needed, cut it off. We recommend that you practice with copper tube before tackling the stainless, which is tough to work with. (It’s also inert, which means it can safely contact your wine. Don’t make a racking cane out of copper.)
For the upper bend, measure 24–30” from the bottom of the J-shaped tube. Place the 0° mark into your bender and execute a 90° bend in the same plane as the other bend. Your cane should lie flat (see Fig 3-2).
Clean up all rough edges with a fine file or 220-grit aluminum oxide or emery paper. As a filtration device, affix a stainless-steel “ChoreBoy” around the turned-up tip of the cane (see Fig 3-3). Before using, sanitize the ChoreBoy in boiling water, not with sanitizing solution. There will be debris in the sponge that may not contact the sanitizing solution. After you’ve boiled the ChoreBoy once, you can use sanitizing solution thereafter. The cane can be sanitized in iodophor or Star-San. Do not use chlorine bleach on stainless steel.
Your completed racking cane will work in all bucket-type containers, but will fail to fir through the neck of many glass carboys. To rack from them, simply eliminate the bottom bend.
Project Three: Cap Plonker

A simple wooden “plonker” is a useful tool for anyone who works with fresh grapes; it’s used to punch down the floating “cap” of crushed grapes during red wine maceration. You want to keep the fruit submerged to ensure maximum extraction of color, flavor and tannins. Many common hardwoods are naturally antibacterial, and if made from redwood or oak (we recommend oak), your plonker will be both resistant to decay and friendly to wine.
Tools: hand saw, sandpaper, screwdriver, stainless-steel wood screws (#6×2”), drill motor and bits.
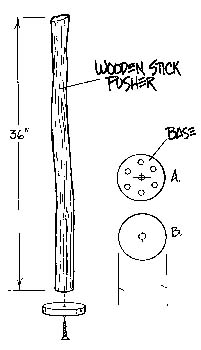
Construction: Begin with your handle, whether it’s a hardwood dowel from the home improvement store or a lovely piece of redwood, oak, cherry or cypress. Make it at least 1” in diameter and do not use pine, however hard or attractive it is, unless you want your wine to taste like PineSol.
Measure your fermenters and add at least a foot of length — 30 cm for Canadian readers. We’ll say that’s about 36’ or a bit over 1 meter. Sand the surface smooth, then cut one end to a perfect 90° angle. The other end, which serves as the handhold, could be carved, rounded or plain.
Cut a circular 3–12” base (75-300 mm) of 1/2” oak and drill holes around the edges to allow liquid to flow through. Or don’t make holes; they’re optional. If you drill holes, make them at least 1/2” for easy cleaning, and sand them smooth.
Find the center of your base and drill a shank hole through it. Find the center of your stick and predrill a pilot hole into it. The total depth (board and stick) should be three screw threads less than the length of your screw, about 1-2/3”. Perfect shank and pilot-hole sizes for a #6 wood screw are as follows: shank hole 9/64”; pilot hole in soft wood 1/16″; pilot hole in hardwood 5/64″. Screw in a #6 x 2″ stainless-steel round-head or pan-head wood screw and you’re done. It’s good policy to protect your plonker with food-grade varnish.


