Home Winery Design
When a hobbyist first plans to make wine, designing a “winery” may not even be an important thought. Sourcing grapes, renting or buying equipment, and deciding where around the house or yard to set up are issues that need more immediate attention. In the longer term, though, if you intend to ferment wine in quantities approaching the U.S. federal limit for amateurs — 200 gallons or 757 liters for a household with two adults — giving some thought to winery design will pay off.
Today, I am viewing home winery design as a blank slate. With any luck, the main principles and decisions will translate effectively into whatever building or space you have available. To start, we need to consider the size of the winery, location, needed support areas, functionality, electricity, and plumbing. These decisions need to consider grape handling, fermentation, bulk aging, and bottling. We will need storage for all the equipment and supplies, and possibly cellaring of finished wine. I am not an architect or engineer, so don’t count on me for technical features of construction or local permitting. However, I have made or helped with wine in several different facilities, ranging from hotel conference rooms (for WineMaker Boot Camps) to elaborate home wineries that could easily accommodate commercial production.
My wife, Marty White, and I came to Sonoma County from Southern California in the early ‘90s. We had visited before as tourists and knew that we enjoyed wine country, so we looked for a property where I could grow a few grapevines and learn to make wine. We found our perfect spot just west of the city limits of Petaluma, in southern Sonoma County. A mixed rural-residential neighborhood of large houses, small cottages, duplexes, and more, it feels like country but is still close to town. After we settled into our new jobs and new home, I began looking at educational opportunities for viticulture and enology. I wanted to accumulate some knowledge before I launched an ambitious new hobby. After a few classes at Santa Rosa Junior College, I concluded that my best bets for growing grapes in my neighborhood would be Chardonnay and Pinot Noir. With my copy of Dr. Richard Smart’s Sunlight into Wine in hand, I ordered 125 dormant bench-grafted vines of each.
Grape growing and winemaking supplies are readily available in a wine growing region like mine. I laid out my 250-vine vineyard and ordered end posts, anchors, highway stakes, and lots of galvanized wire from a local store. Installing the trellises and planting the dormant vines made for hard work and an interesting experience, but that’s not today’s subject. Rather, I approached a local independent contractor, Kirby Wilkerson, about building me a small winery in the backyard between the house and the vineyard block.


Kirby is a general contractor and an accomplished draftsman. After we discussed features and layouts for the new building, he produced drawings for it. It is just 13 x 17 feet (4 x 5.2 m) for an area of 221 sq. ft. or 20.8 m2. At the left side along the wide front, there is a small concrete porch with a door that leads into the wine fermentation room. Behind that room is another small, windowless room with a through-the-wall Breezaire cooling unit for bottled wine cellaring. I sized the cooling unit so I could open the door between those two rooms and cool the production room as well. On the right side of the front, a concrete ramp leads up to double doors and a simple room that makes up half the building. I intended that for vineyard support, parking my small garden tractor inside. While that worked at first, I soon found that I needed that space for several 32-gallon (120-L) square plastic fermenters for my red wine. The garden tractor was exiled to the garage of the main house.
We built the winery with thick frame walls, with the gaps filled with rigid foam insulation, for efficient cooling. It is also on an 8-inch (20-cm) concrete slab to help keep the temperature stable. I wanted electrical outlets, lights, water supply, and floor drainage as well. The county approved power and lights but refused a permit for drainage or water. It seems they were concerned that those additions would allow me to bootleg my winery into being a dwelling unit. While I let the issue go and my winery remains without indoor plumbing, I miss those features whenever I am making wine.
I bought a manual crusher/destemmer and a mid-sized basket press, so those went in the new winery. For the first couple of harvests, the crop was small and I had enough room in just one side of the building. I did crushing and pressing outside the winery on a temporary plywood pad laid on a gravel driveway. It is easy to drag even full 32-gallon (120-L) bins of must (each containing about 200 lbs. or 90 kg) off the plywood, up the ramp, and into the winemaking space. For cleaning, I rely on a hose and buckets of cleaning and sanitizing solutions on the porch and in the driveway.
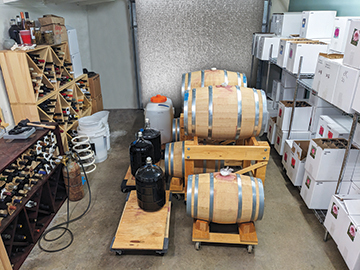
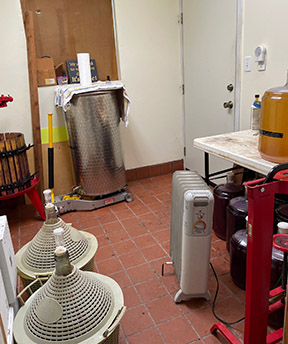
After vine maturity in my vineyard, and with some purchased grapes as well, the original “tractor” room can become quite full with six or seven red-wine fermenting bins while the original production room is taken over by a 53-gallon (200-L) variable capacity tank and several PET carboys for white wine fermentation. After pressing reds and racking fermented whites, I cluster the containers in one room and use an oil-filled space heater to keep malolactic fermentation (MLF) proceeding — typically above 65 °F (18 °C). For my barrel program, I have two hectoliter (26-gallon) oak barrels. I like that size because I can carry such a barrel when it is empty (I don’t try to move them full). I can place both of them end-to-end on blocks in the aisle between bottle storage racks in the cooled cellar. Great for cool, extended barrel aging — but a bit awkward when grabbing that special bottle up in the far corner of the wine rack.
Size Matters
When you set out to design your winery, first consider its size. If you only plan on a carboy or two, you probably don’t need to dedicate any permanent space to your hobby. Since this article is winery design, we will consider larger production. Having used my hobby winery and visited others nearby, I am satisfied with the size I chose. If you want to keep equipment set up year-round, you may need more room. Something around the size of a one-car garage or a small barn will likely meet your needs, although you may need to do some of the work outdoors in a driveway or on a patio. If you can build or set aside a space about the size of a two-car garage, say 20 x 24 feet (6 x 7.3 m), you can probably do everything indoors.

To make wine indoors, you need to get the grapes (or must) in and, eventually, the wine out. I usually estimate that I get about 6 gallons (23 L) of wine for every 100 lbs. (45 kg) of grapes. At that rate, you need about 3,000 lbs. (1,400 kg) of fruit to make 200 gallons (750 L) of wine. Most of us don’t usually move thousands of pounds (kilograms) around the house and yard except on wheels — a car, truck, or tractor. If you plan mechanized handling of your grapes as they come in from the vineyard, you need to think about the paving and access to your winery. When I bring purchased grapes home from a vineyard, I haul them in my 32-gallon (120-L) square bins. Each holds about 125 lbs. (57 kg) of grapes as clusters. I can back a pickup truck or SUV up the gravel driveway to my winery and two people can lift out each bin. If you instead use what are usually called half-ton bins (because that is about their capacity of grape clusters), you will need more equipment and better pavement. Those bins are 4 x 4 x 2 feet deep (1.2 x 1.2 x 0.6 m). If you are fortunate enough to have a forklift or a tractor with a forklift attachment, you can lift such a bin out of a truck or trailer and put it wherever you want. If that means putting it inside your winery, you need a double-wide doorway or a roll-up door that will allow the bin to pass through. If you can’t arrange that, or if your winery is on another level — like in the basement — you may need to process the grapes outside and move must indoors in smaller containers. Common sizes for smaller fermenters include the square ones I use or the next larger round ones at 44 gallons (166 L). Both sizes will fit through a normal doorway of about 30–35 inches (76–90 cm). Beyond carrying or dragging full bins, flat-top dollies are available if you have smooth, hard pavement.
Location
Once you have selected your winery size, consider the location. If you have a hobby vineyard, locating the winery near the vines is convenient. If you use part of the winery space for bottled wine storage, locating it near your house is a priority. If it is on a different level (like a basement, or even another level on your property), you need to consider moving grapes, wine, and equipment up or down ramps or stairs. Building out your winery space inside an existing building like a barn or garage could be more economical than a free-standing building. Keeping a building cool is easier if it is built partially underground.
Function
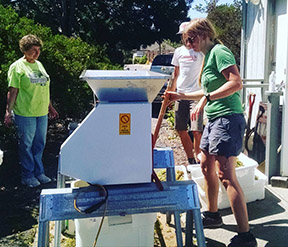
With size and location in hand, map out your winery functions. I like to consider functions in the order they proceed from harvest. When grapes arrive and you get them out of the car, truck, or trailer, the next stop is the destemmer or destemmer/crusher. Since crushing is seasonal and brief, many commercial wineries use a “crush pad” set up outdoors rather than dedicate space inside. If you can assign a space directly outside your fermenting room, handling the must containers will be more efficient. If you live in a climate where it is either too hot or too cold to work outdoors at harvest time, you may need to dedicate an interior room to crushing.
There are two routes to get destemmed or crushed must into bins. The first, for red wine production, involves crushing directly into open-top fermenters, if possible. Move smaller ones by hand as described earlier or use a pallet jack or forklift for half-ton bins. Size your red-wine room for the maximum volume you expect to make, keeping enough space around the bins to reach all the fermenters for punchdowns and additions. A very large amount of carbon dioxide will be produced — even more if you cool the must with dry ice for a cold soak. Arrange good ventilation with fans, vents, or forced-air HVAC. Your space will be most flexible if you can arrange to both heat and cool the room with installed heating and air conditioning. For reference, my fermenting room for red wine is about 9 x 12 feet (2.7 x 3.7 m) and it is comfortable for a half-ton of must and very crowded with a ton.
The other route after crushing is to your press for white or rosé wine. Pressing is another function that I usually do outdoors, although I have crowded it inside during rainy weather. The area needed is as big as your press, room to move around it, and space for buckets or a pump for moving juice or wine. A portion of your crush pad may also serve as your press pad, but you will want to provide storage space for your press that is protected from weather during the months that it is not in use. I store my idle press in the same room that I ferment white and pink wines. After your red wine ferments, you can use the same press pad or room as for white juice or move the press to the red-wine fermenting room. The main consideration is to have the fermented must and the press near each other to make transfer easy.
After pressing finished red wine or fermenting white, you will need space for bulk aging. If you plan to use standard 60-gallon (225-L) barrels, each will be about 28.5 inches in diameter and 35 inches long (72 x 89 cm). If you will stack them, the racks usually accommodate two barrels side-by-side. The hectoliter barrels I use are only about 24 inches (60 cm) in diameter. Other choices for bulk aging include Flextanks, stainless steel tanks, or carboys made of plastic or glass. Carboys fit easily in closets or small rooms, but for tanks you will need to account for the dimensions for specific storage options. As with must handling, doorway dimensions may be critical for bringing tanks into your aging room or cellar.
After bulk aging comes bottling. This is another brief activity that comes up just once or a few times in a year. Many commercial wineries have a dedicated permanent bottling line, but all the home wineries I have visited (including mine) use temporary setups. I use the space that is otherwise my fermenting room for white wine, setting up my pump, fillers, and floor corker as needed. The only year-round space needed is equipment storage. On bottling day, you need space to put the empty bottles and to sanitize and drain them. Right after bottling, you need space to move full cases out of the way so you can continue filling. Home improvement stores carry heavy-duty plastic shelving units that are rated up to 250 lbs. (113 kg) per shelf. They are sold in compact bundles and are easily assembled at home, making suitable units for case-goods storage.
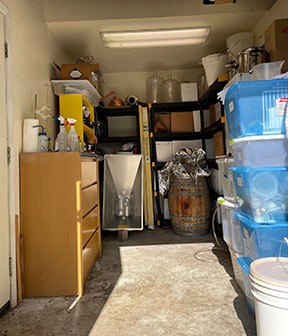
One other function to keep in mind is laboratory testing. You probably need only a few feet (about one meter) of bench space, plus a couple of drawers or a cabinet for storing laboratory supplies. While you are planning that storage space, include planning for your wine supplies and small equipment. Cleaning and addition products, siphon hoses, wine thieves, and so forth all tend to accumulate. It’s best to plan for a space to put them in addition to the bench for running lab tests.
Utilities and Temperature Control
The final areas we will consider when designing our winery are provisions for utilities and methods to control the temperature. Nearly all home winemaking equipment using electric power is sold in North America for 120 VAC. That means you can run regular household power circuits to your winery. Since many winery processes are wet, GFI circuit protection should be used (consult your electrician). You need power for electric destemmers or crushers, electric hydraulic presses, pumps, and some bottle fillers. You also want good area lighting and possibly task lighting. Fluorescent lights may not work well at cool cellar temperatures and incandescent bulbs add heat, so you may want to explore LED lighting options.
Related to power needs are heating and cooling. I use a space heater when needed, but built-in heating would be more efficient. Heating will only be needed if you are working in a very cold climate or if you are managing red wine or conducting MLF late enough in the autumn that you run the risk of a stuck fermentation if the environment gets too cold. Cooling, however, is often needed in my home winery. Ideal wine storage temperature — in bulk or in bottles — is generally considered to be around 55 °F (13 °C). More important than specific temperature, though, is maintaining that temperature with relatively little variation. A sudden increase in temperature can pop bungs out of barrels or carboys and wide swings are detrimental to graceful wine aging. Small air conditioners can be used for general room cooling for the winemaker’s comfort, but they do not operate effectively below about 60–65 °F (15.5–18 °C). While dedicated through-the-wall cooling units like Breezaire or even a heat pump can be expensive, other alternatives include using an override controller like the CoolBot products or using a glycol chiller to cool just the tanks or carboys, rather than the whole room (read more about this in my story “Home Glycol Cooling Systems” at www.winemakermag.com/article/home-glycol-cooling-systems). And, if you can, get innovative with your site. Besides a partial or complete underground location as described earlier, the most creative cellar cooling I heard of was a local Sonoma County home winemaker who lived on a hillside lot with a year-round creek running through it. He put a water intake upstream and piped it to his wine cellar, where he mounted copper pipes on the ceiling for continuous cool flow. The water exited back into the creek downstream — free chilling!
Speaking of flowing water, winemaking involves lots of cleaning and sanitizing. If you can include hot and cold water supply in your winery, you will be well ahead of the game. Drainage to a municipal sewage system is also very convenient. It is possible to work outdoors with garden hoses, but it can be inconvenient. For instance, having always washed my glass carboys on my gravel driveway with a hose, I was very pleased to switch to PET plastic carboys and carry them to the house to wash in the kitchen sink. Setting up a laundry-style deep sink in your winery and mounting a pegboard drying rack on the wall above it will save you time and effort. Everything clean and stored out of the way? Good winery design!